Nintex Community Menu Bar
Question

Create parent record and associated child(ren) record on the same page

  • Jul 10, 2024 1:33 PM UTC
  • 10 replies
  • 57 views
  • Translate All

Forum|alt.badge.img+1

I need to create a parent record (for example, account) and one or more child records (for example, contacts) all on one page.  The page has a field editor for the parent and a table for the contacts.  I want to be able to click the save button and the parent will be created and then the contacts will be created and associated with the newly created account record.

How can I accomplish this?

10 replies

Forum|alt.badge.img+17

Do you have a specific number of child records? If so you should be able to use an action sequence. You would disable/remove standard save buttons. You would add either a page title component or a navigation component and use it as your “button”. You would create a set of actions that first saves the parent record model, then creates new rows on your child record model (use separate models for each child and parent). The new row action allows you to populate fields on the rows being created. You can make the parent field of your new child row equal to the ID field of the parent.

Translate

Forum|alt.badge.img+1
  • Author
  • Jul 10, 2024 2:02 PM UTC

No specific number of child records.  Can be zero, one or many.

Translate

Forum|alt.badge.img+17

You can’t attach a child to a parent until that parent has been saved. Saving the parent creates the Salsesforce ID that is used to associate the child, so you will have to save the parent first. You could try to do everything with one button, but I think you would have better luck with a button that saves the parent record and then, once saved, allows you to create children. On your child model, you would add a condition that the parent ID is equal to the ID of the record in your parent model. Make sure your parent model is set to only have one row. Your newly created parent should become row 0 and be used as the row for your child model condition. Then, when you create a new child row, it should auto populate the parent field with the ID of the parent record.

Translate

Forum|alt.badge.img+1
  • Author
  • Jul 10, 2024 2:02 PM UTC

Thank you Raymond.  Would it be possible to use multiple actions to get the results?  

In the page title component set the button action type to “run multiple actions”.  Then in the actions tabs create multiple actions to  “Save Changes in Model: Account”, query the record to get the new account id, then “Save changes in model: Contact”.

Translate

Forum|alt.badge.img+17

I’m not sure if that will put the Account number into each of the contacts, but it is worth a try. If it doesn’t work, you could try putting a model action on your child model that updates field on rows when the model is requeried. You would set it to update the parent ID. Then in your actions on your button you would save the child model, requery the child model, then save the child model again. The difference here is that the model action will effect all rows in the model simultaneously.

Translate

Forum|alt.badge.img+10

ksumner,

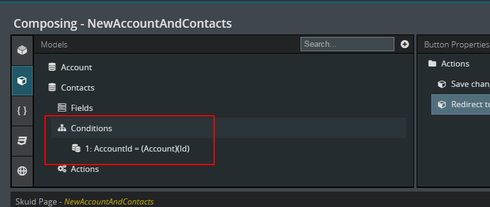
When you add your Contact model, set the AccountId field on this model to be the Id of the Account model. Skuid assigns a temporary ‘Id’ number for each record created (i.e. 1, 2, 3, 4, 5…). Your Save button needs to save both models. Skuid handles updating the 1, 2, 3, 4, 5 with the correct Salesforce Id (in this case the AccountId will be set for each Contact)

Here is a screenshot of the condition.

Here is my sample page:

<skuidpage unsavedchangeswarning="yes" personalizationmode="server" showsidebar="true" showheader="true" tabtooverride="Account">   <models>
  <model id="Account" limit="1" query="false" createrowifnonefound="true" sobject="Account" adapter="" type="">
     <fields>
        <field id="Name"></field>
        <field id="CreatedDate"></field>
        <field id="Phone"></field>
        <field id="ParentId"></field>
        <field id="Parent.Name"></field>
        <field id="Description"></field>
     </fields>
     <conditions></conditions>
     <actions></actions>
  </model>
  <model id="Contacts" limit="20" query="false" createrowifnonefound="false" adapter="" type="" sobject="Contact">
     <fields>
        <field id="FirstName"></field>
        <field id="LastName"></field>
        <field id="Phone"></field>
     </fields>
     <conditions>
        <condition type="modelmerge" value="" field="AccountId" operator="=" model="Account" enclosevalueinquotes="true" mergefield="Id" novaluebehavior="noquery"></condition>
     </conditions>
     <actions></actions>
  </model>
{{Name}} {{Model.label}} Account Contacts Account Contacts
Contacts

Thanks,

Bill

Translate

Forum|alt.badge.img+17

I didn’t know Skuid did that! Thanks, Bill!

Translate

Forum|alt.badge.img+1
  • Author
  • Jul 10, 2024 2:02 PM UTC

This is awesome!   Thank you Bill.

Translate

Forum|alt.badge.img+17
  • Nintex Employee
  • Jul 10, 2024 2:02 PM UTC

Here is a tutorial that explains all this:   http://help.skuid.com/m/components/l/102570-the-wizard-component-create-new-contact-wizard

The tutorial talks about a wizard,  but the same concepts can be applied in a single page. 

Translate

annajosephine
Nintex Employee
Forum|alt.badge.img+18
  • Nintex Employee
  • Jul 10, 2024 2:02 PM UTC

Looking back at this post this morning… I wasn’t able to find the contact wizard tutorial but I did find this one for an Account Wizard, same concepts: https://docs.skuid.com/latest/v2/en/skuid/components/ink/wizard/new-record-wizard.html#id1

Translate