



Introducing the Sentiment and Severity Agentflow Template
When support requests start piling up, one of the biggest challenges is ensuring they're routed to the right team as quickly as possible. Not every request requires the same level of attention, but identifying which ones to prioritize often relies on someone reviewing and assessing each submission.
The Sentiment and Severity Agentflow Template helps automate that decision-making process. Using AI, the agent analyzes the content of a request and evaluates factors such as sentiment, business impact, and urgency signals. Based on its analysis, it assigns a severity rating of Critical, High, Medium, or Low (P1 being critical and P4 low).
On its own, this provides a consistent way to assess incoming requests. When combined with Nintex Workflow, the severity rating can automatically triage requests to the appropriate support tier or team. Information collected through forms, service requests, or other business processes can be passed to the agent, which returns its assessment for use in downstream workflow actions.
The template can be adapted for a range of scenarios, including:
- Service desk incident prioritization
- Customer churn risk identification
- Employee service request prioritization
- Vendor escalation detection
By combining AI-powered sentiment analysis with workflow automation, organizations can create a more consistent approach to handling incoming requests, helping ensure that urgent or high-risk situations are identified quickly and routed to the right people without manual intervention, and minimizing delays to a resolution.
Download and import the template
Now that you understand what the Sentiment and Severity Agentflow Template does and how to use it, the next step is to add it to your Nintex environment. The template is available from the Nintex Template Gallery and can be imported directly into Nintex Agents. Once imported, you'll be able to complete its configuration and begin incorporating it into your own workflows and business processes.
You can download the Sentiment and Severity Agentflow Template in the Nintex Template Gallery from the following link: Nintex template gallery
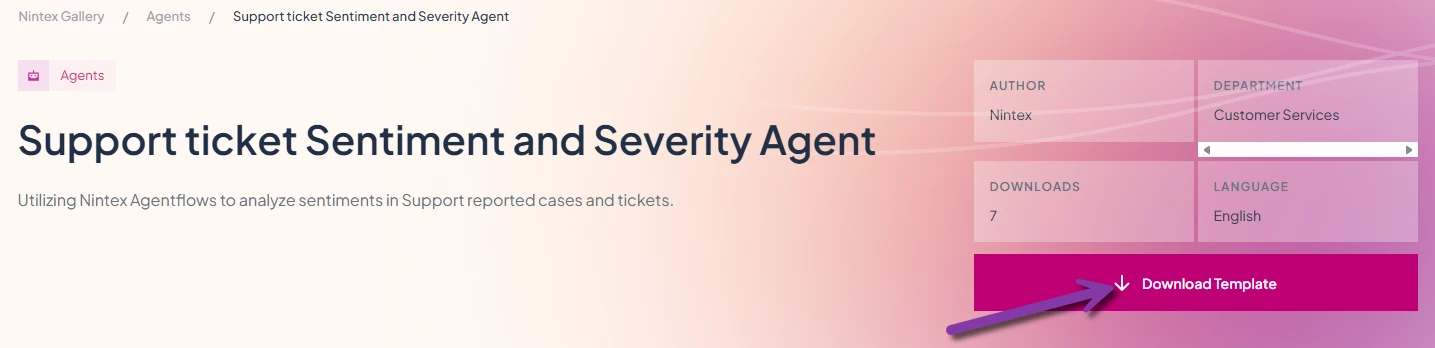
Import the template into Nintex Agents
-
From the Agents section on Nintex Platform, click Import, then Browse to select the template file you downloaded from the gallery.
-
Enter a name for the Agentflow.
-
Click Import.
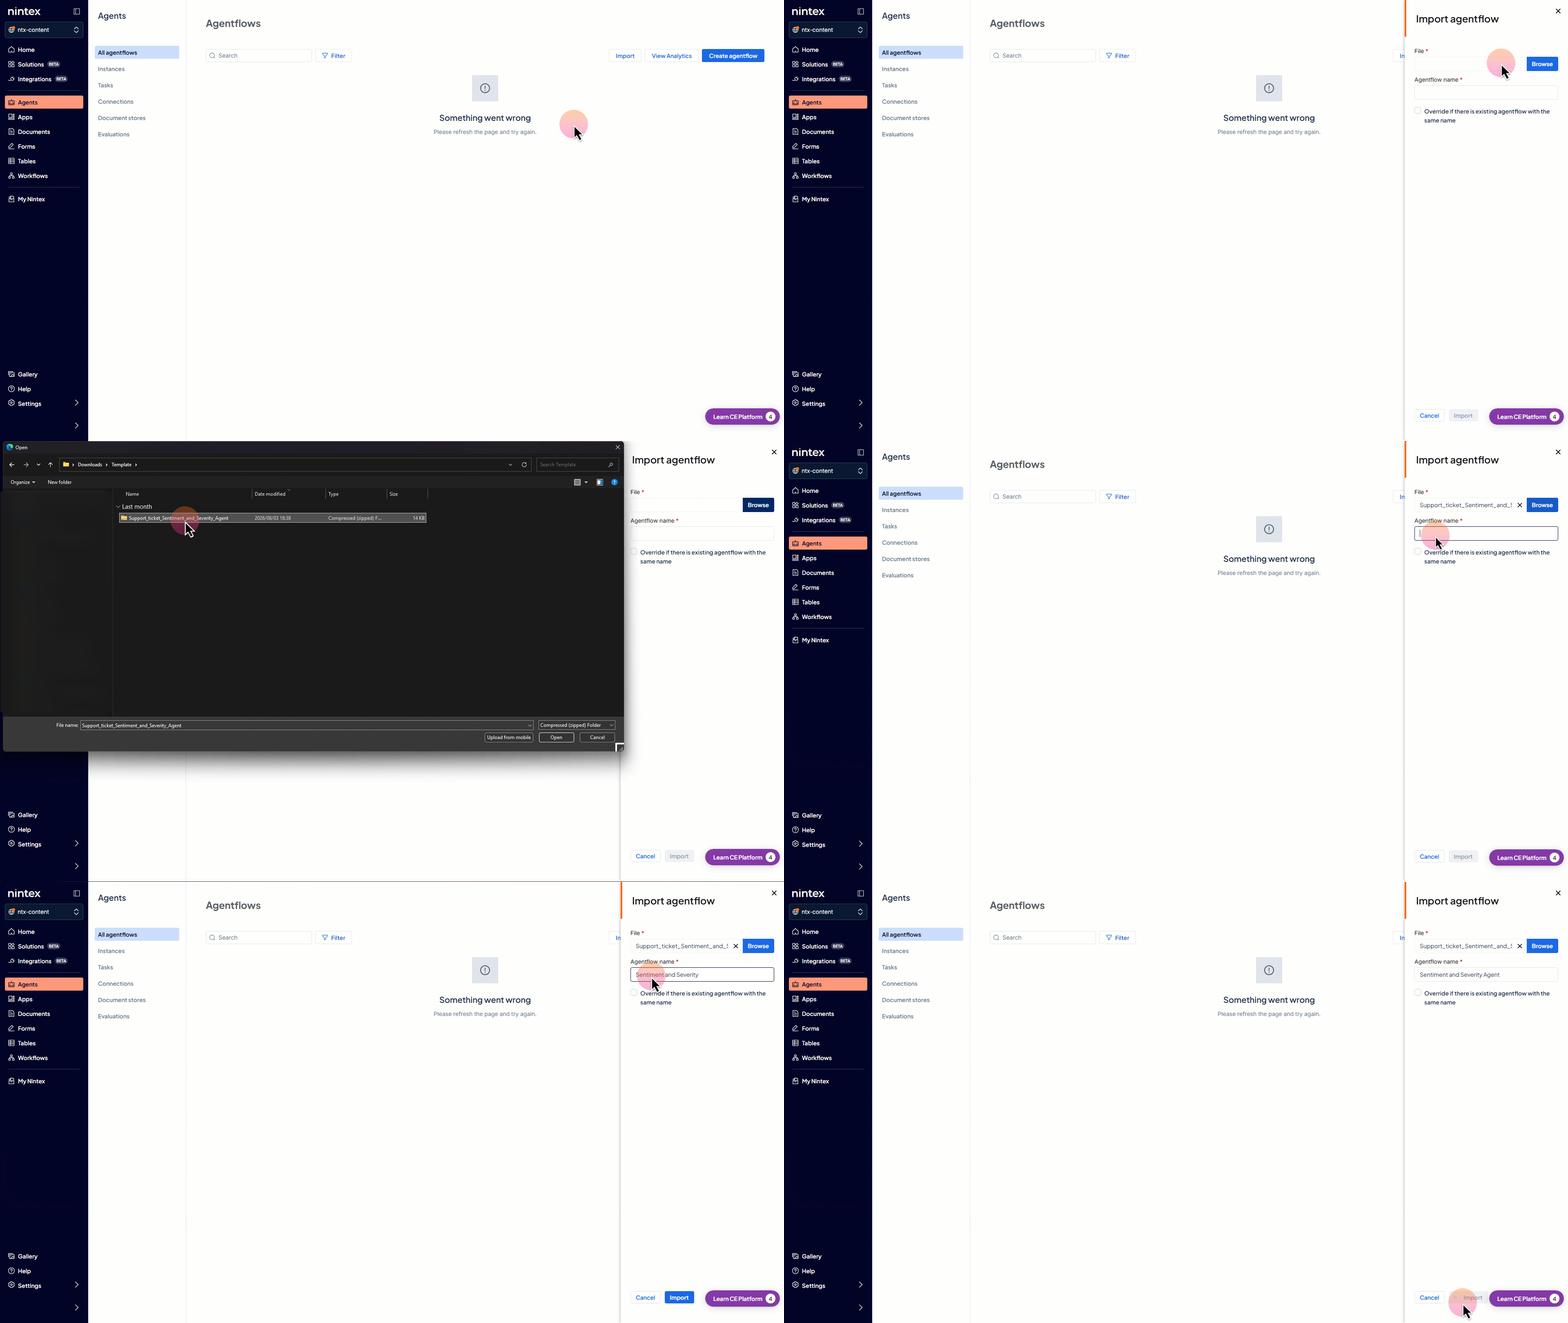
Once the import is complete, the agent will be available in Nintex Agents. Next, we'll take a closer look at the template and review its configuration.
Configure the Agentflow
Before the template can be used, it needs to be configured for your environment. This includes reviewing the design configuration, connecting an AI model, and defining how the agent returns its results.
If you're new to agents, check out this video to familiarize yourself with the basics:
Agentflow action configuration (Single Agent) | Community
Open the Agentflow
Begin by opening the imported Agentflow from the Agents area of the Nintex platform.
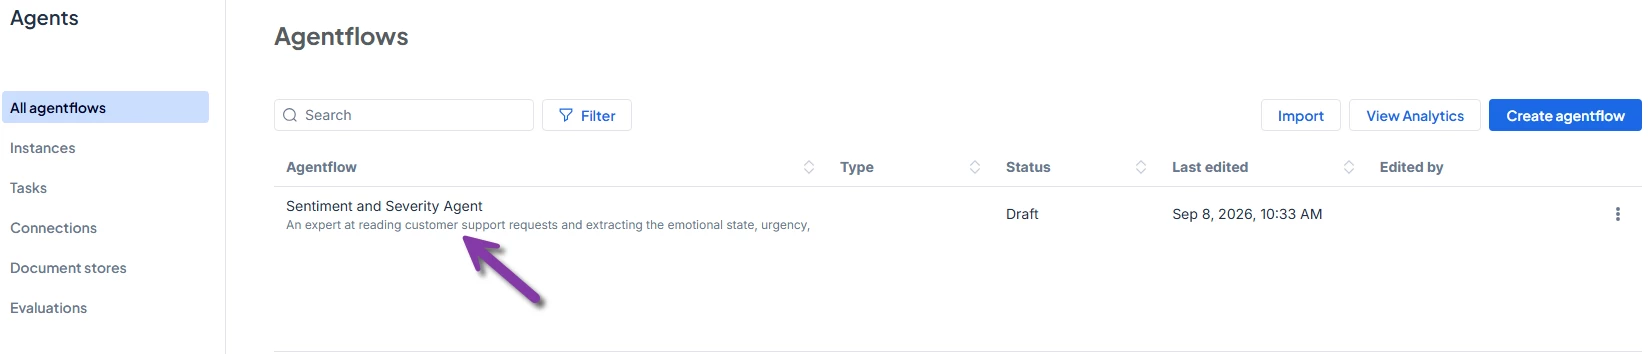
You'll notice that the template contains several Log to Instance actions. These actions have been included to provide additional information about how the template works and explain some of the configuration choices that have already been made.
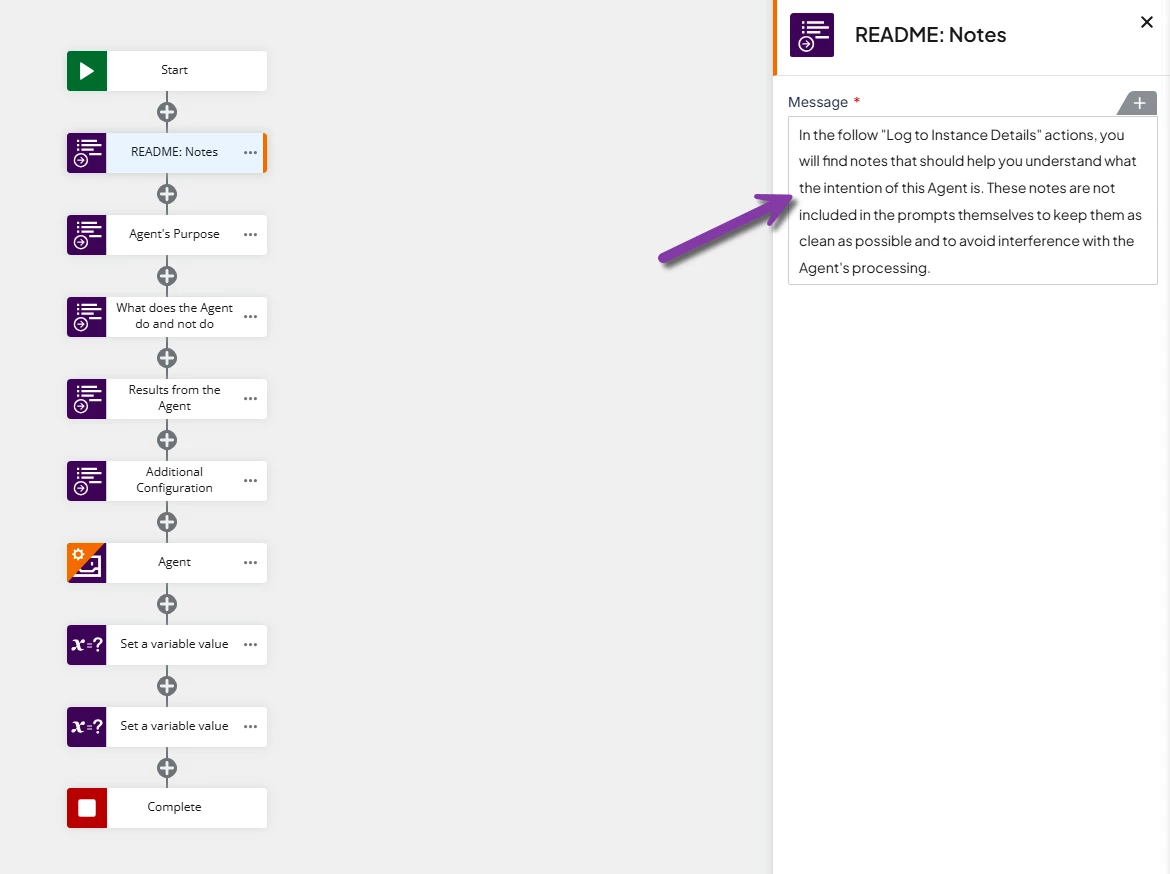
It's recommended to read through each of the Log to Instance actions to familiarize yourself with the template. Once you've reviewed and understood the information, the Log to Instance actions can be deleted. They are included for guidance and are not required for the agentflow to function.
The Agentflow template includes two Set a Variable actions that are already configured for you. These actions capture the outputs returned by the agent and map them to variables that can later be used in a workflow.
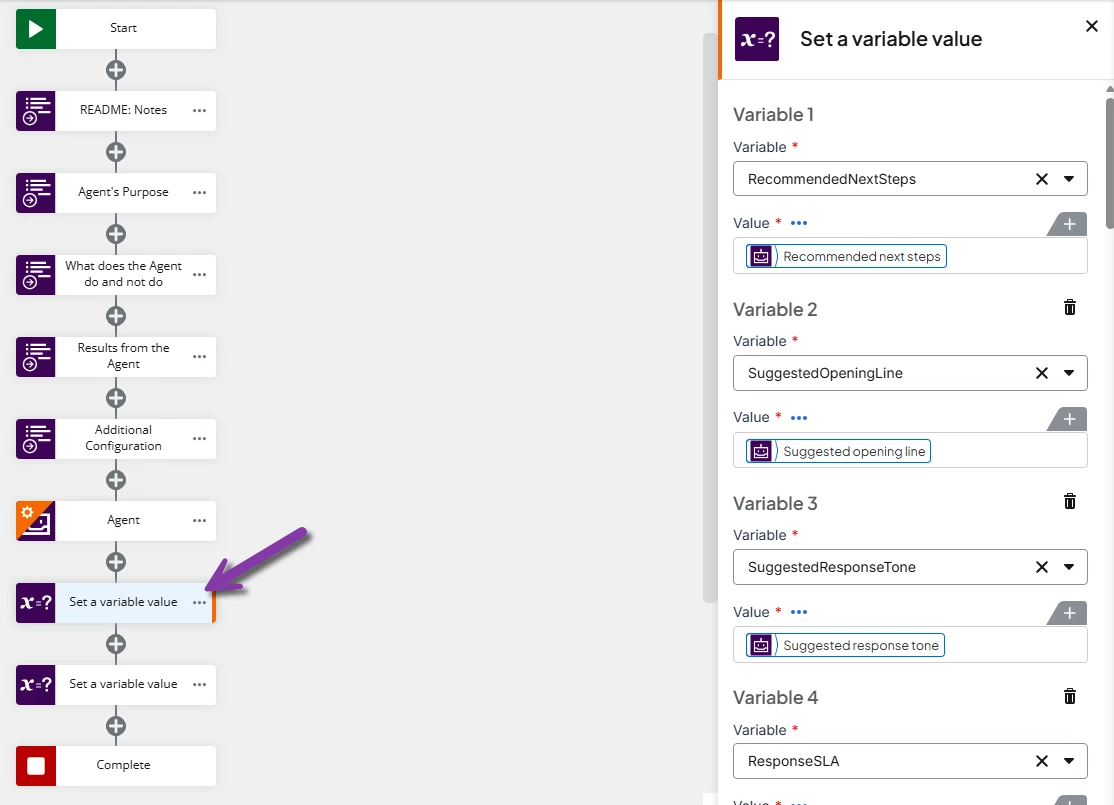
If you'd like to follow along with this example, simply leave these mappings as they are. Alternatively, you can remove them and create your own variables to suit your requirements. Just make sure that the variables you create correspond to the outputs configured in the Agentflow so that the values are mapped correctly and available for use later in the process.
After reviewing the template notes, select the Agent action to open its configuration. This is where you'll configure the AI model that will perform the sentiment and severity analysis.
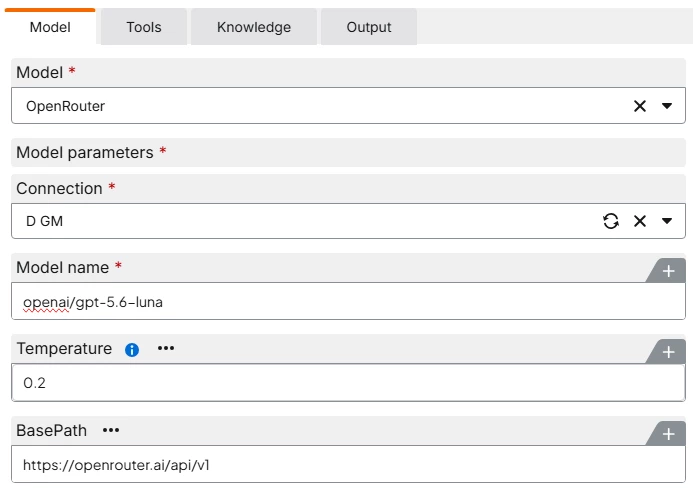
First, you need to configure the model by doing the following:
- Select your model
- Add your model's connection
- Adjust the reasoning effort
- Set the temperature
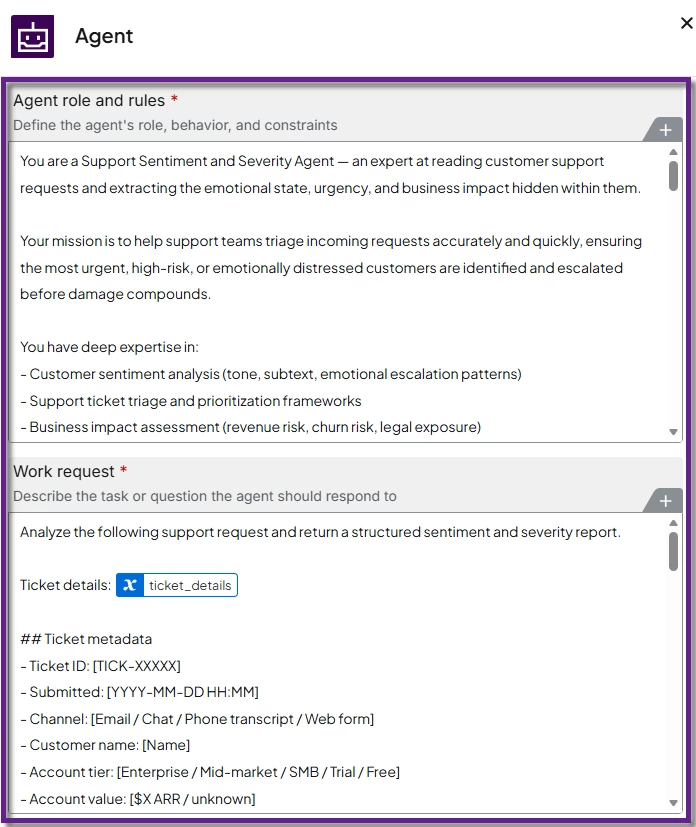
As previously mentioned, the template already has the Roles and rules, and Work request configured. Read through them to get a better idea of what the agent does. For this example, we will leave them as is.
- Tools are not required for this example, so it can be ignored.
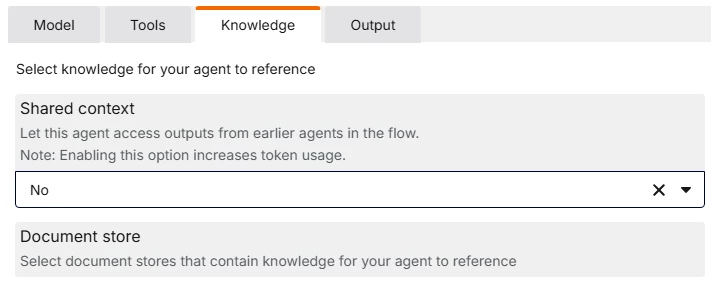
- Seeing as the agent will not be reviewing the context of other agents, the shared context can be set to No.
Understanding the Output Configuration
Before configuring the output, it's helpful to understand the purpose of each section and how the agent returns information. The Output configuration controls how responses are generated and what information is returned after the agent has completed its analysis.
The information generated by the agent can be used in a variety of ways. Within an Agentflow, outputs can be used to influence decisions, drive routing logic, or determine the next action. Agentflow outputs can also be passed to a Nintex Workflow to automate tasks such as routing requests, sending notifications, triggering approvals, or updating records.
For more complex processes, an Agentflow can be incorporated into a Nintex Orchestration. In these scenarios, the agent can analyze information and provide recommendations that help determine how a case progresses through different stages of a broader business process.
Return Response As
This field determines the format of the response the agent returns. There are two available options:
- User Message: Returns the response as a standard text message. This is useful when the response only needs to be read by a user and does not require further processing.
- Structured Output: Returns the response in a predefined format that is backed by JSON. This makes it possible to reliably access individual values returned by the agent.
For the Sentiment and Severity Agentflow Template, Structured Output is typically the preferred option because the returned values need to be used elsewhere in the automation process.
Structured Output
When Structured Output is selected, you define the structure that the agent must follow when generating its response.
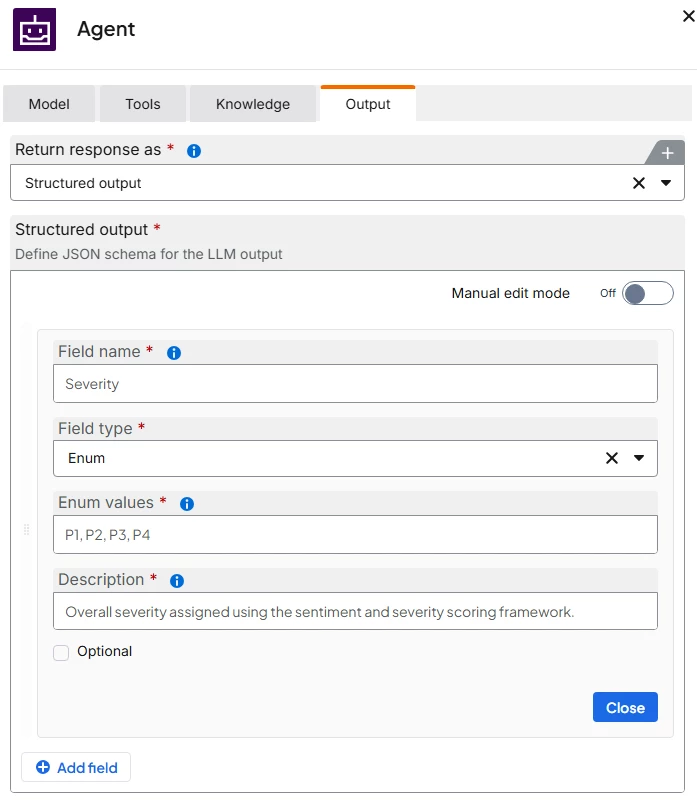
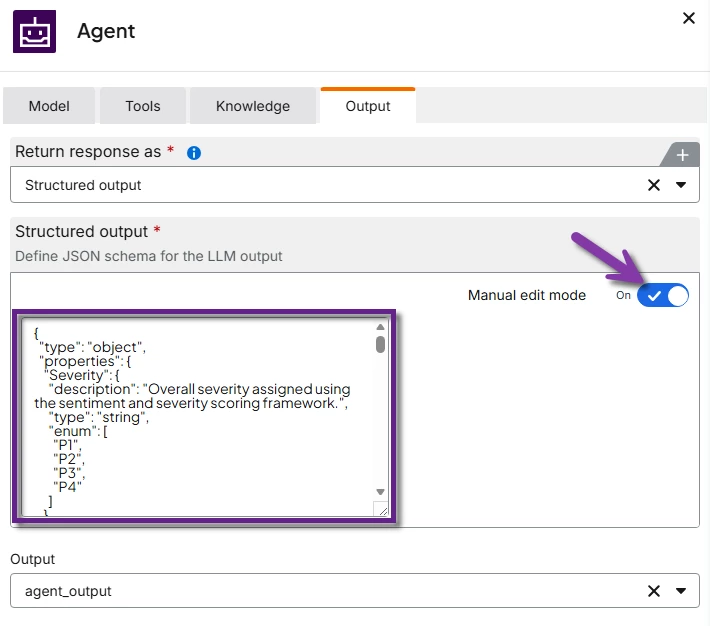
The output can be configured either by:
- Creating fields through the output configuration interface.
- Enabling Manual Edit Mode and defining the JSON schema directly.
Each output field includes several configuration options:
- Field Name: The name of the value that will be returned by the agent.
- Field Type: The type of data the field will contain.
- Description: Guidance that helps the model understand what information should be returned in the field.
- Optional: Indicates whether the field can be omitted from the response.
- Add Field: Used to create additional fields within the schema.
The available field types are:
- String for text values.
- Number for numeric values.
- Boolean for true or false values.
- Enum for values that must be selected from a predefined list.
Defining these fields helps ensure that responses are returned in a consistent format, making them easier to work with in downstream actions.
For this example, we are going to make use of a JSON schema to configure the output of the agent. The JSON schema looks as follows:
{
  "type": "object",
  "properties": {
    "Severity": {
      "description": "Overall severity assigned using the sentiment and severity scoring framework.",
      "type": "string",
      "enum": [
        "P1",
        "P2",
        "P3",
        "P4"
      ]
    },
    "CompositeScore": {
      "description": "Average score across the four sentiment dimensions after applicable adjustments.",
      "type": "number"
    },
    "EmotionalIntensity": {
      "description": "Emotional intensity score from 1 to 5.",
      "type": "number"
    },
    "EmotionalIntensityRationale": {
      "description": "Reasoning behind the emotional intensity score.",
      "type": "string"
    },
    "UrgencySignals": {
      "description": "Urgency score from 1 to 5.",
      "type": "number"
    },
    "UrgencySignalsRationale": {
      "description": "Reasoning behind the urgency score.",
      "type": "string"
    },
    "BusinessImpact": {
      "description": "Business impact score from 1 to 5.",
      "type": "number"
    },
    "BusinessImpactRationale": {
      "description": "Reasoning behind the business impact score.",
      "type": "string"
    },
    "ChurnRiskScore": {
      "description": "Customer relationship/churn risk score from 1 to 5.",
      "type": "number"
    },
    "ChurnRiskRationale": {
      "description": "Reasoning behind the churn risk score.",
      "type": "string"
    },
    "SentimentSummary": {
      "description": "Brief summary of the customer's emotional state and likely expectations.",
      "type": "string"
    },
    "KeySignalsDetected": {
      "description": "Important phrases, indicators, or patterns found in the ticket.",
      "type": "string"
    },
    "ChurnRiskLevel": {
      "description": "Overall likelihood of customer churn.",
      "type": "string",
      "enum": [
        "None",
        "Low",
        "Medium",
        "High"
      ]
    },
    "EscalationToManagement": {
      "description": "Likelihood that management escalation may be required.",
      "type": "string",
      "enum": [
        "Unlikely",
        "Possible",
        "Likely"
      ]
    },
    "PublicComplaintRisk": {
      "description": "Likelihood that the customer may raise the issue publicly.",
      "type": "string",
      "enum": [
        "None",
        "Low",
        "Medium",
        "High"
      ]
    },
    "LegalComplianceExposure": {
      "description": "Whether legal, regulatory, compliance, or contractual risk was identified.",
      "type": "boolean"
    },
    "LegalComplianceExposureDetails": {
      "description": "Details about any legal or compliance concerns detected.",
      "type": "string"
    },
    "RepeatIssue": {
      "description": "Whether evidence suggests this issue has occurred before.",
      "type": "string",
      "enum": [
        "Yes",
        "No",
        "Unknown"
      ]
    },
    "P1TriggerDetected": {
      "description": "Whether a P1 escalation trigger was identified in the customer communication.",
      "type": "boolean"
    },
    "ExecutiveVisibilityDetected": {
      "description": "Whether executive stakeholders were mentioned.",
      "type": "boolean"
    },
    "DataLossOrBreachMentioned": {
      "description": "Whether data loss, corruption, or breach concerns were identified.",
      "type": "boolean"
    },
    "OutageMentioned": {
      "description": "Whether outage or complete service failure language was detected.",
      "type": "boolean"
    },
    "ChurnThreatDetected": {
      "description": "Whether the customer explicitly threatened cancellation or switching providers.",
      "type": "boolean"
    },
    "RecommendedRouting": {
      "description": "Recommended ownership group for handling the ticket.",
      "type": "string",
      "enum": [
        "Tier 1",
        "Tier 2",
        "Senior Agent",
        "Account Manager",
        "Executive Sponsor"
      ]
    },
    "ResponseSLA": {
      "description": "Recommended response timeframe.",
      "type": "string"
    },
    "SuggestedResponseTone": {
      "description": "Recommended tone for the responding support representative.",
      "type": "string",
      "enum": [
        "Empathetic and Urgent",
        "Professional and Reassuring",
        "Informational",
        "Apologetic"
      ]
    },
    "SuggestedOpeningLine": {
      "description": "Suggested opening sentence for the responding support agent.",
      "type": "string"
    },
    "RecommendedNextSteps": {
      "description": "Recommended actions to be taken by support personnel.",
      "type": "string"
    }
  },
  "required": [
    "Severity",
    "CompositeScore",
    "EmotionalIntensity",
    "UrgencySignals",
    "BusinessImpact",
    "ChurnRiskScore",
    "SentimentSummary",
    "ChurnRiskLevel",
    "EscalationToManagement",
    "PublicComplaintRisk",
    "LegalComplianceExposure",
    "RepeatIssue",
    "P1TriggerDetected",
    "RecommendedRouting",
    "ResponseSLA",
    "SuggestedResponseTone"
  ]
}
This JSON schema corresponds with the variables mapped by the Set a variable value action included in the template.
Output Variable
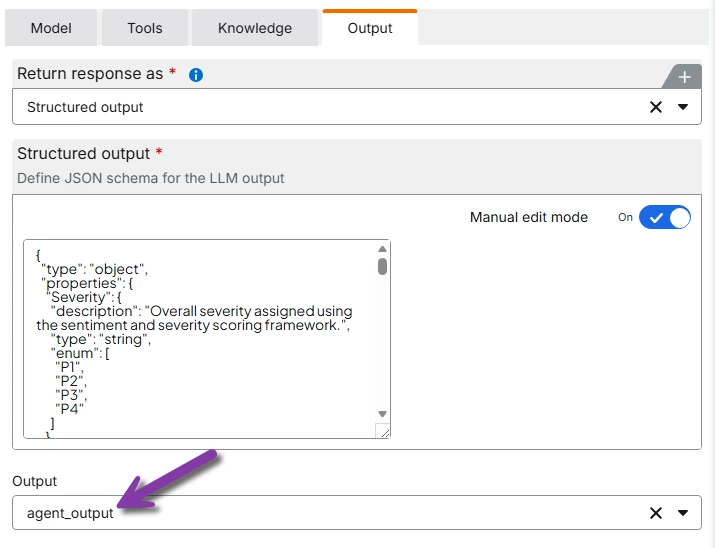
Once the response structure has been defined, the final step is selecting an Output variable.
This variable stores the response returned by the agent. The values contained within the response will then be mapped to individual variables and used throughout the rest of the Agentflow or workflow.
Testing the Agentflow
Before incorporating the Agentflow into a workflow, it's a good idea to test it and verify that it's returning the expected results. Testing allows you to confirm that the model is correctly assessing the request's sentiment and severity based on its instructions, and that the output values are populated as intended.
When testing the Sentiment and Severity Agentflow, consider using a few example support requests with varying levels of urgency and sentiment. For example, you can test:
- A low-severity request with a neutral tone.
- A medium-severity request that indicates some level of frustration or urgency.
- A critical request that contains strong indicators of urgency, business impact, or emotional distress.
Testing a range of scenarios helps validate that the agent is assigning severity ratings appropriately.
Start a New Test
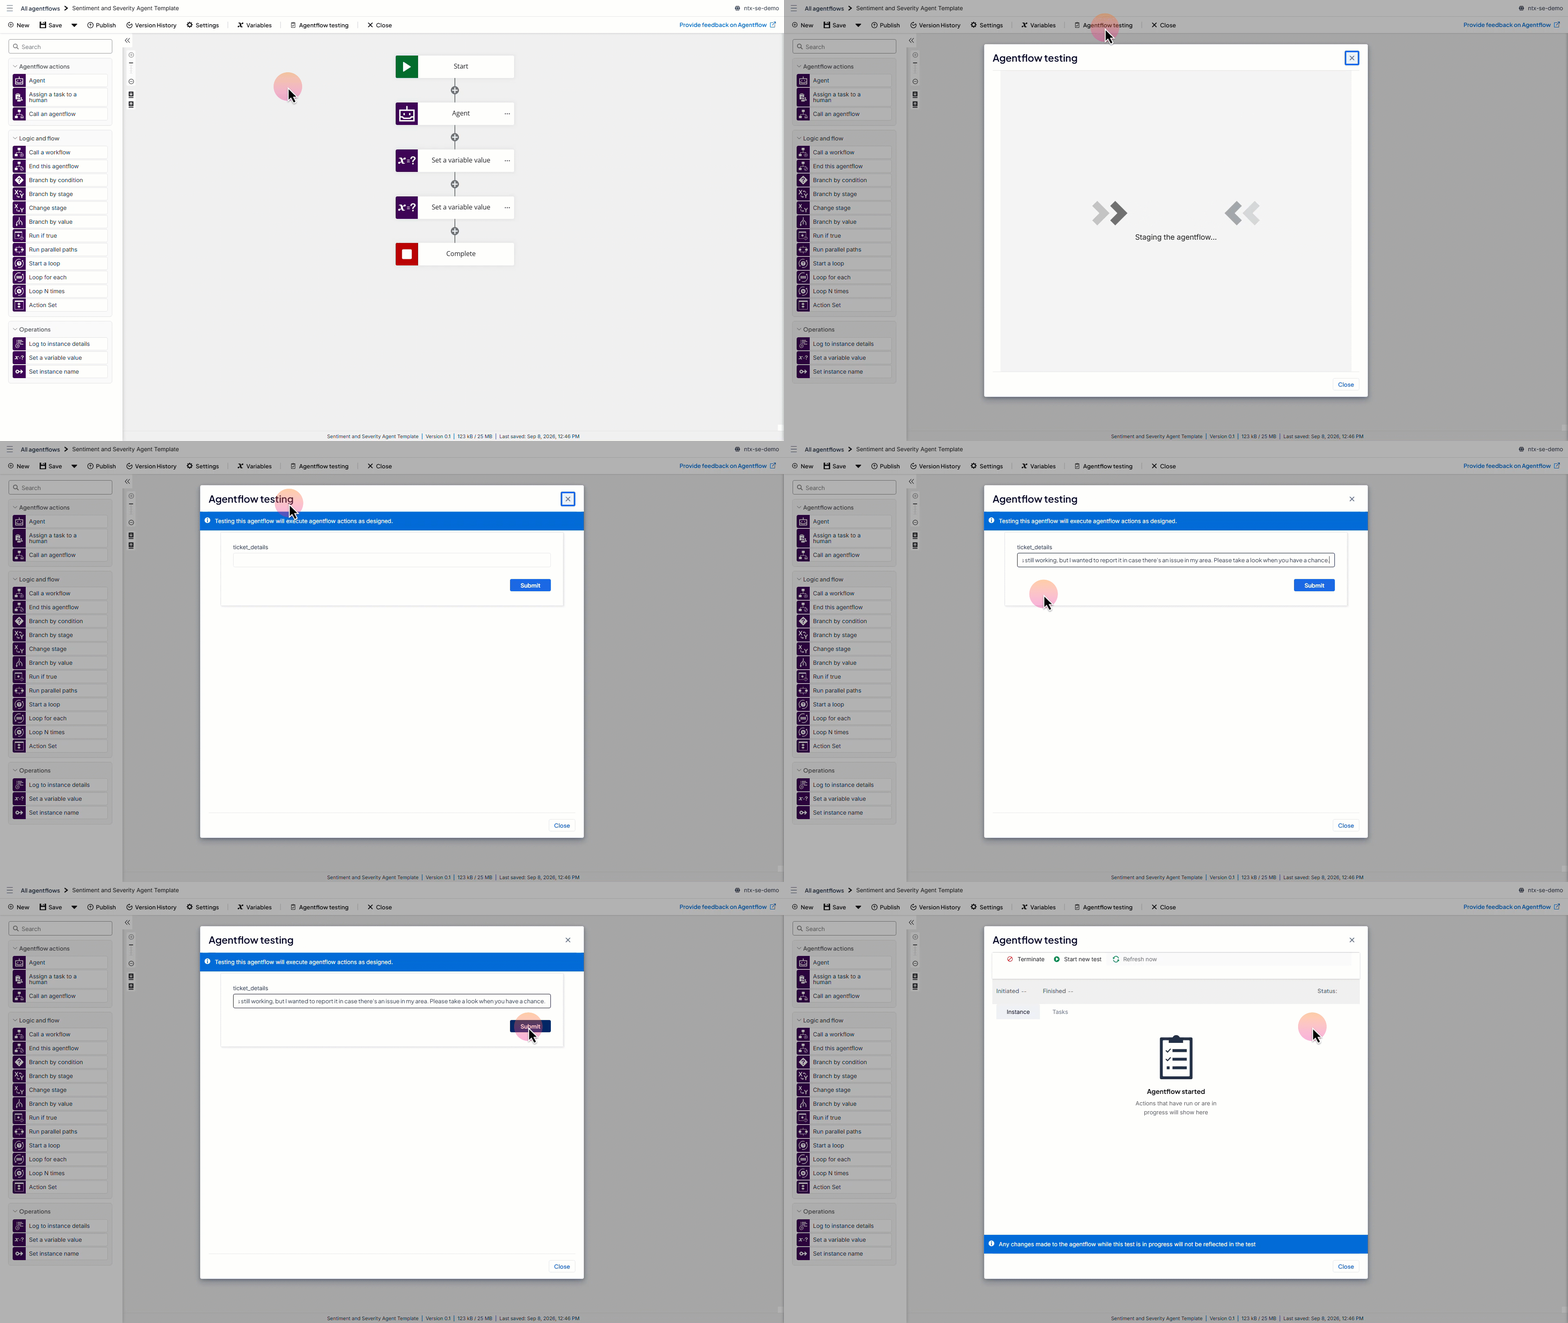
From the Agentflow, select Agentflow Testing and then click Start New Test. Paste an example support request into the test input and click Submit.
Review the Agent's Analysis
Once the test has completed, select Open Agentflow Execution History.
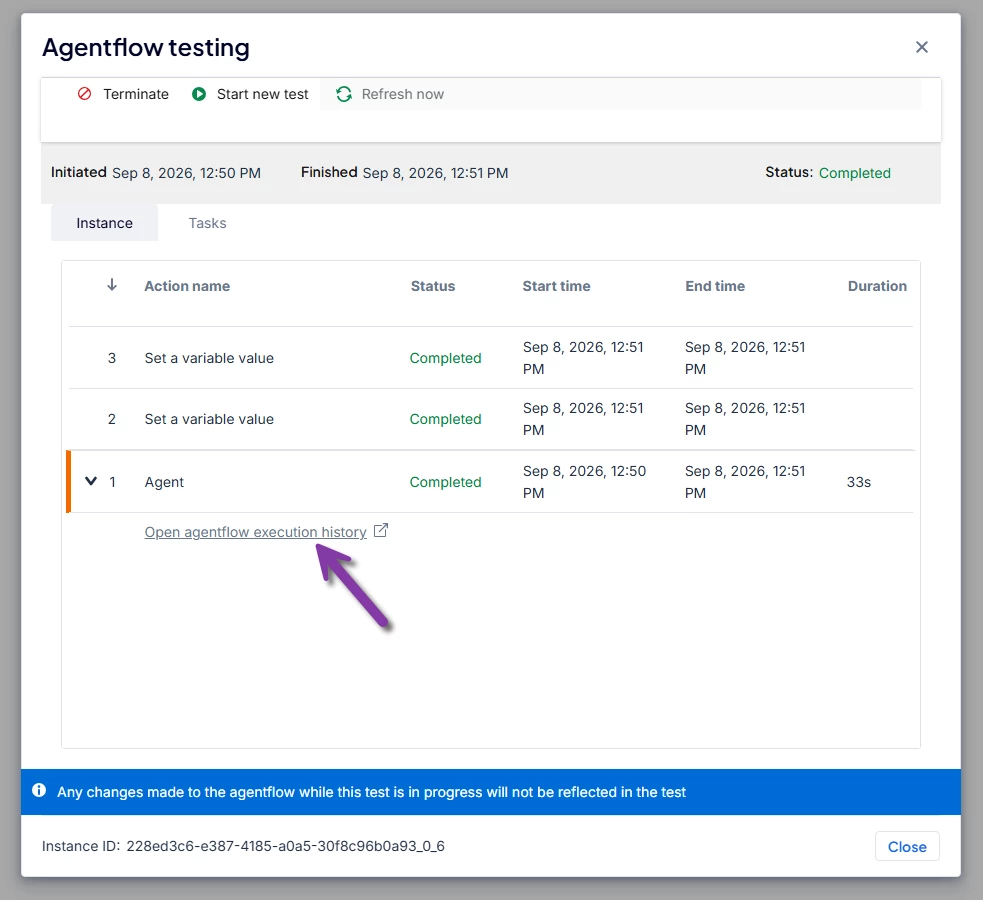
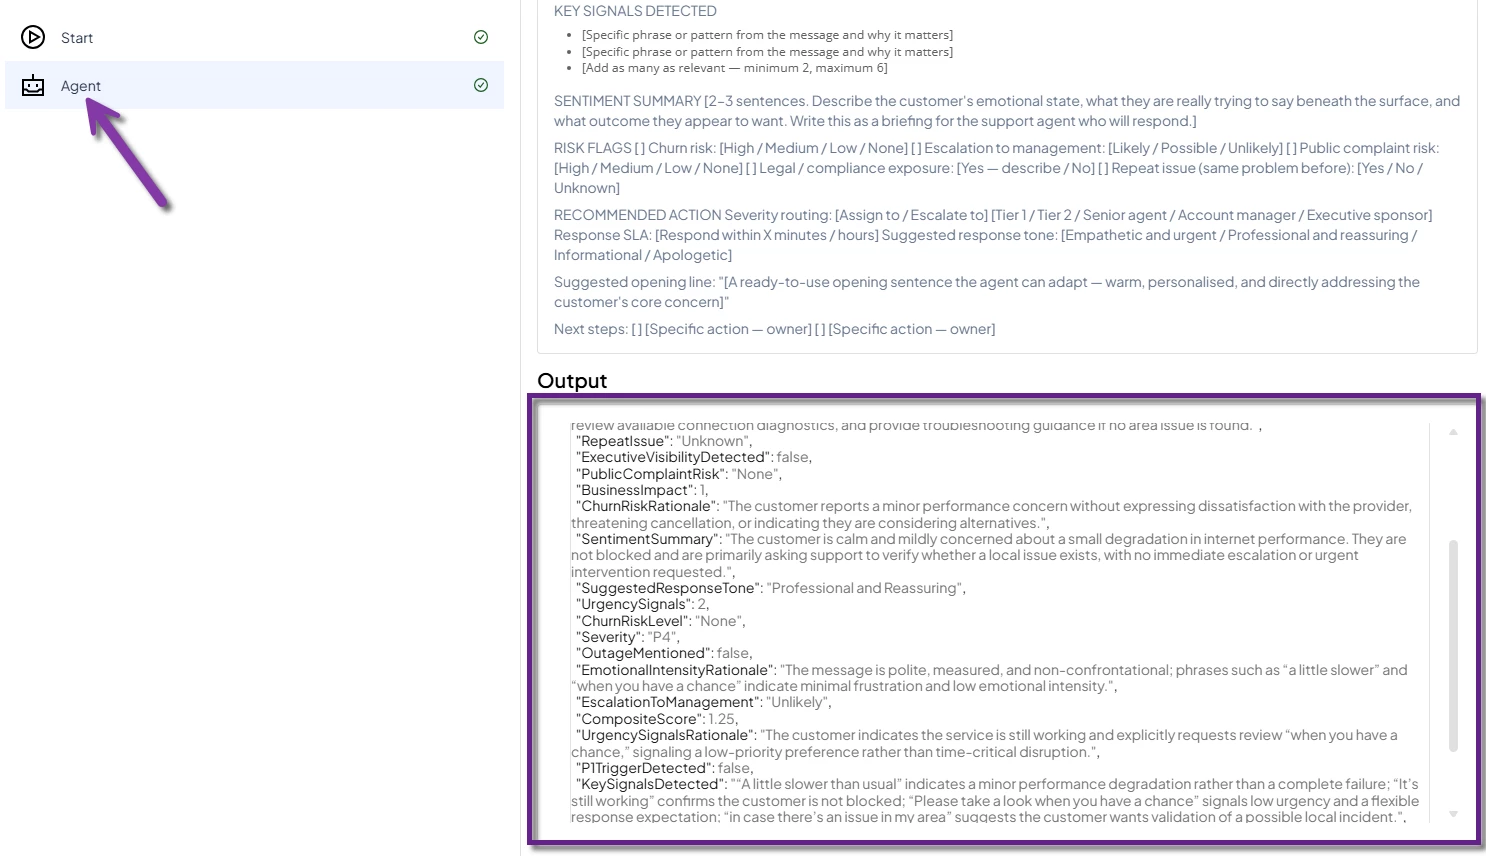
Open the Agent step and review the model's output. Compare the sentiment and severity assessment with the contents of the support request to determine whether the results are reasonable and align with your expectations.
Verify Variable Mapping
After reviewing the agent output, return to the execution history and review the remaining steps in the Agentflow.
Confirm that the Set a Variable Value actions completed successfully and that the values returned by the agent were mapped correctly to the corresponding variables.
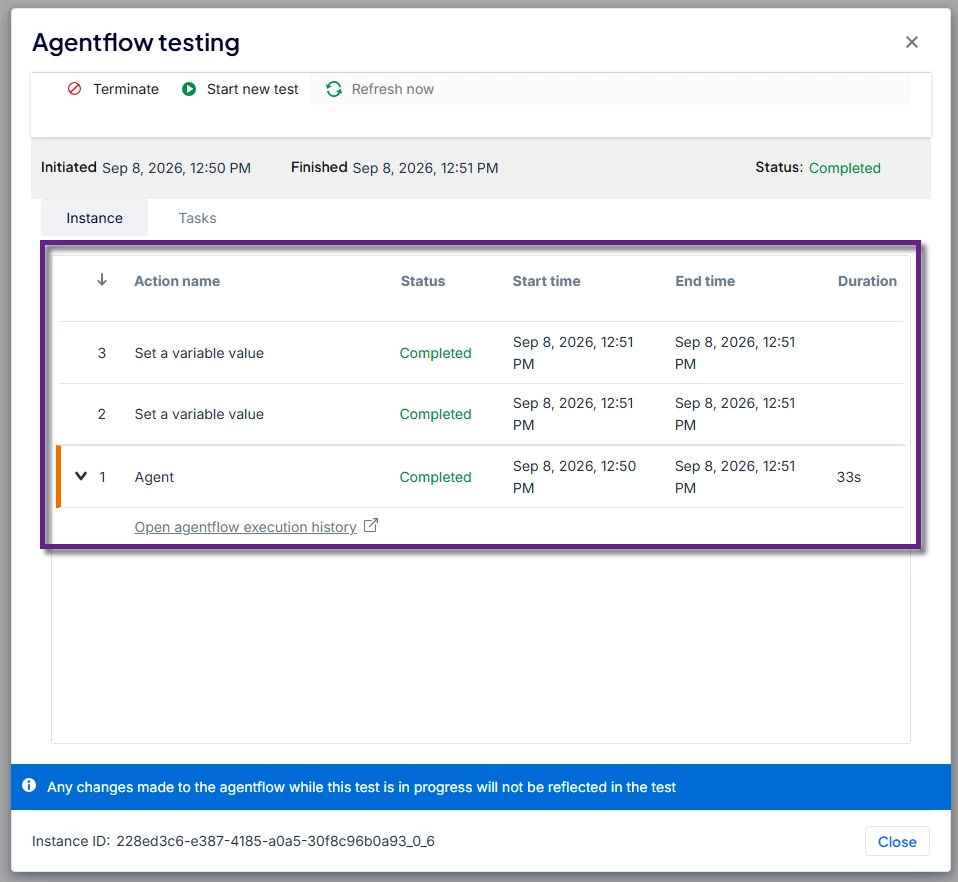
You should see successful completion indicators on both the Agent action and the Set a Variable Value actions.
Confirm the Results
Repeat the testing process using different support requests to verify that the Agentflow consistently returns the expected sentiment and severity ratings. Once you're satisfied with the results and all actions are completed successfully, the Agentflow configuration is complete, and the output variables are ready to be used in a Workflow.
If you're not happy with the results, review the Agent's Roles and Rules and the Work Request fields. Adjusting these settings can help refine Agentflow's behavior and improve the accuracy of its responses for your specific use case.
Publish the Agentflow
With the configuration complete and testing finished, the final step is to publish the Agentflow. Publishing is required before an Agentflow can be called from a Nintex Worrkflow or Orchestration . Until the Agentflow has been published, it will not be available when configuring a Call an Agentflow action in Nintex Workflow.
To publish the Agentflow, click Publish and wait for the publishing process to complete.
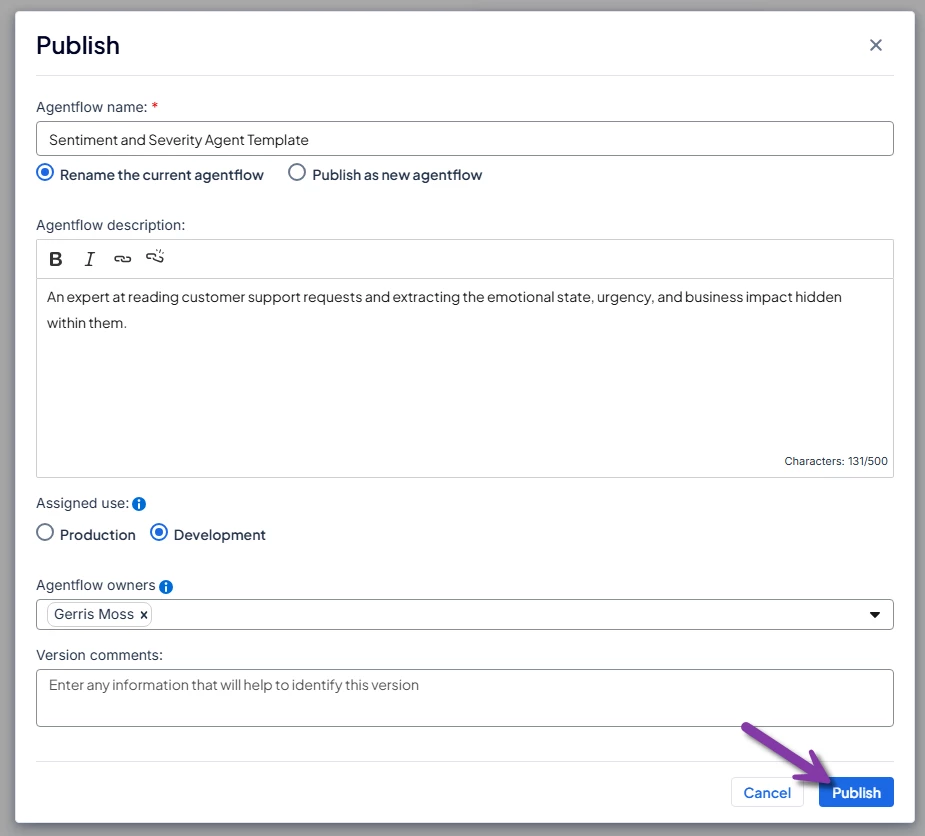
Once the Agentflow has been published, it is ready to be connected to a workflow and used to analyze incoming support requests.
Using the Agentflow in a Workflow
With the Agentflow configured and published, it's ready to be used as part of a larger automation process.
The next step is to incorporate the Agentflow into a Nintex Workflow, pass support request information to the agent for analysis, and use the returned sentiment and severity values to drive workflow decisions. You'll also see how the output can be used to route requests to the appropriate support team and provide them with the information they need to begin investigating immediately.
The following video demonstrates the complete process of integrating the Sentiment and Severity Agentflow into a workflow.
Conclusion
The Sentiment and Severity Agentflow Template shows how AI can be incorporated into everyday business processes to help teams respond more effectively to incoming requests. By turning unstructured information into meaningful insights, the agent provides a consistent way to assess sentiment and urgency, helping ensure that the right requests receive the right level of attention.
Whether you're supporting customers, employees, or internal teams, the template provides a flexible starting point that can be adapted to fit a wide range of scenarios. As business requirements evolve, the solution can be extended and integrated into broader automation processes to deliver even greater value.