


Introduction
This is another question that I’ve run into more than few times over the years: “How do I interact with this date field? It won’t let me type anything, I can only pick the date from the pop out menu.” And the truth about it is that there is no concrete answer on how to interact with these types of controls. Each of them is built differently and each will need to be handled differently. Lucky for us, the Date/Time field in Nintex Workflow Cloud Forms is a perfect example of this question.
In this blog, I’ll go over how to handle this field in NWC Forms and hopefully provide enough information in order for you to take the methods and apply them to the date fields in your business application. This relies heavily on another topic I posted about previously, manipulating the Rules of an action. If you’re unfamiliar with this topic and haven’t read my other blog post about it, check it out here.
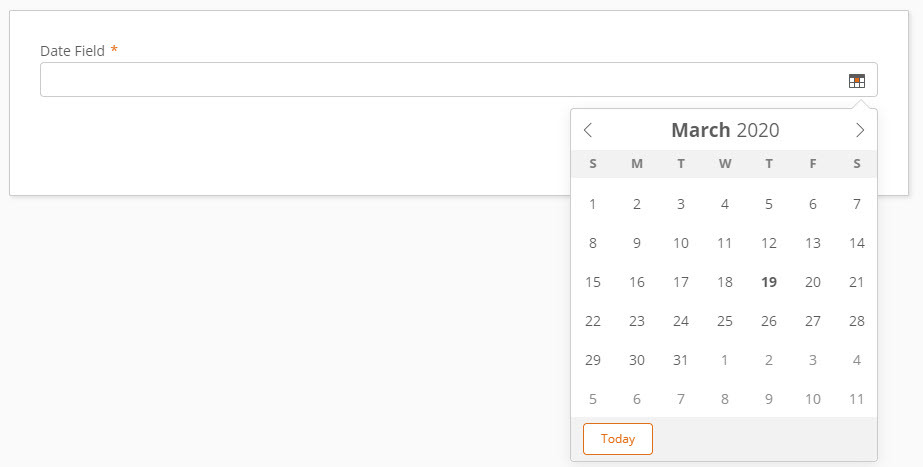
This is the field in question that I need to send a date value to. If you’re unfamiliar with NWC Forms, the only way to set a value in this field is to pick it from that popup menu as typing is not possible within that field.
Before Starting
The most important part before starting this is fully understanding how the field works. Like I said before, each date picker is built different so some exploring will be required before trying to automate it. Some questions to consider:
- Does the pop out menu disappear when the field loses focus?
- If it does lose focus, does the picker reappear where you left off?
- How do I pick the year?
- What format is the month in? Numbers? Zero-filled? Word? Abbreviation?
- How do I pick the month?
- Do I need to use page controls to pick the year or the month
Take a look at this video of me digging in and trying to understand the NWC date field picker.
So a few things I discovered:
- I can give something else focus and not lose the pop out.
- If the field is blank, the pop out defaults to today’s month and year.
- If there is already a date in the field, the picker shows that date when opened.
- I can click the Month name to show a ‘month picker’ control
- I can click the Year to show a ‘year picker’ control. This control displays a decade on each page, starting with ‘0’ years, ending with ‘9’ years (ex. 2010-2019).
- If I need to choose a Year that isn’t displayed, I need to click on the page keys.
Now that I know these ‘rules’, I can take them and apply while I build my botflow.
Breaking Down the Date
The first thing to do in Nintex RPA is breakdown the date that you need to send into its individual components: Year, Month, Day. This is easily accomplished using the Date Formulas built into Nintex RPA.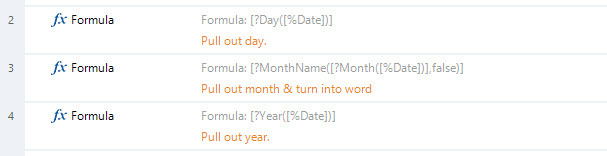
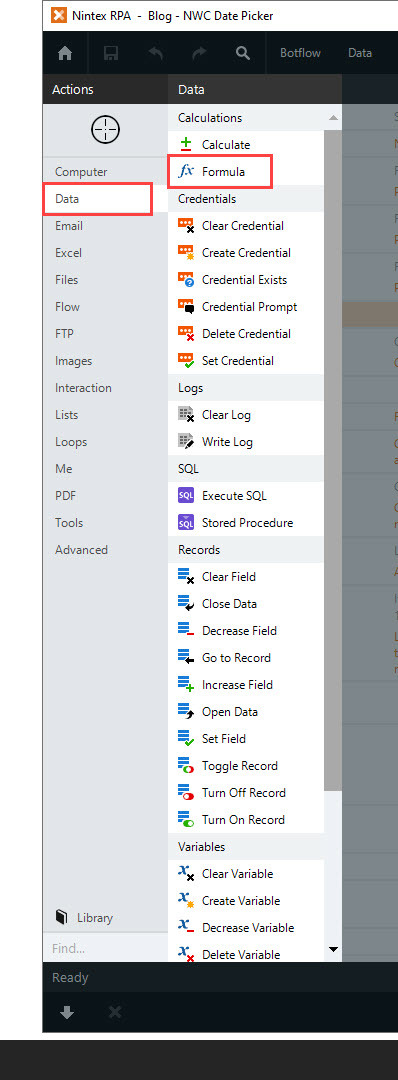
You can find the Formula action under the ‘Data’ category on the left side, under the targeting tool.
Within the Formula action, there are 3 o r 4 formulas that you will need to utilize to pull out the parts of the date. These formulas are “Day”, “Month”, “MonthName” and “Year”.
The “Day”, “Month” and “Year” formulas are pretty self explanatory within the formula builder. Simply provide the date that you need to pick (from a variable or data) and it will output the relevant piece of it. Save each result to unique variables, since these will need to be referenced later.
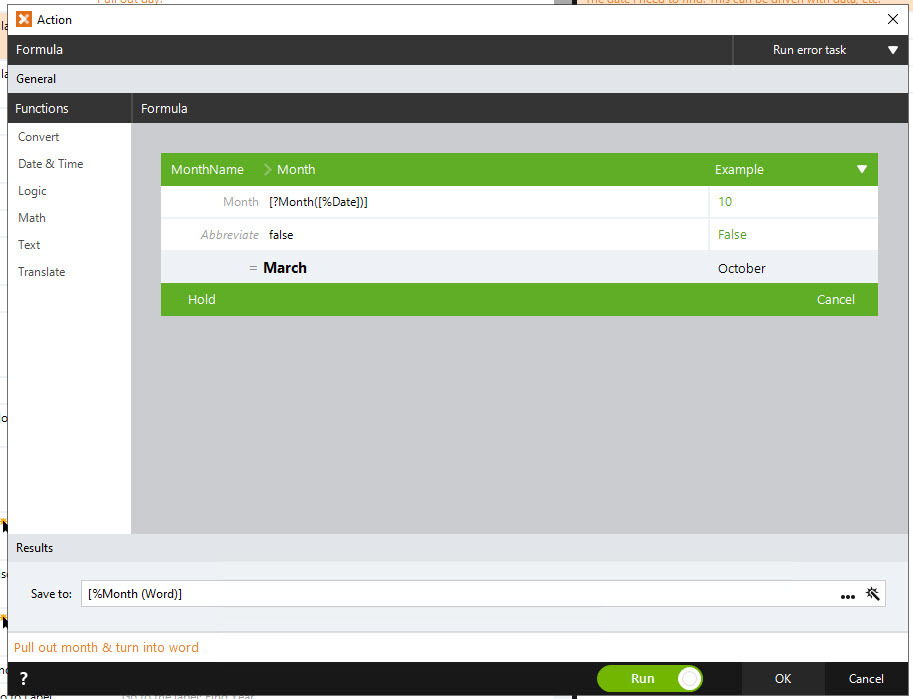
In the case of this NWC form field, I’ll need to take the “Month” and change it to the word form. This is where the “MonthName” formula comes in. MonthName takes the month number and outputs the word form. You can embed the Month formula in the first field to make this easier.
With these 3 pieces now we can start to tackle the form control itself!
The Actual Date Picker
For this field, for the pop out menu to appear, it needs to be given focus. I’ll do this first by creating a Click action after targeting the field itself. After the menu pops out is where the fun begins.
The first part of this is picking the year, since this is the most complicated part in my case.
Quite a lot going on here… let’s break it down.
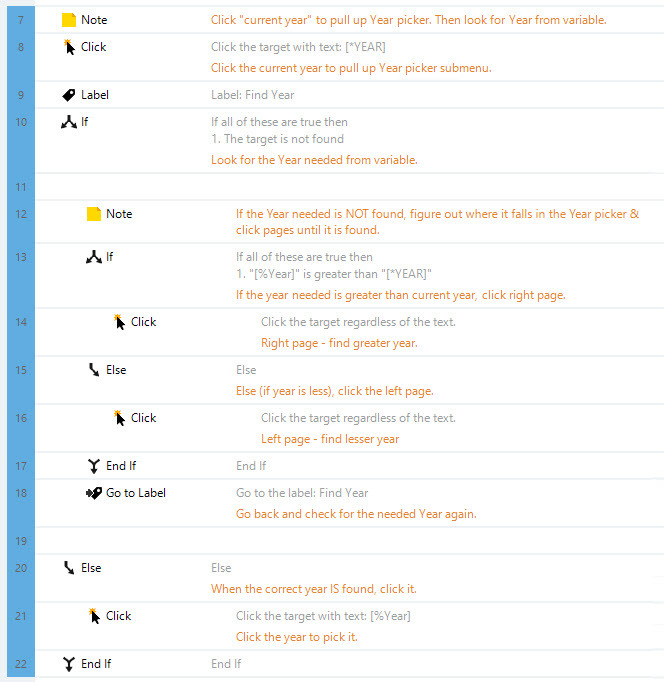
During my ‘discovery’, I determined that the month & year will default to today’s date since the field starts blank. I’ve setup a Click on Line 8 to click the current year [*YEAR] by manipulating the ‘Text’ rule on the Click action (if you don’t know how to do this, see my other blog mentioned at the beginning). This click pulls up what I’ve been calling the ‘year picker’ menu.
At this point, there is some logic that needs to be worked out. I could probably have used some math formulas to figure out exactly how many pages to click and used that instead, but I opted to go down the route of basically looping until it finds the right page.
Line 10 is an ‘If’ action that I built based on manipulating the Rule to look for my Year variable [%Year]. This ‘If’ is what drives the page clicks. “If the year I need [%Year] is not found / Else” followed by some more logic to determine which direction to page towards. The ‘Else’ on Line 20 allows a Click to happen when the [%Year] is found. This is setup again by manipulating the Text rule to look for [%Year].
Line 13 and Line 15 is that logic, an ‘If’ action, that determines which page to click towards. “If the year I need [%Year] is greater than the current year [*YEAR] / Else”. If it is greater, than click the right page arrow otherwise it is less so click the left page arrow.
Then the final piece that makes this all work is Line 9 and Line 18. A Label is kind of similar to a loop, and you can think of it a bit like a bookmark. Line 18 is sending the botflow back to Line 9 to go through all these checks again. This ONLY happens when the [%Year] is not found. This will essentially loop forever until the [%Year] is found, at which point it drops down into the ‘Else’ on Line 20 (mentioned above).
Now that the year is selected, the next to pick would be the month. This is significantly easier to do thanks to the fact that all the months are visible on the ‘month picker’ menu. This can be accomplished with 2 Clicks.
The first, you will target the month name at the top of the date picker menu. After this, change the ‘Text’ rule to [*MONTH], to Click the current month from the date picker popout. The next Click, target a month on the new month picker menu, and adjust the Text Rule again to [%Month], to click the month needed.
And now finally, the day! The easiest of them all. Simply target a day on the date picker menu, and adjust the Text Rule to [%Day] and create a Click action. This will select the day needed and input the value into the field.
Here is a raw recording of myself coming blind into this field and working through how to accomplish this.
<<raw build video >>