


When setting up a new SharePoint Site Collection or Subsite, you may want to install the Nintex Office apps to leverage Nintex's workflow and forms capabilities. This guide outlines the steps required to install Nintex Office apps into a new SharePoint Site Collection or Subsite.
Prerequisites
Before proceeding with the installation of Nintex apps, ensure the following prerequisites are met:
-
Nintex Subscription: Ensure your organization has an active Nintex subscription.
-
Appropriate Permissions: The user performing the installation must have Site Collection Administrator rights.
-
SharePoint Environment: This guide assumes you are using SharePoint Online (Office 365). If you're working in a SharePoint On-Prem environment, the steps may vary slightly.
Steps to Install Nintex Workflow for Office 365 in a SharePoint Site Collection or Subsite
-
Navigate to the SharePoint Site Collection or Subsite
-
Open the specific site where you want to install the Nintex app.
-
-
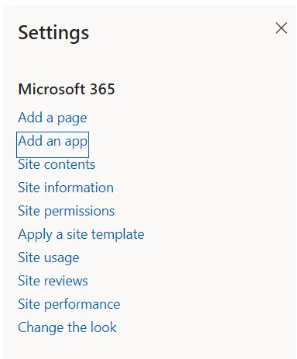
Access the SharePoint Store
-
Once inside your Site Collection or Subsite, click on the Settings (gear icon) in the top-right corner of the SharePoint page. From the dropdown menu, select Add an app.
-
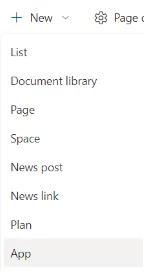
Or Click on the “+ New v” drop-down menu and select App.
-
On the “Your Apps” page, click SharePoint Store in the left-hand menu. This will take you to the SharePoint Store, where you can browse for available apps.
-

-
Search for Nintex Workflow for Office 365
-
In the search bar of the SharePoint Store, type "Nintex Workflow for Office 365" or "Nintex Forms for Office 365" depending on what you need.
-
Once you see the Nintex app, click on it to open the app details page.
-
-
Add Nintex Workflow or Forms App
-
On the app details page, click the Add it button.
-
SharePoint will now prompt you to trust the Nintex app. Click Trust it to grant the app the necessary permissions to function within your Site Collection or Subsite.
-
-
Wait for Installation
-
SharePoint will now install the Nintex app in your Site Collection or Subsite.
-
To verify the installation, go to Site Contents and check if the Nintex app appears in the list of installed apps.
-
-
Activate Nintex Workflow or Forms (if required)
-
Once the app is installed, navigate back to Site Settings.
-
Under Site Collection Features or Manage site features, click on Nintex Workflow or Nintex Forms.
-
-
To allow workflows to read from and write to all items in a SharePoint site, follow these steps:
-
Open the site settings and click on Manage site features.
-
Activate the feature called "Workflows can use app permissions".
-

Configuring Nintex Workflow and Forms
After successfully installing Nintex Workflow or Forms, you can begin configuring and creating workflows and forms for your new Site Collection or Subsite.
-
Create New Workflows:
-
Open a list or library in the Site Collection.
-
In the list ribbon, you should now see a Nintex Workflow button.
-
Click on it to create new workflows or manage existing ones.
-
-
Design Forms:
-
Similarly, go to the list or library where you want to use Nintex Forms.
-
You should see the Nintex Forms option in the list or library settings, allowing you to create custom forms for your list items.
-