

Original publish date: 11 May 2021
KB003363
PRODUCT: K2 Cloud, K2 Five, K2 blackpearl
TAGS: Microsoft Exchange
Caution:
In September 2019, Microsoft announced plans to turn off Basic Authentication for Exchange Web Services (EWS) for Exchange Online. An article released on the 1st of September 2022 announced that Microsoft will start to turn off basic auth for specific protocols in Exchange Online from the 1st of October 2022.
The following Microsoft articles have more information about the change:
- Basic Authentication Deprecation in Exchange Online – September 2022 Update
- Deprecation of Basic authentication in Exchange Online
This notification from Microsoft may lead to questions about your K2 environments and whether they will be affected by these changes. This article attempts to address the most common questions arising from this change in authentication support.
K2 uses Basic authentication when integrating with Exchange Online. Because Microsoft is deprecating Basic authentication for EWS, K2 is replacing Basic Authentication with OAuth authentication for Exchange integration. All current Exchange Online connections that use Basic authentication will not work once Microsoft disables support for Basic Authentication. To prepare for this change, you will need to edit integration points between K2 and Exchange Online to be OAuth-enabled.
The K2 fix packs released during April 2020 include an upgrade for the K2 Connection String Editor tool to make it OAuth compatible, and an update to Exchange Online integration to support OAuth authentication.
FAQs about the authentication change
Q: Does K2 use EWS + Basic Authentication for Exchange Online integration?
A: Yes
Q: Which K2 components are affected by the change?
A: Workflow SmartActions, Workflow Notifications, Email reminders, the Workflow Email Step and SmartForms Send Email rule action.
Q: Which K2 versions are affected?
A: K2 Cloud, K2 Five and K2 blackpearl.
Q: Will this upcoming Microsoft change affect supported Exchange on-premises versions?
A: No. Exchange on-premises will not be affected by this change.
Q: Does K2 have a plan to address this change prior to the 2021 deadline?
A: Yes. K2 will update Exchange Online integration to utilize OAuth authentication in a series of Fix Packs released during April 2020. The Fix Packs include an updated K2 Connection String Editor tool to allow you to set up OAuth connections where necessary.
Q: What will happen if we do not make the necessary changes/fixes in our K2 environment by the deadline?
A: If the fix is not applied before the 2021 deadline, any communication between your K2 system and Exchange Online will fail. That means the following will not work:
- SmartActions
- Async steps – sent by MessageBus
- Escalations
- Email steps – Workflow designer and inflight message sending
- Forms with a send email rule
- Workflow message sending
- Can't send email errors can occur, and notifications will not work. An example of the error you may encounter:
SourceCode.WorkFlow.Common.EWS: Autodiscover not available and mail cannot be sent. Reconfigure K2 server with valid Exchange settings.
Q: How do we address the issue if we missed the deadline for switching to OAuth?
A: Apply the solution steps described in this article, and then retry any errors in the Workflow Errors section of K2 Management.
Q: Are SmartObjects that use the Exchange Management, Exchange Administration and Exchange Metadata Service Types affected?
A: Yes. These legacy Service Types do not support Exchange Online with OAuth. The new Exchange Online Feature SmartObjects will need to be used.
Q: Are the Exchange Wizards affected?
A: Yes. These wizards rely on the SmartObjects in the previous question.
Q: Are the SmartObjects using the Exchange Online Service Broker affected?
A: It depends on the Authentication Mode used for the Service Instance:
- Using OAuth Authentication: Not affected, OAuth Authentication will remain fully supported after this change.
- Using Impersonate Authentication: Not affected, Impersonate Authentication is only supported for Exchange On-premises which will not be affected by this change.
- Using Static Authentication for Exchange On-premises: Not affected, Exchange On-premises is not affected by this change.
- Using Static Authentication for Exchange Online: Affected, Static Authentication credentials are passed using Basic Authentication which will no longer be supported. Change the service instance to use OAuth Authentication instead.
Q: Why are 401 errors presented over and over in the Host Server logs after doing the OAuth configuration described in this article?
A: The authentication tokens are set to expire every 90 minutes, this causes a log entry. The system immediately automatically re-authenticates and retrieves a new token so the log entry can be ignored.
Solution
Before making the required changes to your K2 environment, download the latest cumulative update and associated fix packs from Nintex customer central product releases that applies to your K2 version:
List of K2 versions:
- K2 Five (5.5)
- K2 Five (5.4)
- K2 Five (5.3)
- K2 Five (5.2)
- K2 Five (5.1)
- K2 Five (5.0)
- K2 blackpearl 4.7
Solution Steps: K2 Five 5.1 and later
- Apply the appropriate Fix Pack for your K2 environment.
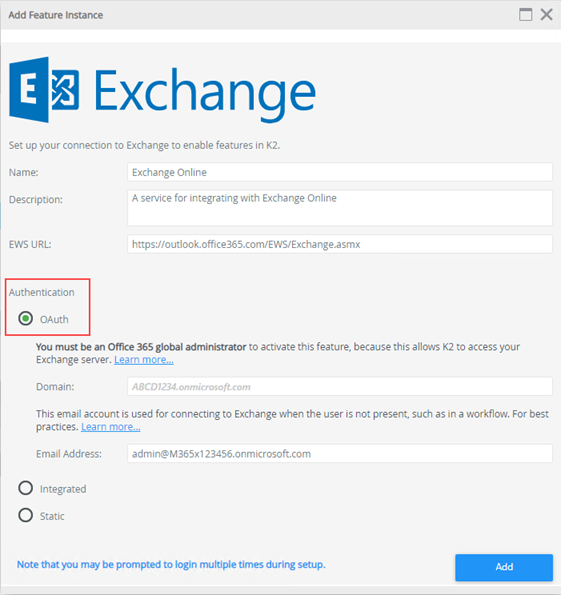
- Enable and/or configure the Exchange Online Feature in your K2 environment to use OAuth authentication, as described in the User Guide. The email address you use when switching to OAuth is the email address used during the K2 setup; usually the K2 Service account email.
- Use the K2 Connection String Editor tool to configure the EWS connection strings. See the section below for details.
Using the K2 Connection String Editor to set EWS connection stringsApplying the Fix Pack updates the K2 connection string editor to support connection stings that use OAuth instead of Basic authentication. Follow these steps to configure connection strings for Exchange destination and connection:
- Open the connection string editor at [K2 installation path]\Host Server\Bin\ConnectionStringEditor.exe.
- Remove SMTP connection entries by selecting them each and clicking the Remove Connection String button.
Removing the existing SMTP entries is only required if you have non-operational SMTP connections listed, for example, because the K2 installer required you to enter an SMTP connection during setup. If you have currently-operational SMTP connection strings listed, you do not need to delete the SMTP connection strings - just add the EWS connection as described in the next step.
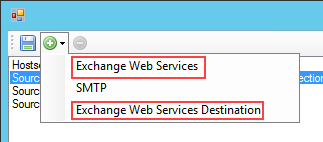
- Edit the connection strings for all Exchange Web Services Connection and Exchange Web Service Destination entries.

- Enter the following values for the connection properties. The ConnectionString property in the Data section builds automatically as you enter the values.
Property Value Behavior Poll Interval Leave blank Connection Autodiscover True Delegate Leave blank OAuth Resource The OAuth Resource property value is the OAuth Resource Name for your Exchange Online integration. Obtain this from K2 Management > Authentication > OAuth > Resources. For example, "Exchange - [your tenant URL]". OAuth Resource Audience The OAuth Resource Audience property is the URL for Exchange online: https://outlook.office365.com Password * Leave blank URL The EWS URL: https://outlook.office365.com/EWS/Exchange.asmx User ID The email address used during the K2 setup; usually the K2 Service account email, for example: k2service@M365x123456.onmicrosoft.com Data ConnectionString Automatically generated based on the values you enter. * If the Exchange connection and destination password property is empty, K2 tries to retrieve the OAuth token using the OAuth Resource and OAuth Resource Audience property values. These property values are the same as those in your K2 OAuth resource for Exchange Online. If there is any value in the password field, K2 reverts to Basic authentication when connecting to EWS which causes authentication errors. - Restart the K2 Server service after editing your EWS connections.
- Verify the changes in K2 Management and the K2HostServer.exe.config file. See the section below for details.
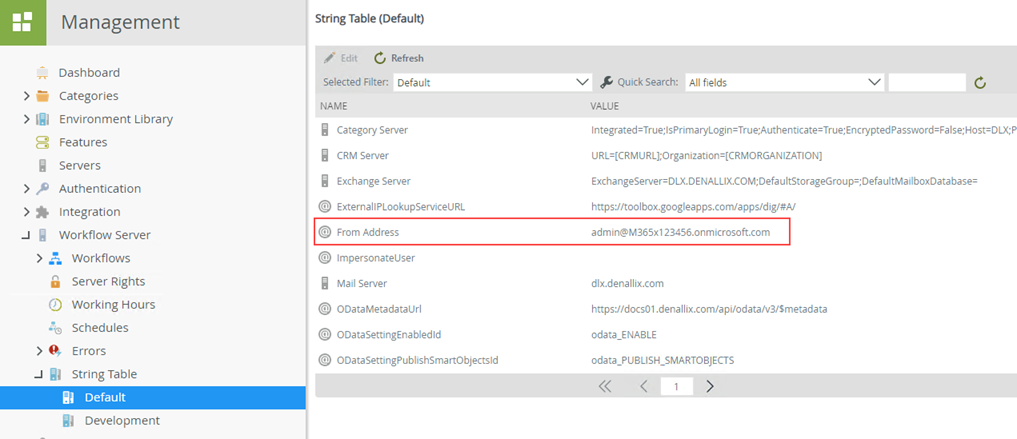
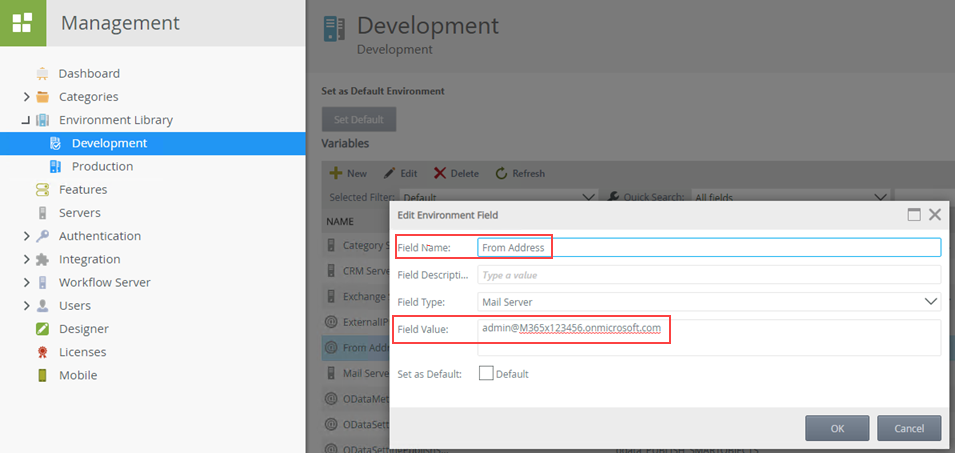
Verifying the changes- Use K2 Management Site to verify that your K2 Service email address is set for the From Address in the Environment Library variables and in the Workflow Server > String Table variable. You access these properties in K2 Management as shown below:
-

- Use the K2 Management Site to verify that the Exchange Online Feature is configured to use OAuth authentication.
- In the K2HostServer.exe.config file located at [K2 installation path]\Host Server\Bin\K2HostServer.exe.config, check that the system self tag is correct. The value specified must be the fully qualified name (FQN) of the user that has the SmartActions Inbox email address as email property.
- Still within the K2HostServer.exe.config file, search for the sendmailfrom property and check that the value is the correct From address email address.
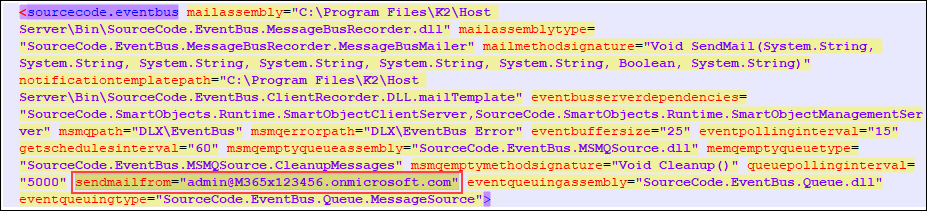
- Still within the K2HostServer.exe.config file and if you are using SmartActions, check these properties: enableListeners="true" and "SmartActions\EWS" as in the image.

Solution Steps: K2 Five 5.0 and K2 blackpearl 4.7
- Apply the appropriate Fix Pack for your K2 environment.
- Manually configure an app in AAD that grants the needed permissions to pass the OAuth token. See the section below for details.
Manually configuring an App in AAD for OAuth TokenIn K2 blackpearl 4.7 and K2 Five (5.0) you must manually configure an app in Azure to grant admin consent and create an OAuth token for authentication when using EWS and Exchange Online. Use these steps to register an app in AAD that grants the needed permissions to pass the OAuth token. (Once the app is registered, you will set up an OAuth resource in K2 to request authorization tokens from Azure.)
Make sure in IIS that the website that hosts the K2 virtual directories is SSL enabled (HTTPS). For instructions on how to do this, see Step 1 - SSL-enable the website that hosts the K2 virtual directories in the topic Manually Configure K2 for Azure Active Directory (AAD) in the Installation and Configuration Guide.
- Find and record your Directory ID/Tenant ID.
- Log in to https://portal.azure.com/ and navigate to your Active Directory Domain.
- Click Azure Active Directory.
- Click Properties and copy the Directory ID for later use.
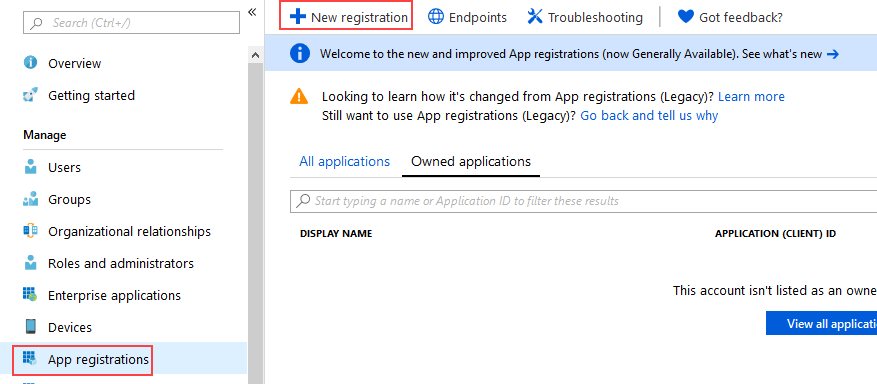
- Click the App registrations item on the blade and then click New registration.
- The Register an application blade opens.
- Give your app a Name (this is the user-facing display name for this application).
- Select who can use this application or access this API in the Supported account types.
- Specify a Redirect URI for OAuth authorization. For example, https://k2.denallix.com/identity/token/oauth/2.
Note: Microsoft made a change in AAD that invalidates the manifest file if URIs contain trailing forward slashes, but K2 requires the trailing slash in identifier URIs. Edit and run the following PowerShell script that will add the trailing slashes. Remember to edit the Azure app name value to match the name of the app you created in Azure, and change the sample IdentifierURIs values to your K2 environment’s values. When you run the script and get prompted for credentials, be sure to log in as an Azure Tenant Admin.# Start of script
$AzureAppName = ""; # App Display Name in https://portal.azure.com
Function Connect-Azure
{
$AzureAD = Get-Module AzureAD;
If(!$AzureAD)
{
Install-Module AzureAD -SkipPublisherCheck -Force -Confirm:$false -WarningAction SilentlyContinue;
Import-Module AzureAD -WarningAction SilentlyContinue;
}
Connect-AzureAD;
}
Function Configure-App
{
$AzureApp = Get-AzureADApplication -Filter "DisplayName eq '$($AzureAppName)'";
If($AzureApp)
{
Set-AzureADApplication -ObjectId $AzureApp.ObjectId `
-IdentifierUris "https://k2.denallix.com/Designer/", "https://k2.denallix.com/Runtime/";
}
}
Connect-Azure;
Configure-App;
#End of Script - Add your additional Redirect URIs to match the Identifier URIs you added by using the script above. The list of Reply URLs should look similar to the following image but with your K2 details.
Note: Redirect URIs are the URIs that Azure accepts as destinations when returning authentication responses (tokens) after successfully authenticating users. Redirect URIs are also known as Reply URLs.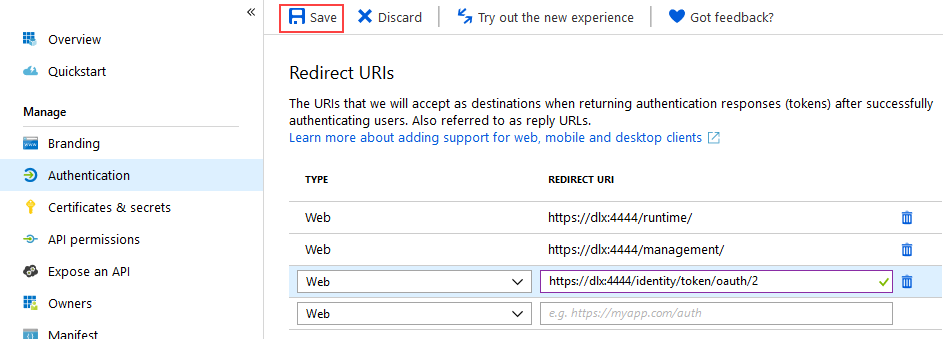
- Your app is now in the list of apps when you select App registrations. Select your new app to continue.
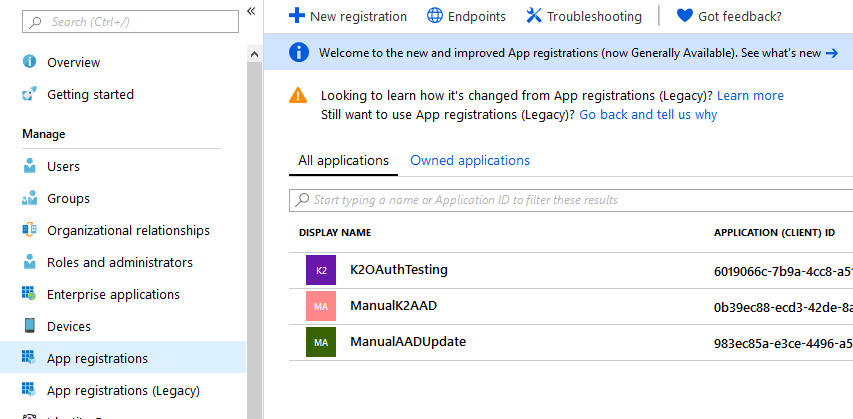
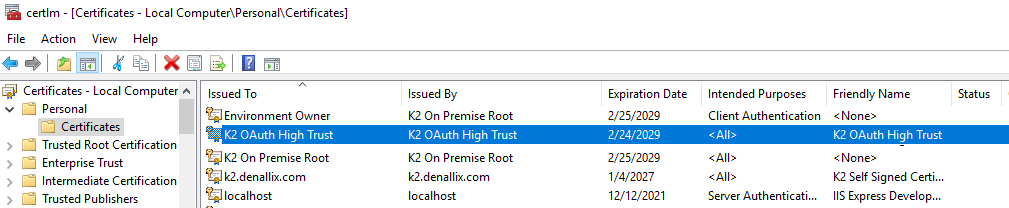
Copy the Application ID for later use. - Export the K2 OAuth High Trust certificate from the Personal branch of your K2 server and upload it to your AAD tenant. Also copy the certificate thumbprint for later use.
- Open the Manage Computer Certificates MMC on your K2 server and export the K2 OAuth High Trust certificate found in the Personal > Certificates branch. Do this by right-clicking the certificate and selecting All Tasks > Export.
- Use the default options:
- No, do not export the private key
- DER encoded binary X.509 (.CER) - Browse to a folder to save the key and type a file name, for example, K2 OAuth High Trust.cer.
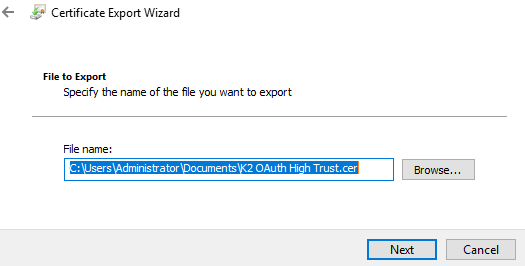
Click Next to continue. - Check your setting in the last page then click Finish to export the certificate.
- In Azure Portal, click Certificates & secrets under the Manage menu for your app.
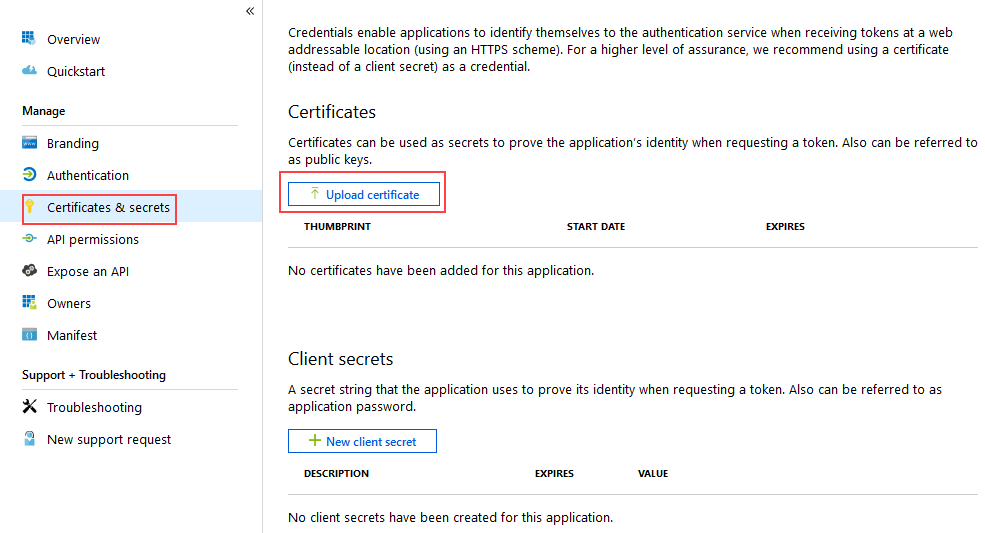
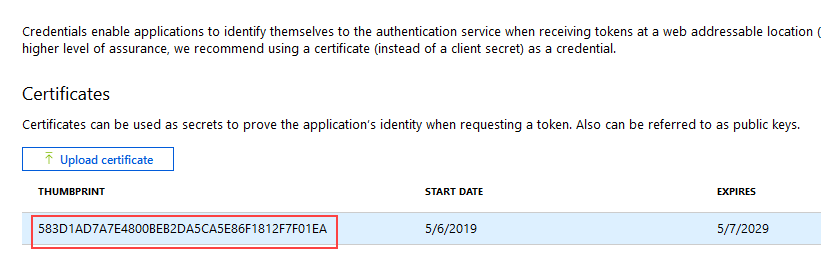
- Click Upload certificate and select the certificate you exported and click Add.
The Certificates section is updated with your key. - Copy the Thumbprint as you will need it in later steps.
- Open the Manage Computer Certificates MMC on your K2 server and export the K2 OAuth High Trust certificate found in the Personal > Certificates branch. Do this by right-clicking the certificate and selecting All Tasks > Export.
- Find and copy your Client Secret for later steps.
- In your AAD tenant, click Certificates & secrets under the Manage menu for your app. Then click New client secret under the Client secrets section.
- Type a Description for the key and select an expiry time. Click Add to generate a Key Value.
The Key Value is your Client Secret -- copy it for later steps.
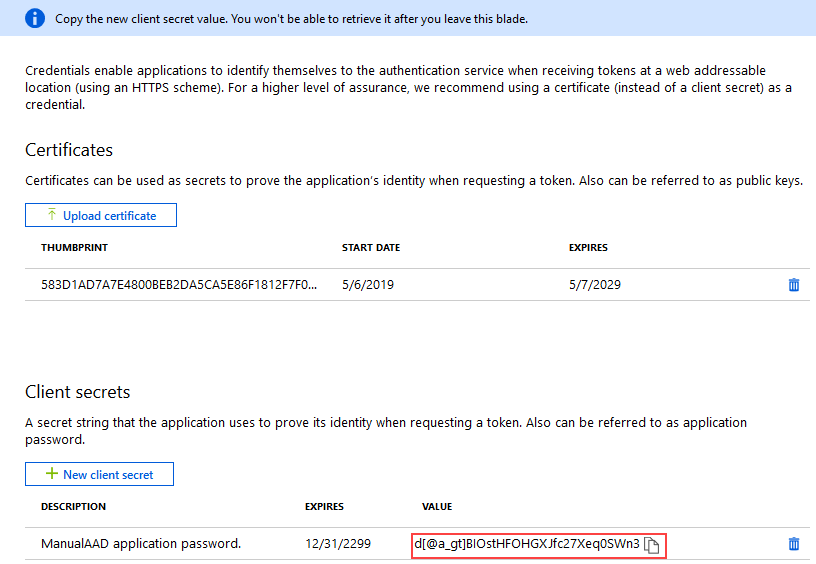
You cannot retrieve this value once you leave the blade so make sure you copy and store it now.
- Set permissions for the app using the following steps:
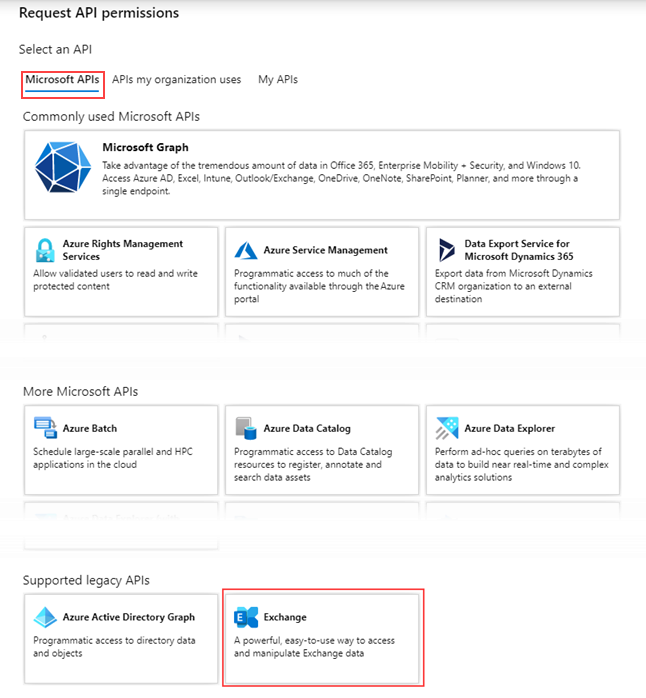
- In your AAD tenant, click API permissions under the Manage menu for your app then click Add a permission.
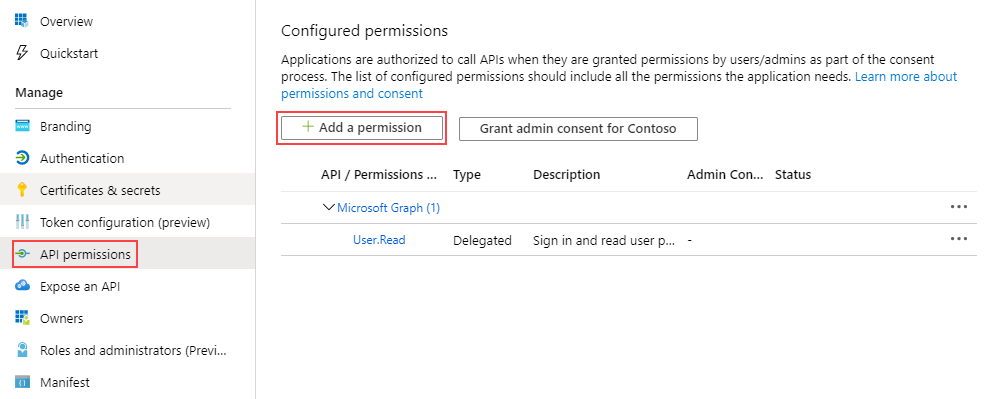
- Click Microsoft APIs and then select Office 365 Exchange Online.
Check the following permission in the Delegated Permissions section:
EWS.AccessAsUser.All (Access mailboxes as the signed-in user via Exchange Web Services)
- Grant admin consent on behalf of all users in the directory by clicking the Grant admin consent for <directory name> button and then the Yes button on the query.
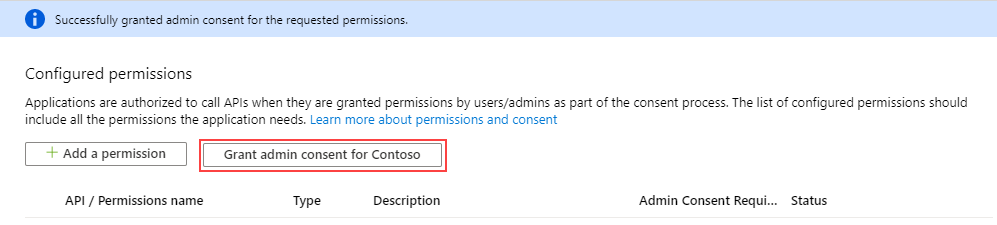
You see admin consent is granted for the new permissions.
- In your AAD tenant, click API permissions under the Manage menu for your app then click Add a permission.
- In your AAD tenant, click Overview for your app and then click Endpoints.
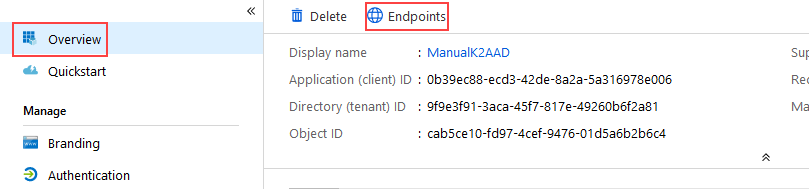
Copy and save the URLs for later use. You need the following items:- Federation metadata document URL
- OAuth 2.0 token endpoint URL
- OAuth 2.0 authorization endpoint URL
- WS-Federation sign-on endpoint
This ends your AAD app configuration. You should have the following items for configuring K2:- Application ID / Client ID. You can get it from the Overview blade. Used as all values of client_id OAuth resource property in K2.
- Client secret. Used in all values of client_secret OAuth resource property in K2.
- Federation metadata document URL. Copy it from Overview > Endpoints page.
- OAuth 2.0 authorization endpoint (v1). Copy it from Overview> Endpoints page. Used when adding a New OAuth Resource in K2.
- OAuth 2.0 token endpoint (v1) URL. Copy it from Overview> Endpoints page. Used when adding New OAuth Resource in K2.
- Directory ID / Tenant ID. GUID part which can be found in the above-mentioned endpoint URLs, or on the Overview blade. Used as token value of entity_id OAuth resource property in K2.
- Thumbprint. Copied from the uploaded certificate on the Certificates & secrets blade.
- Find and record your Directory ID/Tenant ID.
- Register an OAuth resource in K2. See the section below for details.
Registering the OAuth resource in K2
After you've configured an app in AAD, set up an OAuth resource in K2 to request authorization tokens from AAD. Remember that your Tenant ID is the GUID portion of your copied URLs.
- Open the K2 Management site and on the dashboard click the View OAuth Settings link, or expand the Authentication > OAuth > Resources nodes, and then do the following:
- Under Resources click New.
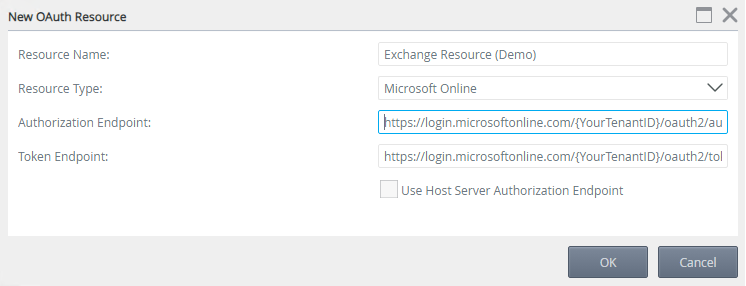
- Enter a Resource Name.
- Select Microsoft Online for the Resource Type. For information on creating resource types see the topic Resource Types in the User Guide.
- Enter the Authorization Endpoint, without the query string parameters, from the AAD App you created earlier (Example: https://login.microsoftonline.com/{YourTenantID}/oauth2/authorize).
- Enter the Token Endpoint, without the query string parameters, from the AAD App you created earlier (Example: https://login.microsoftonline.com/{YourTenantID}/oauth2/token).
- Leave the Use Host Server Authorization Endpoint check box unchecked and click OK.
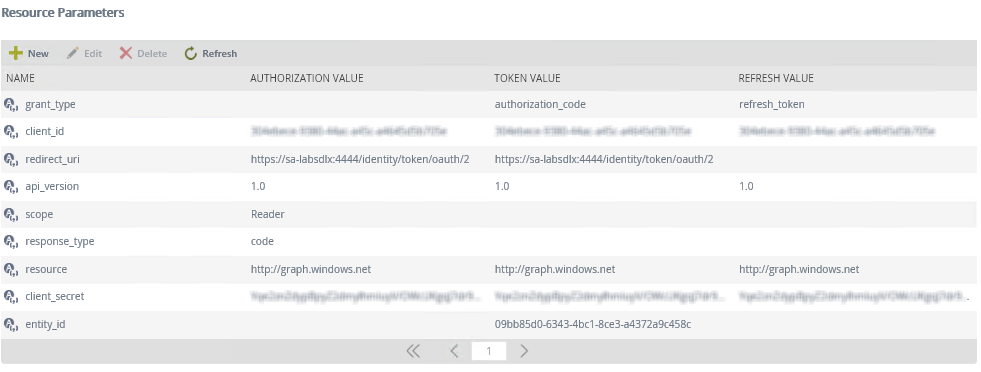
- Select the resource from the Resources list and you'll see the Resource Parameters section update. Follow these steps using the Resource Parameters section:
- Select resource from the Resource Parameters list and click Edit. Enter https://outlook.office365.com for the Authorization Value, the Token Value, and the Refresh Value and click OK.
- Select redirect_uri from the Resource Parameters list and click Edit. Enter https://{YourK2Server}/identity/token/oauth/2 for the Authorization Value and the Token Value and click OK (replace {YourK2Server} with the server name or host header value to your K2 site).
- Select client_id from the Resource Parameters list and click Edit. Enter the Application ID from the Azure app you created earlier for the Authorization Value, the Token Value and the Refresh Value and click OK.
- Select response_type from the Resource Parameters list and click Edit. Enter code for the Authorization Value and click OK.
- Select entity_id from the Resource Parameters list and click Edit. Enter your Tenant ID (the GUID in your endpoints) in the Token Value and click OK.
- Select grant_type from the Resource Parameters list and click Edit. Enter authorization_code in the Token Value and refresh_token in the Refresh Value, and click OK.
- Make sure all three of the api_version values are blank.
- Make sure all three of the scope values are blank.
- Select client_secret from the Resource Parameters list and click Edit. Enter the Client Secret from the Azure app you created earlier for the Authorization Value, the Token Value, and the Refresh Value, and click OK.
- Open the K2 Management site and on the dashboard click the View OAuth Settings link, or expand the Authentication > OAuth > Resources nodes, and then do the following:
- Use the K2 Connection String Editor tool to configure the EWS connection string. See the section below for details.
Using the K2 Connection String Editor
Applying the Fix Pack updates the K2 connection string editor to support connection stings that use OAuth instead of Basic authentication. Follow these steps to configure connection strings for Exchange destination and connection:
- Open the connection string editor at [K2 installation path]\Host Server\Bin\ConnectionStringEditor.exe.
- Remove SMTP connection entries by selecting them each and clicking the Remove Connection String button.
Removing the existing SMTP entries is only required if you have non-operational SMTP connections listed, for example because the K2 installer required you to enter an SMTP connection during setup. If you have currently-operational SMTP connection strings listed, you do not need to delete the SMTP connection strings - just add the EWS connection as described in the next step.
- Edit the connection strings for all Exchange Web Services Connection and Exchange Web Service Destination entries.
- Enter the following values for the connection properties. The ConnectionString property in the Data section builds automatically as you enter the values.
Property Value Behavior Poll Interval Leave blank Connection Autodiscover True Delegate Leave blank OAuth Resource The OAuth Resource property value is the OAuth Resource Name for your Exchange Online integration in K2. Obtain this from K2 Management > Authentication > OAuth > Resources. For example, "Exchange - [your tenant URL]". OAuth Resource Audience The OAuth Resource Audience property is the URL for Exchange online: https://outlook.office365.com Password * Leave blank URL The EWS URL: https://outlook.office365.com/EWS/Exchange.asmx User ID The email address used during the K2 setup; usually the K2 Service account email, for example: k2service@M365x123456.onmicrosoft.com Data ConnectionString Automatically generated based on the values you enter. * If the Exchange connection and destination password property is empty, K2 tries to retrieve the OAuth token using the OAuth Resource and OAuth Resource Audience property values. These property values are the same as those in your K2 OAuth resource for Exchange Online. If there is any value in the password field, K2 reverts to Basic authentication when connecting to EWS which causes authentication errors.
- Restart the K2 Server service after editing your EWS connections.
- Verify the changes in K2 Management and the K2HostServer.exe.config file. See the section below for details.
Verifying the changes- Use K2 Management Site to verify that your K2 Service email address is set for the From Address in the Environment Library variables and in the Workflow Server > String Table variable. You access these properties in K2 Management as shown below:
-

- Use the K2 Management Site to verify that the OAuth Resource you configured as described in Register an OAuth Resource in K2 is set correctly.
- In the K2HostServer.exe.config file located at [K2 installation path]\Host Server\Bin\K2HostServer.exe.config, check that the system self tag is correct. The value specified must be the fully qualified name (FQN) of the user that has the SmartActions Inbox email address as email property.
- Still within the K2HostServer.exe.config file, search for the sendmailfrom property and check that the value is the Azure admin email address.

- Still within the K2HostServer.exe.config file and if you are using SmartActions, check these properties: enableListeners="true" and "SmartActions\EWS" as in the image.

To cache the OAuth token, you can run a browser as the K2 Service account and then in K2 Management, register a new Service Instance. Any of the Exchange Service Types are recommended when registering the instance. You must use the OAuth Resource and OAuth Resource Audience described earlier in this article to generate the token. You'll be prompted to log in with admin credentials. When successful, the token will be cached.
The Service Instance you create is a 'dummy' instance (the process of registering the instance includes caching the token) it will not work, and report an error that you can ignore. You should delete the 'dummy' instance, if it exists, after the token is cached.