


A proxy server handles client HTTP requests for resources. A proxy can return a requested resource from its cache or forward the request to the server where the resource resides. Proxies can improve network performance by reducing the number of requests sent to remote servers. They can also be used to restrict access to resources or to provide access to the internet in cases where the system does not have direct access to the internet.
Additional configuration is required to make Nintex Gateway operate correctly when there is a proxy server used. Nintex Gateway is a .NET application and uses both .NET Framework and .NET Core. They have two different proxy configurations, so you must configure your proxy settings for both.
.NET Framework
You can follow the standard system proxy configuration or work with the Nintex Gateway configuration file to configure a proxy.
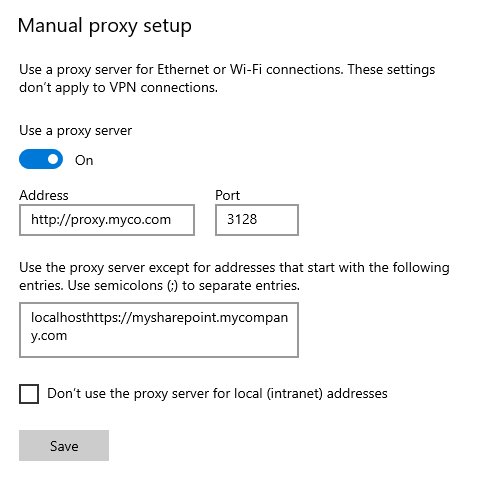
The standard system proxy configuration is found in the Proxy tab of your Network and Internet system settings. This sets the .NET Framework proxy for all .NET apps. You can manually set the proxy and add an exclusion list.
If you need to set the proxy just for Nintex Gateway, navigate to your OnPremises.Gateway.ConfigurationApp.exe.config file (typically located in C:Program Files (x86)NintexNintex GatewayConfiguration App) and add a <defaultProxy> section specifying the details of your proxy.
For example:
<system.net>
<defaultProxy>
<proxy proxyaddress="http://proxy.mycompany.com:3128"
bypassonlocal="True"
/>
<bypasslist>
<add address="https://mysharepoint.mycompany.com" />
</bypasslist>
</defaultProxy>
</system.net>
For more information about configuring the proxy for your .NET Framework using a configuration file see https://docs.microsoft.com/en-us/dotnet/framework/network-programming/proxy-configuration.
.NET Core
This sets the proxy for the windows service. For your .NET Core proxy configuration, you set the system environment variables all_proxy and no_proxy. The all_proxy variable points to the proxy, allowing external internet traffic through that proxy. The no_proxy variable lists web sites within your intranet that do not go through the proxy.
To configure the all_proxy system variable:
- Navigate to Control Panel > System and Security > System > Advanced System Settings (in Windows Explorer click This PC > Properties > Advanced System Settings).

- Click on the Environment Variables… button.
- If the variable does not exist, click New.
- In the Variable name text box enter all_proxy.
- In the Variable value text box enter the location of your proxy and port number, for example http://proxy.mycompany.com:3128 or http://username.password@proxy.mycompany.com:3128
- Click OK to save the variable.
- You must reboot the computer after creating or modifying a system variable.
If your proxy is configured on the edge of your intranet, with no internal websites, you just need to create the all_proxy variable. If you have local websites that are not accessible when using the proxy, you can create and configure the no_proxy system variable to list those sites that should not use the proxy. This is an exclusion list.
To configure the no_proxy variable:
- Navigate to Control Panel > System and Security > System > Advanced System Settings (in Windows Explorer click This PC > Properties > Advanced System Settings).
- Click on the Environment Variables… button.
- If the variable does not exist, click New.
- In the Variable name text box enter no_proxy.
- In the Variable value text box enter the location of your local web sites, for example localhost,https://mysharepoint.mycompany.com.
- Use comma-separated hostname:port values.
- IP addresses are okay, but hostnames are never resolved.
- Suffixes are always matched (example.com will match test.example.com).
- If top-level domains need to be matched, avoid using a leading dot (.).
- Click OK to save the variable.
- You must reboot the computer after creating or modifying a system variable.