


Uploading Files to Azure Blob Storage via Azure Function from Nintex Workflows
While our awesome product team is working on a native capability to upload a file into Nintex Data. In some business automation scenarios, you may need to store files from into Azure Blob Storage. This article explains how to achieve that using an Azure Function with an HTTP trigger and calling it from Nintex as an external web service.
Solution Overview
We will:
- Create an Azure Function App with an HTTP trigger to receive a Base64-encoded file and store it in Azure Blob Storage.
- From Nintex, call this function as a web service, passing the filename, base64 and content.
- The Azure Function will return a SAS URI (secure access link) of the uploaded file.
Prerequisites
Before proceeding, ensure the following are in place:
- An Azure Subscription – with access to:
- Azure Blob Storage (Storage Account):
This is where all the files will be uploaded.
Steps:
- Go to the Azure Portal.
- Search for “Storage accounts” and click + Create.
- Fill in the fields:
- Subscription: Choose your subscription.
- Resource group: Create a new one or use existing.
- Storage account name: Must be globally unique (e.g., mystorage123).
- Region: Choose a region close to your users.
- Performance / Redundancy: Keep defaults for now.
- Click Review + Create → then Create.
- After deployment:
Go to your storage account → Containers
- Click + Container
- Name <Give your preferred name>
- Set Public access level to Private → Click Create
- Azure Functions
This is where we host the custom logic like decoding base64 and uploading to Blob.
Steps:
- Go to Azure Portal → search for Function App → click + Create.
- Fill in:
- App name
- Runtime stack: .NET (This code is on 8)
- Region: Same as your storage account
- Storage account: Use the one created above
- Click Review + Create → then Create.
Now we need to set the function App with an HTTP trigger. For that
- Go to your Function App → Functions → Click + Add
- Choose:
- Template: HTTP trigger
- Function name: “Name of your choice”
- Authorization level: Function
- Click Create
- Azure Storage Account
- A blob container (you can create this in the script)
- Toolkit for NWC:
- Can be downloaded from gallery. This will be used to convert a file to base64.
Azure Function App
Note:
The code shared below excludes sensitive values like Storage Account Name and Key. Instead, we will read these from Azure Function configuration settings (local.settings.json or environment variables in Azure).
Azure Function Code
using System.Net;
using System.Text.Json;
using Azure.Storage;
using Azure.Storage.Blobs;
using Azure.Storage.Sas;
using Microsoft.Azure.Functions.Worker;
using Microsoft.Azure.Functions.Worker.Http;
using Microsoft.Extensions.Configuration;
public class UploadToBlob
{
private readonly IConfiguration _config;
public UploadToBlob(IConfiguration config)
{
_config = config;
}
[Function("UploadToBlob")]
public async Task<HttpResponseData> Run(
[HttpTrigger(AuthorizationLevel.Function, "post")] HttpRequestData req)
{
var requestBody = await new StreamReader(req.Body).ReadToEndAsync();
var data = JsonSerializer.Deserialize<UploadRequest>(requestBody);
if (data == null || string.IsNullOrEmpty(data.Base64) || string.IsNullOrEmpty(data.FileName))
{
var badRes = req.CreateResponse(HttpStatusCode.BadRequest);
await badRes.WriteStringAsync("Missing base64 or fileName");
return badRes;
}
string containerName = _config["ContainerName"];
string accountName = _config["StorageAccountName"];
string accountKey = _config["StorageAccountKey"];
if (string.IsNullOrEmpty(accountName) || string.IsNullOrEmpty(accountKey))
{
var errorRes = req.CreateResponse(HttpStatusCode.InternalServerError);
await errorRes.WriteStringAsync("Storage account credentials are not configured.");
return errorRes;
}
var blobUri = new Uri($"https://{accountName}.blob.core.windows.net");
var credential = new StorageSharedKeyCredential(accountName, accountKey);
var blobServiceClient = new BlobServiceClient(blobUri, credential);
var containerClient = blobServiceClient.GetBlobContainerClient(containerName);
await containerClient.CreateIfNotExistsAsync();
var blobClient = containerClient.GetBlobClient(data.FileName);
var fileBytes = Convert.FromBase64String(data.Base64);
using var stream = new MemoryStream(fileBytes);
await blobClient.UploadAsync(stream, overwrite: true);
var sasUri = GenerateSasUri(blobClient);
var response = req.CreateResponse(HttpStatusCode.OK);
await response.WriteStringAsync($"{sasUri}");
return response;
}
private Uri GenerateSasUri(BlobClient blobClient)
{
return blobClient.GenerateSasUri(
BlobSasPermissions.Read,
DateTimeOffset.UtcNow.AddHours(1)
);
}
}
public class UploadRequest
{
public string FileName { get; set; }
public string Base64 { get; set; }
public string ContentType { get; set; }
}
Change App Settings (local.settings.json)
{
"IsEncrypted": false,
"Values": {
"AzureWebJobsStorage": "",
"FUNCTIONS_WORKER_RUNTIME": "dotnet-isolated",
"ContainerName": "your-container-name",
"StorageAccountName": "your-storage-account-name",
"StorageAccountKey": "your-storage-account-key"
}
}
Replace the placeholders with your actual Azure Storage details.
Nintex Workflow Settings
Two key actions that we will be doing in Nintex Workflows:
- Converting attachments to Base64 files.
- Calling Azure function App to upload the documents into Azure Blob
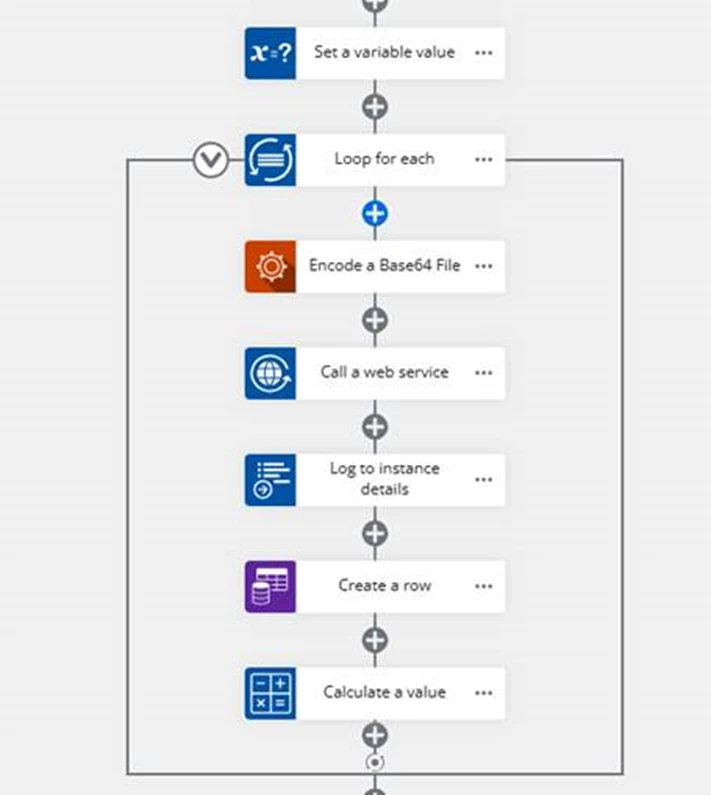
- Run a loop to go through all the attachments uploaded in the form.
- Call Encode a Base64 File to convert attachment into Base64.
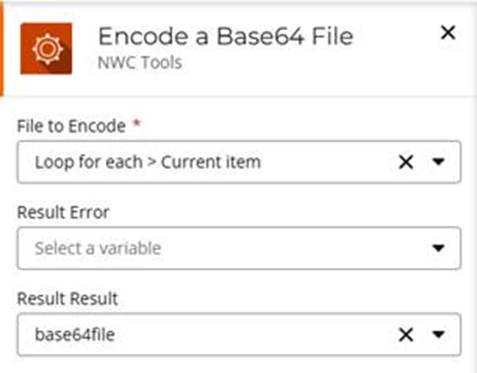
- Once the file is converted to Base64
- Call a web service action.
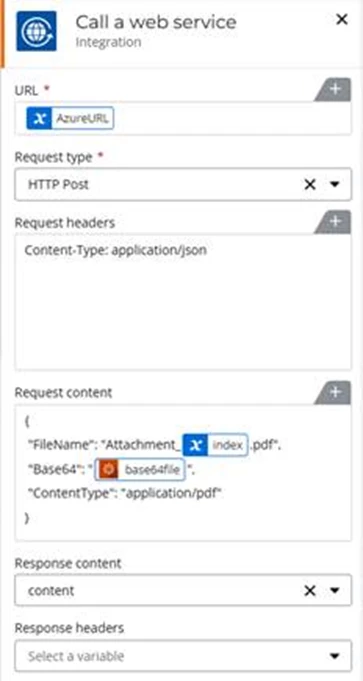
Use the Call a web service in Nintex to call this Azure Function:
- Request type: HTTP POST
- URL: Your Azure Function URL
- Request headers:
- Content-Type: application/json
- Request content:
{
" FileName": "<<Name of the attachment>>",
" Base64": "<your-base64-content>",
" ContentType": "<<Content Type>>"
}
- Response
In this example function returns a URL with a SAS token. But this can change based on your requirement.
Here's a video of the solution in action -
Thank you.