Introduction
Not a lot of people know about Nintex RPA’s great interaction with SAP, so I thought I would create a blog about it and explain exactly how easy it is to get started. If you’re familiar with Nintex RPA (formerly Foxtrot RPA), then you should know by now that our goal has always been to make things as easy as possible for anyone to get in and start automating their tasks. This is no different when working with SAP, and as usual the main tool is the drag-and-drop selector to build all of your SAP actions.
Setup within SAP
Before getting started, it is important to enable scripting access within your SAP client. Without changing these settings, Nintex RPA will not be able to interact in the best way possible.
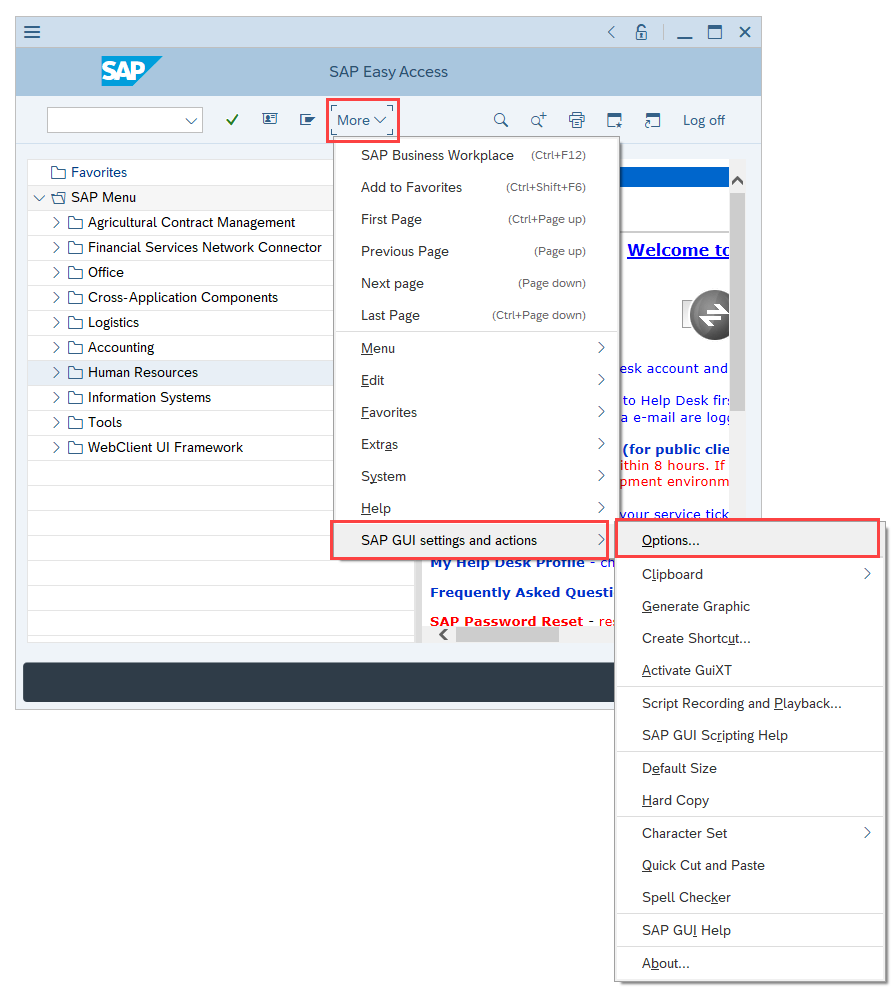
After logging in, find the Options menu.
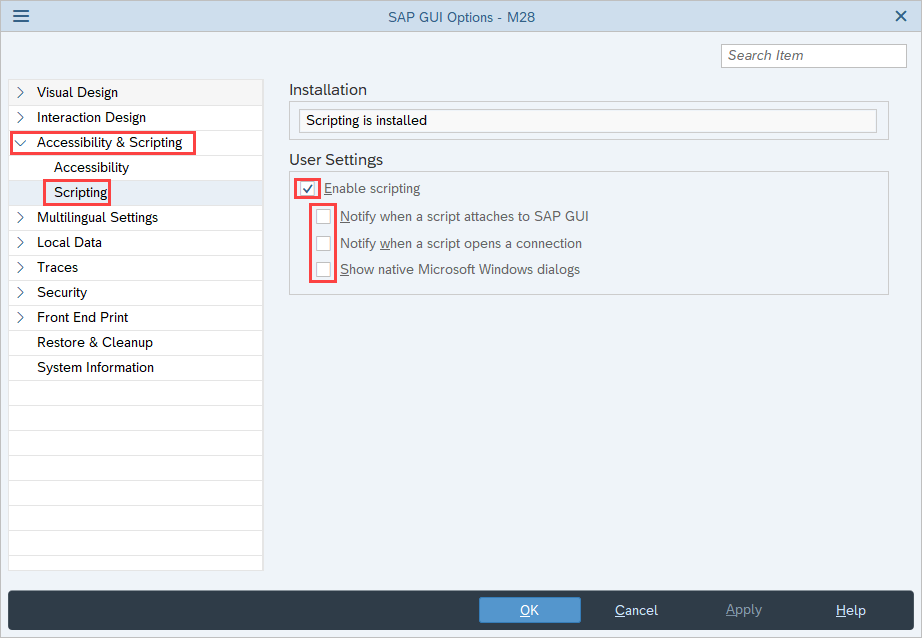
 From there, choose “Accessibility & Scripting” then “Scripting”. Check the box to enable scripting, and make sure the others below that option are unchecked.

And that’s it! There is no other setup needed within SAP or within Nintex RPA. No special connectors to setup, no plugins needed, and no connections within Nintex RPA to worry about.
Interacting with SAP
Now that SAP is setup for automation, we can start creating our botflow. I am trying to automate is customer address updates. Each day I receive an Excel sheet with a list of customers, their customer ID and their new address. I will broadly cover the few actions needed perform this task, and use them to do the initial search for our customer record. From there, it is just a matter of using those same actions to do the update in each field.
General Interactions
Starting with the most important part: automating SAP with Nintex RPA is the same experience as automating any other system. Everything can be done with our drag-and-drop selector/bullseye tool. See this quick video for reference:
You’ll notice that Nintex RPA is ‘boxing in’ specific fields and buttons on the SAP screen. This makes it really easy to identify what you’re interacting with and will be reliable since we’re using object based targeting rather than coordinate or pixel based. What this means, essentially, is that Nintex RPA knows everything going on behind the scenes to reliably find the target the next time around, rather than relying on the coordinate of that control on the screen. So if that control moves around or is a different size next week, Nintex RPA will still be able to find it on the screen.
Creating a Send Value Action
One of the main actions you’ll use when automating against SAP is Nintex RPA’s Send Value action. If I had to guess I would say that this is the most widely used action, in general.
To make a Send Value action, just target the field you wish to interact with. In this case, I’ve dropped the selector over the ‘Customer’ field on this lookup screen. After Nintex RPA pops back up, choose Send Value from the list to begin configuring it. Enter the value you wish to send, whether it is a hard-coded value or being driven by a variable or data and choose your options as you see fit.
One thing I do want to highlight on this action is the Bypass the keyboard option. This option has only ever been available when interacting with Internet Explorer before. Since it is also available in SAP, I really suggest using it. With this option enabled, Nintex RPA will skip trying to emulate keystrokes in the field and instead will just drop the value in. This will speed up the action & increases reliability. Just a reminder that you can configure your Preferences to have this option enabled by default.
Creating a Click Action
To make a Click action, just target the button you want to click on. In this case, I’ve dropped the selector onto the ‘Enter’ button that looks like a checkmark. After Nintex RPA appears again, choose Click from the list of actions to configure it. Again, you’ll see an option to Bypass the mouse for a faster click. Similar to the Send Value action, choosing this option will be faster and more reliable since it will not need to move the mouse to do the click.
Creating a Get Value Action
Creating a Get Value action is very similar to creating a Send Value action.
The difference being you are specifying which Variable or Data Field to save the value to, rather than choosing what you’re sending. In this case, I’ve creating a Variable on the fly to temporarily store the value from the field I’ve targeted.
Wrap Up
If you’re familiar with Nintex RPA, you’ll see that this is all par for the course! There is nothing different when interacting with SAP compared to interacting with another application. For those unfamiliar with Nintex RPA, variations of these 3 actions I’ve highlighted will be kind of a “backbone” for most processes in any system.
There are of course, many more actions that are available to be used (nearly 400 as of this writing), but as you can imagine it would get quite lengthy to go over each one-by-one. So, for now, I’ll just leave it at the three most widely used.
The final product for my initial process will look something like this:
As you can see, the bulk of the actions are just iterations of Send Value, Click and Get Value. There are a couple of If actions and some other actions in order to make the video look nice, but they aren’t strictly required to accomplish this task ?
As always, I look forward to hearing any comments or questions about what I’ve written! If you enjoyed, don’t hesitate to leave a Kudos and share with your friends ? Thanks for reading.
- John


