


This month, we’re highlighting a feature that, will save you a staggering amount of time and project hours. The document replacement feature is essential for anyone creating eSignature templates for their documents prior to being sent for signature. If you have business processes involving lengthy form packets and multiple forms—or, perhaps, shorter documents prone to minor changes periodically—you will see the greatest level of benefit.
What is the new document replacement feature?
If you’ve ever used eSignature to digitally transform your business’s forms or documents, you may be familiar with where our inspiration for the document replacement tool originated from. Replacing a template’s document can potentially save weeks (or months) of otherwise wasted time or effort, you must understand the role that layers play when digitizing documents for eSignature…
“When users begin ‘creating’ a document for eSignature, they’re actually creating a separate layer on top of the document(s) they’ve uploaded. This layer is referred to as the document’s template. It’s on the template that AssureSign users create, drag, and drop field inputs—otherwise known as jotblocks—in areas where the underlying form solicits information or a signature.”
-Mario Manderachia, Senior Developer
For example, let’s say you need to create an eSignature template for your business’s 63-page loan application packet. Then, three months after your team completes the lengthy template, your business must revise and replace the packet due to a small typo. That minor misprint could mean weeks of wasted work on behalf of you and your team…
Thankfully, AssureSign’s document replacement feature allows users to swap out initial documents and forms, preventing small changes from ravaging your existing templates.
Replace a Template’s Underlying Document with These 5 Steps:
1. Login to your AssureSign web portal and click “VIEW TEMPLATES (SIMPLE SETUP)” from the portal’s main left navigation.
This takes you to your master view of all the templates within your AssureSign account (or sub-account). Once you’ve located the template with the underlying document you’re swapping…
2. Click the “EDIT” link on the desired template’s far righthand side.
Once your template and its underlying document(s) are finished loading…

3. Navigate to the icon menu on the left and click the “Document Manager” icon (first icon at the top).
Once the “Document Manager menu appears, the template’s underlying document(s) should be visibly listed. To replace one or more of the template’s underlying documents…
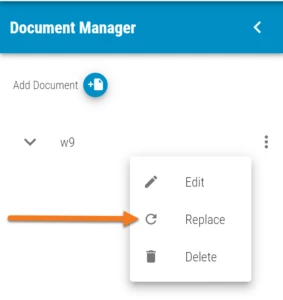
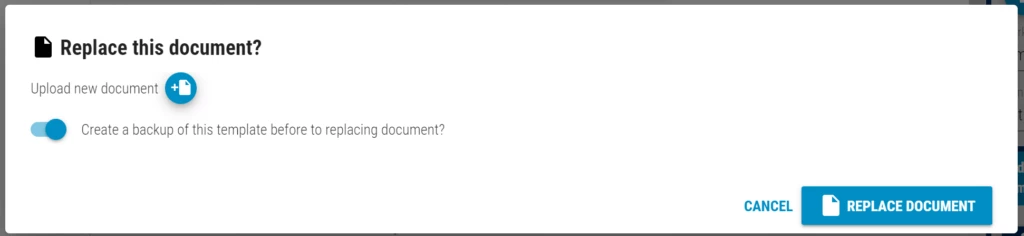
4. Click the vertical ellipses beside the original document(s) and select “Replace.” Locate your new document in the file explorer and open the document.
We always recommend activating the “Create a backup of this template…” option. This will effectively create a backup of your unchanged template.
5. Once the desired underlying document(s) have been replaced, adjust your existing jotblocks and document elements to properly fit the newly uploaded document.
Once finished, you can send the forms for signature immediately or save the template to use at a later date.