How to use the Deploy Package
KB000188
PRODUCTK2 blackpearl
TAGSK2 Designer for Visual Studio
LEGACY/ARCHIVED CONTENT
This article has been archived, and/or refers to legacy products, components or features. The content in this article is offered "as is" and will no longer be updated. Archived content is provided for reference purposes only. This content does not infer that the product, component or feature is supported, or that the product, component or feature will continue to function as described herein.
Introduction |
| Best practices in business application development requires that a solution be developed in a development environment, tested in a test environment, and once approved, deployed in a production environment. Because there are different environments involved, and because many organizations progressively lock down permissions through the process (i.e., developers have full control in the development environment, less control in the test environment, and may not have access at all to production), the deployment tools have been integrated into the build process to enable deployment to different environments. |
About the Deployment PackageTo facilitate transferring the process between environments the K2 Deployment Package is used. A deployment package is created when the project is successfully built with no errors. The package is copied and relocated to the target environment (e.g. Test or Production). When available in the environment, the MSBUILD utility from Microsoft is used to deploy the process in the new environment. In summary, the Deployment Package is used successfully in the two steps described below: Step 1: Build the process and create the deployment packageThe K2 blackpearl business application is developed in the development environment. Quality Assurance and Testing is performed in this environment as well. Once complete, the process is built and deployed to the development environment. This ‘final’ version of the process is then available as the Deployment Package. 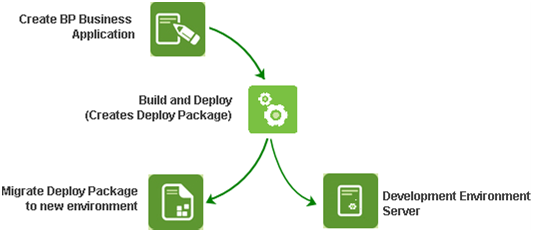 [Figure 1. Development process] Step 2: Using the deploy package in another environment
| ||||||||||||||||||||||||||||||||
| Once the deployment package is copied to the new environment, the MSBUILD application is used to perform the deployment task. This command line application will enable the developer to test all the environmental variables and resources to ensure that the business application will function once deployed. When the environment has been verified as compatible with the business application, it is then deployed to the K2 Server for use. 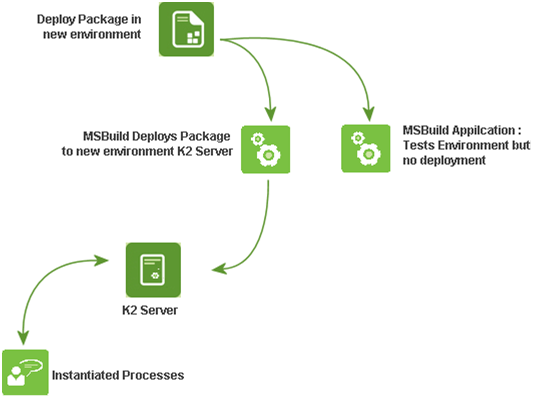 [Figure 2. Deployment process] From K2 Process to Deployment PackageThe Create Deploy Package option is available from the Solution Explorer in the K2 Designer for Visual Studio. Once the development cycle for a process is complete (i.e., the process has been built and tested appropriately), the deploy package is created. This is done by performing the following steps in the K2 Designer for Visual Studio:
What is a Deploy Package?The deploy package is a collection of files which the MSBUILD application will use to deploy the process in the new environment.
| ||||||||||||||||||||||||||||||||
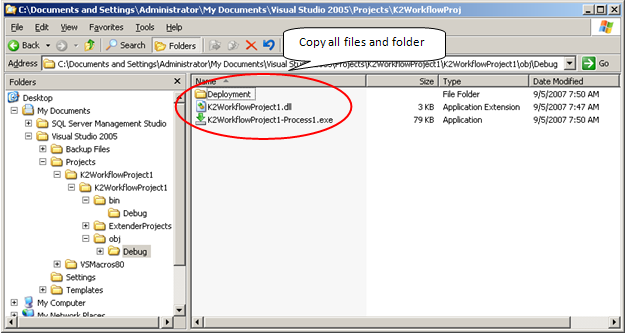
These files and resources can be seen in the figure below:
[Figure 3. Deployment Package files] Additional files, including the MSBUILD file, are located in the deployment folder: 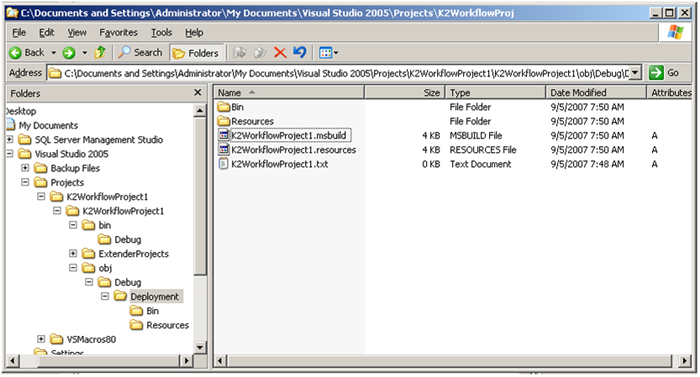 [Figure 4. Additional files located in the Deployment folder] To move the Deployment Package, all files in the object folder and sub directories (as shown in Figure 3) must be copied to the new environment. Working with the MSBUILD File The MSBUILD file includes a number of properties that can be set as necessary. Property Groups The property group tags are set and cleared using the command line application MSBUILD. The table below describes the property options.
The two properties that affect the deployment process are Deploy_Processes and TestOnly. The TestOnly property enables a mock deploy which essentially ‘tests’ the environment to ensure that all parameters are correct. Thereafter the Deploy_Processes option is set to true and the FULL process deployment takes place. | ||||||||||||||||||||||||||||||||
| ||||||||||||||||||||||||||||||||
| The below XML code sample shows the properties set for a deployment: <PropertyGroup> <Deploy_Processes>True</Deploy_Processes> <Create_Notifications>True</Create_Notifications> <Deploy_SmartObjects_And_Associations>True</Deploy_SmartObjects_And_Associations> <Create_Workflow_Smart_Objects>True</Create_Workflow_Smart_Objects> <Create_Workflow_Reporting_Smart_Objects>True</Create_Workflow_Reporting_Smart_Objects> </PropertyGroup> <PropertyGroup> <TestOnly>False</TestOnly> <Environment>Development</Environment> </PropertyGroup> Deployment Methodology
Using the MSBUILD ApplicationThe MSBUILD application is provided as a tool with the .NET 2.0 Framework. The .NET 2.0 Framework must be installed on the machine in order to use the deploy package.
As shown in Figure 5, the MSBUILD Application can be located using Windows Explorer, but cannot be run from there. 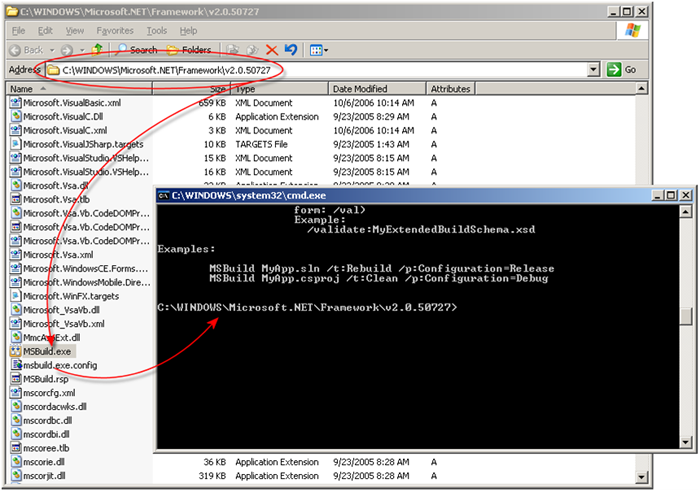 [Figure 5. The location of the MSBUILD utility]
To run the MSBUILD utility: 1. Open a command prompt (click on Start > Run and type in CMD and press ENTER) 2. At the prompt, type in cd WindowsMicrosoft.NETFrameworkV2.0.50727 and press ENTER 3. For help on using the application, type MSBUILD /? and press ENTER
Example: Using MSBUILD
The two examples below will assist in deploying the package to a new environment. For further assistance in using MSBUILD, please refer to the Microsoft Documentation. For the following examples, the following assumptions are made:
Testing the EnvironmentTo test the environment settings without deploying the package, use the TestOnly flag. Use the following syntax: MSBUILD [FileName] /p:TestOnly=True;Environment=[Environment] If no errors are reported by this command your environment is most likely suitable to deploy the package. You may now proceed to deploy the package. Deploying the PackageTo deploy the package, use the following syntax: MSBUILD [FileName] /p:Environment=[Environment] Sample SyntaxUsing our assumptions above, the following command could be used to test the deployment environment: MSBUILD “C:Visio ExpenseobjDebugDeploymentExpense Claims Process.msbuild” /p:TestOnly=True;Environment=Production To deploy using our assumptions above, the following command could be used: MSBUILD “C:Visio ExpenseobjDebugDeploymentExpense Claims Process.msbuild” /p:Environment=Production | ||||||||||||||||||||||||||||||||

