


Nintex DocGen for Salesforce provides flexible deployment options tailored to a variety of user types—from admins to developers to field reps. Whether you're looking for basic one-click document creation or advanced automated flows, there’s a method to match your organization’s needs.
Let’s explore the most popular ways to deploy DocGen for Salesforce.
Lightning Component
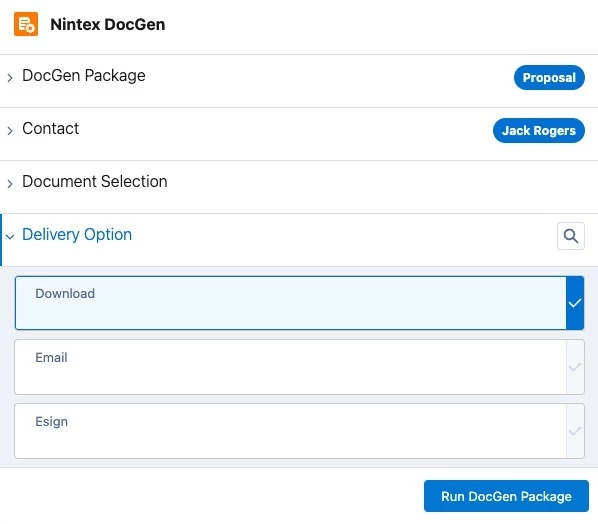
Add the DocGen Lightning Component to Salesforce Lightning record pages for a user-friendly, visual interface.
⚠️ Note: The Lightning Component is not customizable. It’s a great tool for basic document generation, but it has some limitations:
- It can’t select contacts unless they’re on the Account or Opportunity object.
- It doesn’t support filtering DocGen packages.
- It can’t bring in attachments from other objects besides the starting object.
- It is only supported for authenticated users.
- It doesn’t support Pause to Edit.
- It doesn’t support embedded signatures for DocuSign and Adobe Sign.
Setup overview
- Go to any Lightning record page and click Edit Page.
- Find and drag the DocGen component from the components toolbox.
- Users can initiate document generation directly from this embedded component.
Nintex Help - Lightning Component for DocGen for Salesforce
🔘 Basic Buttons
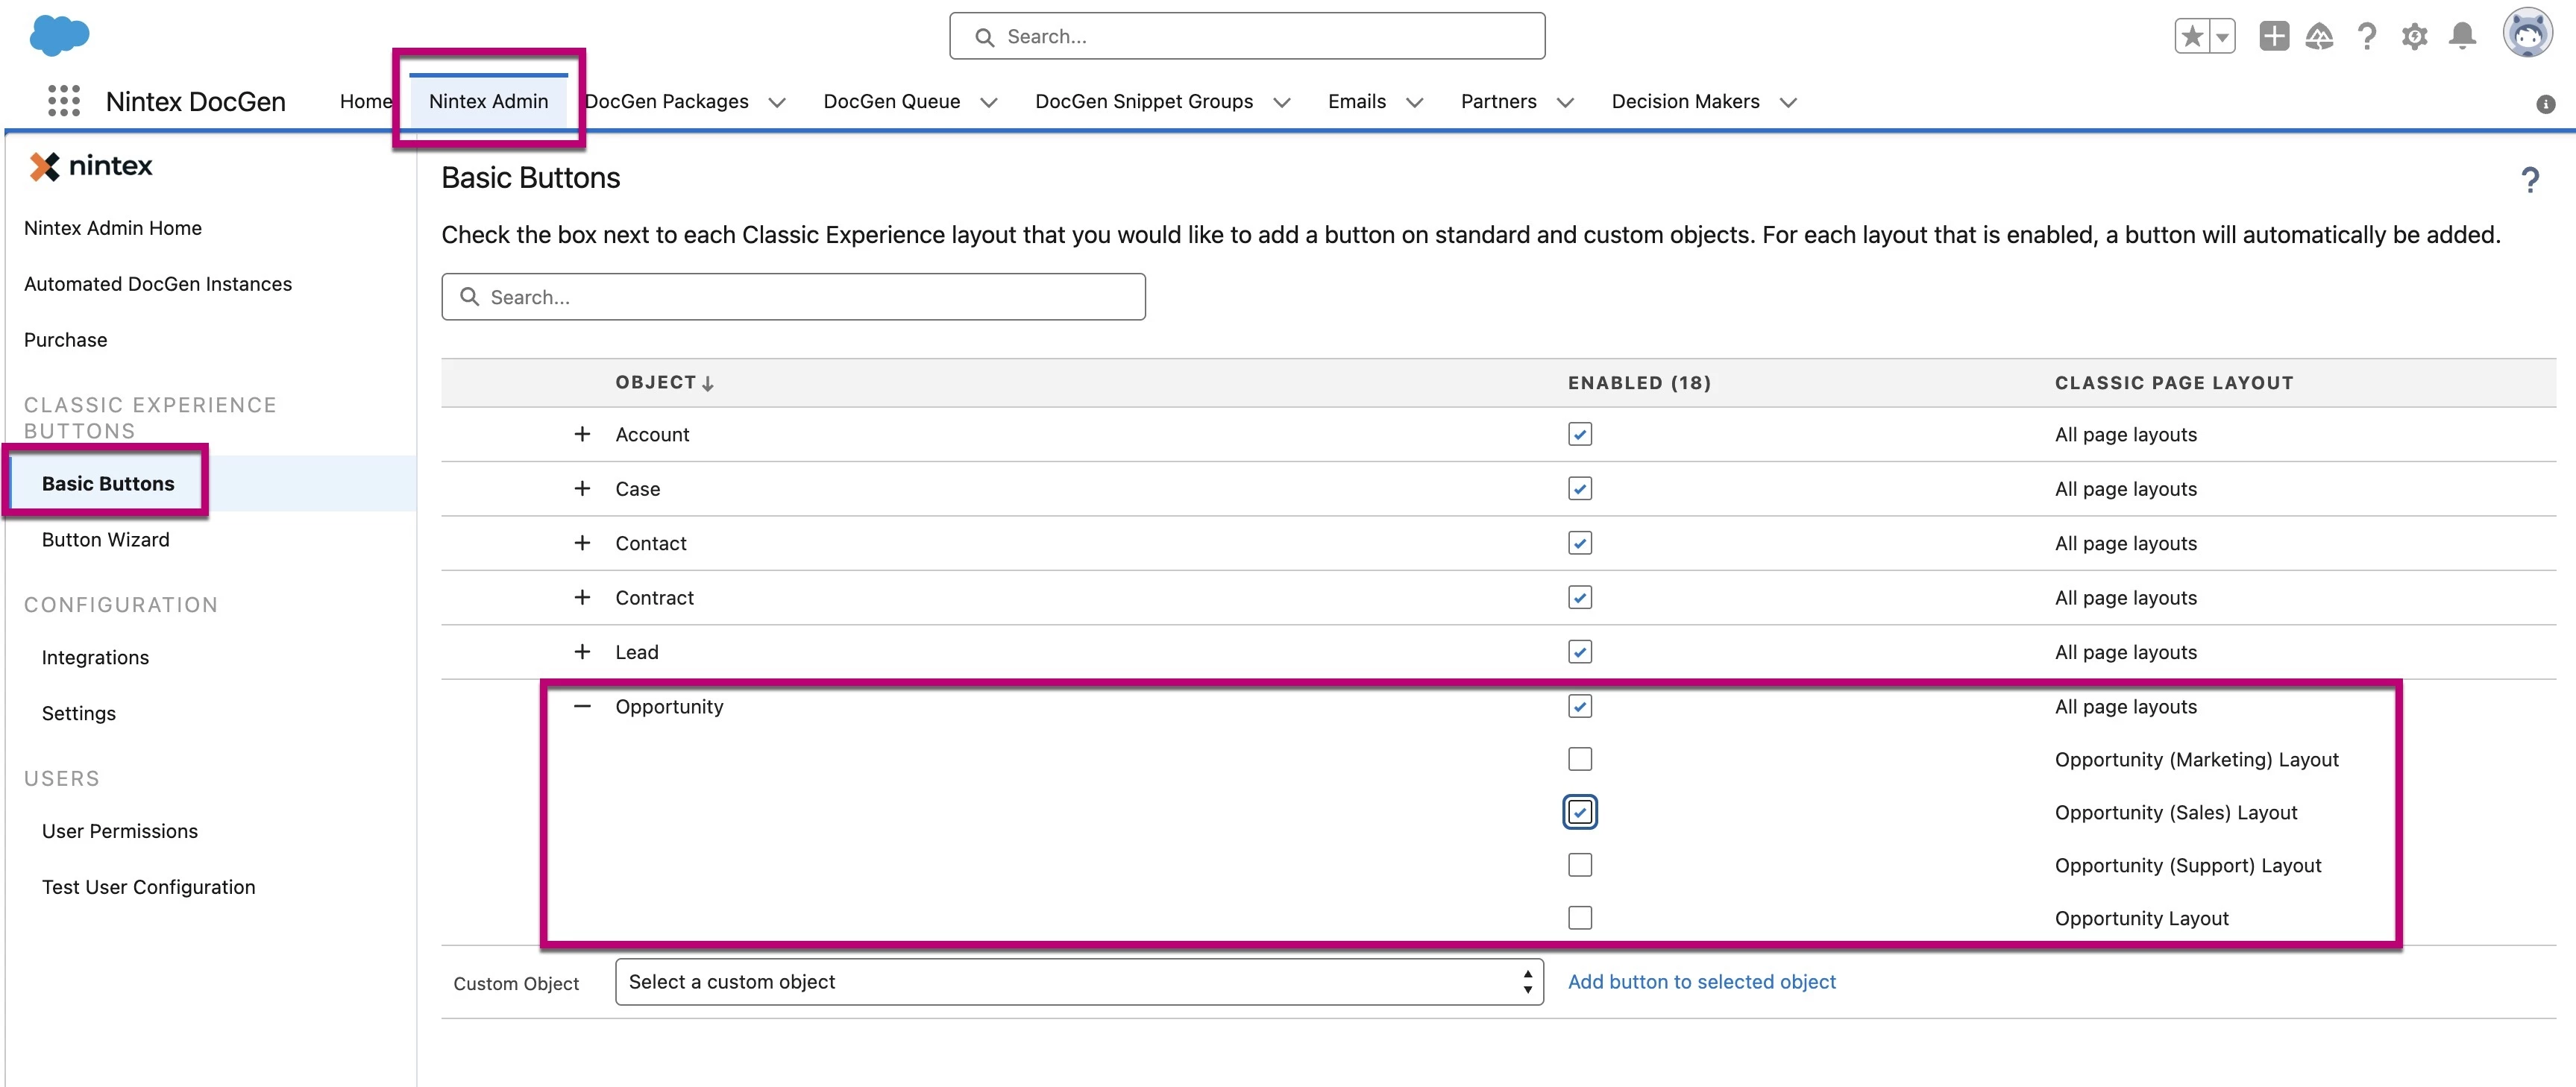
Create Basic Buttons in Salesforce to manually trigger document generation. These buttons can be added to the page layout like the Lightning Component.
Basic Buttons are ideal for:
- Teams that prefer simple click-to-generate workflows.
- Use cases where minimal customization is required.
Setup overview
Nintex Help - Add basic buttons to generate documents.
⚙️ Custom Buttons
Take things a step further with Custom Buttons that offer more control and automation options. Use the Button Wizard in Nintex Admin.
Custom Buttons:
- Support auto-run, which enables document generation without user interaction.
- Allow for filtering, so documents only generate under specific conditions.
- Use relationships from Other objects.
All Custom Buttons are configured in the Button Wizard. Since there are so many options, the following use case has been selected to demonstrate some of the possibilities.
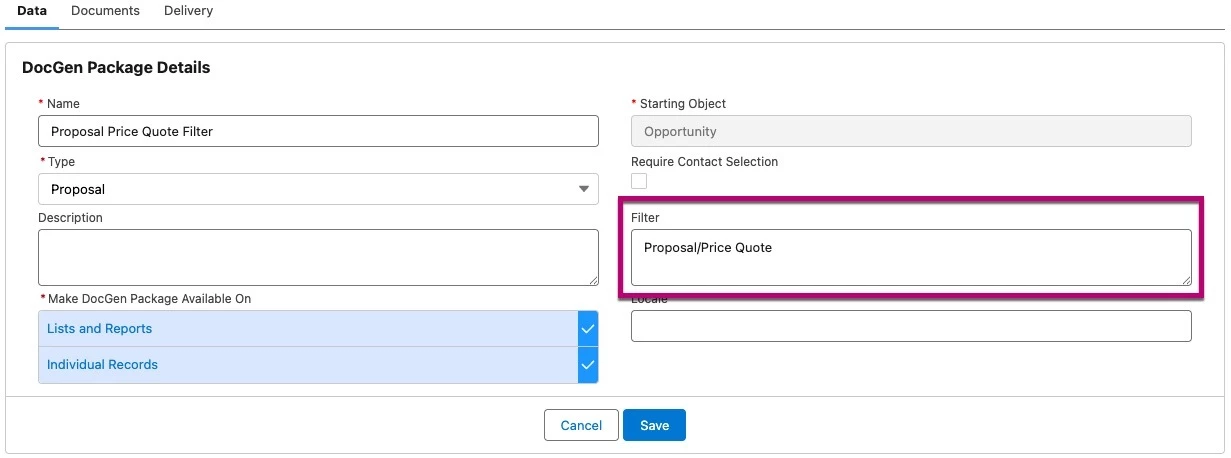
💡 Use Case: Filter DocGen packages by opportunity stage. For example, if the opportunity stage that an end user is working with is set to Proposal/Price Quote, only the packages with that specific filter value will appear when this button is selected.
Setup overview
Assign a filter on the DocGen package.
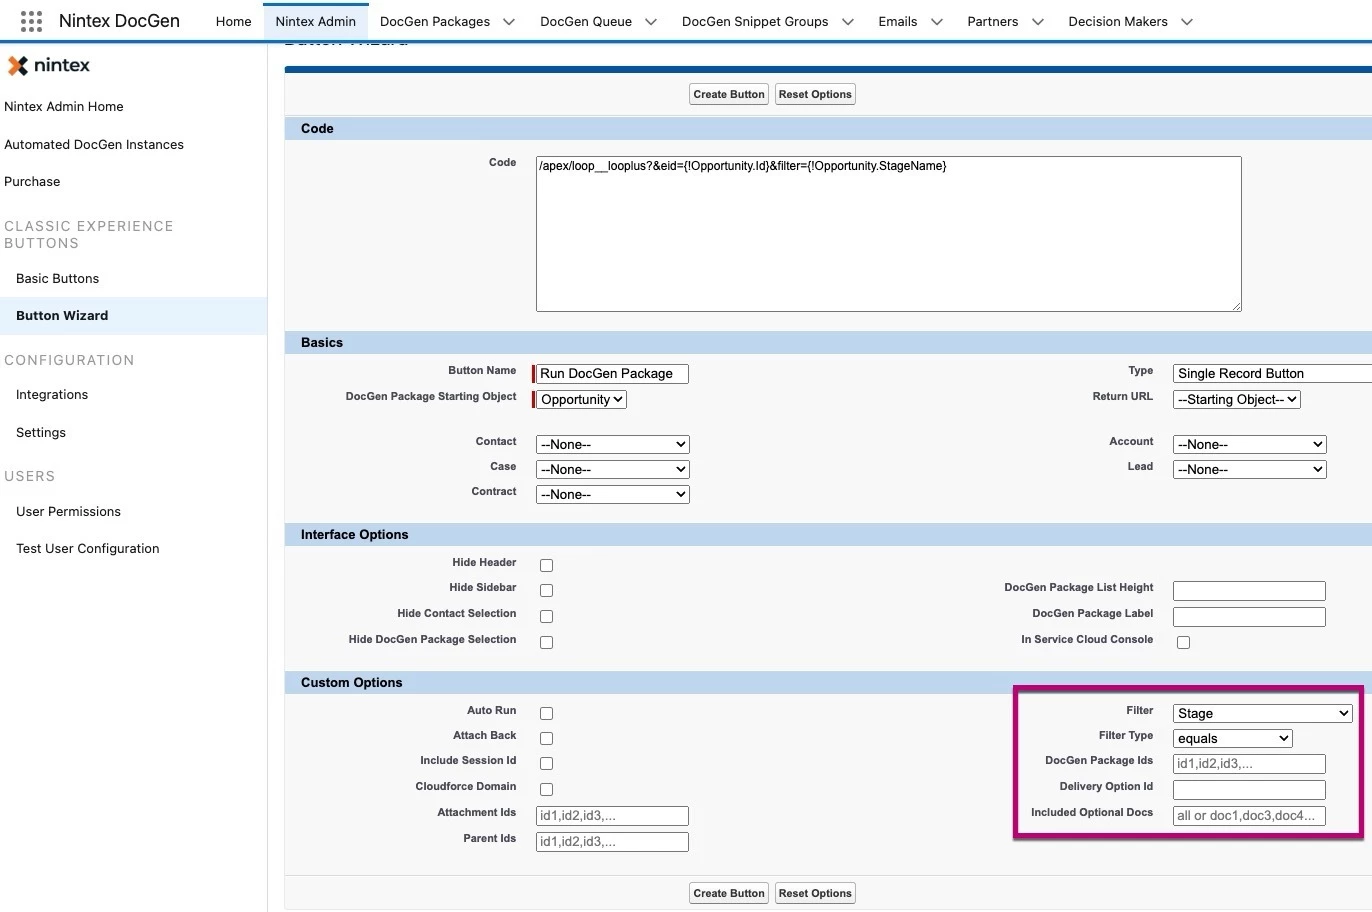
Next, choose the filter in the Button Wizard. This package will only run if the opportunity’s stage matches the package’s stage.
The Basic DocGen for Salesforce Learning Path covers this process in detail.
A detailed Community article is in the works!
Nintex Help - Configure buttons to generate documents
🔄 Flow Builder
Salesforce Flow Builder provides powerful tools to create flexible and intuitive document generation experiences. It can be built to look similar to the Lightning Component but has all of the flexibility that end users may need. Using the Flow Builder, there are three ways to deploy DocGen for Salesforce.
Option 1: Custom Screen Flows with the Preview DocGen Component
Use this option when:
- You need to create a guided, step-by-step experience for users.
- You need interactive document selection based on user input.
- You need to allow users to enter or update information (like terms and conditions, custom descriptions, ect.) before document generation.
Setup overview
Add the Preview DocGen component to a Screen element on a Screen Flow.
The DocGen Package and Delivery Option can then be defined.

For more detailed setup instructions, see Nintex Help: Use Nintex DocGen with Flow Builder
Option 2: Apex Action for Automated Document Generation
This option:
- Works with full automation with no user interaction required.
- Works in any flow type.
- Supports all delivery options except download.
Setup Overview
From the Flow Builder, add an Action.
From Actions search for DocGen and select Run DocGen Package.
Within the Action, the DocPackage ID, Delivery ID, and record ID can be defined.

Note: The DocGen package runs in the context of the user who triggers the flow. That user must have an active Nintex DocGen for Salesforce license.
Option 3: Salesforce Outbound message and Drawloop_next field
Run DocGen as a specific user using an older, yet supported, method still in use by some organizations.
Drawloop_Next Field Capabilities:
-
Supports complex logic and dynamic value merging using formulas or flow variables
-
Usable only within Record-Triggered Flows
Setup Overview
-
Create a custom Salesforce field named Drawloop_Next
-
Make the field a Formula type on the object the package will run from named Drawloop_Next
-
The formula needs to reference all of the fields that would be manually selected by a user: record Id, DocGen package Id, and a delivery Id.
-
Can be built static or with record variables that update the formula
-
Detailed instructions on formula guidelines can be found here.
-
-
Create an Outbound message and add the` Drawloop_Next field.
-
Set the endpoint URL to
https://api.docgen.nintex.io/package/111 -
Add the Drawloop_next field
-
Make sure the Send Session ID checkbox is checked
-
-
Add the Outbound message to a Record Triggered Workflow.

📦 Bulk Document Generation
There are two main approaches for performing bulk or mass document generation in DocGen for Salesforce. Both allow users to generate documents for multiple records at once, but the setup process and use cases vary.
Option 1: Visualforce Page + List Button (List View Selection)
- Gives users control to select specific records to generate documents in bulk
- Generated documents can be delivered through all delivery options, with the exception of download and Nintex eSign
- The same button can generate documents for one or multiple records
- Up to 200 records can be selected and processed at one time
- Copy and paste the setup
Setup Overview
There are very detailed instructions in this Community article.
To summarize.
- Create a Visualforce Page
- Create a List Button
- Add the button to the List View layout
Here is a demonstration of a very basic mass generation button created from a Visualforce page.
Option 2: Button Wizard + Salesforce Report
- Reduces human error
- Can be set to auto run
Setup overview
- Select Mass DocGen Package via Report Button on the Button Wizard
- Identify the Report Folder Id and the Report Id
- Add the button to the List View layout
💻 Apex Integration
Developers can use Apex for full programmatic control over DocGen.
- Ideal for complex or custom use cases like integrating DocGen into external processes.
- Supports sending documents via email, generating multiple packages in loops, and more.
Key Apex classes for deployment:
- loopMessage Class
- What it is: Used to trigger document generation asynchronously, meaning it runs in the background.
- Why use it: Ideal for bulk or long-running operations like nightly batch jobs or mass document generation
- Benefits
- Doesn’t block the UI
- Handles large data volumes
- loopMessage Sample and instructions
- ProcessDdp Class
- What it is: Triggers document generation synchronously, meaning it runs immediately and waits for the process to complete.
- Why use it: great for real-time actions, like when users click a custom button and expect an immediate result. It can be embedded directly into your custom-built interfaces or Apex logic, so users don’t have to switch to another screen, UI, or use Flow.
- Benefits
- Immediate feedback (like the standard DocGen loading bar)
- More user-facing
- ProcessDdp Sample and Instructions
- DocumentService Class
- What it is: Allows multiple documents to be merged into a single file
- Why use it: Useful when you need to consolidate outputs from different DocGen jobs or manually assembled files.
- DocumentService Sample and Instructions
Nintex Help - Apex for DocGen for Salesforce
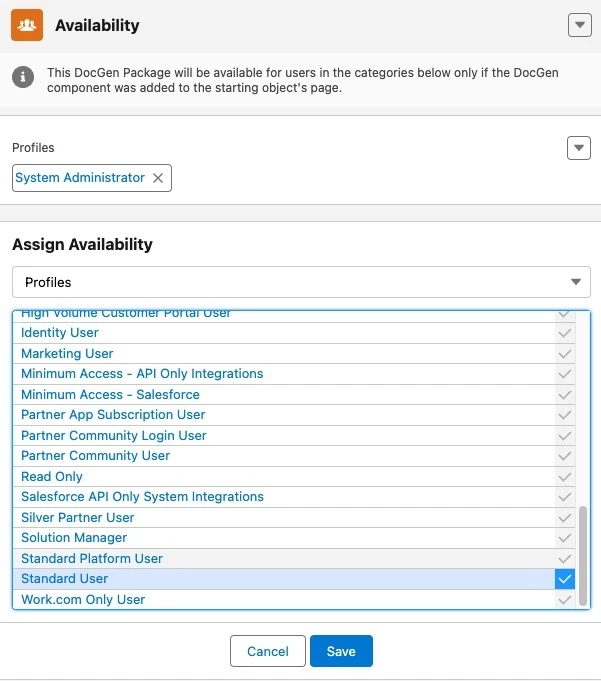
🔐 Limited Deployment for Specific Users
Use profiles, permission sets, roles, and public groups to control access.
- Ensure only the right users or teams can run document packages.
- Helps meet security and compliance requirements.
Setup overview
These permissions are managed within each DocGen Package. Only packages that include the end user's assigned permissions will be available for them to run.
🌐 Deploy Buttons to Salesforce Experience Cloud (Communities)
Extend DocGen for Salesforce functionality to partners, customers, or external users via Salesforce Experience Cloud.
- Add buttons to Community pages for self-service document generation.
- Maintain full control over which packages are available and who can use them.
Setup overview
These buttons are configured in Nintex Admin just like any others—using the Button Wizard. To ensure they work correctly, specific requirements must be met for the running user. For full details, refer to this article: Requirements for buttons in Experience Cloud
🧭 Wrap Up
With so many deployment options, Nintex DocGen for Salesforce can flex to meet your organization’s unique document automation goals—whether you're looking for simplicity, scale, or seamless integration.
👀 Need help deciding the best deployment strategy for your business? Drop your use case in the comments—we’d love to help you tailor your setup!