How to add a 3rd party server to the Event Bus
KB000185
PRODUCTK2 blackpearl
TAGSK2 Server
LEGACY/ARCHIVED CONTENT
This article has been archived, and/or refers to legacy products, components or features. The content in this article is offered "as is" and will no longer be updated. Archived content is provided for reference purposes only. This content does not infer that the product, component or feature is supported, or that the product, component or feature will continue to function as described herein.
| This topic refers to legacy products, components or features. Therefore, this topic is offered "as is" and will no longer be updated. This topic does not infer that the product, component or feature is supported, or that the product, component or feature will continue to function as described herein. |
Introduction
A 3rd party server (such as SAP or Salesforce) can be added to the Notification Event structure. This allows the execution of events on these 3rd party servers to be recorded and the appropriate notification generated from the Event database.
Note:
|
Event Bus Architecture and DetailsThe figure below shows the Event Bus architecture: 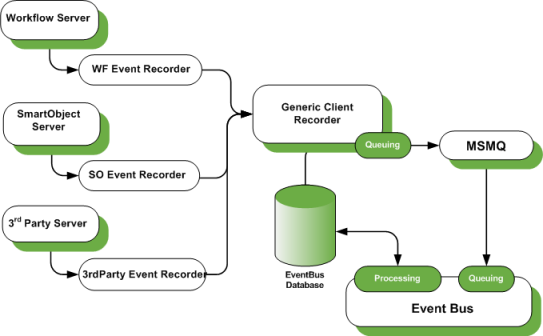 [Figure 1. The Notification Event architecture, including a 3rd party server] To add a 3rd party server, the following steps are required:
Server RecorderThe server will require a Server Recorder and an interface between the server and the recorder. The Server Recorder and Interface components are developed separately as custom components. The recorder needs to implement the 3rd party system interfaces to ensure that the events from that system can be consumed. The recorder also needs to reference the SourceCode.Eventbus.ClientRecorder assembly, in order to raise the event via the Event.RaiseEvent method. Object BrowserTo display the server’s data structure in the K2 Notification Event object browser (as shown in Figure 2), another component needs to be developed. This component will need to be able to display the objects, events and properties of the 3rd party server. This object browser component needs to implement the IObjectBrowser interface, which is in the SourceCode.Eventbus.Interfaces assembly. 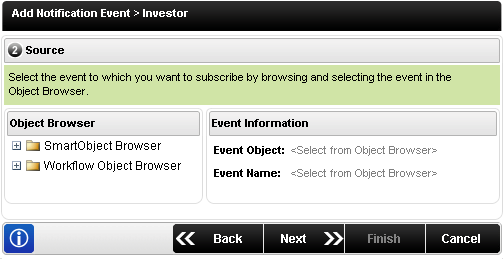 [Figure 2. Object Browser in Workspace displaying the K2 Workflow and SmartObject data] In order for your custom object browser to display in the Notification Event object browser, add the new server and interface details to the section, located in the Workspace web.config file.
| ||
| <eventbusobjectbrowsers> <objectbrowser id="61012dd2-ebfd-4dde-8639-340befc0f974" displayname="SmartObject Browser" assemblytypeprovider="SourceCode.EventBus.ObjectBrowsers.SmartObjectBrowser" imageclosed="images/OB/folder_closed.gif" imageopen="images/OB/folder-open.gif" assemblyfullname="C:Program FilesK2 blackpearlBinSourceCode.EventBus.ObjectBrowsers.dll” connectionstring="BLACKPEARL,5555" /> <objectbrowser id="bc76ec99-6acd-4e9a-8dd8-db05b6be30ee" displayname="Workflow Object Browser” assemblytypeprovider="SourceCode.EventBus.ObjectBrowsers.K2ObjectBrowser" imageclosed="images/OB/folder_closed.gif" imageopen="images/OB/folder-open.gif" assemblyfullname="C:Program FilesK2 blackpearlBinSourceCode.EventBus.ObjectBrowsers.dll” connectionstring="BLACKPEARL,5555" /> </eventbusobjectbrowsers> | ||
| Resolver and Data Provider In order to resolve data from the 3rd party server, you must create a data provider and a data resolver:
The Resolver interface must be added to the SourceCode.EventBus.mapping.config file under the <resolvers> section as shown below: <resolvers> <resolver id=”4756240D-45B8-4acO-B47F-CO67OBFF28BB" assembly="SourceCode.EventBus.Mapping, Version=4.0.0.0, Culture=neutral, PublicKeyToken=16a2c5aaaa1b130d" assemblytype="SourceCode.EventBus.Mapping.SOXMLDataResolver"></resolver> <resolver id="4756240D-45B8-4acO-B47F-CO67OBFF28CC" assembly="SourceCode.EventBus.Mapping, Version=4.0.0.0, Culture=neutral, PublicKeyToken=16a2c5aaaa1b130d” assemblytype="SourceCode.EventBus.Mapping.valueTypeDataResolver"></resolver> <resolver id="3688D90C-4BEE-4639-9549-A472491BE5F3" assembly="SourceCode.EventBus.Mapping, Version=4.0.0.0, Culture=neutral, PublicKeyToken=16a2cSaaaa1b130d” assemblytype="SourceCode.EventBus.Mapping.WorkFlowlItemContextDataResolver”></resolver> <resolver id="A6A4C4F4-18OF-4c11-8D9E-D9CE81EFEFC2” assembly="[INSTALLDIR]Host ServerBinourceCode.Workflow.Data.Resolvers.dll" assemblytype="SourceCode.Workflow.Data.Resolvers.DataFieldPartResolver"></resolver> <resolver id="2EF2EECE-C347-48Da-BAC4-81ADF8872B26” assembly="[INsTALLDIR]Host ServerBinSourceCode.Workflow.Data.Resolvers.dll" assemblytype="SourceCode.Workflow.Data.Resolvers.WorkflowContextFieldPartResolver"></resolver> <resolver id="502B68FF-1C66-45F8-9E45-5537A9521FF2" assembly="SourceCode.EventBus.FileSystemXmlResolver, Version=4.0.0.0, Culture=neutral, PublicKeyToken=16a2c5aaaa1b130d" assemblytype="SourceCode.EventBus.FileSystemXmlResolver.ExpenseClaimResolver"></resolver> <resolver id="F07C0651-5ADE-4364-B54A-9FB0AB59ED2D" assembly="SourceCode.EventBus.FileSystemXmlResolver, Version=4.0.0.0, Culture=neutral, PublicKeyToken=16a2c5aaaa1b130d" assemblytype="SourceCode.EventBus.FileSystemXmlResolver.OrderResolver"></resolver> </resolvers> The custom Data Resolver assembly information must be added to the <mapping> section in the SourceCode.EventBus.Server.config file shown below: <mappings> <config> <mappings> <mapping guid="4756240D-45B8-4ac0-B47F-C0670BFF28BB" assemblyfullname="SourceCode.EventBus.Mapping, Version=4.0.0.0, Culture=neutral, PublicKeyToken=16a2c5aaaa1b130d" assemblytyperesolver="SourceCode.EventBus.Mapping.SOXMLDataResolver" assemblytypeprovider="SourceCode.EventBus.Mapping.SOXMLDataProvider" /> ... </mappings> </config> </mappings>
| ||
Working with the Event Bus When working with the Event Bus, there are several steps to look for to ensure that your environment has been set up properly:
| ||
| <msmqpath>BLACKPEARLEventBus</msmqpath> | ||
| ||
| <msmqpath>BLACKPEARLEventBus</msmqpath> | ||
| ||
| ||
AppendixTroubleshooting the Event BusIf you are encountering issues with the Event Bus not raising notifications, check the following items:
Event Bus Prerequisite ChecksThe K2 Event Bus makes use of a Microsoft Windows 2003 Component called Microsoft Message Queuing. It is installed as part of the operating system. Depending on the operating system configuration, this component may not have been included; verify that this component is installed. 1. Click on Start > Control Panel > Add or Remove Programs 2. From the Add / Remove Programs dialog, select AddRemove Windows Components 3. Scroll down and locate Application Server, click on the item to select it. 4. Click on the Details button for Application Server. The Message Queuing feature must be enabled. 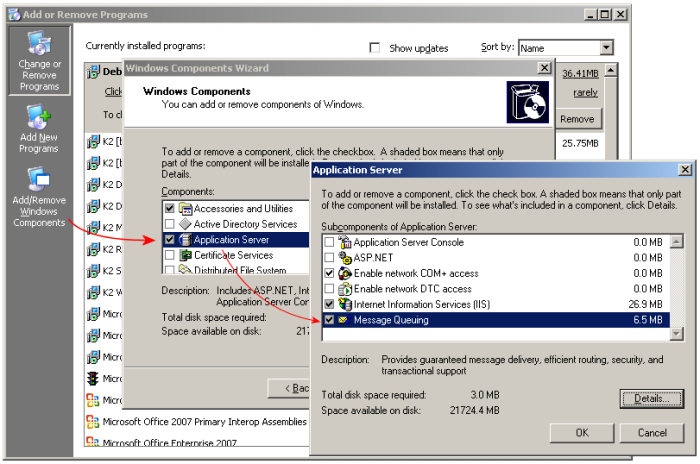 [Figure 6. The Message Queuing component in the Windows Components dialog] 5. Click on the Details button for Message Queuing. The default components that are enabled are sufficient for K2. 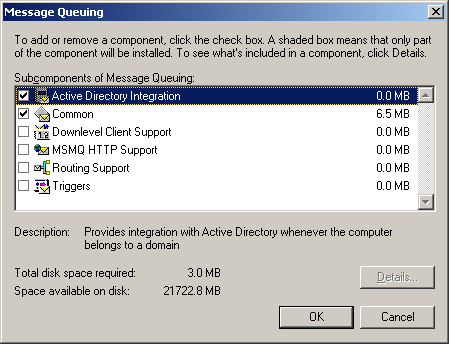 [Figure 7. The Message Queuing subcomponents] |

