Ever since we designed Nintex Automation Cloud, we at Nintex have taken the approach that we'll work with your data where you want it. If you want it in a CRM, database, SharePoint, Google, or various other systems, we don't mind. We have connectors to over 100 different systems, and if we don't supply a connector, you can build your own using our Xtensions framework.
However, while we provide all this flexibility, some of our customers have told us they don't want to store their data in an external system, and why can’t Nintex just host it for them? Well, their wish has come true with the GA release of Nintex Data (some of you invited to the early preview would know this technology as Nintex tables).
I'll explain critical concepts in this article and provide links to the help documentation for more detailed explanations.
What is Nintex Data?
First things first, what is Nintex Data? This is a place where you can store and retrieve your data in tables. We manage it here at Nintex, and it sits safely in your regional Microsoft data center.
Think of a Nintex table similar to a database table or SharePoint list. It contains a series of columns of different data types, e.g., text, number, and date, and data is stored in the rows of a table. You can, both manually and via Nintex Automation Cloud, create, query, read, update, and delete the data.
What can you do with them? Well, the world is your oyster, and the possibilities are endless, but here are some examples:
- A place to look up reference information such as Department details, including name, cost code, and manager
- A place to share information between workflows such as global variables and constants, e.g., escalation contact details and timeframes
- A place to record the status of a process
- A place to look up delegated authorities
Here's an example Nintex table, which is used to store insurance policy information, and we'll use this as an example while we explore the table features:

In our example above, we are an insurance broker and want to store a list of all the insurance policies we manage—the customer, the premium amount, and when they are valid. When a customer has renewed a policy, our operator should be able to open a form, pick the customer, and update the new premium and anniversary date.
Let's go ahead and create that table.
Creating a Nintex Table
Before you create a table, please ensure that it will work with our predefined limits of a maximum of 25 columns and 50,000 rows and the data types that will be stored. Here’s the complete list:
| Max tables (per tenant) | Max rows per table | Allocated rows (all tenants) | Max columns per table | # of sortable columns per table | |
|---|---|---|---|---|---|
| Data Limits | 5,000 | 50,000 | 1,000,000 | 25 | 10 |
These limits are correct when writing this blog, but we're constantly developing and adding new features, so you should check out the help documentation to see if these limits have changed: Nintex Help: Limits.
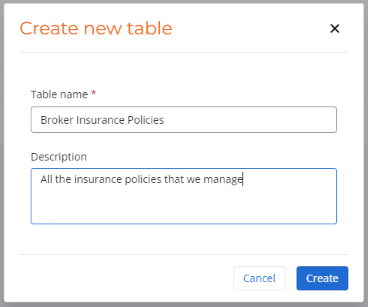
From the Data menu, click on the Create Table button. So that you know, you'll be prompted for a table name and description.
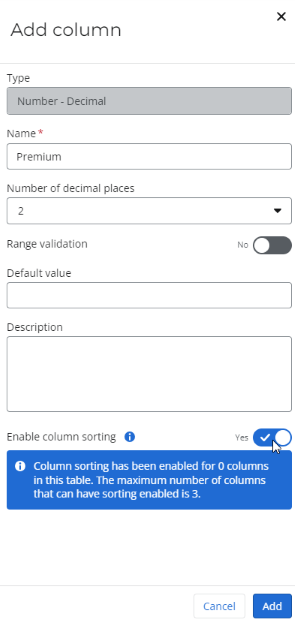
The system will automatically create some columns, such as Name and Created by, and we can add up to 24 more columns of our choosing. Click the plus button at the top right, pick your data type, and give the column a name.

What's the major data type missing from this list? Files. Yes - we will support files and other data types in the future. 😉
Once you’ve picked the type of column to create, you’ll see many options here depending on your chosen data type. In this example, it’s a number (decimal) field, so we can decide how many decimal places we want to store and if there are upper and lower ranges. You can also make the column sortable by ticking the sorting toggle.
Populating the Table
Once the table has been created, you can populate it with data. You can populate manually using the Add row button.

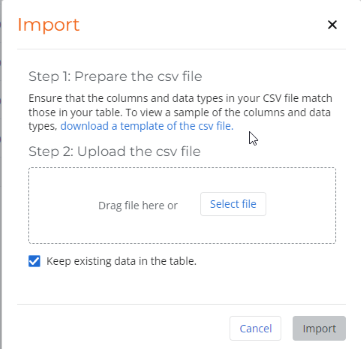
Then, you enter data as you would into a spreadsheet. This interface also allows you to edit and delete data. We also provide a bulk data import function via the import button. The import is via a CSV file, and the first row of this file must match the column headers. To simplify life, we prepare a CSV template with headers populated for you automatically.
The 3rd method of populating the table is via the workflow, but we'll get to that later because we're now going to create a form to retrieve this data.
Accessing Table Data in a Nintex Form
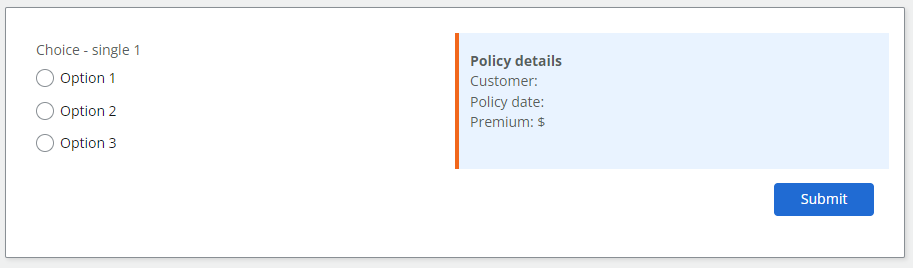
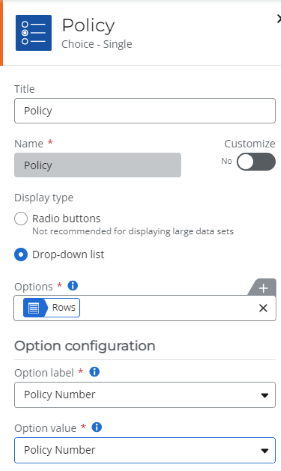
In this form, we will create a drop-down list of all policies, which we'll retrieve from the table. Once a policy has been selected, we'll retrieve the details and display them on a label. So, to set up my form, I've dragged over a choice—a single control and also a label control, which I populated with a few titles.
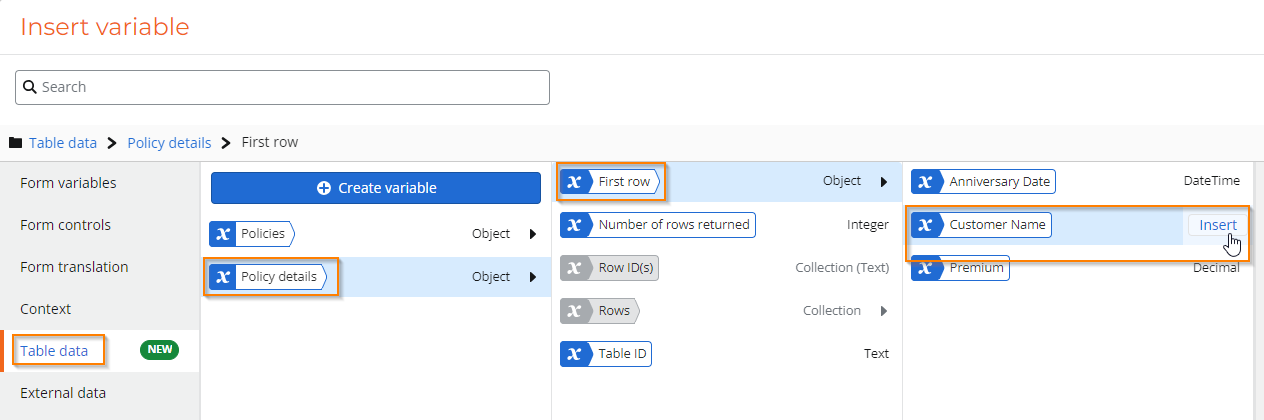
To populate the choice control with the list of policy numbers, we'll create a table data source variable to retrieve all policy numbers, and then we'll use those results in the control. If you're unfamiliar with data source variables, check out this article: Nintex Community: Choice Single control - Data Source Variable usage.
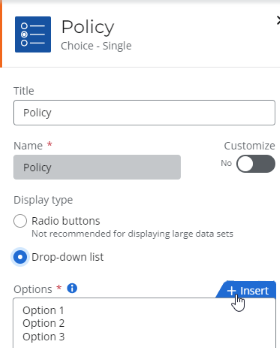
I name the choice control Policy, change it to a drop-down list, and click the + Insert button.
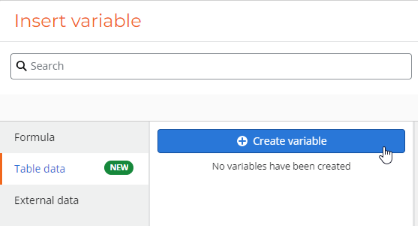
Then, it asks me where I'm retrieving my data from. In our case today, we're getting it from a Table, so I need to create a table data variable:
We must name the variable at this stage and pick the table columns we want.
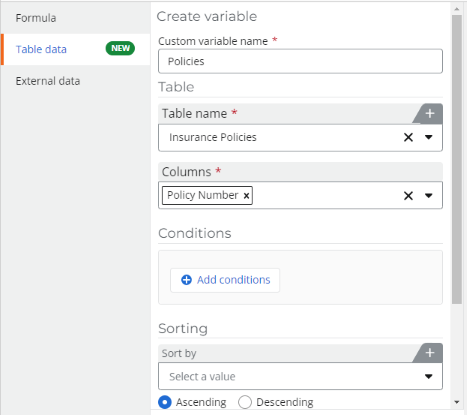
I only wanted to show the policy numbers in this drop-down list, so that's the only field I selected. In some cases, you might want to use the ID column, which uniquely identifies the table entry, but in my case, my policy numbers are unique, so I don't need ID. You can also filter your results and sort them from this screen.
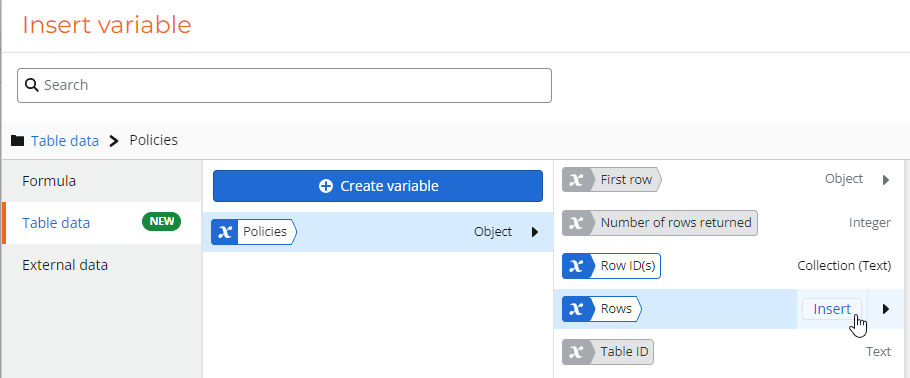
Now that we have the variable, we can populate the choice control. I'll select the rows collection, and all will be returned in our query.
Then, Nintex Automation Cloud prompts us for two things: What do you want to display to the end user, and what value do you want to save when they have made their choice? In my case, I want to display the policy number and also save it. If using the ID column, I'd display the policy number and save the ID.
If you're following along, now is a good time to preview the form to see if you can successfully get your list of values.
The next step is to retrieve all the other policy details and display them on the label. To do that, we need another data source variable. Why do we need a second variable? Why can't we use the one we already created? The first one collects a list of all policies. The second one will collect the details of just a single policy.
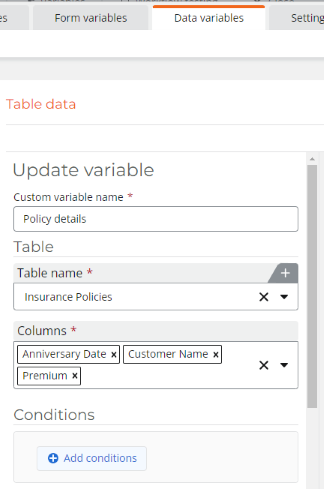
Here I am back at the create variable screen, and this time, I've picked the columns I'm interested in (customer, anniversary date, and premium). If I left it as is, it would return those details for all policies, but of course, I only want the details for the policy selected in the choice control, so I hit the Add conditions button in the screenshot and added a filter.
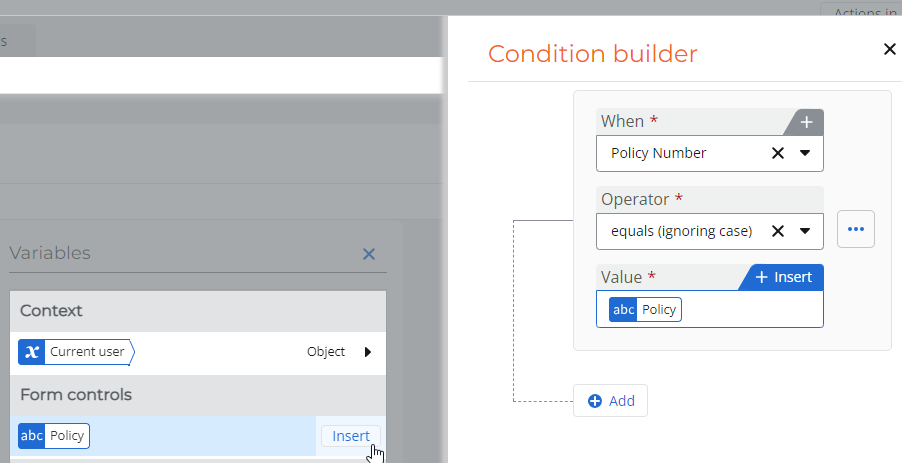
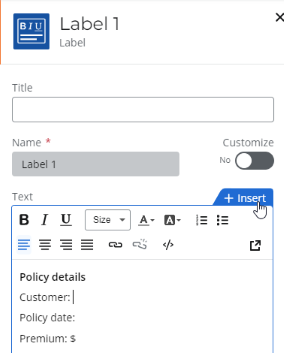
In this picture, I'm selecting the policy in the table where the policy number matches the one chosen in the choice control. Now, I can go to that label control and start populating it. For example, to show the customer name, I've positioned my mouse next to the customer label and hit the insert button:
Then I navigate through the DSV to find the customer name:
I'll do the same thing for the anniversary date and policy amount, and then it's time to test.
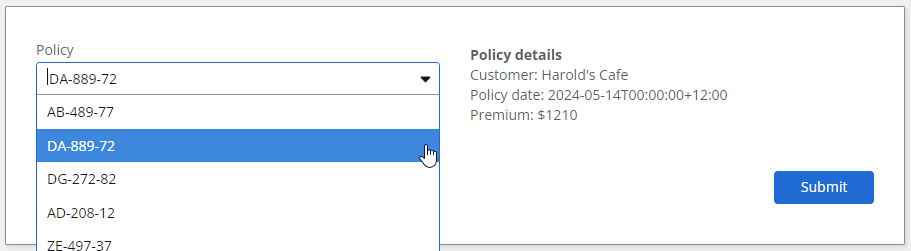
Everything looks great to me. Of course, there are other things we could do to improve it. Out of the scope of this article is the data that comes back (hint: use the format date function). We could also populate other fields with these values instead of showing them in a label. Hint: use the set value command in a rule.
What happens if we want to update the premium amount? For this article, let's drag over a currency control, and we'll take that value and populate the table.

Accessing Table Data in Workflow
We'll use the workflow to update the premium amount. This will be very familiar if you have used workflow actions to query and modify data from other systems. I'm going to use the Update rows action, so I drag that to the workflow and start configuring:
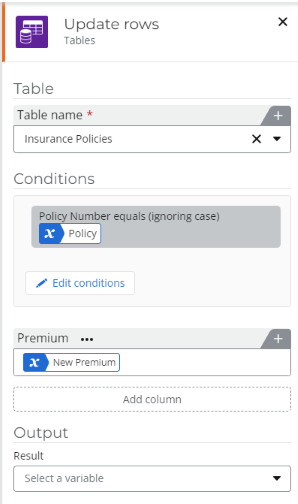
Let's examine how this was configured. Hopefully, the Table name is intuitive. I selected it manually from the list of all table names, but please remember that you can also pick it dynamically using a variable. Then, I set a condition that only the policy corresponding to the policy we chose in the form should be updated. If I didn't set a condition, it would update every row!
After that, I told the action which table columns we wanted to update. In this case, I only needed to update the premium amount column, and of course, I'm getting the value from the new field we just added to the form.
I hope this is helpful to you. Go forth and enjoy using this new feature. If you have any suggestions, we want to hear them. Feel free to comment here on how you're doing, and if you have product feedback, the best place to log those requests is via Nintex Ideas. For further reading, check out this blog, which provides additional insights into what you could do with Nintex data and this video to help you get started quickly.
Chris Ben
Senior Solutions Engineer | Nintex