Nintex Community Menu Bar

Exporting a data table from one Nintex environment to another (a how-to)

  • March 17, 2025
  • 5 replies
  • 39 views
  • Translate

Forum|alt.badge.img+8

I am making good use of Nintex Data Tables now. It is especially good for getting a quick response in your workflow form. Sometimes calls to our on-prem SQL database take several seconds. But I ran into a problem whenever I moved my data from Test into Production.  While there is a nice “Import” feature to Tables, there is no Export.  So I built one, and I’ll display that here below.


The “Import” process takes a CSV (Comma Separated Values) file, so I will generate that using a workflow in my Test environment.


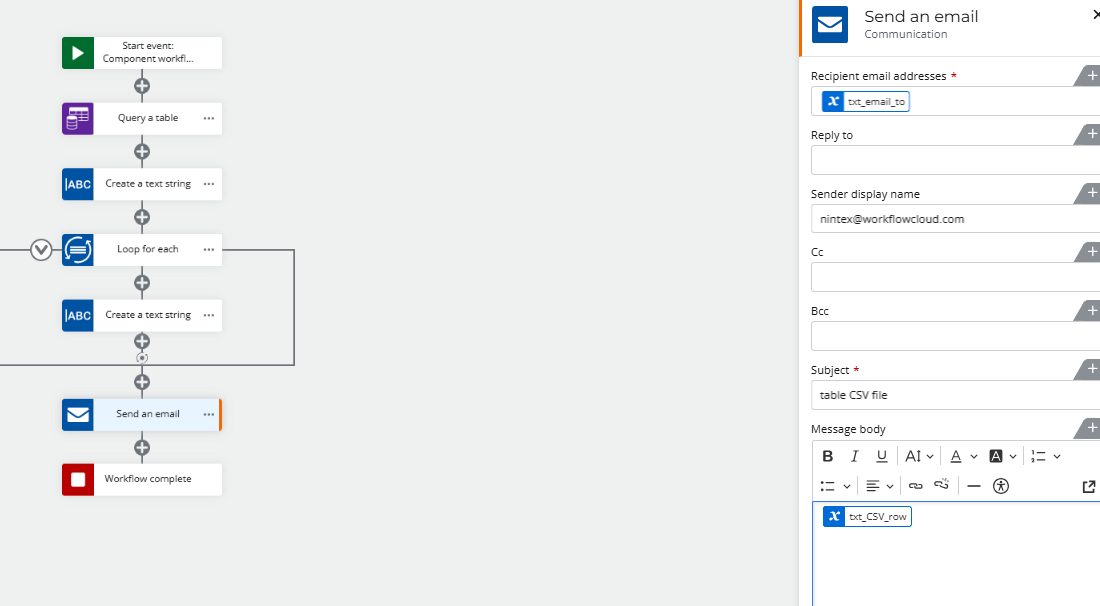
First, create a workflow and set the Start Event as a Nintex Component workflow.

Insert the following actions that we will configure:

  1. Query a table
  2. Create a text string
  3. Loop for each
    1. (inside your loop) Create a text string
  4. Send an email (or substitute some other method of obtaining your output


Configuring these actions:

For “Query a table” you simply select your Table and select all the columns you want. If you want all the rows, then don’t add any Conditions. Complete the other settings and create an output object.


In “Create a text string” you will be creating a header line, including the newline at the end. In my case, I had these column headers:

"Name","Facility","Address","County","City","Number","Manager"<br/>

Send the result to a text variable.


In “Loop for each” set the Target Collection to the “Rows” from your data table variable.


Inside the loop, in Create a text string, you will create a row in your text file, like this:


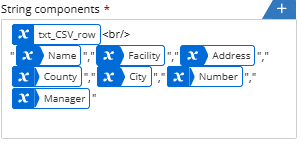
send the result into the same variable. You are appending a new row to the text variable with each pass through the loop.


Now, outside the loop, send the output to yourself. I used “Send an email” but you can also develop another method to obtain the output.


Now you can use this output text file in the Import table process in your Nintex Production environment.

Did this topic help you find an answer to your question?

5 replies

SimonMuntz
Nintex Employee
Forum|alt.badge.img+22
  • Nintex Employee
  • 2452 replies
  • March 17, 2025

Hi ​@PabloL,

Great, how to.
An export feature is coming very soon. 😀

Translate

Forum|alt.badge.img+2
  • Rookie
  • 5 replies
  • March 19, 2025

Hi,

How exactly do you send the text string to yourself? that’s the bit i’m struggling with. You have created a text string, how does that translate into a csv file?

Translate

Forum|alt.badge.img+8
  • Author
  • Apprentice
  • 70 replies
  • March 20, 2025

How to send a text string to myself? I use “Send an email.”  The text string is a Nintex variable that can be added to the Message Body of the email.  You might also save it to a file and upload into SharePoint.


Here is the full workflow:


Translate

Forum|alt.badge.img+2
  • Rookie
  • 5 replies
  • March 21, 2025

I have that part ok, I can generate the string and email it to myself but i can’t use it to create a csv file in nintex or do anything with it once i’ve received the email. There is no way to use that string to create a file in the system. How do you do that part? 


Translate

Forum|alt.badge.img+8
  • Author
  • Apprentice
  • 70 replies
  • March 21, 2025

When I receive the email, the body of the email has text in it.  I copy & paste that text into a file and save it.  I can rename the extension to CSV if necessary, but it is now a CSV formatted file that can be used in the import process.  Example data here-


"Name","Facility","Address","County","City"

"San Antonio","Financial Centers","101 Main St., San Antonio, Texas 78209","Bexar","San Antonio"

"Austin","Financial Centers","102 1st St., Austin, Texas 78705","Travis","Austin"


Translate

Reply


Cookie policy

We use cookies to enhance and personalize your experience. If you accept you agree to our full cookie policy. Learn more about our cookies.

 
Cookie Settings