How To: Working with K2 Exchange Integration
KB001189
PRODUCT
Introduction
K2 interacts with the Microsoft Exchange Server in a number of different ways:
- Send emails, escalations and notifications
- Workflow Event Wizards
- SmartObjects
Send Emails
The most common usage of the Microsoft Exchange Server within a K2 environment is to leverage Exchange to send K2 generated emails.
Event Wizards
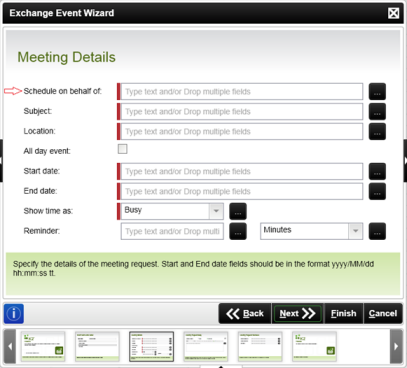
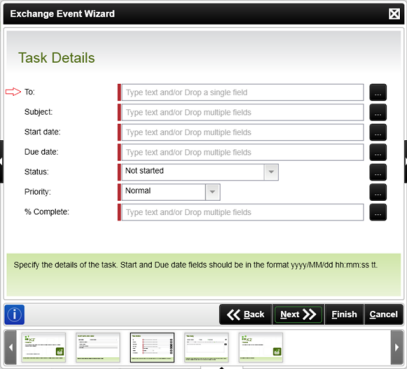
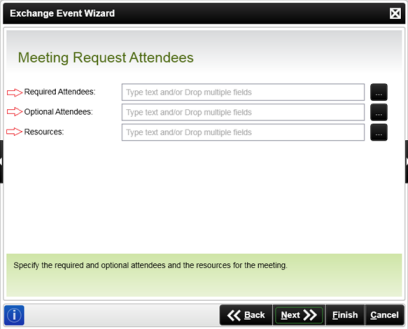
With K2 4.5 update 1230 and later, event wizards are surfaced in the K2 workflow design tools that permit interaction with specific Exchange functionality. This permits the below functionality to be part of an automated K2 workflow. The following functionality is exposed via this Exchange wizard:
- Create Meeting Request
- Create Task
- Create Mailbox
- Disable Mailbox
For full details around this functionality please refer to the product documentation.
SmartObjects
K2 SmartObject Services (also known as a ServiceBroker) ships with K2 that permit SmartObject interaction to Exchange Server functionality. All K2 SmartObjects, not just Exchange based, can be leveraged within workflows or external to workflows such as via a custom form via K2 SmartObject API.
The following functionality is exposed via the Exchange SmartObject Services:
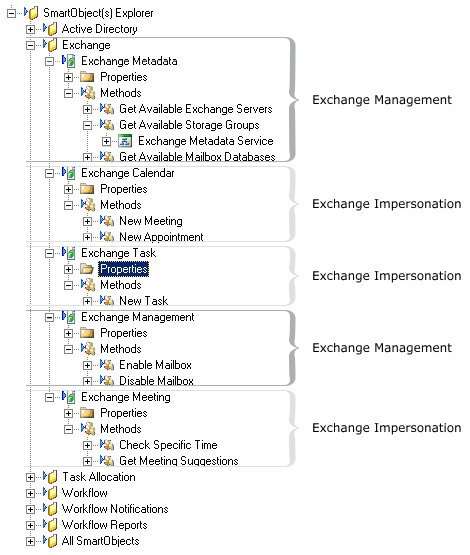
- Exchange Metadata
- Get available Exchange services
- Get available storage groups
- Get available mailbox databases
- Exchange Functionality
- Create New Meeting
- Create New Appointment
- Get Meeting Time Suggestions
- Enable Mailbox
- Disable Mailbox
- Create New Task
Microsoft Exchange 2007 (SP2 or SP3)
Prerequisites:
- Exchange Management Tools
The Exchange Management Tools need to be installed on the machine hosting the K2 Server. The reason for these software prerequisites is to allow the K2 server to examine the users Exchange server for database and other details. The Exchange Server Configuration panel in the K2 Setup Manager is populated with the user's Exchange server details if Exchange integration is enabled. The K2 Setup Manager automatically detects the Exchange server settings using the Exchange Management Tools and pre-populates the integration screen for new installations resulting in the installation of the Exchange Service and associated SmartObjects. If the prerequisite software is not detected or the installation is an upgrade, the screen is not displayed.- The version of the Exchange Management Tools needs to be on the same version of Microsoft Exchange as the Exchange Server.
- To install the Exchange Management Tools, perform the following steps:
-
- Run the Installer
- Select Custom Installation
- Select the Management Tools option
-
-
Background
- The e-mail hierarchy in Microsoft Exchange 2007 is as follows:[Exchange Server][Storage Group][Mailbox Database]
- A user can only have one e-mail account per Exchange Server
- An Exchange Server can have multiple Storage Groups
- A Storage Group can have multiple Mailbox Databases
Account Permissions:
-
- Installation Account
This account should have View-Only Administrator rights for Exchange to be able to browse Exchange servers and mailbox databases and to successfully install K2 blackpearl. - Design-time Operational Rights:
An Exchange Administrator account should be created and given Exchange Organization Administrator rights. When the Create/Disable mailbox action is selected, the wizard should be configured to Run As the Exchange Administrator account. - K2 Service Account
The K2 Service account requires a minimum permissions level of View-Only Administrator rights. If the K2 Service Account is also being used as the Exchange Administrator account defined in the point above, then it requires Exchange Organizational Administrator rights.
- Installation Account
- Runtime Operational Rights:
When the Create/Disable mailbox action is selected, the wizard should be configured to Run As the Exchange Administrator account defined in the above Design-time points.
An Exchange Service Impersonation account should be created and given Exchange Impersonation rights.**
When a Meeting Request or a Send Task action is selected in the Exchange Event Wizard, the wizard should be configured to Run As the Exchange Service Impersonation account.
**Giving Exchange impersonation rights for an account requires the account to NOT be part of the Exchange Organization Administrator group.- To assign Exchange Impersonation rights run the following scripts replacing <ExchangeServer> the with the relevant Exchange Server name and <ExServiceUser> with the name of the EXCHANGE_IMPERSONATOR account.
- Add-ADPermission -Identity (get-exchangeserver -identity <ExchangeServer>).DistinguishedName -User (Get-User -Identity <ExServiceUser> | select-object).identity -AccessRights GenericAll -InheritanceType Descendents
- Add-ADPermission -Identity (get-exchangeserver -identity <ExchangeServer>).DistinguishedName -User (Get-User -Identity <ExServiceUser> | select-object).identity -ExtendedRight ms-Exch-EPI-Impersonation
- Add-ADPermission -Identity (get-exchangeserver -identity <ExchangeServer>).DistinguishedName -User (Get-User -Identity <ExServiceUser> | select-object).identity -ExtendedRight ms-Exch-EPI-May-Impersonate
- Add-ADPermission -Identity (get-exchangeserver -identity <ExchangeServer>).DistinguishedName -User (Get-User -Identity <ExServiceUser> | select-object).identity -ExtendedRights Send-As
- Add-ADPermission -Identity (get-exchangeserver -identity <ExchangeServer>).DistinguishedName -User (Get-User -Identity <ExServiceUser> | select-object).identity -ExtendedRights Receive-As
-
- It is very important to note that the Exchange Service Impersonation account should not have any administrator permissions in the Exchange Management Console.
- This Exchange Service Impersonation account makes use of a SSL Server Certificate between the K2 Server and the Exchange Server.
- To assign Exchange Impersonation rights run the following scripts replacing <ExchangeServer> the with the relevant Exchange Server name and <ExServiceUser> with the name of the EXCHANGE_IMPERSONATOR account.
Microsoft Exchange Server 2010
Prerequisites:
- Windows Powershell 2
- WinRM (Windows Remote Management)
The reason for these software prerequisites is to allow the K2 server to examine the users Exchange server for database and other details. The Exchange Server Configuration panel in the K2 Setup Manager is populated with the user's Exchange server details if Exchange integration is enabled. The K2 Setup Manager automatically detects the Exchange server settings using the Windows Remote Management and pre-populates the integration screen for new installations resulting in the installation of the Exchange Service and associated SmartObjects. If the prerequisite software is not detected or the installation is an upgrade, the screen is not displayed.
Account Permissions:
- Installation Account
This account should have View-Only rights for Exchange to be able to browse Exchange servers and mailbox databases.
Also give the account Execute rights on the Microsoft.PowerShell configuration, by running the following command in the Exchange Management Shell:
Set-PSSessionConfiguration Microsoft.PowerShell –ShowSecurityDescriptorUI - K2 Service Account
This account should have Recipient Management rights for Exchange to be able to create and disable mailboxes and browse Exchange servers and mailbox databases.
Also give the account Execute rights on the Microsoft.PowerShell configuration, by running the following command in the Exchange Management Shell:
Set-PSSessionConfiguration Microsoft.PowerShell –ShowSecurityDescriptorUI - Exchange Impersonation Account
A second service account, the Exchange Impersonation Account is required for Microsoft Exchange 2010 integration. This account should be assigned the Application Impersonation role to be able to impersonate users for sending meeting requests and creating tasks.
Run the following command in the Exchange Command Shell to give impersonation rights:
new-ManagementRoleAssignment -Name: _suImpersonateRoleAsg -Role: ApplicationImpersonation -User: “impersonation account name”
Give this account “Log on as batch job” rights on the K2 Server machine to be able to run Exchange Events as this account.
It is recommended that Autodiscover be enabled on the Exchange 2013 On-premises server as this allows the K2 Installer to perform the environment configurations without needing manual input.
Autodiscover must be enabled when using Exchange Online. See http://msdn.microsoft.com/en-us/library/exchange/gg194011%28v=exchg.140%29.aspx for further information.
Using the Autodiscover service to find the most appropriate URL for the specified user's mailbox instead of using a hard-coded EWS URL means that your workflow always uses the correct EWS URL for that particular mailbox. Autodiscover determines the best endpoint for a particular user (the endpoint that is closest to the user's Mailbox server).
Prerequisites:
- Windows Powershell 2
- WinRM (Windows Remote Management)
Account Permissions:
- Installation Account
This account should have View-Only rights for Exchange to be able to browse Exchange servers and mailbox databases.
Also give the account Execute rights on the Microsoft.PowerShell configuration, by running the following command in the Exchange Management Shell: Set-PSSessionConfiguration Microsoft.PowerShell –ShowSecurityDescriptorUI - K2 Service Account
The K2 Service Account needs “ApplicationImpersonation” rights.
For Enable/Disable mailbox the account used to install the option needs to be part of the “Organizational Management” or “Recipient Management” role group; or create the account as a “Global Administrator”.
Also give the account Execute rights on the Microsoft.PowerShell configuration, by running the following command in the Exchange Management Shell: Set-PSSessionConfiguration Microsoft.PowerShell –ShowSecurityDescriptorUI
Configuring WinRM
The following commands should be run through the Exchange Management Shell on the Exchange Server machine:
Enable-PSRemoting
Set-Item wsman:localhostclient rustedhosts “k2server machine fqn”
Configure IIS on the Exchange server machine:
By default, WinRM uses http and connects through the Default Web Site on port 80.
Add bindings to http port 80, with no hostname and All Unassigned if they don’t exist.
PowerShell should not have SSL enabled.
PowerShell should have only anonymous access enabled.
Troubleshooting
To resolve possible connection issues with WinRM, try the following:
On the Exchange server, edit group policy and under Computer ConfigurationAdministrative TemplatesWindows ComponentsWindows Remote Management (WinRM)WinRM Service, set IPv4 & IPv6 filters = *
IPv6 should be enabled
On the K2 server machine, run the following cmdlet in PowerShell
Set-ExecutionPolicy Unrestricted
PowerShell can’t connect to host headers, so the Exchange certificate should be issued to the Exchange Server machine name and the Exchange service instances should point to the machine name as well
SSL Certificate
- Depending on the Environment and how the SSL Certificate was configured, the Exchange Web Service URL of the Exchange Server Service Object might have to be changed.
Exchange Components SmartObjects
- The Exchange Component consists out of the following SmartObjects:

User Details in the Exchange Event Wizard
For the Meeting and Task Details screens, the e-mail address of the user (or users) is required. This also applies to all three user fields on the Meeting Attendees screen.


