


How To: Create On-Premises Data Connections using Azure Logic Apps
KB001843
PRODUCT
When building solutions in a cloud-based platform, you may need to connect the apps you are designing to data systems that exist within your secured, on-premises environment. When building apps on the K2 platform hosted in the cloud, there are multiple options for connecting to data sources that exist in both on-premises and cloud configurations. The purpose of this article is to detail the steps to use the Microsoft Azure platform to work with on-premises data from SharePoint 2013/2016 and Microsoft SQL Server in K2.
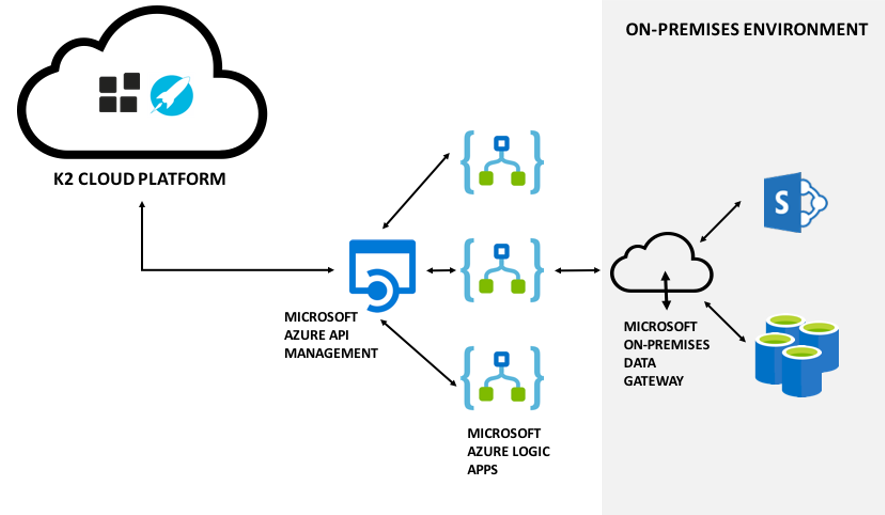
Several different technologies used in this approach allow you a no-code method to expose on-premises data and are all native capabilities in both the K2 platform and integration capabilities provided by the Microsoft Azure platform, including:
- K2 REST Service Broker: Allows you to integrate REST endpoints that are exposed by the Azure Platform
- Microsoft Azure API Management: Allows you to manage Azure Logic Apps endpoints
- Microsoft Azure Logic Apps: Executes query/update logic against on-premises data sources
- Microsoft On-Premises Data Gateway: Connectivity from on-premises data into cloud services
Each technology works in combination with the others to allow you to surface data that lives in on-premises systems into cloud-based K2 applications as in this diagram.
High Level Configuration Steps
- Install On-Premises Data Gateway for Logic Apps
- Create a Microsoft Logic App to interact with on-premises systems
- Create Azure API Management app to interact with Logic Apps
- Configure K2 REST broker for the endpoint
- Execute SmartObject to start Logic App that interacts with the on-premises system
Step 1: Install On-Premises Data Gateway for Logic Apps
The On-Premises Data Gateway is a product available for Microsoft customers that allows you to expose data into cloud offerings such as K2 Appit. The LOB data is currently limited to Microsoft SharePoint 2013/2016 and Microsoft SQL Server. Details on how to obtain, install and configure the On-Premises Data Gateway can be found in the Microsoft topic Install the on-premises data gateway for Logic Apps
Step 2: Create a Microsoft Logic App to interact with On-Premises Systems
Once you make the connection to on-premises data sources, you can design an Azure Logic App to interact with those data systems (i.e. query Microsoft SQL Server or create a SharePoint list item). To interact with this Logic App you need to ensure that it is triggered with an HTTP event as pictured in the example here:
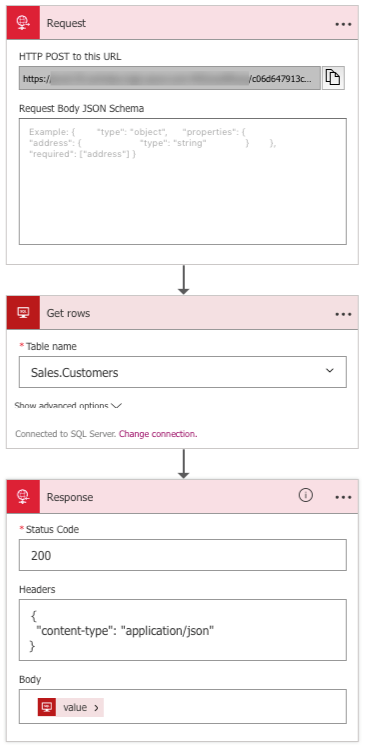
In this example, the Get rows action queries an on-premises SQL Server instance using the On-Premises Data Gateway, and selects records from the Sales.Customers table. The recordset is converted into JSON in the Response activity which is returned to the caller.
Details on how to ensure the Logic App is HTTP accessible can be found in the Microsoft topic Call logic apps by creating and configuring trigger endpoints
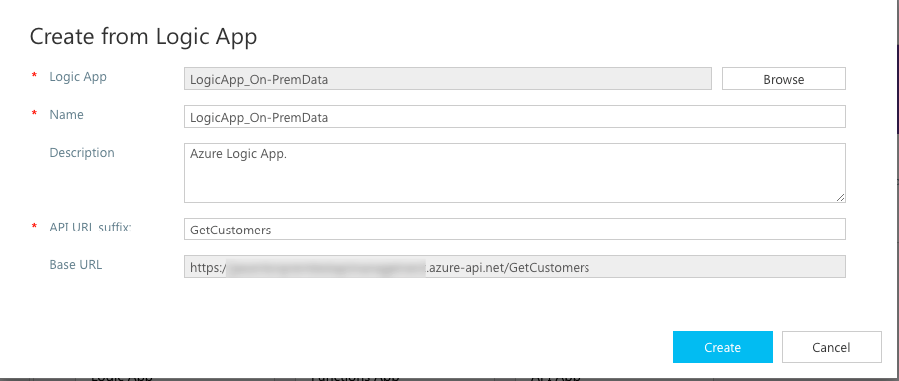
Step 3: Create Azure API Management app to interact with Logic App
To expose the Logic App in a format that the K2 platform can use, you must create an API Management endpoint that you then use the K2 REST service broker to call. More details on how to configure and deploy API Management are available in the Microsoft topic Manage your first API in Azure API Management
In this example, we start by configuring the underlying API from the Logic App that was created in the previous step:
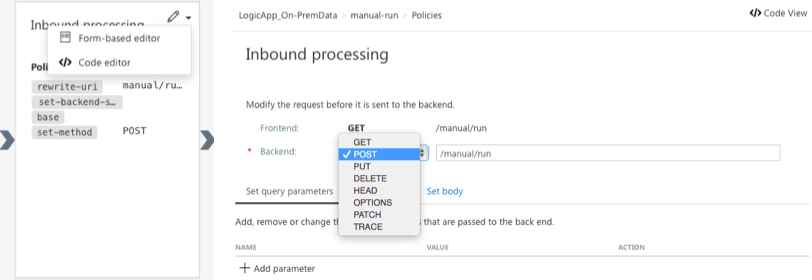
Microsoft Azure Logic Apps only allow for POST operations to be recognized by the Logic App runtime. To produce an endpoint that the K2 platform can use to query and retrieve data, change the expected operation on the front-end of the API Management from a POST to a GET via the Form-based editor option as pictured here.
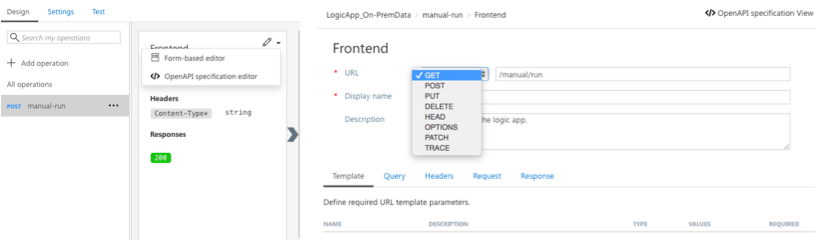
Next, map the front-end GET operation to the back-end POST operation via the Backend configuration using the Form-based editor option as pictured here.
Step 4: Configure K2 REST broker for the callable endpoint
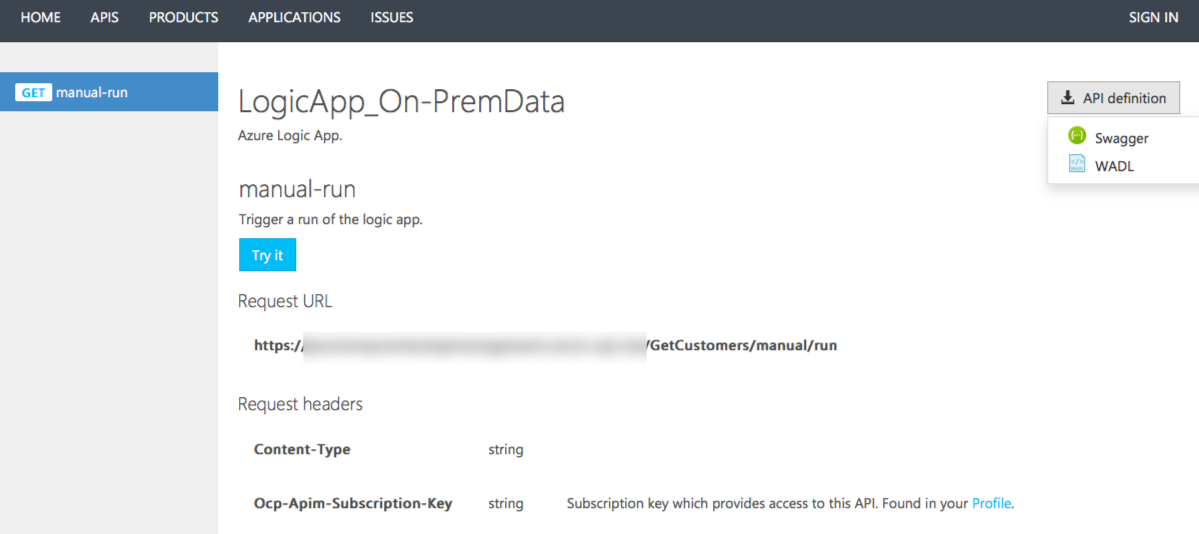
Now that a REST API is available in Azure API Management, download the Swagger definition using the Developer Portal of the Azure API Management application as pictured here.
You can find the option to get the Swagger file using the API definition button.
The Swagger file generated for this example:
"swagger": "2.0",
"info": {
"title": "Azure API Management",
"description": "API for Azure API Management endpoint",
"version": "0.0.0"
},
"host": "
.azure-api.net",
"schemes": [
"https"
],
"paths": {
"/Get_Customers/manual/run": {
"get": {
"tags": [
"Get_Customers"
],
"description": "Get customers",
"operationId": "get_customers",
"produces": [
"application/json"
],
"parameters": [
{
"name": "ocp-apim-subscription-key",
"in": "header",
"description": "ocp-apim-subscription-key",
"required": true,
"type": "string",
"x-example": ""
}
],
"responses": {
"200": {
"description": "OK",
"schema": {
"type": "array",
"items": {
"$ref": "#/definitions/GetCustomers"
}
}
}
},
"security": []
}
}
},
"definitions": {
"GetCustomers": {
"description": "Model for GetCustomers",
"properties": {
"CustomerName": {
"type": "string",
"x-example": "Tailspin Toys (Head Office)"
},
"DeliveryAddressLine1": {
"type": "string",
"x-example": "Shop 38"
},
"DeliveryAddressLine2": {
"type": "string",
"x-example": "1877 Mittal Road"
},
"DeliveryPostalCode": {
"type": "string",
"x-example": "90410"
},
"PaymentDays": {
"type": "integer",
"format": "int32",
"x-example": "7"
},
"PhoneNumber": {
"type": "string",
"x-example": "(308) 555-0100"
},
"WebsiteURL": {
"type": "string",
"x-example": "http://www.tailspintoys.com"
}
}
}
},
"securityDefinitions": {},
"security": [],
"tags": [
{
"name": "Get_Customers",
"description": "Operations about Get_Customers"
}
]
}
Step 5: Execute SmartObject to Start Logic App that Interacts with the On-premises System
With the Azure API Management REST endpoint exposed as a K2 SmartObject, the on-premises data can be used in applications built in K2, including both workflow and forms. Execute a SmartObject method directly or build a form based on the SmartObject.
Additional & Linked Resources
- REST Service Broker
- REST Swagger File Reference Format
- Resources for Working with the REST broker
- Install the on-premises data gateway for Logic Apps (Microsoft)
- Call logic apps by creating and configuring trigger endpoints (Microsoft)
- Manage your first API in Azure API Management (Microsoft)