


This blog post will kick off a small series that I have in mind about how Foxtrot RPA and Nintex Workflow Cloud are Better Together. The intention is to provide ways to integrate the tools until we get built in functionality on both ends. I will focus on ways to do this using each tool’s built in functionality, rather than any extensibility capability, to emphasize the “no code” philosophy that Nintex aims for. I will try to update all posts in this series with links to other posts for easy reference.
----------------------------------------------------------------------------------
In this scenario, I’ve got a workflow running that is doing it’s thing. However, in this process there is a need to interact with a legacy system, or a system without a compatible API for NWC to hook into. Normally, this would be a hard stop, maybe assign a task to someone to do this step in the process, something like that. Well now that we have Nintex Foxtrot RPA in the platform we utilize a botflow to finish this process.
There are a couple of ways you could do this, but in this blog I’ll talk about how we can utilize Nintex Workflow Cloud’s Generate Document action for this scenario. Anyone familiar with Nintex Workflow Cloud may have used a Generate Document action before. Maybe to create an invoice, or to send out an NDA to be signed, something like that. This is a bit of a different use case, as I’ll be populating an Excel sheet for Foxtrot RPA to pull data in from.
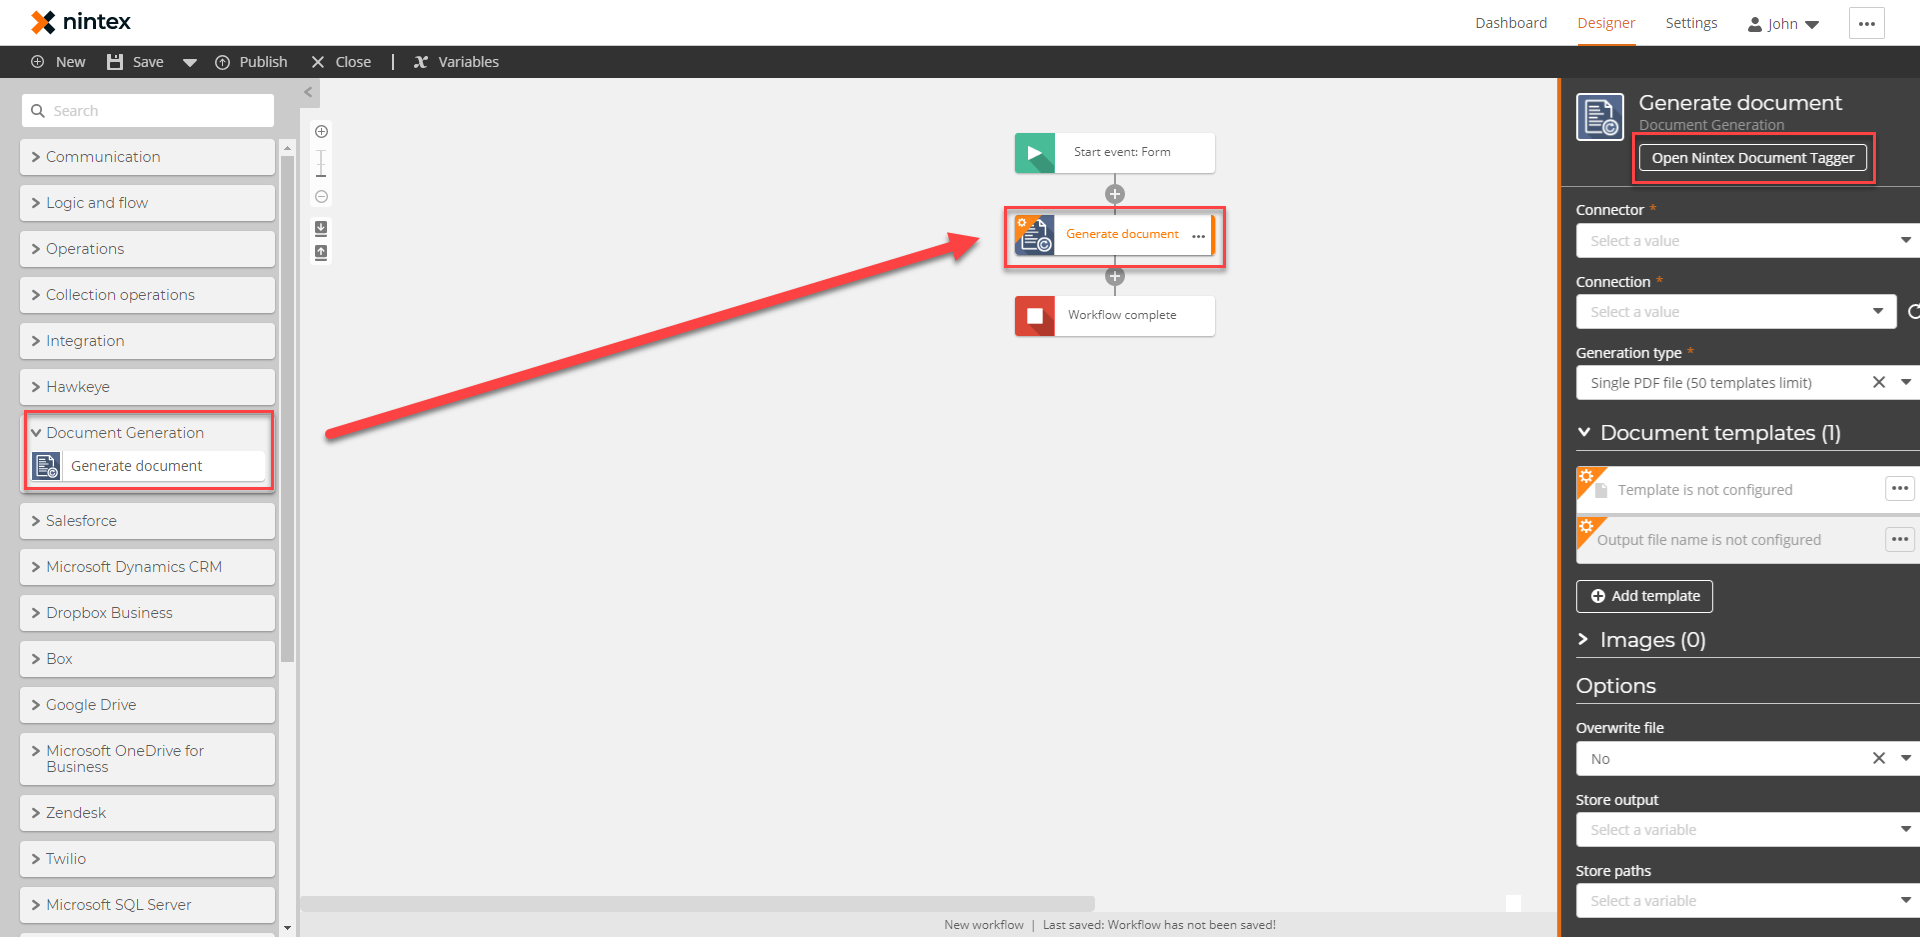
The first thing to do is to create the Generate Document action in the workflow. This should be created at the point in the process where the botflow needs to pick up the work. In my example, I am just working with a blank workflow. After the action is on the workspace, click on it to access the configuration then find the Open Nintex Document Tagger button to click on.
 After the Document Tagger window is open, create a fresh Excel worksheet. The reason for an Excel sheet is simply because it is the easiest way to get data into a botflow, which I will talk about a little bit later. In this Excel worksheet, each Tag needs to be in the Name portion of its own cell. In mine, I have entered field labels for myself, but these aren’t necessary.
 When all the tags are set, the Name Manager tool within Excel (under the Formulas tab) can confirm their locations. Mine looks like this:
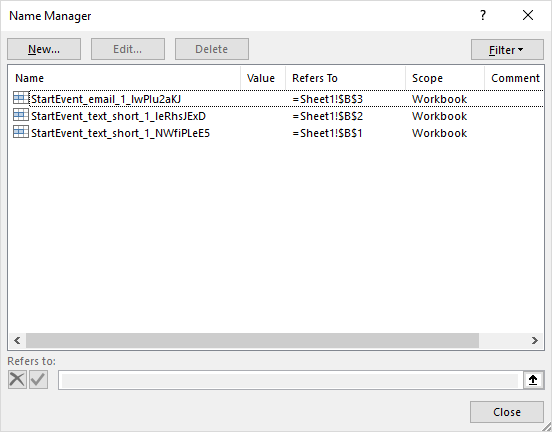
If everything looks to be in line, then the Excel worksheet should be saved to a cloud drive. In my case, I am using OneDrive but Google Drive, Box or Dropbox can be used as well. Coming back to the workflow end, it is now time to configure that Generate Document action that was created previously.
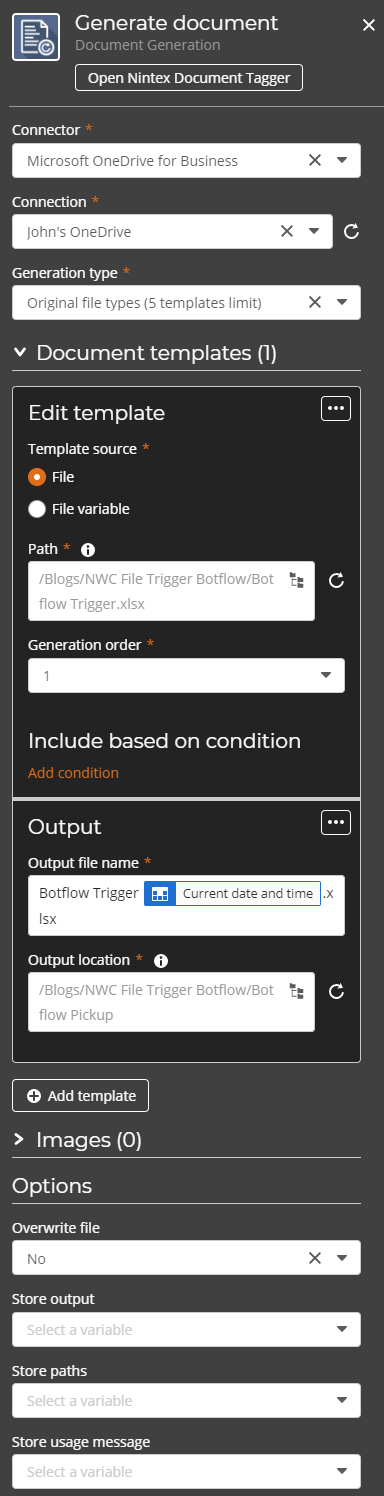
Connector: As I mentioned before, this will need to be a cloud drive.
Document Template: This is the Excel sheet that was just setup. Navigate to the path where it was save, and pick it from the dropdown in that field.
Output: This is the name of the file that will be output. In cases of high volume workflows, I like to append the Context variable of Current Date and Time to give it a unique name so it is easier to track which file belongs to which instance. The location will be where the Foxtrot RPA botflow picks the file up. It is important that this is a location that can be access from the machine(s) the botflow will run on.
And that’s it from the workflow end! Very simple. Now each time the workflow runs it will generate an Excel worksheet with the data that is needed to be handled by Foxtrot RPA.
Now that the workflow is prepared to drop the file, there is some setup to do in FoxHub and Foxtrot RPA to watch for it. The botflow should be setup first, then the Job and Trigger can be setup in FoxHub.
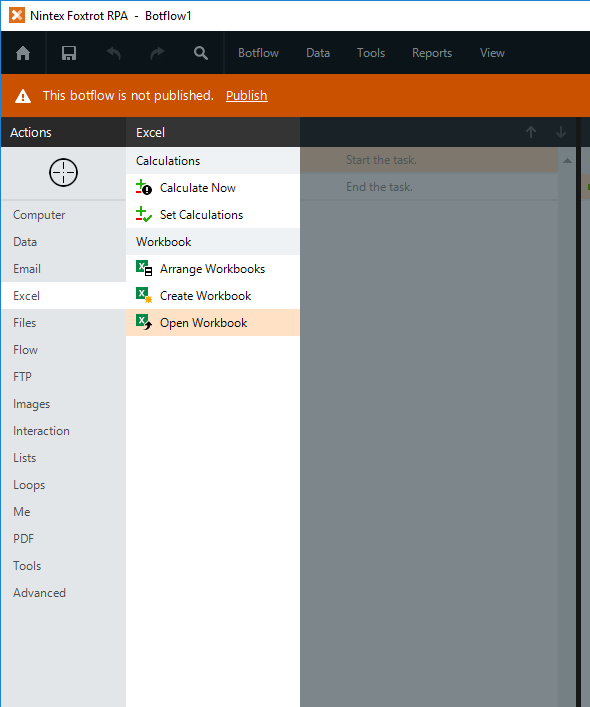
In Foxtrot RPA, some basic steps should be setup first in order to open Excel, read the information in and then close the worksheet. To start, find the Open Workbook action under Excel in the action list directly beneath the bullseye.
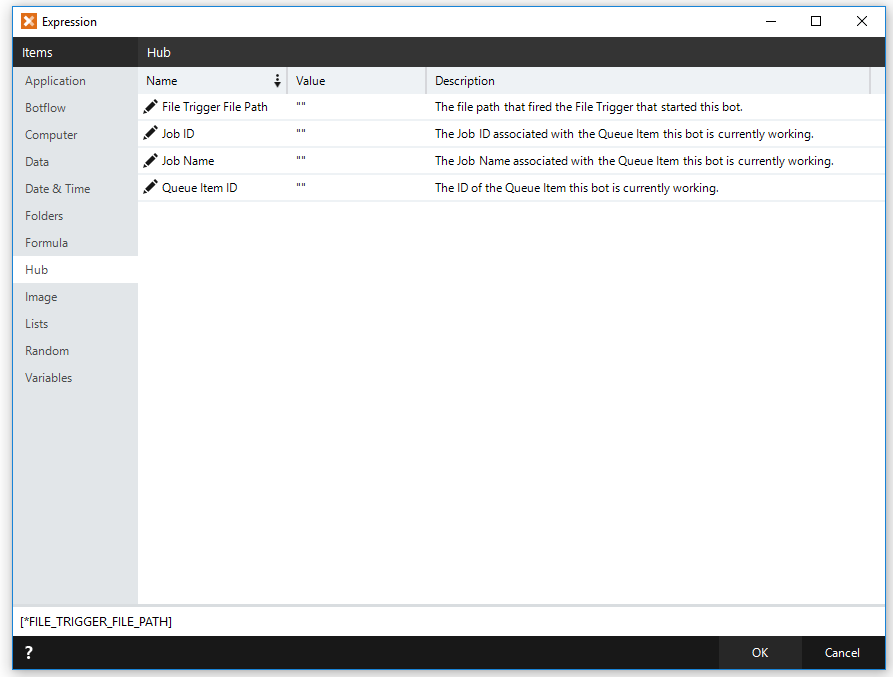
After choosing this on the list, the value of the Workbook field should be [*FILE_TRIGGER_FILE_PATH]. This will tell the botflow to open the workbook that triggered it to run. This value comes directly from FoxHub.
This token is found by clicking the Expression Builder button on the very right hand side of the field (the “magic wand”). Once the Expression Builder is open, click the Hub tab to find all tokens related to FoxHub. At the moment, these tokens will be blank since this botflow was not started through FoxHub. After clicking the “File Trigger File Path” token, it will populate in the Workbook field.
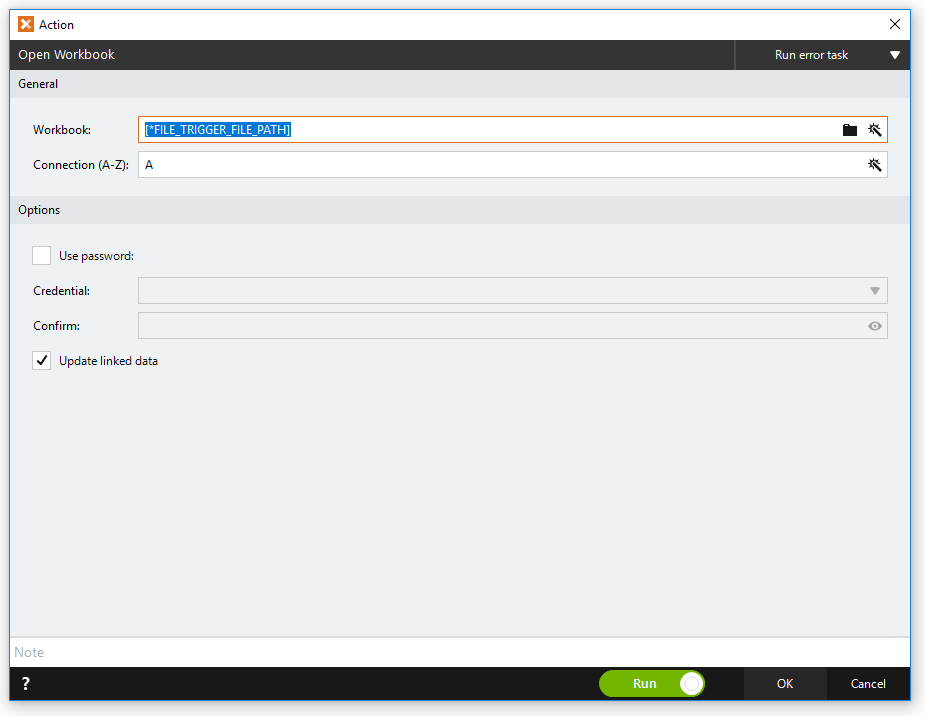
Since the token value is blank, if this Open Workbook action runs it will result in an error. This is fine, but there still needs to be a workbook open to create our next steps.
With the Document Template, that was created earlier, open as a point of reference, use Foxtrot’s bullseye tool to target each cell that will be populated with data. After targeting, select a Get Value action and create a Variable to store the value in.
After those steps are finished, it is recommended to create actions for Foxtrot to close the workbook and Excel itself before moving on with the rest of the process. Use Foxtrot’s bullseye to target the ‘Workbook’ option, found under the dark ‘Targets’ banner when hover over Excel. From there, at the bottom of the list is a Close Workbook action. After that action is created, next bring the bullseye to target all of Excel by dropping it on the title bar. A Close Window action should be created.
Make sure to save and publish this botflow now that all the steps have been created. Foxtrot RPA can be closed, the next steps will take place in FoxHub. Three things need to be setup in FoxHub: the Bot, the Job, and the Trigger.
By default, the machine that FoxHub is running on will be added as a Bot. If the botflow is intended to run on the same machine as FoxHub, then no further action needs to be taken. If it is intended to run on a machine separate from the FoxHub machine, then the Bot will need to be added. To do this, just right click in the blank space and select Add from the menu. Provide the name of the machine in the ‘Bot’ field, and if needed a specific user to run as can be named.
Once the Bot is added, a Job will need to be created. A Job is essentially telling FoxHub what botflow to run on which machines. Again, right click in the blank space and choose Add from the menu. In this case, choose a Solo Job. Provide an identifying name for the Job, then navigate to the directory your botflow was saved in. Select which Bot that the botflow should run on, and click OK to save the Job.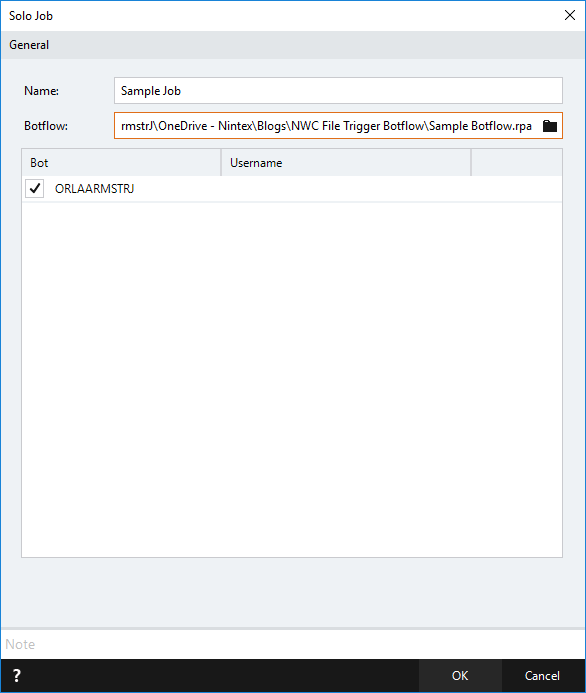
Now that the Job is defined, a File Trigger can be added. Find the Triggers tab on the left-hand side, the user must be in “Professional” or “Expert” mode to see this tab. In the upper right-hand corner, click the plus sign and choose File Trigger. Give it a recognizable name and choose the Job that was just created. In the File field, “*.xlsx” will be enough, since there is a directory dedicated to this kick off. The In Folder is where the previously created Generate Document action will drop the file. Out Folder is where FoxHub will move the file once it has been detected. In this case, I’ve created a subfolder called “Output” within my ‘In Folder’.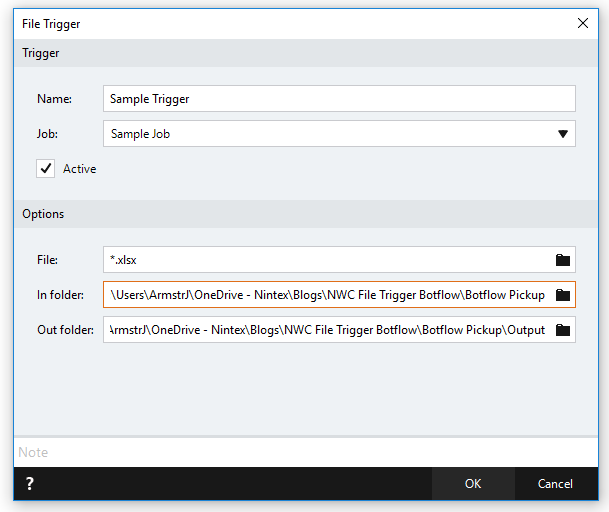
With everything setup in FoxHub, that NWC workflow can now trigger a botflow to start working! In this case, the botflow is not very complicated but this should just serve as a guideline or proof-of-concept to be expanded on.
Questions, comments, concerns please voice them in the replies below! Thanks for reading.
- John
Note: This blog was written using version 15 of the Foxtrot Suite. Readers in the future may have a different experience than outlined in the blog post above.