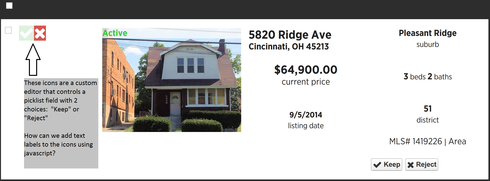
I recently completed the “Table Component: Custom Field Renderers” tutorial and it worked as expected. We have successfully created a custom editor for a picklist field in a table element. However, we weren’t happy with the ui-silk icons used the example so we added the font-awesome css as an external resource and are now using the font-awesome icons in place of the the silk icons.
Taking it a step further, we would now like to add text labels to the icons. However, our javascript skills are rather limited and we are at a dead end.
Using the same example from the tutorial, how can you add text labels to the icons created for the custom editor?

Here is the javascript snippet from the tutorial that we tweaked to pull in the font-awesome icons (we are also using bootstrap to generate the button colors):
var $ = skuid.$,
 field = arguments[0],
 value = arguments[1];

 var cellElem =
 field.element
 .css( 'margin', '3px' );

 switch( field.mode )
 {
 case 'read':
 case 'readonly':
 var iconElem =
 $( '<div>' )
 .addClass( 'fa' )
 .appendTo( cellElem );

 // Based on the value, apply a particular icon style to the iconElem
 switch( value )
 {
 case 'Keep': iconElem.addClass('fa-check'); break;
 case 'Reject': iconElem.addClass('fa-times'); break;
 default: iconElem.addClass('null'); break;
 }
 break;


 case 'edit':
 // The click handler is applied to each rating option <div>. It sets
 // the appropriate styling and updates the Model with the selected value
 function optionClickHandler ( event )
 {
 // "unselect" all options
 $.each( options, unselect );

 // Get the value of the clicked rating option
 var selVal = $( event.target ).data( 'value' );
 // Apply "selected" styling to the appropriate icon
 select(
 options.filter(
 function( opt ){ return opt.data('value') === selVal; }
 )[0]
 );

 // And here it is......
 // Update the model with **one** line of code!
 field.model.updateRow( field.row, field.id, selVal );
 }

 // Create a function to style "selected" elements (opacity = 100%)
 function select ( i, elem )
 {
 $( elem || i ).css( 'opacity', '1.0' );
 }

 // Create a function to style "unselected" elements (opacity = 20%)
 // Note: opactity is not compatible with IE8! use:
 // -ms-filter: "progid:DXImageTransform.Microsoft.Alpha(Opacity=50)";
 function unselect ( i, elem )
 {
 $( elem || i ).css( 'opacity', '0.2' );
 }

 // Create an array of our icon DOM elements
 // The "data-value" attribute is used to associated the DOM element
 // with one of the values in the Rating picklist
 var options =
 [ $( '<div>' ).attr( 'data-value', null )
 .addClass( 'null' ),
 $( '<div>' ).attr( 'data-value', 'Keep' )
 .addClass( 'fa fa-check fa-2x btn-success'),
 $( '<div>' ).attr( 'data-value', 'Reject' )
 .addClass( 'fa fa-times fa-2x btn-danger' )];

 // Initialize the option elements and add them to the table cell element
 $.each( options,
 function( i, opt ){
 opt.click(optionClickHandler)
 .addClass( 'inline' ).addClass( 'buttonicon' )
 .appendTo( cellElem );

 // Apply styling to the already-selected rating
 if ( opt.data( 'value' ) == value )
 select( opt );
 else
 unselect( opt );
 });
 break;
 }


