I was looking for a creative way to filter the calendar per view…month, week, etc… / user like you can on the day view. It is common for us to have customers that have offices with office staff that do the scheduling and they need to see all staff schedules. The problem is this works fine with the day view, but not on the month or week, because there can be 20+ persons on staff and the calendar is way over filled. If they could filter per user or other fields on the models then a view could be created that would work well. We tried grouping on the week view, but this does not work well when over a few staff members. Really like to see this as an improvement area in a future release :)
(If anyone has a similar use case and has created work arounds please let me know.)
Thanks! Note: This topic was created from a reply on the Filter Calendar View by User topic.
David, one of the cool use cases for the new Action Framework is arbitrary filters. You can create a pretty powerful filtering tool that works on the calendar. It even lets you flter more than one model at a time. Here is what I did.
Assumptions: I’m assuming you have a page with models that drive a calendar. And a calendar component using these models as sources. I used Events and Tasks. Aside: WIth Salesforce Summer 14 you can create a formula field that reads Activity date and converts it to a date time field so it can be used in Skuid… Cool!
**Now to the filter. **
1. Create a new model (UserFilter) on an object that has OwnerID. This model should “Create default row” turned on and “Load Model Data” turned off. We are only using this model as a means of selecting the user. (It is a filter source).
2. Add a field editor to the page that uses the UserFilter model and add the OwnerId field. I used the picklist renderer.
3. Add a page title component below the field editor and add two buttons. (Remove the title and subtitle text).
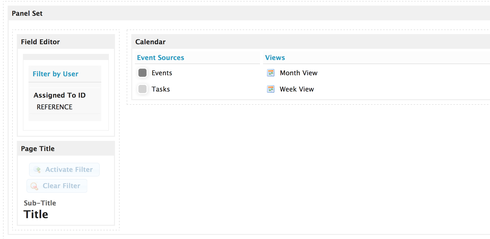
Here is how my page looked with these items now added:

**Configuration: **
4. Add Conditions to event source models: On the models that are used as event sources for your calendar, add a condition on OwnerId that is fitlerable default off. I did this on both the Task and Event model.
**5. Set up the “Activate Filter” button on the page title as follows. **
Action Type: Run multiple actions
Action 1: Activate and Set value of Model condition: Choose the Task model, the OwnerID condtion established in step 4. Pass the following value: {{$Model.UserFilter.data.0.OwnerId}}
Action 2: Activate and Set value of Model condition - do the same for the Event model
Action 3: Query models: All the models modified by conditions in Actions 1 and 2.

**6. Set up the “Clear Filter” button on the page title as follows. **
Action Type: Run multiple actions
Action 1: Deactivate Model condition: Choose the Task model, the OwnerID condtion established in step 4.
Action 2: Deactivate Model condition - do the same for the Event model
Action 3: Query models: All the models modified by conditions in Actions 1 and 2.
Action 5: Update a field on row(s): Choose the UserFilter model, and the owner id field - and simply pass in a blank value (put nothing in the value field). This will reset the picklst to --None–.
**7. Save your page and look at your beautiful work. **
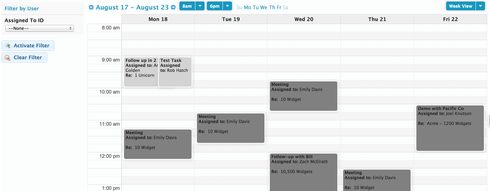
When no filter is selected:
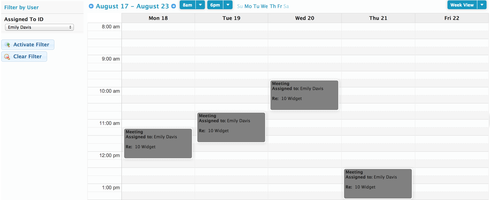
Then when a Owner ID is selected and the Activate Filter button is pushed:

Hope this helps!
One creative approach I’ve seen some Skuid users do already is to use a Queue as a Filter.
For example, you put a Queue, on a Staff Members Model, in a left panel of the screen. In the right there’s a Calendar.
Using the Summer 14 release, you set your Queue Item Action to be Run Multiple Actions.
You add 2 or more Actions, depending on how many Calendar Event Sources you want to filter.
(For each Event Source you want to filter) Add a “Activate and Set Model Condition”.
- Model: your Event Source’s Model.
- Condition: a filterable Condition on the OwnerId field, or whatever relationship field is pointing to your Staff member.
- Value: {{{Id}}}
Query Models: (All Models on which you have activated and set a Model Condition)
I have posted the XML for an example page in our Sample Pages repository:
https://raw.githubusercontent.com/skuidify/SamplePages/master/pages/CalendarFilteredByQueues.xml
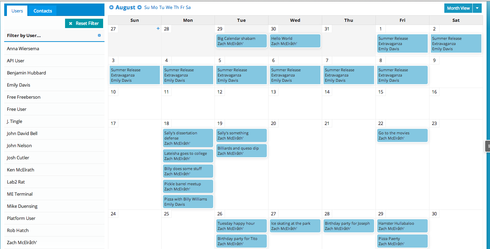
Which looks like this:

Thank you, will give these methods a go and let you know how it works. Appreciate the quick response as always!
Hi Zach, your Queue method works well but is there a way to be able to select multiple users from the queue rather than just one user. ie., when you are trying to schedule a meeting for two internal users it would be beneficial to see both users in the one calendar. Also, in the popup to edit / add an event, how can we add the ability to add multiple users to the appointment.
We currently do not have a method for multi select filters to be built declaratively. In neither of the models described above could you select mutliple values and have the calendar filter to only show those items. Sorry.
Rob, in your example, where does the picklist of Usernames/IDs to use as the filter get populated?
How about this?
Replace queue with table which allows for more possibilities.
1. Add a Table component to the left panel in place of the Queue.
2. Create Custom Field on User object called “Selected” or something.
3. Make the table component pointing to your User Model.
4. Make the table in edit by default.
5. Remove the Save/Cancel button and allow inline record creation.
6. Make the first field in the table the “Selected” field and remove the label.
7. Make the second field the Full Name field in read-only mode.
Save Model on any change so we can update a second model
1. Set Action on Model to Save on Update.

Have to get back to work now so …
Create a model for the currently selected users called “SelectedUsers”
…
Use “SelectedUsers” model instead of …
The only thing that I could think of as being an issue is the fact that the “Selected” field is saved and will be so next time the model is loaded. Is there a way to clear the field on page load?
Peter - its a little hackish - but I just grabbed any object that looked up to User, so I could appropriate that lookup field and bring it into a field editor - where the possible values for user would be displayed. You are never saving records on that object so it doesnt really matter.
I see, OK, thanks. I’ve gotten this approach to work so that users can choose a picklist value from a field, and that filters the primary page model(s) correctly. And I can remove the condition with a “Clear” button as spelled out above. Very nice!
However, the last part of the “clear” actions, where I need to blank out the picklist on the FilterModel row that is showing currently selected picklist value, doesn’t seem to work. The model does get “unfiltered”, but I can’t get the picklist to be “unselected” again (or changed to any other value, for that matter) by just creating an action that says “updated field on row to �blank]”. That action doesn’t seem to do anything.
(Sorry, I’d show a screencast, but it’s working with private financial data, so its hard to clean up.)
Peter - I’m confused here. I’m able to clear a picklist field value and it resets to “–None–” in the interface. Maybe your field is required? Can you add a “none” option to your field and then reset explicitly to “none”
I’m not sure why it isn’t working for me. Probably some config setting I’m missing. I don’t think this approach is going to work for my current problem anyway, though. We need the table search and also a filtered search based on some other model context settings that are a bit complicated. It will be super handy in the future, though!
Update: You can use a table to filter your calendar source the same way demonstrated with charts here: https://community.skuid.com/t/chart-filters-pro-tip-from-skuid-certification-training
Ha! Matt Brown will be glad to know his solution is being used in other ways…
Today, can we do a multi user select filter on the calendar component?
You can add a Filter Set above the calendar, bound to the same Model as the calendar. Add a multi-select filter on “owner”
Enter your E-mail address. We'll send you an e-mail with instructions to reset your password.
