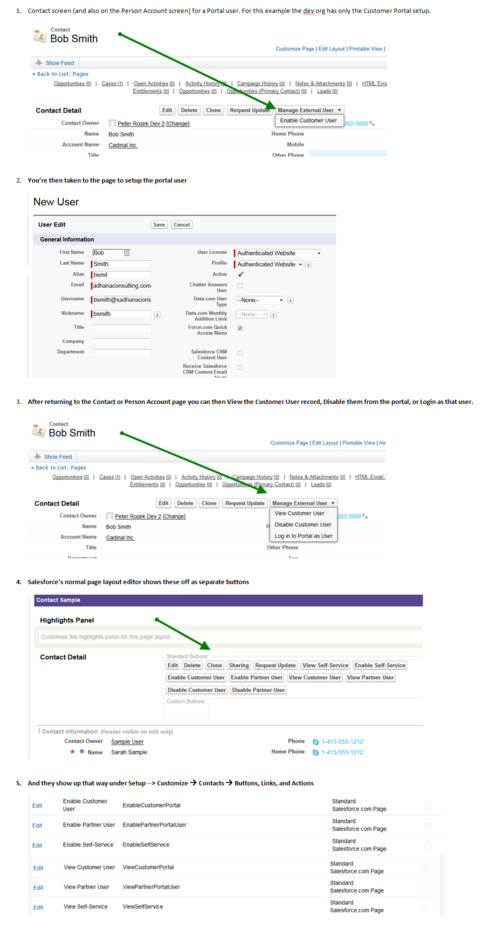
Salesforce has buttons to enable and manage Customer Portal and Partner Portal users. These buttons show up on Contact page and also on Person Account pages when that feature is enabled. I need to be able to do this from within Skuid. It would be okay to have multiple buttons if that’s necessary. I’ll attach screen shots for clarity… 
These buttons can be implemented in your skuid layouts.
Most of them are simply redirects that carry with them parameters to get you to the right place on the destination page. These can be converted to skuid using the following process.
1. Follow one of the redirect buttons in the standard layout. When I selected “View Customer User” the Url is as follows:
https://na12.salesforce.com/005U0000001dWkz?ut=c&retURL=%2F003U000000XI5sIIAT&id=005U0000001dWkz&cntc=003U000000XI5sI
2 Lets parse that out so we can make our redirect
A. https://na12.salesforce.com :Domain name. Never include this in a redirect. Using a relative link will ensure your code works moving from sandboxes to production, and if Salesforce changes the Instance of your org.
B. /005U0000001dWkz :The first ID. Copy this URL into your browser (https://na12.salesforce.com/005U0000001dWkz) to see what object this is. In this case it is a User Id. We will replace this number with a merge field. The User Id has to be in a model on your contact page. Syntax like this will merge it: {{$Model.User.data.0.Id}} (where the User data is in the model User).
C. Rinse and repeat for all other ID’s in the query strings. Note, retURL parameters usually start with %2F, which is encoding for the “/” character. Leave those letters in your redirect. At the end, your redirect url will look like this:
/{{$Model.User.data.0.Id}}?ut=c&retURL=%2F{{ContactId}}&id={{$Model.User.data.0.Id}}&cntc={{ContactId}}<br>
3. Add a new button in a page title component in Skuid and paste that redirect url into it.
A few final notes.
- Improve the user experience by conditionally displaying the right buttons. If contacts do not have portal user accounts - show the “add” button, If they do have portal user accounts show the “edit” and “remove” buttons.
- The “Log in as the user” button is different. It is “on click javascript” and would require translating the javascript into a custom snippet in Skuid.
- When you put buttons in a page title, or table row action, pay attention to the model context. Make sure you will have the data you need for your parameters in the model context you are using. If for example you are on a page title connected to “contact” you may not have the user data. The syntaxt {{$Model.User.data.0.Id}} allows you get that “foreign model data”. If the data is in the model in context, you just need to select the field and it will look like this: {{ContactId}} The data has to be in a model to be able to be passed in the redirect.
Hope that helps.
Rob, thanks for breaking this down. So far it’s not quite working. I suspect that’s because I’m using Person Accounts and not Contacts, which changes things a little…I think. I’ll do some more testing and will post again if I work out the syntax for the Person Account.
You will have to do the URL deconstruction regardless of where the button is coming from, but if you follow the general steps laid out above, I think you should be able to get Person Account buttons to work.
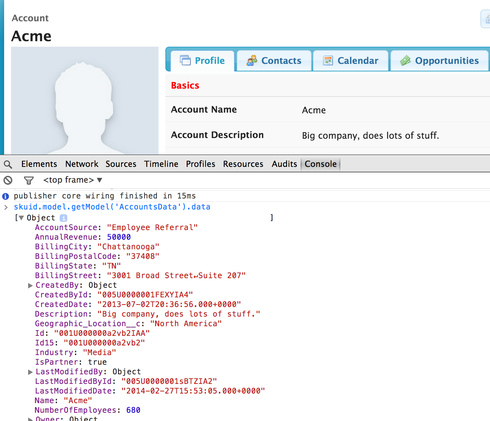
Just make sure that the fields you are passing into the redirect are actually live in your model when you attempt to pass them along. Use the console and our Model API to query what is actually in the model. The syntax in the console is “skuid.model.getModel(‘’).data” (Where you replace with your actual model name). This will show what is really in the client.

You may also try the ID15 value in your redirect as well as the regular ID (which is 18 characters). Again - when you deconstruct the standard button URL count your ID length to get the correct item.
Hope it works.
Hi Rob,
Can you provide some more details on how to create the custom snippet in order to login as the user?
This is the url from that standard button:
javascript:navigateToUrl(%27/servlet/servlet.su?oid=00DE0000000JCDu&retURL=%252F003E0000007weuU&sunetworkid=0DBE00000004CJX&sunetworkuserid=005E00000073EqQ%27);
Just implement it as a redirect action and deconstruct the URL:
/servlet/servlet.su?oid=00DE0000000JCDu&retURL=%2F003E0000007weuU&sunetworkid=0DBE00000004CJX&sunetworkuserid=005E00000073EqQ
Rob,
Great tutorial thanks! There is a new wrinkle with recreating the button. A confirmation token is now generated (I think daily) on the Enable Partner button. So just editing the URL doesn’t work any more.
I think the way around this is to create a button on the object based on this post: https://community.skuid.com/t/how-do-i-expose-a-submit-for-approval-button-within-skui…
I created the button with this body:
{!URLFOR($Action.Account.EnableAsPartner, Account.Id)}
When I run it from a page title within Skuid I get the following error and the URL doesn’t generate a confirmation token.

Ugh. First Approval flows, and now Portal User management. Salesforce, why are you making our lives so hard!
Check the URLs created by the standard process and see if they have added a sesison ID in the URL string that can be added through the URL hack. If that doesn’t work I think the only solution is going to be invokable apex…
There is not a session id, I will open a ticket with SF and see what they say.
Standard Process URL:
<a href="https://na9.salesforce.com/ui/portal/EnablePRMAccountPage/e?save=1&retURL=%2F001E0000010MeKN%3Fnooverride%3D1%26sfdc.override%3D1%26srKp%3D001%26srPos%3D0%253FobjectType%253DAccount&id=001E0000010MeKN&_CONFIRMATIONTOKEN=VmpFPSxNakF4Tmkwd01TMHhPRlF4T0RveE9Eb3dNUzQ1TlRoYSxqcThCWWMyMkhYVkRqRTVZeXozZElaLE5UVTNOekJt" rel="nofollow" target="_blank" title="Link https//na9salesforcecom/ui/portal/EnablePRMAccountPage/esave1retURL2F001E0000010MeKN3Fnooverride3D126sfdcoverride3D126srKp3D00126srPos3D0253FobjectType253DAccountid001E0000010MeKN_CONFIRMATIONTOKENVmpFPSxNakF4Tmkwd01TMHhPRlF4T0RveE9Eb3dNUzQ1TlRoYSxqcThCWWMyMkhYVkRqRTVZeXozZElaLE5UVTNOekJt"></a><u>https://na9.salesforce.com/ui/portal/EnablePRMAccountPage/e?save=1&retURL=%2F001E0000010MeKN%3Fnooverride%3D1%26sfdc.override%3D1%26srKp%3D001%26srPos%3D0%253FobjectType%253DAccount&id=001E0000010MeKN&_CONFIRMATIONTOKEN=VmpFPSxNakF4Tmkwd01TMHhPRlF4T0RveE9Eb3dNUzQ1TlRoYSxqcThCWWMyMkhYVkRqRTVZeXozZElaLE5UVTNOekJt</u>
Custom Button URL:
<a href="https://na9.salesforce.com/ui/portal/EnablePRMAccountPage/e?save=1&retURL=%2Fservlet%2Fservlet.Integration%3Flid%3D00bE0000001ERXDIA4%26eid%3D001E0000013FTgPIAW%26ic%3D1%26retURL%3Dhttps%253A%252F%252Fskuid.na9.visual.force.com%252Fapex%252Fskuid__ui%253Fpage%253DManagePortalUsers&id=001E0000013FTgP" rel="nofollow" target="_blank" title="Link https//na9salesforcecom/ui/portal/EnablePRMAccountPage/esave1retURL2Fservlet2FservletIntegration3Flid3D00bE0000001ERXDIA426eid3D001E0000013FTgPIAW26ic3D126retURL3Dhttps253A252F252Fskuidna9visualforcecom252Fapex252Fskuid__ui253Fpage253DManagePortalUsersid001E0000013FTgP">https://na9.salesforce.com/ui/portal/EnablePRMAccountPage/e?save=1&retURL=%2Fservlet%2Fservlet.Integration%3Flid%3D00bE0000001ERXDIA4%26eid%3D001E0000013FTgPIAW%26ic%3D1%26retURL%3Dhttps%253A%252F%252Fskuid.na9.visual.force.com%252Fapex%252Fskuid__ui%253Fpage%253DManagePortalUsers&id=001E0000013FTgP</a>
Tami did you ever get a response from Salesforce on this?
I didn’t but so far it has been working without first enabling the account. I originally had a conversation with SF and they said I had to enable the account first. Through some testing I realized I didn’t. So just the button to create the portal was all I needed. Let me know if this is the case for you and I give you the code for the button.
Yea that would be great thanks!
I added a couple more parameters to pass through to the user record. I am using this as a row action redirect URL. Let me know if you have any questions.
/005/e?ut=P&retURL=%2F/apex/skuid__ui?page=NameofPage%3Fnooverride%3D1%26sfdc.override%3D0&cntc={{Id}}&Email={{Internal_Email__c}}&Username={{Internal_Email__c}}&name_firstName={{FirstName}}&name_lastName={{LastName}}&Alias={{Alias__c}}&CommunityNickname={{Name}}&Profile={{Portal_Profile_ID__c}}
Enter your E-mail address. We'll send you an e-mail with instructions to reset your password.
