Article Contributors: Artur Martirosyan
For successful integration, the following initial steps need to be carried out:
- An active Viber account - The account must be created on the platforms that support bots, e.g. iOS, Android, etc. To create an account, you can download the Viber mobile or desktop version
- Active Viber Bot – You can create your Viber Bot here
- To create a Bot with the same account you will need to sign in with the phone number that has been used during the account creation.
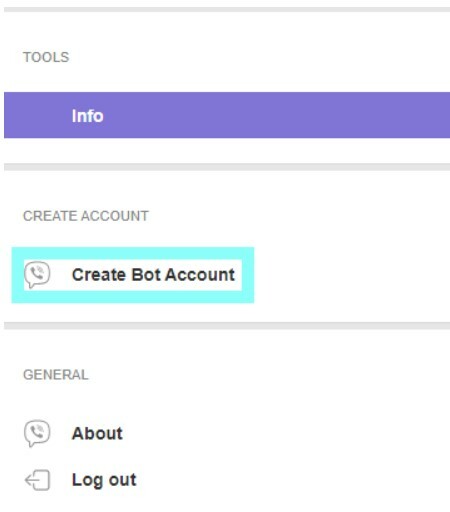
- Account authentication token – Once the Bot is created a unique account identifier will be generated, it will be available for the administrator account across various platforms where the account has been used.
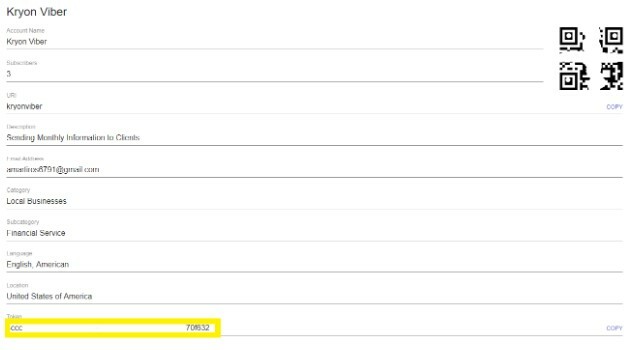
Once the above steps are complete, you can start setting up the Viber WebHook. Setting up an account webhook is one of the key steps which will enable the integration between two platforms to use API calls. The Webhook is being used for receiving & sending messages as well as getting callbacks from Viber. To set up an account Webhook, the following two items are required:
- Account authentication token
- A valid and certified URL – The URL that is being used for the Viber Webhook must have an SSL certificate. In this example, a certificate from GoDaddy has been used. More about the certificates you can read here or under the requirements of the Viber official page. Note: Self-signed certificates are not supported.
Setting up Account Webhook
To set up Viber Account Webhook you need to Post the following API using Kryon Studio “Call Rest API Method” Advanced Command
Resource URL
https://chatapi.viber.com/pa/set_webhook
Post Data
{ "url":"https://myhost.com", "event_types":[ "delivered", "seen", "failed", "subscribed", "unsubscribed", "conversation_started" ], "send_name": true, "send_photo": true}The Advanced Command in Kryon Studio will look like as below:
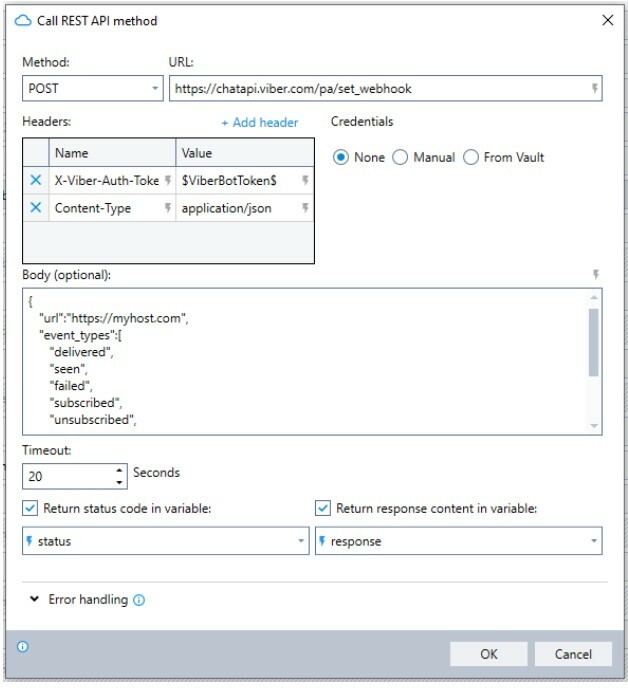
$ViberBotToken$ - This is the Account Authentication Token variable taken from the info page of the Viber Bot (2nd point under Initial Requirements).
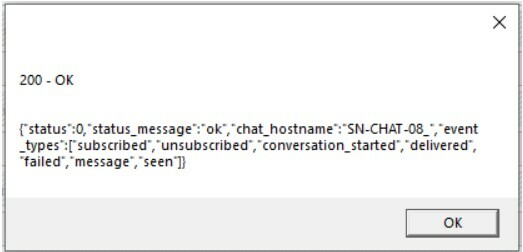
A successful data posting should return “Status”: 0 in response to the callback. If you didn’t get this response then please check and make sure that all requests to your Webhook URL receive HTTP status 200. Once you get the “Status”:0, it means your webhook successfully is step up. In Kryon Studio using Advanced Command "Show Message" you should see a similar response like below from your API call.
Alternatively, you can get the subscriber’s ID if you add them temporarily as a member of the group/bot. Once you add any of the subscribers as a member you can run the following API call to get the info data of the account where you will see all the members’ IDs. The member IDs usually are the same as the subscriber IDs.
Resource URL
https://chatapi.viber.com/pa/get_account_info
Post Data
{}The above API response will have the following structure where the IDs highlighted in green are the member IDs, which can be used for sending messages
{ "status": 0, "status_message": "ok", "id": "pa:5533890926942343283", "chat_hostname": "SN-CHAT-06_", "name": "Kryon Viber", "uri": "kryonviber", "icon": "https://media-direct.cdn.viber.com/pg_download?pgtp=icons&dlid=0-04-01-5ab164322e5e0ef483d84a2da493cc0163642e834be82d91eaa748bac159d0cc&fltp=jpg&imsz=0000", "background": "http://content.cdn.viber.com/backgrounds_v1/Android/800/10000999.jpg", "category": "Local Businesses", "subcategory": "Financial Service", "location": { "lat": 40.7691018, "lon": -73.96878 }, "country": "US", "webhook": "https://myhost.com", "event_types": [ "subscribed", "unsubscribed", "conversation_started", "delivered", "failed", "message", "seen" ], "members": [ { "id": "vN3HQZKrTS2wqg8EyZ2RkQ==", "name": "Artur", "avatar": "https://media-direct.cdn.viber.com/download_photo?dlid=xl4SAHPQJ256VMxMS0wwa4XFc6ESX_G1jMH0DEdbg7er-4_zpeqQCY0Oe2PrtG858XuOL0i4OH0vY2OCfzyuYqHxZUZ3CxAyIw9nllA2TAZkEv-QByOKR3RdRdA&fltp=jpg&imsz=0000", "role": "admin" }, { "id": "oLE1DAYGo3tFNnkCkSiAGQ==", "name": "Gayane", "avatar": "https://media-direct.cdn.viber.com/download_photo?dlid=xl4SAHPQJ256VMxMGVEzPcnHIbwdCqHngcagWRcIgL6qqNXwobaUCNYEKWTvtm5rrXmIKku8Y3gpMjDRLjmuZ_WmZBpyCUIyJwhjw-4GuxfEDItio7vY3VHkLxctPQ23YiEVPw&fltp=jpg&imsz=0000", "role": "admin" } ], "subscribers_count": 3 }In Kryon Studio the Advanced Command will look like as below:
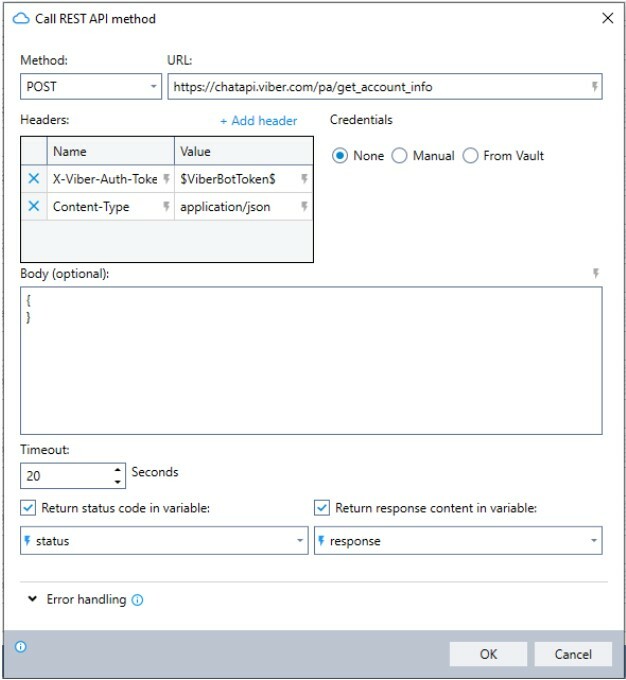
Resource URL for getting user details
https://chatapi.viber.com/pa/get_user_details
Post Data for getting user/subscriber information
{ "id":"vN3HQZKrTS2wqg8EyZ2RkQ=="}Resource URL for sending messages
https://chatapi.viber.com/pa/send_message
Post Data for sending text messages
{ "receiver":"$SuscriberID$", "min_api_version":1, "sender":{ "name":"Kryon Viber", "avatar":"" }, "tracking_data":"tracking data", "type":"text", "text":"Hello World"}Post Data for sending messages with pictures
{ "receiver":"$SuscriberID$", "min_api_version":1, "sender":{ "name":"Kryon Viber", "avatar":"" }, "tracking_data":"tracking data", "type":"picture", "text":"Photo description", "media":""}Post Data for sending messages with URL
{ "receiver":"$SuscriberID$", "min_api_version":1, "sender":{ "name":"Kryon Viber", "avatar":"http://avatar.example.com" }, "tracking_data":"tracking data", "type":"url", "media":"https://kryonsystems.com"}Post Data for sending messages with file attachments
{ "receiver":"$SuscriberID$", "min_api_version":1, "sender":{ "name":"Kryon Viber", "avatar":"" }, "tracking_data":"tracking data", "type":"file", "media":"http://www.images.com/file.doc", "size":10000, "file_name":"name_of_file.doc"}For more information or other Post Data, you can visit Viber for Developer page. I hope this article will help you to automate your processes connected to your Viber account. For any further assistance please let us know by leaving comments on KryoNet.
For similar guides, for other messenger apps, you can check also the below links
Sending Notification from Slack
Sending Notification from Telegram


