I’ve been making a list on which users can sign up to a variety of events. On the nintex form they can choose which event they want to sign up for (it’s a choice column), and upon item creation a workflow starts that sends a confirmation email and stuff, and this workflow should also check if the user has already signed up for the same event, and if so, delete the entry again to prevent duplicate signups.
The workflow should also check how many users in total have signed up for that event and check that against a participant limit. If users try to sign up while the limit was already reached, the workflow should instead put the entry on a backup list.
I use a List Query to search the list for other entries by the user signing up (event is same, user is same, id is not same), and delete the new item if it finds any. I also use a List Query to count the number of entries in the list (event is same).
This all seems to work quite well, the issue is if users enter multiple forms in quick succession (either multiple users or the same user) List Query apparently doesn't find an earlier entry properly (Sharepoint or the workflow can lag behind I suppose). This can result in users entering duplicate signups or overflowing the entry list beyond the event capacity.
Has anyone had a similar situation like this or have an idea how to handle this in a robust way on Nintex for Sharepoint 2019?
Best answer by MegaJerk
Okay, so this is going to get a bit technical here and there, but I’ll try to break things down the best that I can. The examples I’ll provide should give you enough information where if you wanna do things in a different way you should be able to customize it for your own purposes, but the focus remains the core problem of “how can I ensure that things multiple things happen one-at-a-time as to prevent race-conditions and correctly handle any number of requests”.
The Sharepoint Setup
I have created two lists on a testing site.
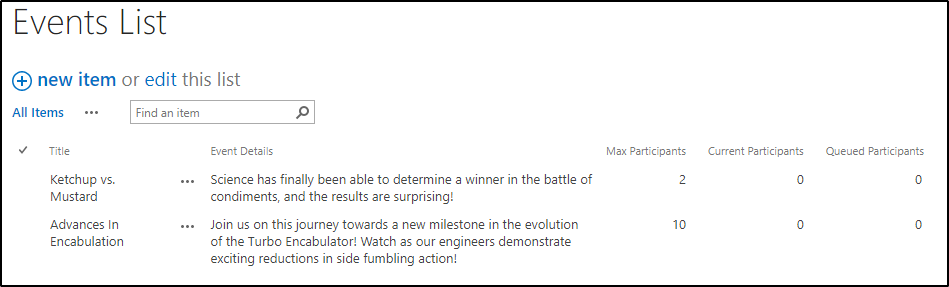
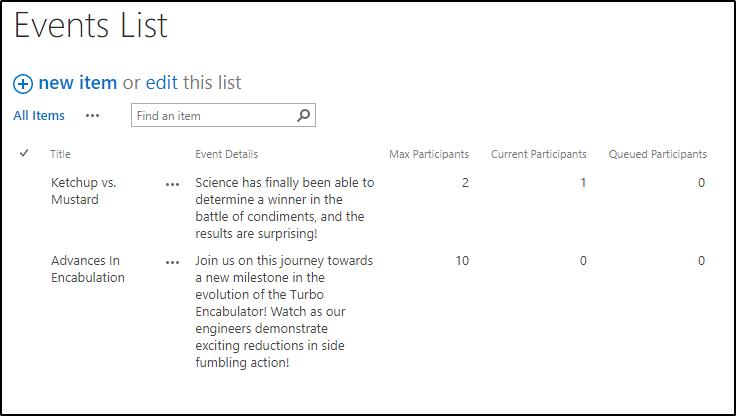
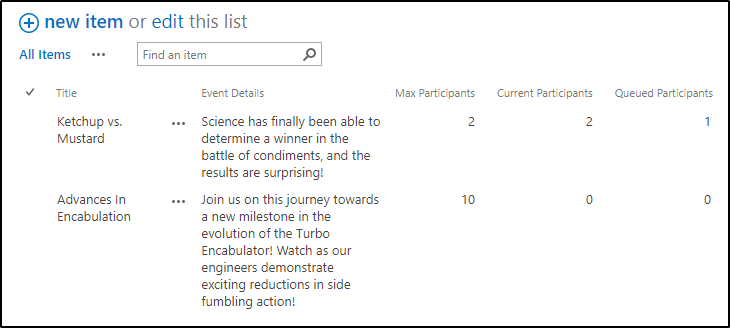
Events List will contain Event Items which have the following columns of Title, Event Details (Multine Text), Max Participants (Number), Current Participants (Number), and Queued Participants (Number):
Showing the Events List with a few already made events!
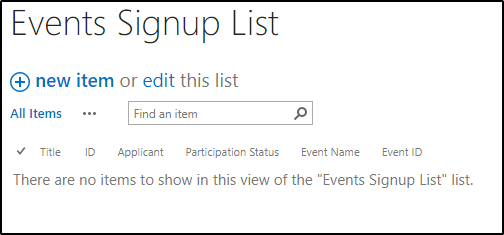
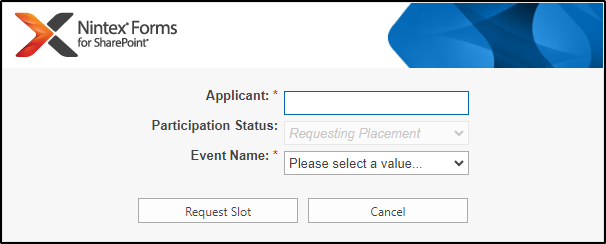
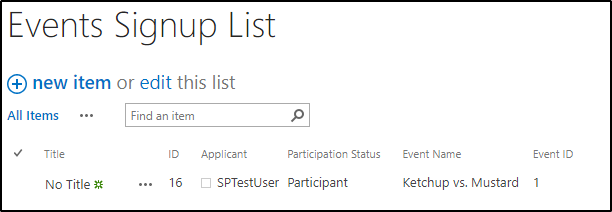
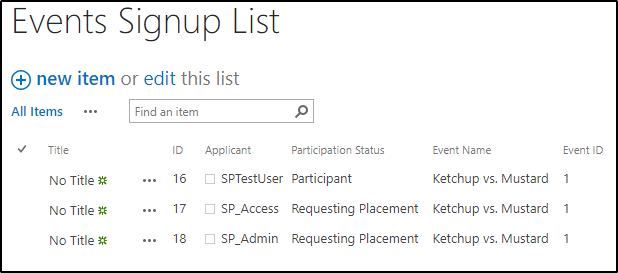
And the Events Signup List, in which items represent a User’s Request for Participation to a given Event from the Events List. Each Signup Request has the following columns - Title, Applicant (Person), Participation Status (Choice), Event Name (Single Line Text), Event ID (Single Line Text):
Showing the Events Signup List with no items / participation requests.
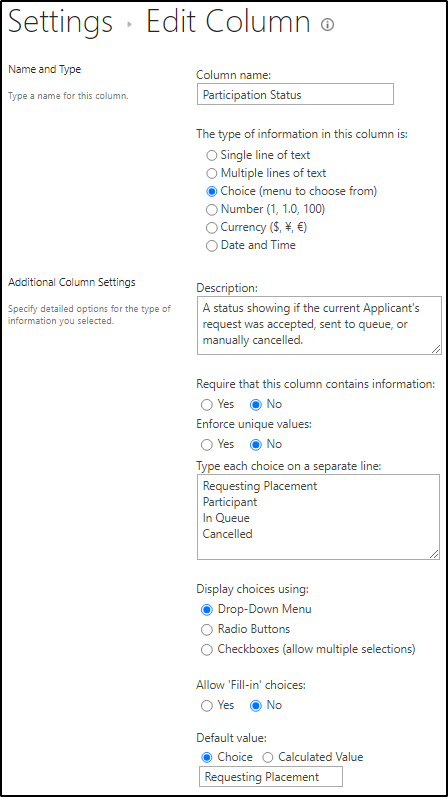
To make things explicit, the [Participation Status] column is configured with following choices in the following way:
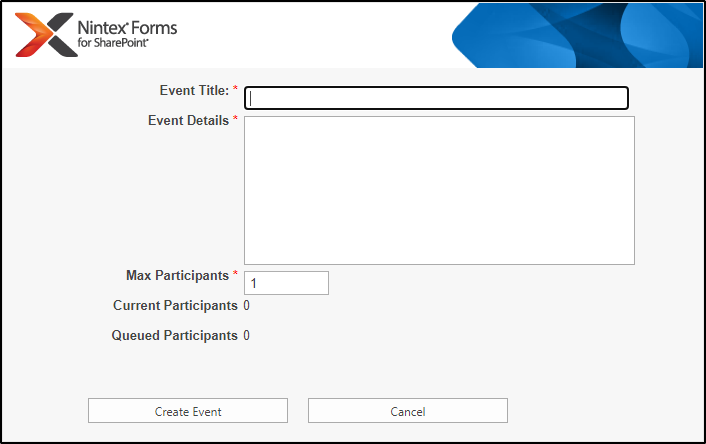
Additionally, each List has its own (very simple) Nintex Form for ease of use.
The Events List:
The Event Signup List:
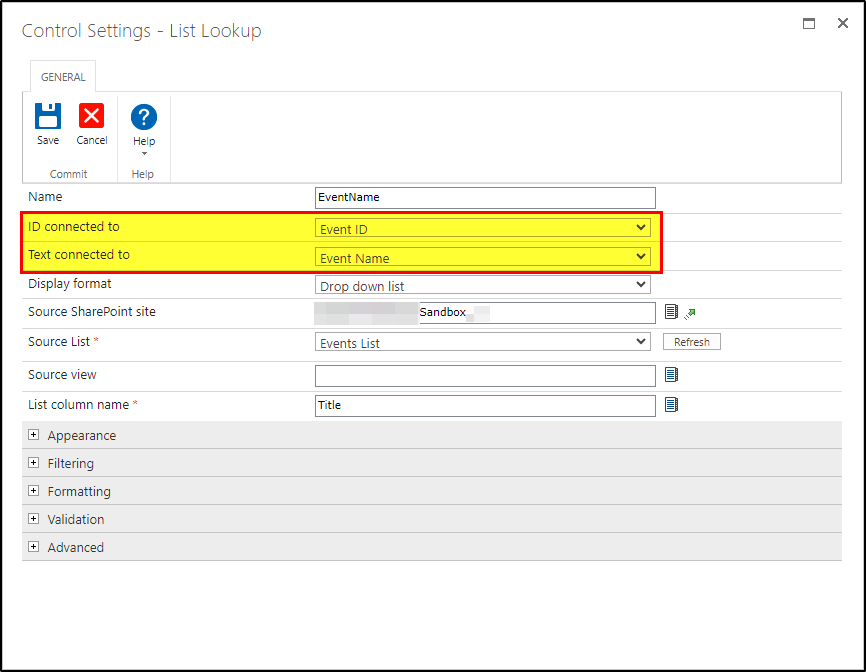
Note 1: the Event Signup List uses a Lookup Field for the Event Name, which saves the Title of the Event to [Event Name] column and the ID of the Event to the [Event ID] column. You can see this in the configuration:
Note 2: Also the [Participation Status] is configured to default to “Requesting Placement”, and is not changeable by the user. So making a new request is *always* making a new request.
How It Should Work
What I want is for a user to create a new “Request” using the Event Signup List’s new item button. They will select from the existing Events in the lookup, and once they hit “Request Slot”, it should attempt to add them to the Current Participants back on Events List, or if there is no more room, to the Queued Participants value.
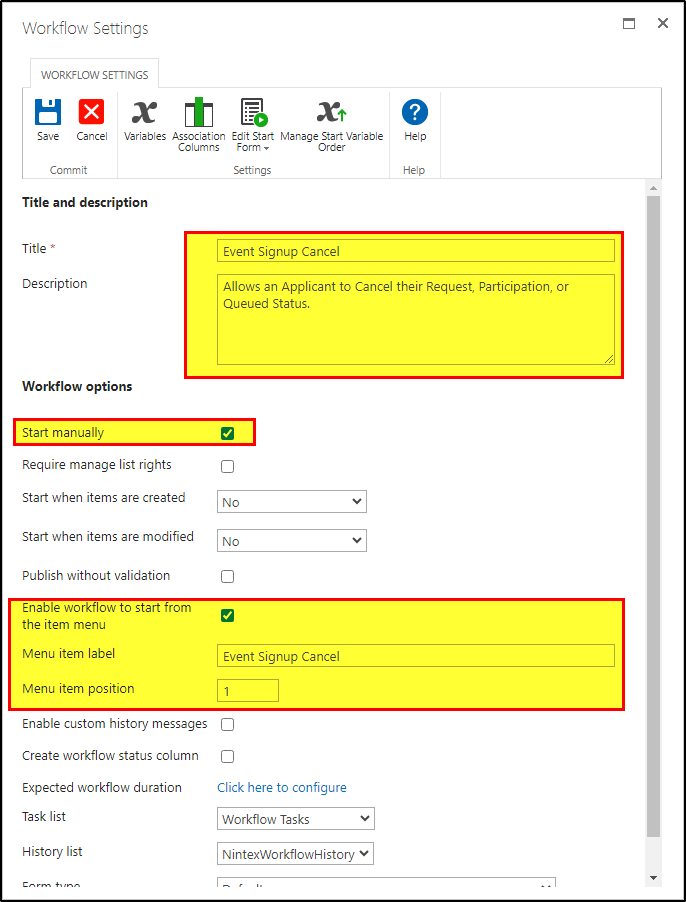
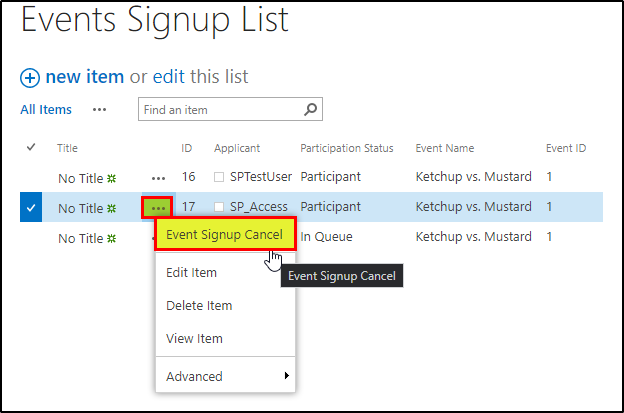
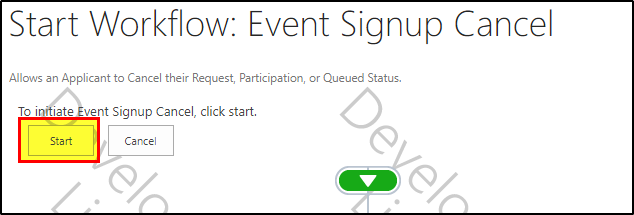
To Cancel a Request I want the user to run the Cancel Request workflow from the Item and it should do the following:
If the current Request Item has a Participation Status of:
Requesting Placement - do nothing
In Queue - Reduce the Queued Participants column of the Events List by 1
Participating:
If Queued Participants is greater than 0
Find lowest Queued person for the event, and promote them to “Participating”, then reduce Queued Participants count by 1.
If Queued Participants is 0
Reduce the Current Participants column of the Events List by 1
Then I want to DELETE the Item of the Request that cancelled
Making A On-At-A-Time UDA
Because there will potentially be a lot of new and existing items (Event Signups) all trying to communicate back to one central Item (Event), we need to ensure that they are doing so one item at a time. While there is no obvious way to do that, the “StartWorkflowOnListItem” operation of the Workflow web service has a particularly useful bit of functionality we can use to our advantage. If you attempt to start a Workflow on an item using this service, and the workflow is already running on said item, it will FAIL and throw an error. And because the Web Service workflow Action has the ability to CAPTURE errors gracefully (without erroring out the workflow), we now have a way to know when the Item we wanna run something on is busy!
With this information we can start to craft a reusable UDA (User Defined Action) that will take a few parameters, and will run a workflow on any given item anywhere in sharepoint with the payload of our choosing and in a way that ensures that only one item at any given time has access to the workflow in question. If two items try to run the same workflow at the same time, one of them will fail and will wait its turn before trying again.
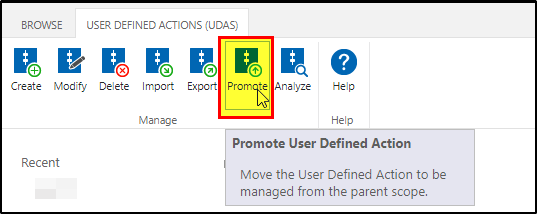
(NOTE: I will attach the exported version of this UDA to this post so that you can import it into your environment. Just remember that you’ll likely need to Promote it to the Site Collection Level in order to make it available to all of the Sites!)
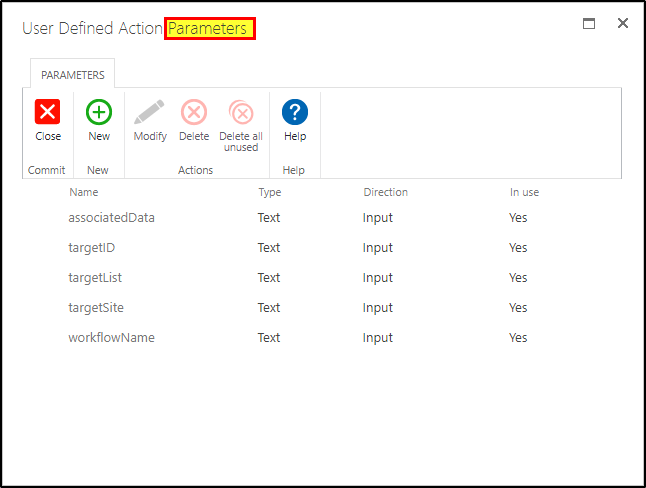
To make this UDA I’ll need a few Parameters:
These will be the values that we MUST fill out if we’re going to use the UDA in one of our workflow. The meaning of each parameter is as follows:
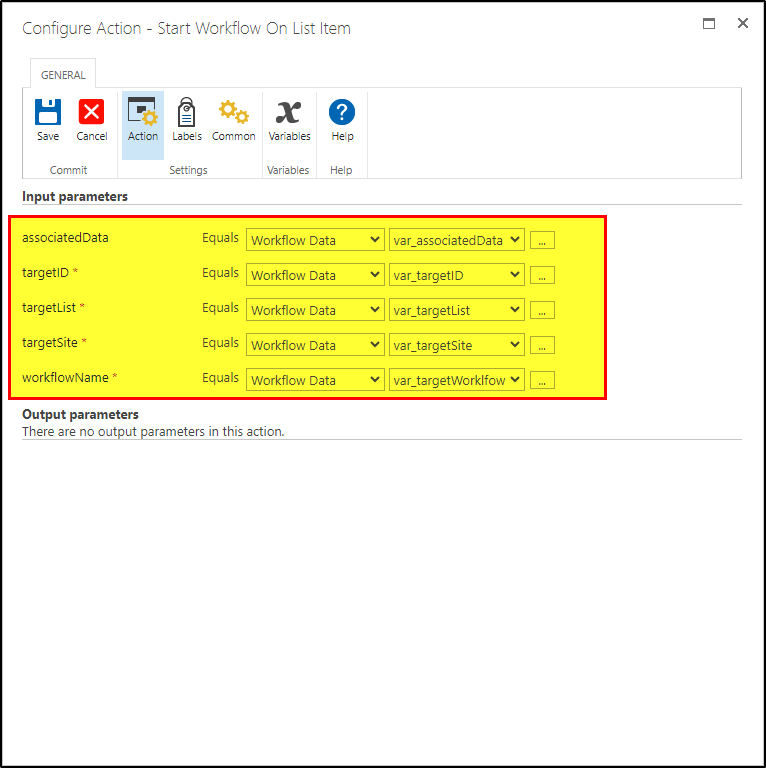
associatedData: Used to pass information to the target workflow. If information is passed it must be done using an Encoded XML string! Failure to encode will result in the UDA stopping preemptively as a failsafe against unwanted looping.
targetID: The ID of the Item you want to run the workflow on.
targetList: The Name of the List where the Item is located.
targetSite: The Name of the Site of the List where the Item is located.
workflowName: The Name of the Workflow you want run.
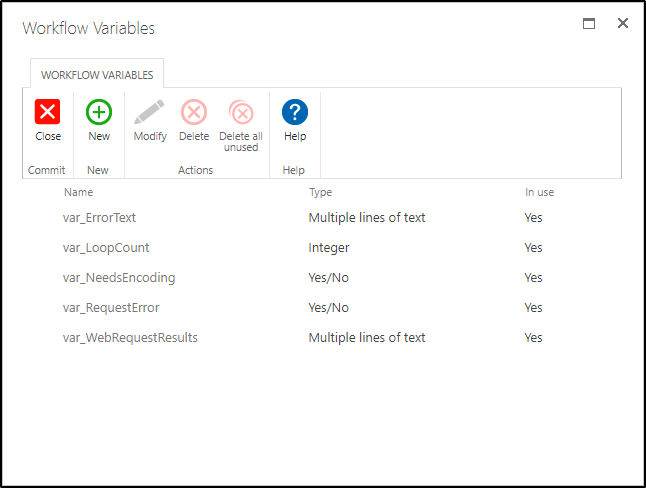
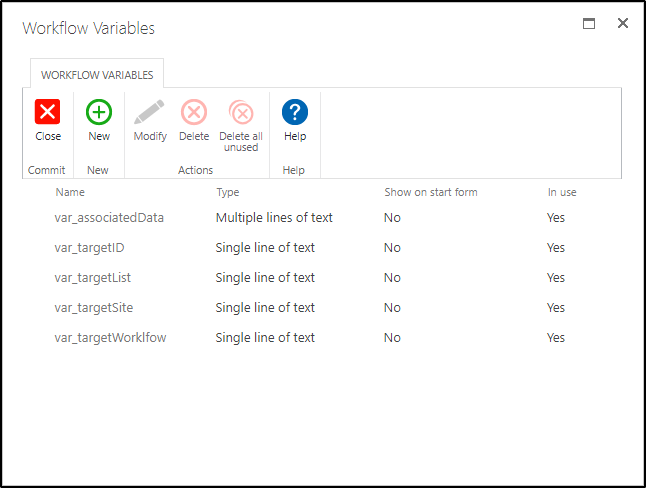
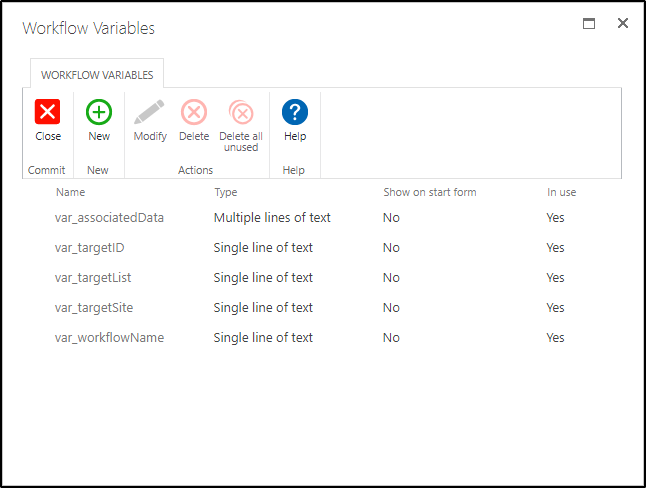
Additionally we’ll need a few workflow variables to hold some of the data that the UDA needs to function:
Now let’s get into the Actions. First thing first, we’ll initialize var_RequestError to Yes (or true), and var_LoopCount to 0:
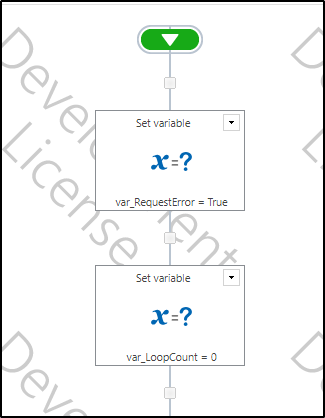
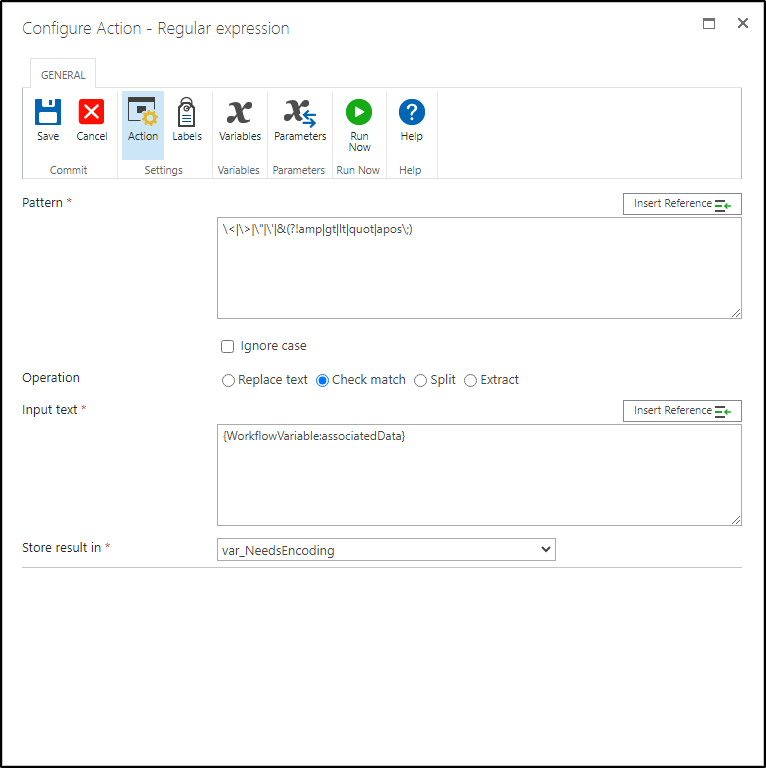
Then we’re going to do a quick check to see if anything has been sent to us in the associatedData parameter, and if so, make sure that it’s encoded properly:
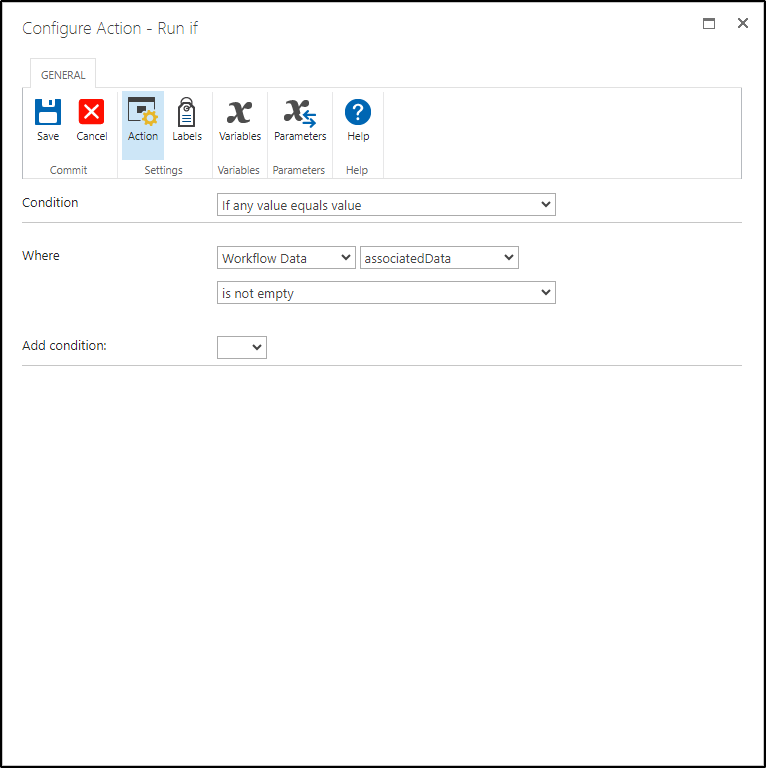
Let’s break that down. First check that the parameter isn’t empty:
If it isn’t empty then we do some regex to check to see if there are any non-encoded characters in the body of the text, and save the results of this (true or false) to the var_NeedsEncoding variable:
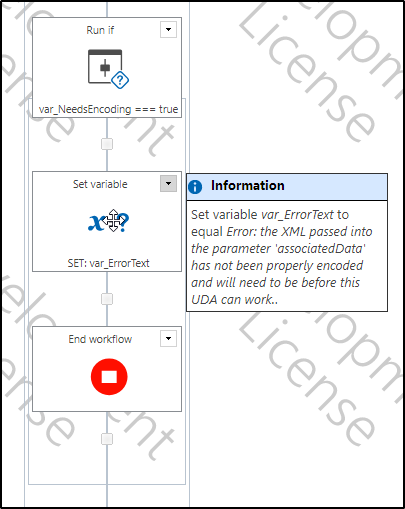
If var_NeedsEncoding is true, then we set an error message and STOP the UDA:
You can send this error message to yourself in an email or do any number of fancy things with it… I probably should have here, but this is already big!
Assuming that our associatedData is either empty or correctly encoded, we then continue onto the next part… the LOOP
Pretty simple huh?
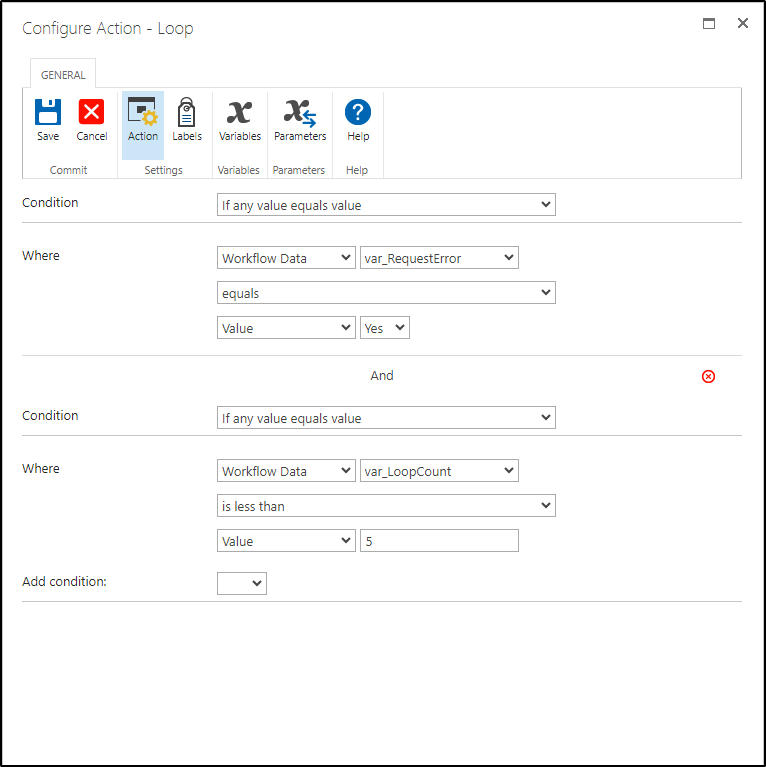
This is what enforces our one-at-a-time compliance. First the guts of loop:
Because we initialized var_RequestError to be set to “Yes” and var_LoopCount to equal 0, we’re always going to loop at least once. However, in the event that we loop again, or again again, the MAX number of loops is dictated by the value that var_LoopCount should be less than to continue. In this case that’s 5. So, it’ll loop at a maximum of 5 times before giving up, and because I’ve never been able to get items to loop more than twice, I suspect that this should be okay for your environment (but if it isn’t then you can change the loop amount here!).
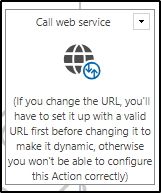
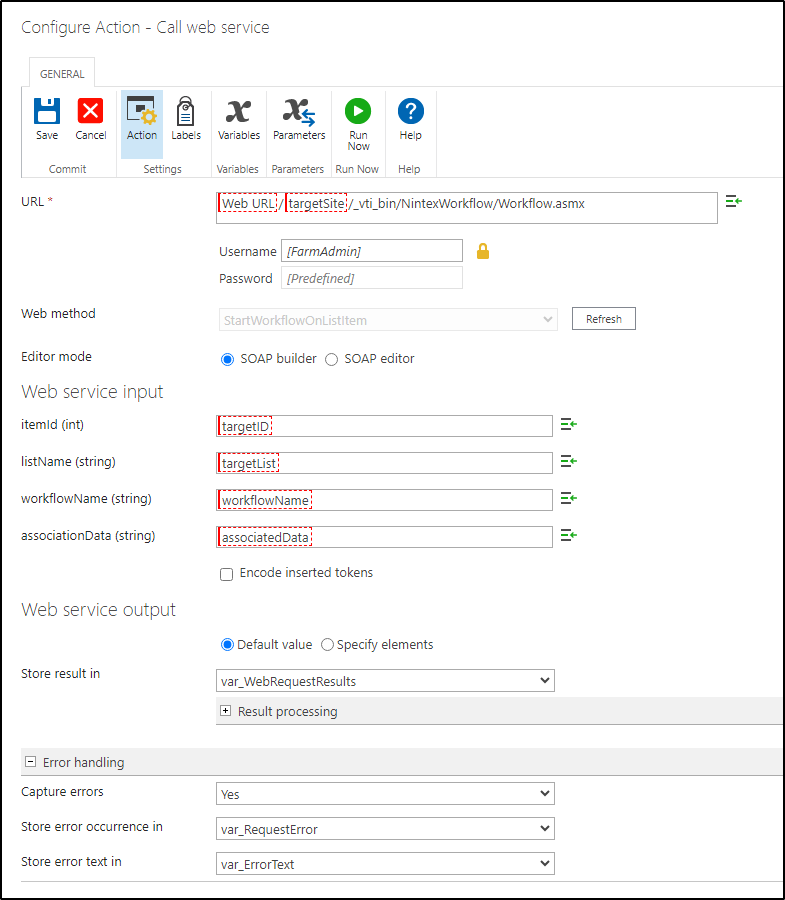
The first thing we do in the loop is to use the Call Web Service action:
don’t worry about that note just yet. we’ll get to that...
Inside it’s pretty straight forward:
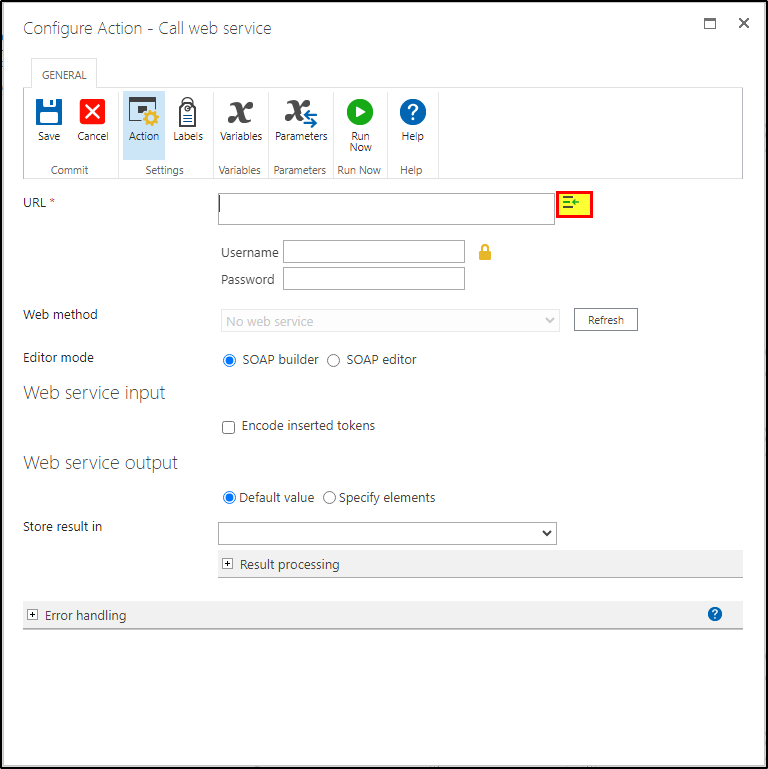
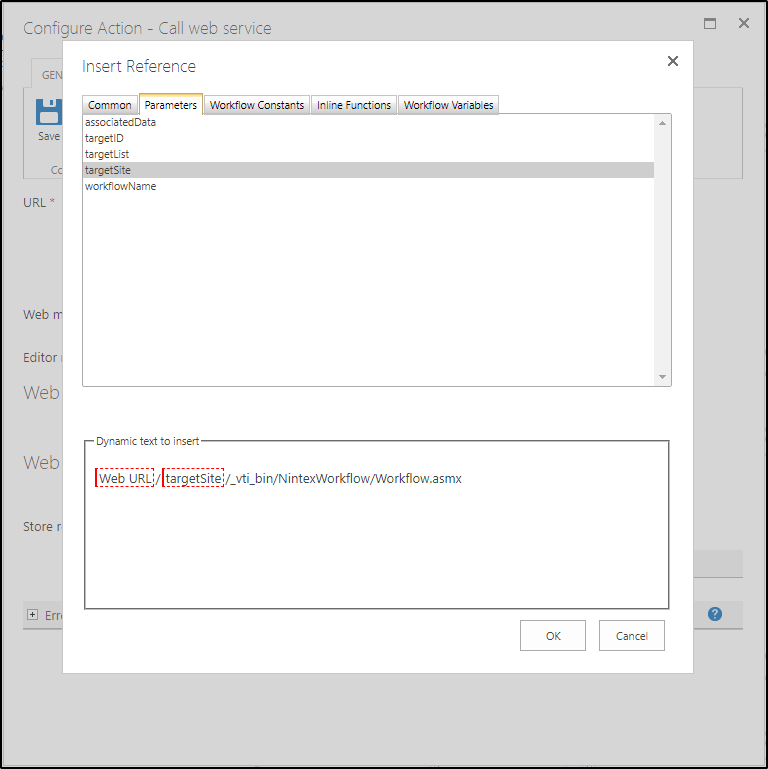
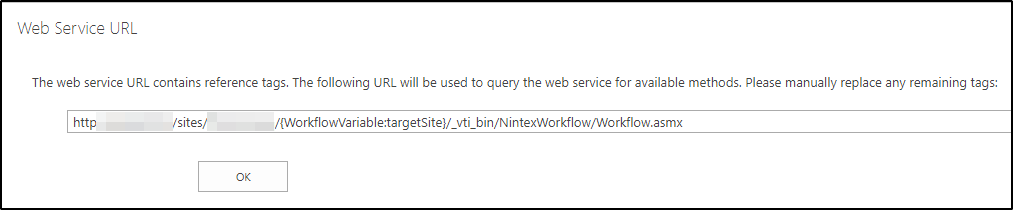
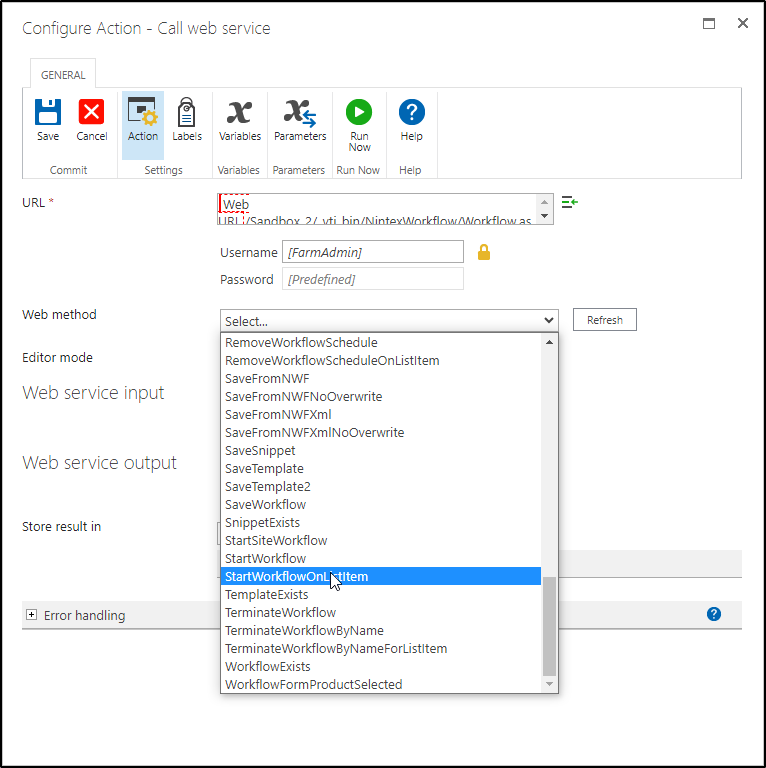
Before I get into explaining what each part of this does, let’s take a little time to dive into JUST the URL portion. A UDA is not necessarily associated to any given Site or List, and therefore sometimes you need the things inside of them to behave dynamically. In this case we want the URL to *change* based on the “targetSite” value. However, for the Call Web Service action to work, it needs to be pointed towards a valid Endpoint at least once so that it can produce a dropdown list of valid service methods for you to use. The initial URL used for this can not use (non-common) parameters or workflow variable references in the URL field when doing this! So, let’s say I have a new Call Web Service action that I wanna point to a dynamic site:
If I insert the following references and string in the URL bar:
and then hit Refresh:
We can see that the URL it’s trying to use has inserted our parameter reference into it:
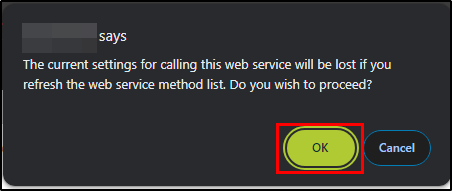
And while the rest of the URL is fine, hitting okay will tell us that we’re in trouble
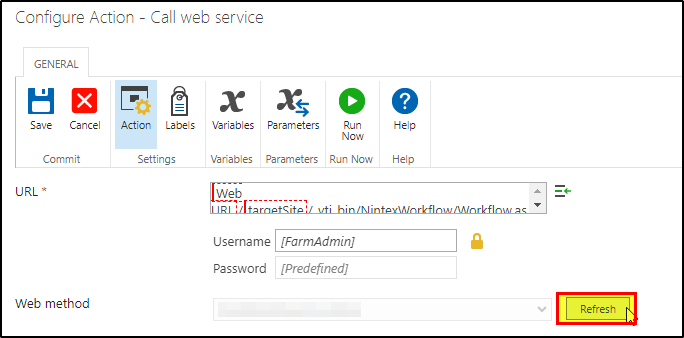
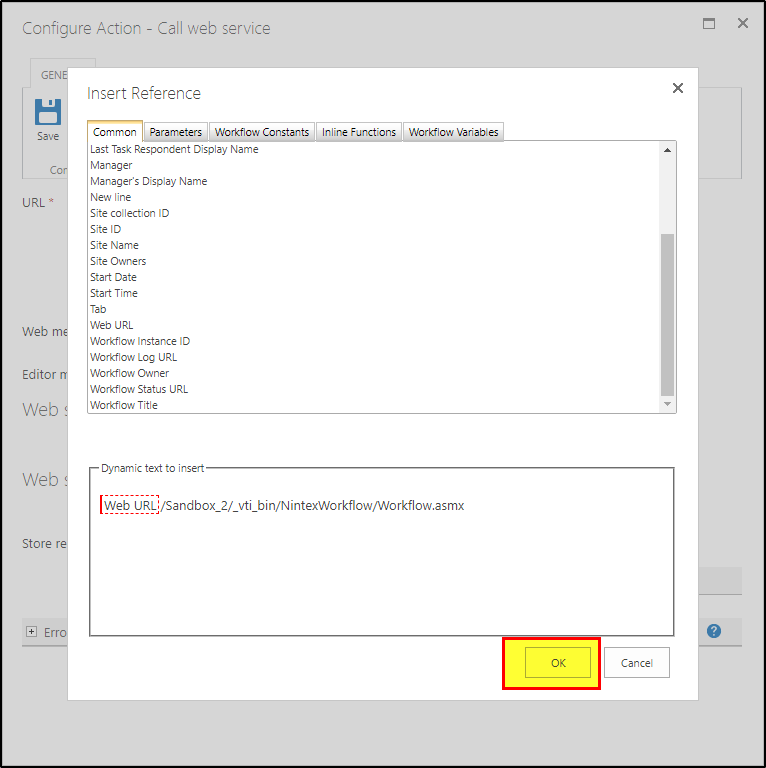
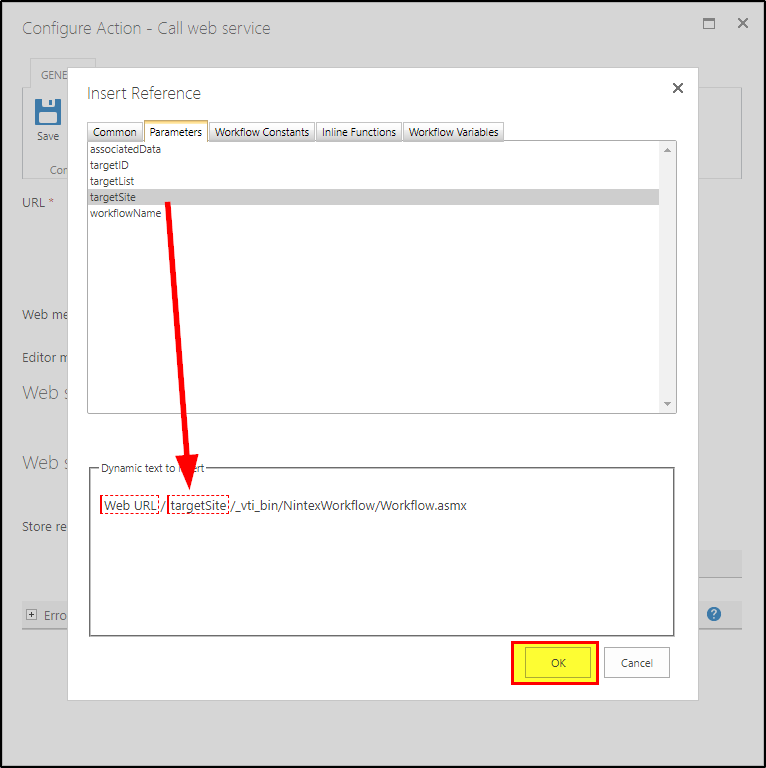
To bypass this, we first replace any instance of a non-common reference with a known value:
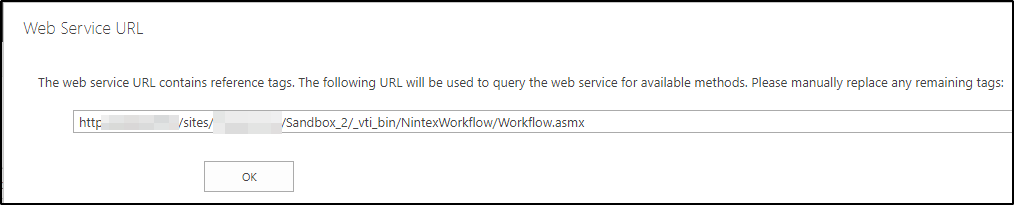
Now when we hit refresh we see that we have a valid URL:
and can make a selection from the drop down:
Once we’ve made the selection, we can then CHANGE the URL value BACK to using a dynamic reference:
Notice how we still have our method selected? Now the action is configured to work with a URL that can be dynamically changed with a parameter!
While I do not think that you will have to go through any of this, I felt like it was important to say in the event that you need to modify that URL value in some specific way, because it could cause you to pull your hair out if you don’t know any of this.
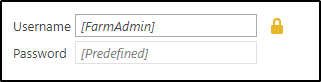
Moving on with our ACTUAL Call Web Service Action, you’ll need to have some Credentials setup to run the Call Web Service Action.
You can do this by either typing in a username and password outright, or by setting up some Credential Workflow Constants in the Nintex Administration portion of your SharePoint’s Central Admin. To use the Workflow Constants here in this action, simply click on the Lock Icon to the right.
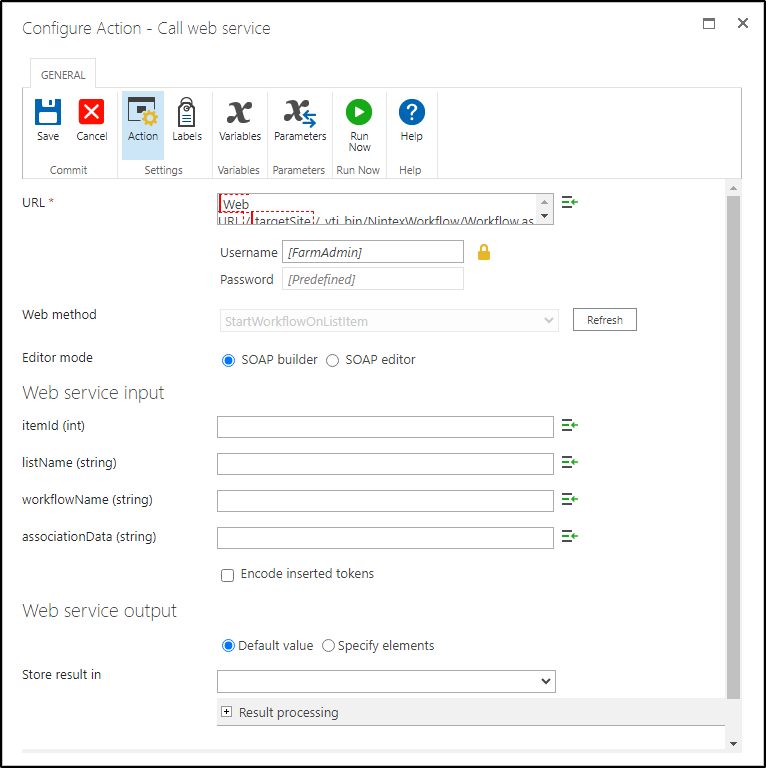
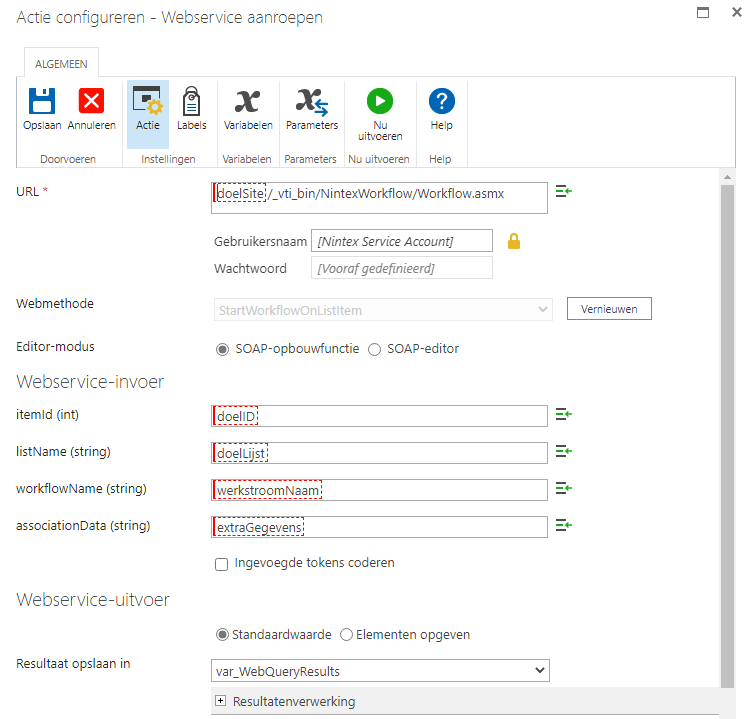
Next up you can see that we’re using the already talked about “StartWorkflowOnListItem” method. Because it’s a little easier to not fuss about with building up a big payload of XML to send to the webservice, I am opting to use the SOAP Builder option, which will present all of the configurable options for a given method to use as discreet inputs, which are populated with our parameters:
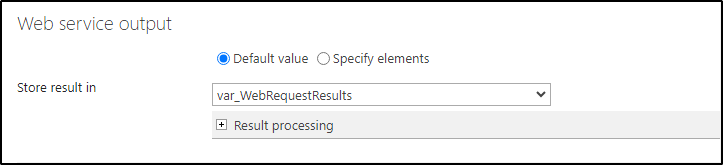
The Results of our Web Service Call are stored in a variable:
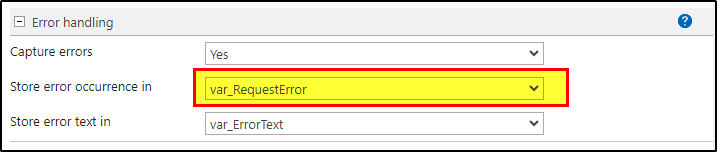
Lastly, and perhaps most importantly, we make sure that Errors are being captured and that the error occurrence is being stored in the var_RequestError variable:
This is important for a few reasons. The most obvious is that we know when we’ve encountered an error! However the less obvious reason is that when the Workflow we want to run actually succeeds, this value is set to FALSE, meaning, no errors were encountered. Remember, we want to loop through and keep making this call so long as there is an error and var_RequestError is initialized to TRUE. So when everything works right, and the workflow is ran, it’s set to FALSE and indicates that our loop should not loop again. And that’s it for the Call Web Service action.
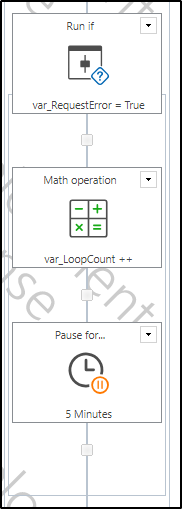
Now it’s just a little bookkeeping. We check to see if var_RequestError is *still* set to True (meaning that we *did* encounter an error in the call web service):
Then we increment the var_LoopCount by 1, and wait 5 minutes. Once the 5 minutes is up we will run the loop again to try running the workflow once more.
So there it is. The entire UDA explained. Incredibly simple but very very useful. Now let’s put it to work!
The List Workflows
First we’ll start with the Event List and it’s single Workflow:
Really? That’s the name we’re going with? Yeah!
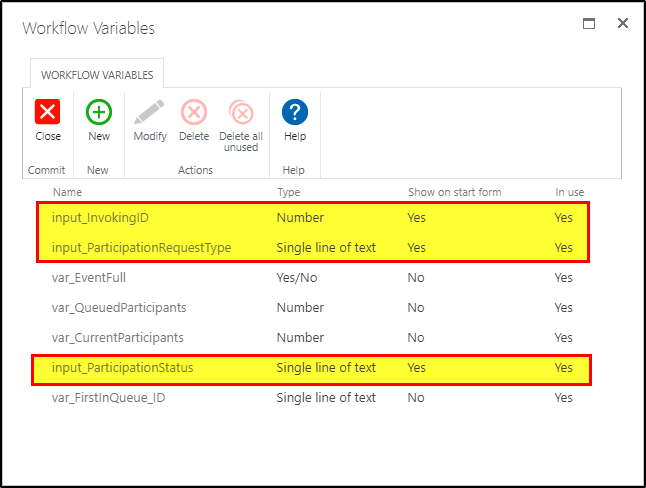
As I described back in the “How it should work” section, we want to take incoming requests from the Event Signup List Item and process it in some meaningful way. To that end, we’ll need a way of knowing which Event Signup Item is invoking this workflow, and so that is reflected in our variables:
We have three “Starting” variables
input_InvokingID: the ID of the Signup Item that invoked this workflow
input_ParticipationRequestType: the type of request being made by the Signup Item
input_ParticipationStatus: the *actual* [Participation Status] value of the Signup Item
The other variables will hold data about the current state of our Event Item
var_EventFull: Default - No, indicates if the Event is full
var_QueuedParticipatns: current number of [Queued Participants]
var_CurrentParticipants: current number of [Current Participants]
var_FirstInQueueID: used to get the ID of someone in Queue who is “first in line” to promote them to Participating.
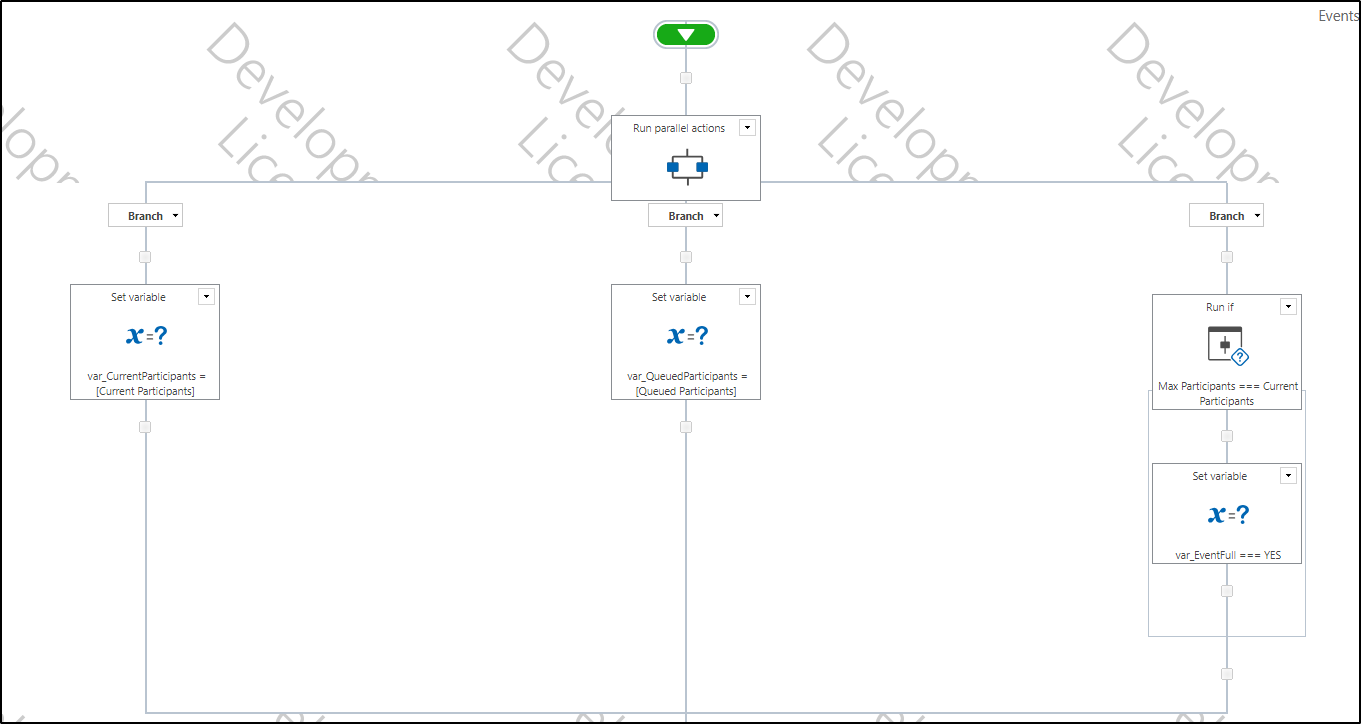
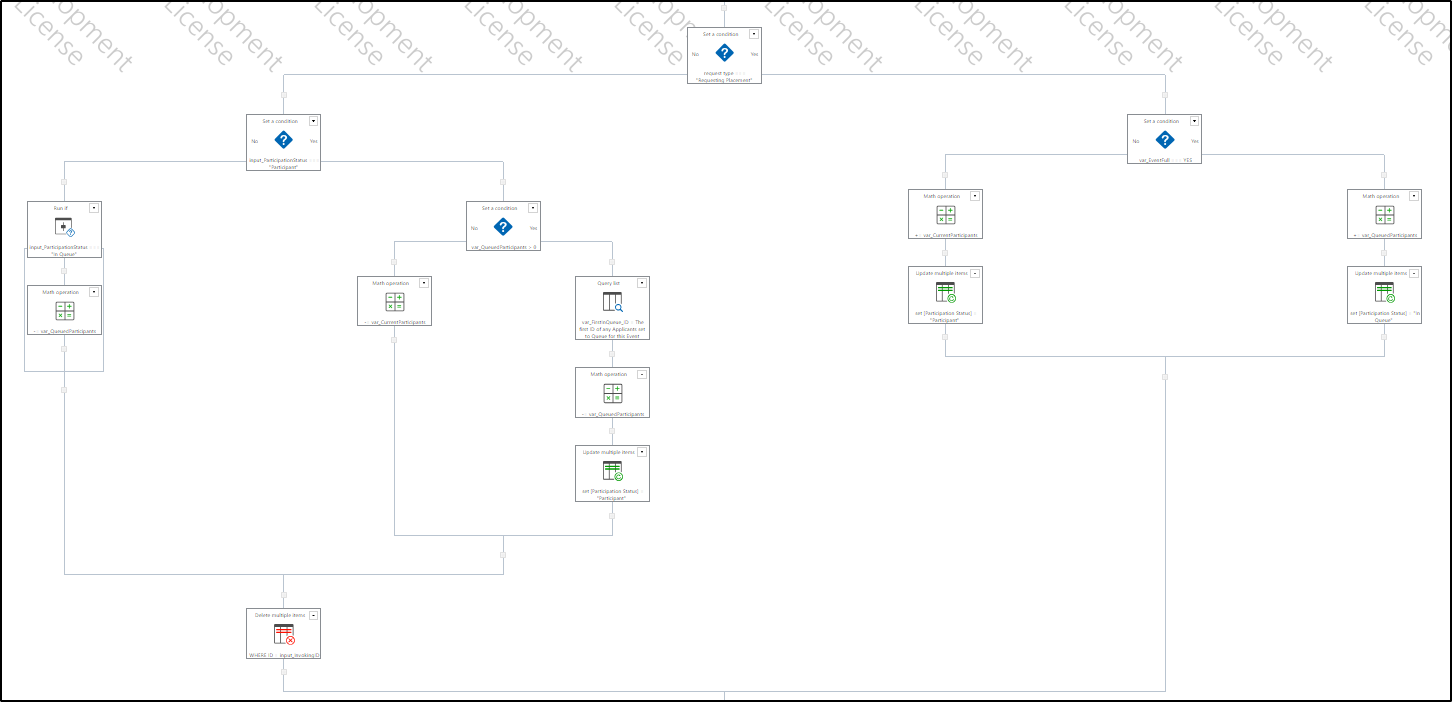
As for the workflow actions, it’s pretty straight forward:
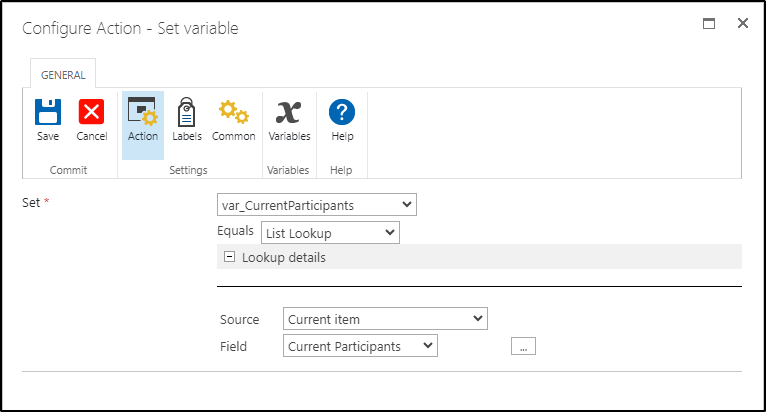
We initialize the var_CurrentParticipants and var_QueuedParticipants to their respective Current Item Lookup values:
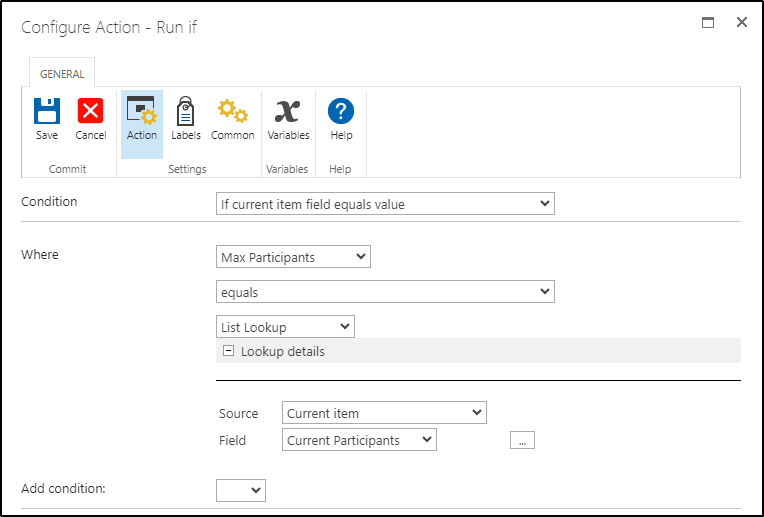
And then set the value of var_EventFull to Yes IF the [Max Participants] column value equals the [Current Participants] column value:
Next up we have several Conditional branches:
Let’s start with the Top three:
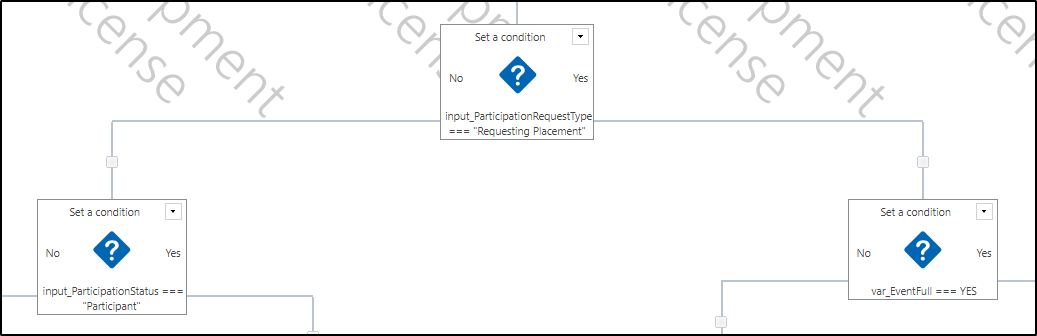
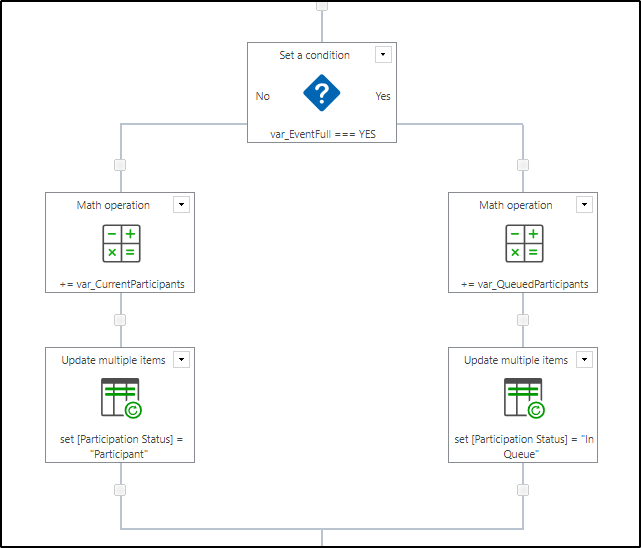
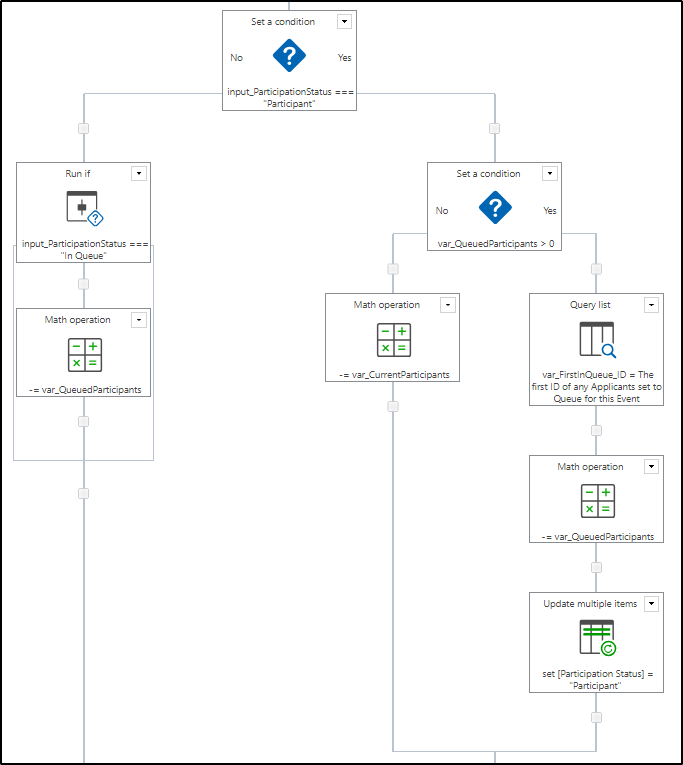
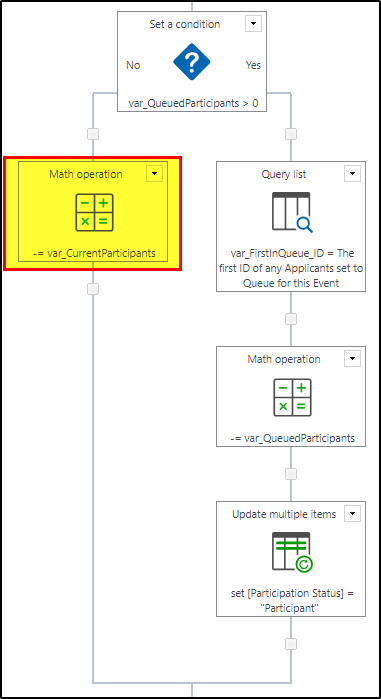
First we check to see if the input_ParticipationRequestType equals “Requesting Placement”. If it does then we check to see if the var_EventFull equals “Yes” or “No”
If the event is Full then we need to add 1 to the var_QueuedParticipants value and then Update the Event Signup List Item’s [Participation Status] to “In Queue”. However if the Event is not Full then we only need to increment the value of var_CurrentParticipants by 1, and update the Event Signup List Item’s [Participation Status] to “Participating”
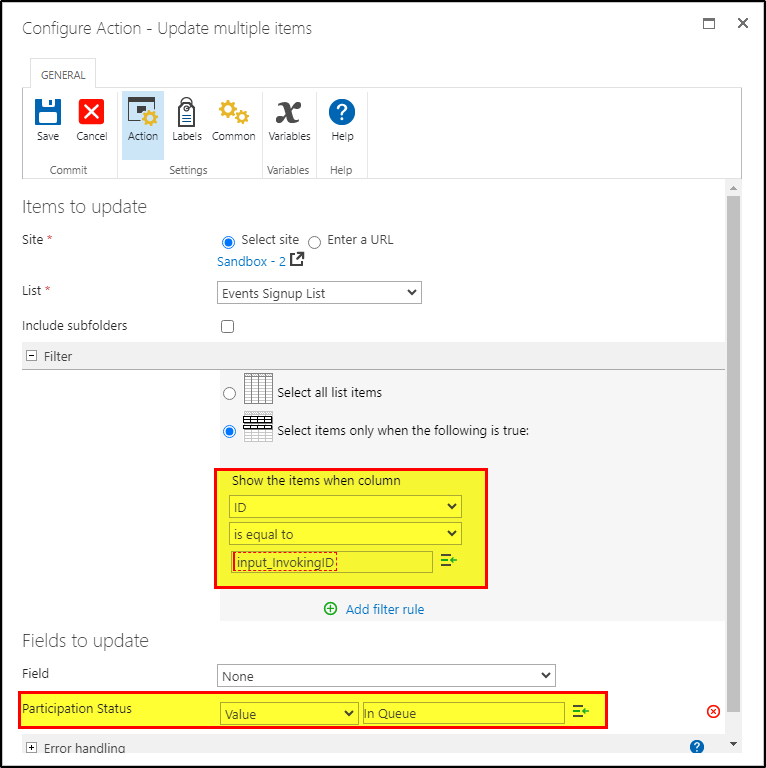
Note that when we set the [Participation Status] on the Event Signup List Item we use the input_invokingID as the value used to specify the item:
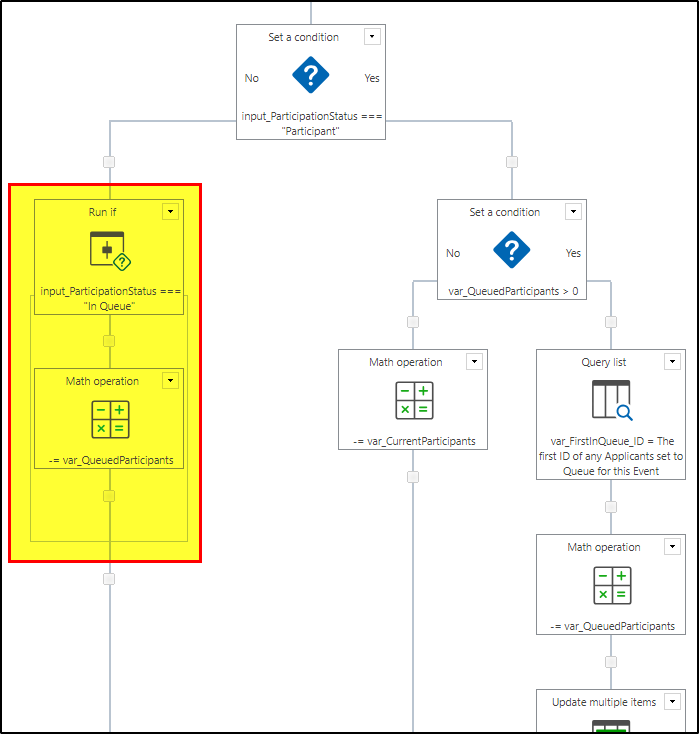
On the flip side, if input_ParticipationRequestType does NOT equal “Requesting Placement” then the user has sent a Cancellation, and we’ll need to then check if the input_ParticipationStatus equals “Participant”.
If it does, that means we’ll need to check and see if there are any existing people in Queue for this Event, and we can easily do that by looking to see if the var_QueuedParticipants value is greater than 0.
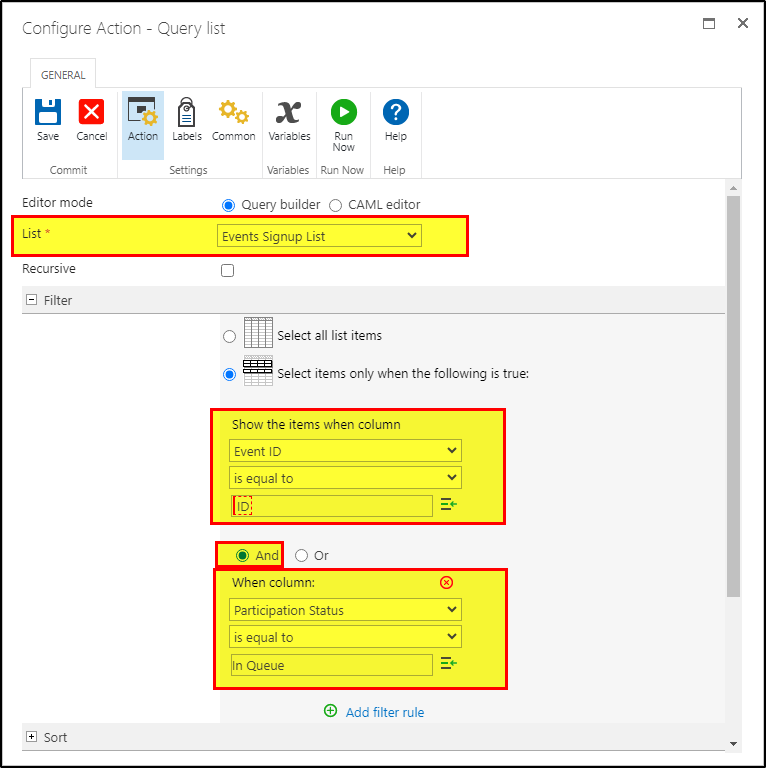
If it is, we Query the Events Signup List where the Event ID is equal to the ID of the current Event the workflow is running on, and the [Participation Status] = “In Queue”
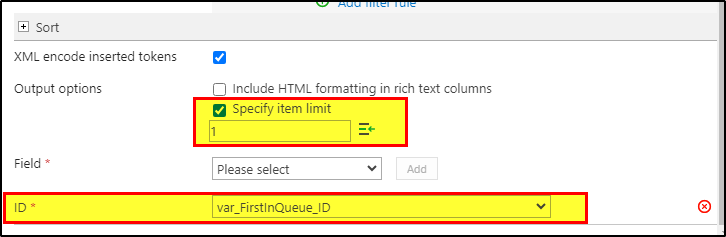
Then (in the same action!) we get only ONE item (the lowest ID) and save it to our var_FirstInQueue_ID variable:
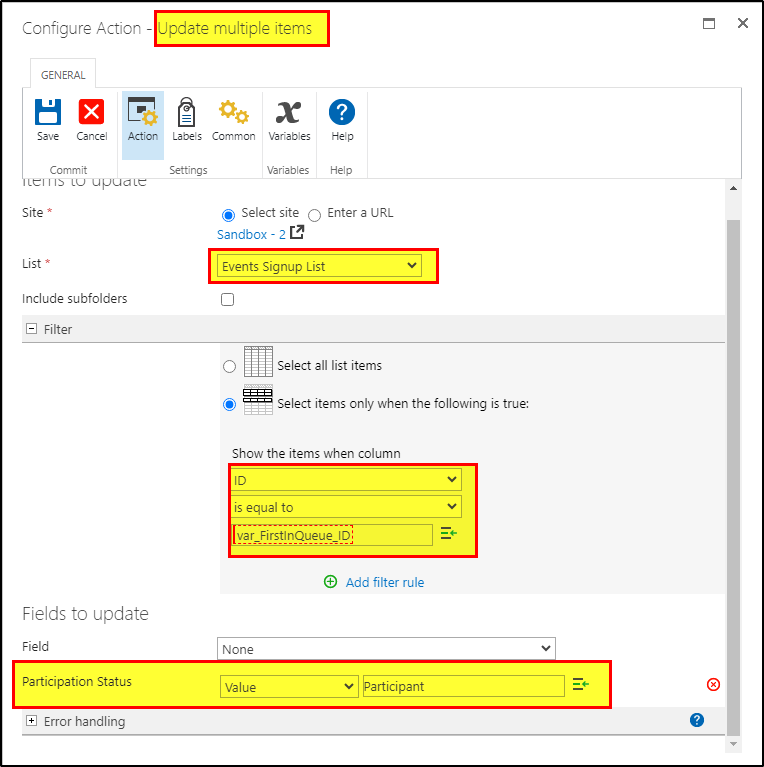
Now that we have an ID for the person who will be promoted to Participant, we decrement the value of var_QueuedParticipants by 1, and Update the Events Signup List Item’s [Participation Status] where the ID of the item is equal to the value in var_FirstInQueue_ID:
But if someone has Cancelled and there are no other people waiting in Queue, then we simply need to decrement the var_CurrentParticipants value by 1
On the other branch where the input_ParticipationStatus does NOT equal “Participant”, we don’t need to do anything unless the invoking item’s current [Participation Status] value is set to “In Queue”, at which point we decrement the var_QueuedParticipants value by 1:
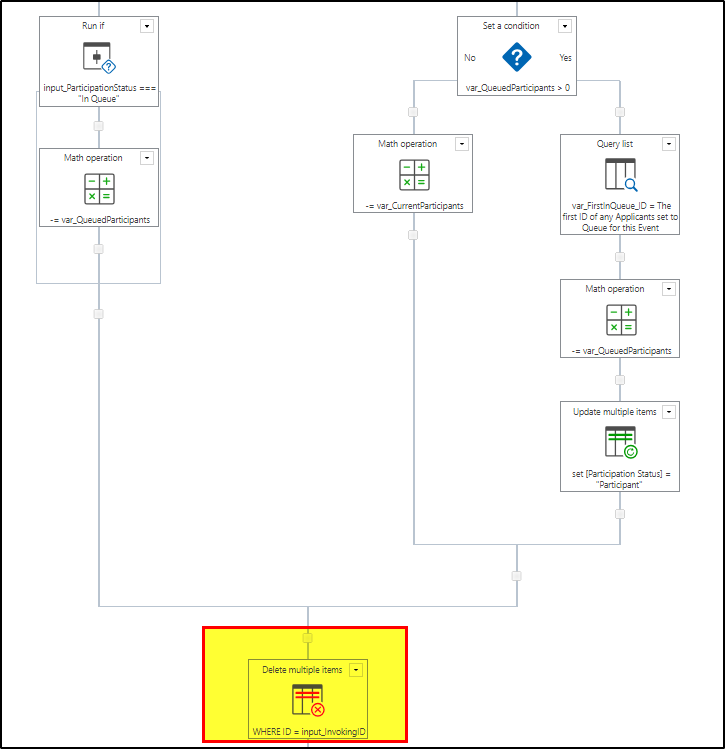
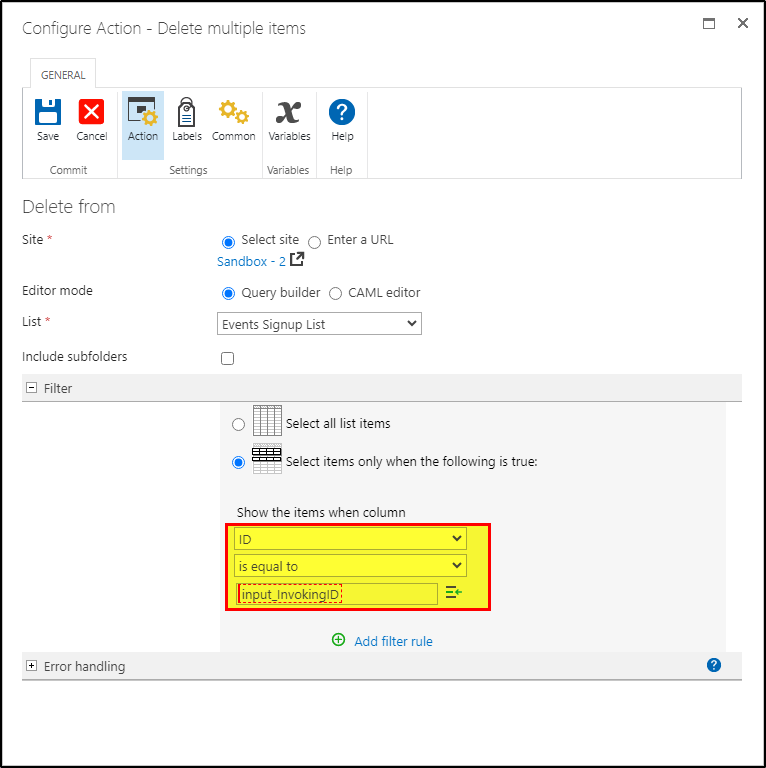
Lastly, for the Cancellation side, we Delete the Events Signup List Item using the input_invokingID as the target:
Last but not least we update the current Event List Item’s [Current Participants] and [Queued Participants] values:
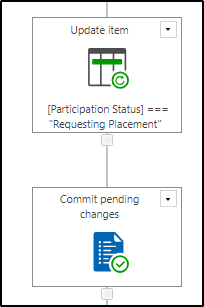
UPDATE: Nope we’re not finished yet. I went back and added a Commit Pending Changes to the end of both places where the workflow updates the child Event Signup List Item, and it’s actually way more performant!
I don’t wanna redo every screenshot I made up there, so, um… add em in!!!
Moving on...
Now that we have the Event List Workflow out of the way, let’s setup the two workflows on the Event Signup List.
First up is the workflow that will handle Requests:
Which has the following variables:
And is configured thusly:
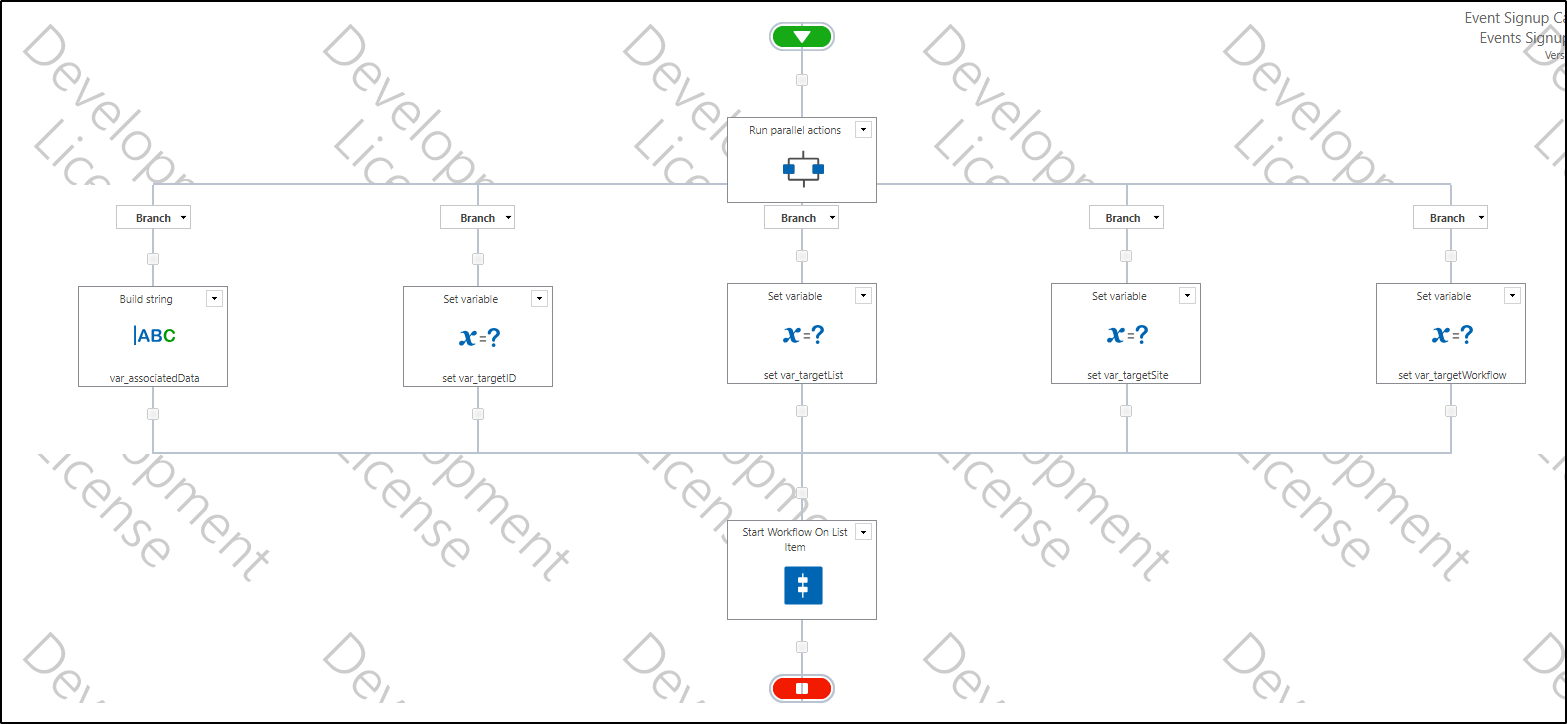
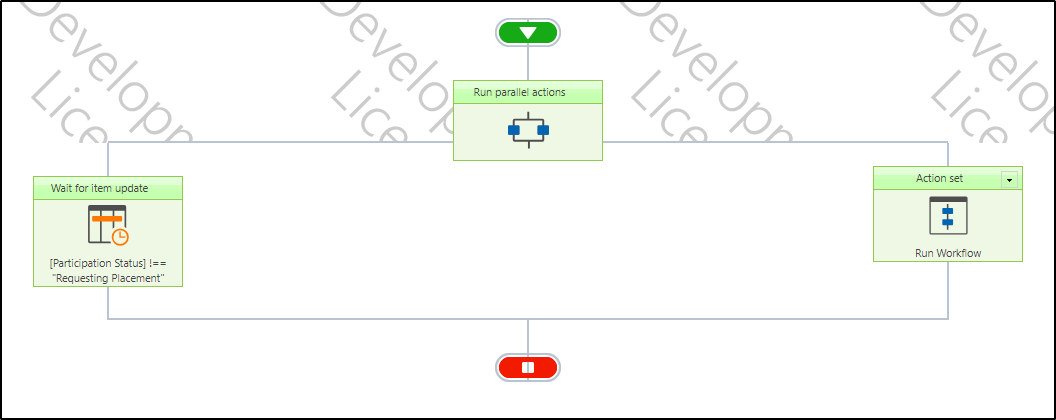
A parallel action with the left branch dedicated to a “Wait for Item Update” action that will wait for the [Participation Status] value to equal something other than “Requesting Placement”, and on the other branch an Action Set.
Inside of the Action Set are a few actions:
Let’s go through it one by one
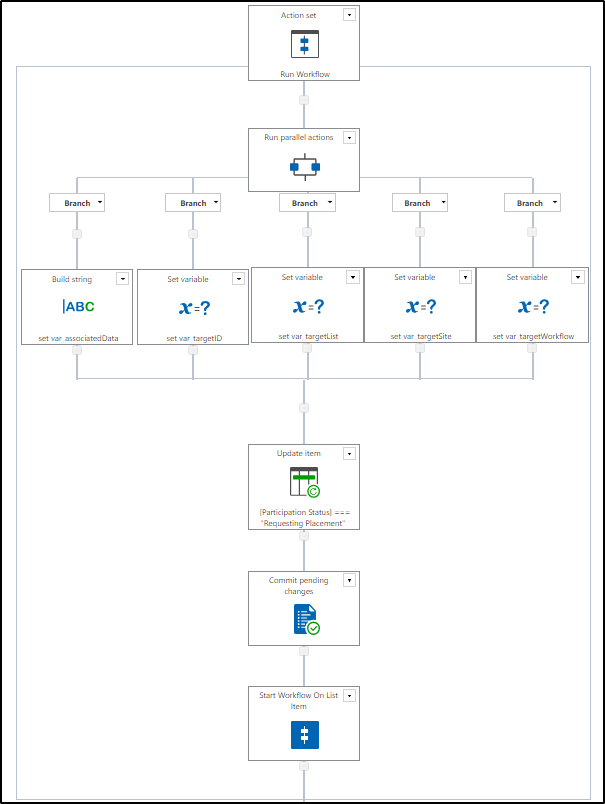
First up are all of the Set Variable actions:
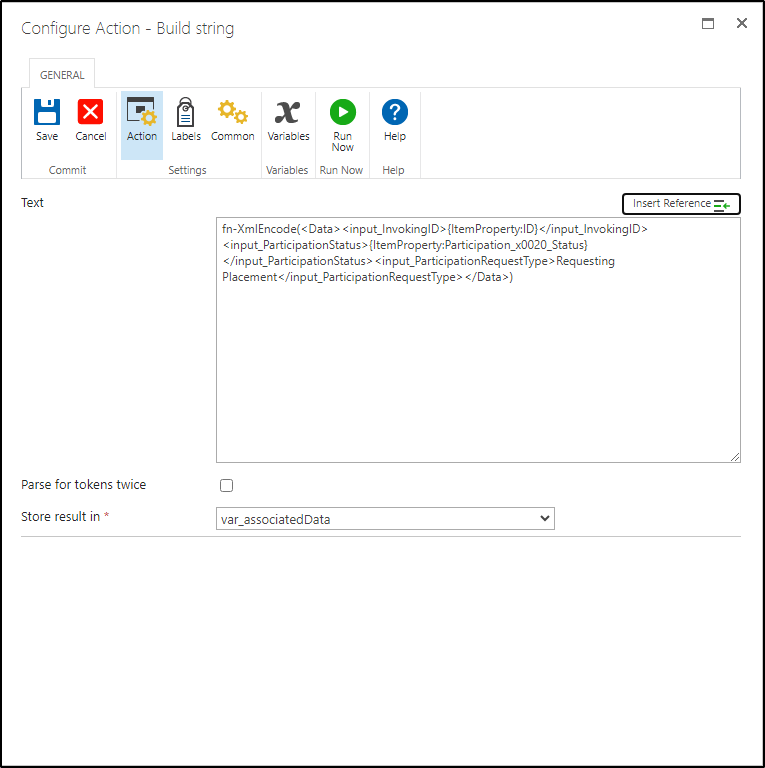
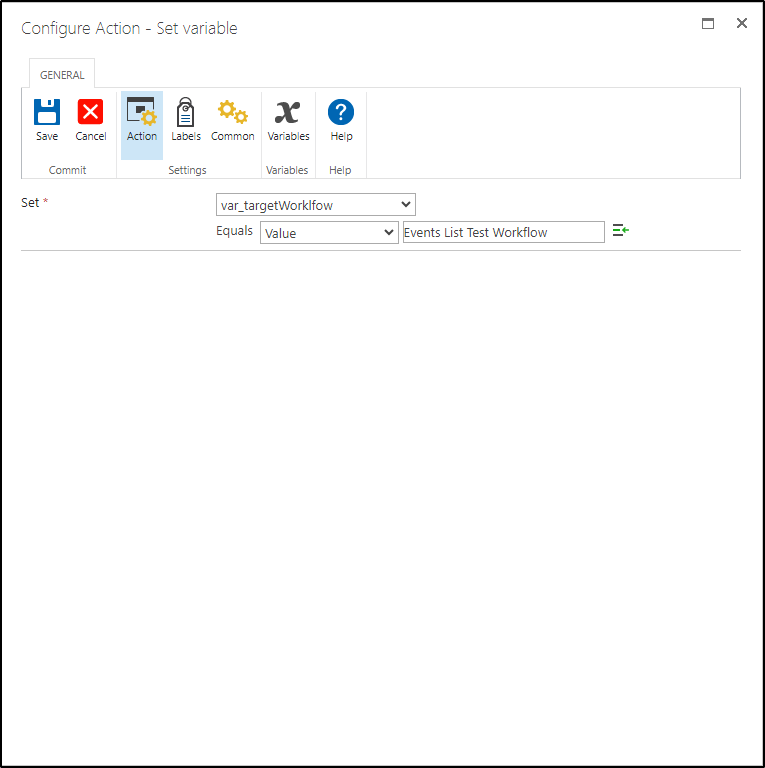
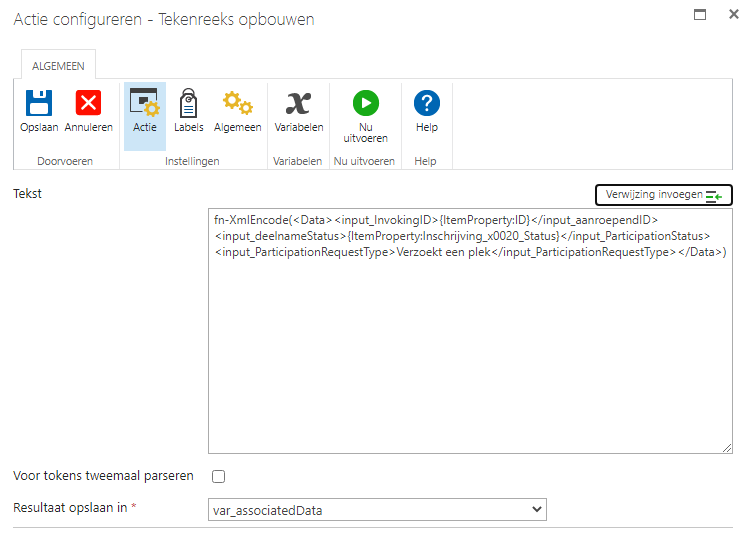
From Left to Right, we set the var_associationData like so:
This is the data (specifically, the starting data) that will be sent to the target Workflow that we want to start. We’re sending our current Item’s [ID] as the value for “input_InvokingID”, the current Item’s [Participation Status] as the value for “input_ParticipationStatus”, and the value “Requesting Placement” for a starting var called “input_ParticipationRequestType”. All of those starting variables we have discussed previous in the Events List workflow we made earlier.
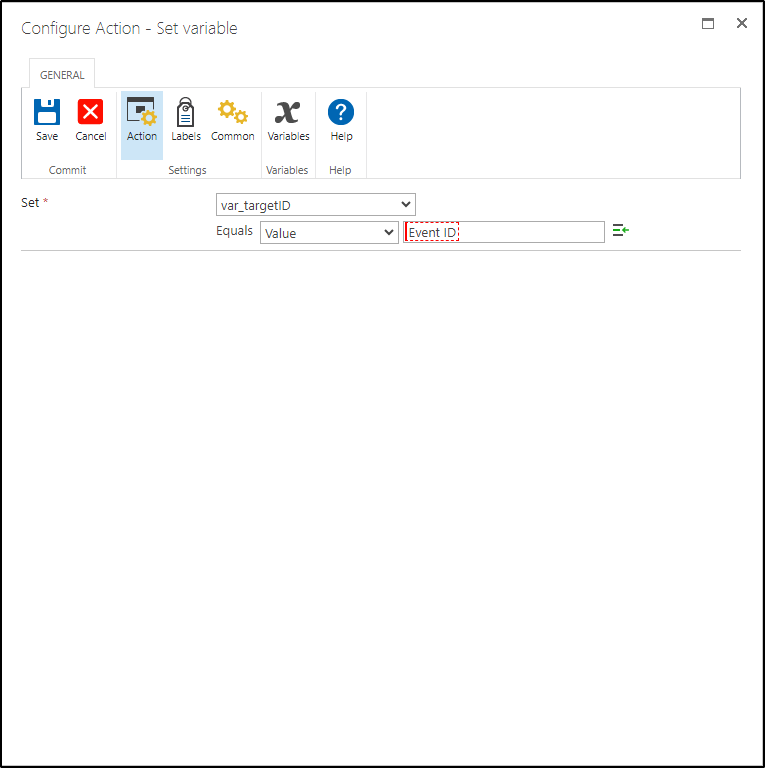
Next up is var_TargetID, that is, the ID of the Item where we want to RUN the workflow. In this case we want to run this workflow on an Event List item, and so the value we use will be whatever value the Event ID has been set up by the user when they selected the Event that they want to be a part of:
var_targetList is just the name of the list of the targetID were the workflow will run. in this case is the Event List:
Then the var_targetSite. Same thing as above but the site:
Note: this should never end with a slash “/”, but can contain one if you’re targeting a sub-site like, say there is a site that is a child of the above Sandbox_2 that I wanted to target called “ChildSite”, then I might type “Sandbox_2/ChildSite” as my value.
And lastly, var_targetWorkflow is just the name of the workflow we wanna start:
After we’ve set all of those values, we need to do one last thing before we start the UDA. This is one of the biggest oddities of using this method, but if we for some reason want to Wait for this Item to update as we have it setup currently, then we need to ensure that the “Wait For Update” ‘sees’ that the Item is in *some* sort of current state. To do this, we just Update the item’s current [Participation Status] to what it ALREADY IS and then Commit Pending Changes.
For whatever reason this ensures that the Wait For Update will see the updates that our Events List workflow makes to the Item, and allows the workflow to fully complete. Without doing this, this workflow will always hang on the Wait for Change action and will never complete!
(Note: You don’t have to use the Wait for Item Update action in your workflow. In fact, for the next workflow we don’t use it at all. But, because in my own environment and experience, I *need* to know when some part of something isn’t working, this ensures that communication between each item has happened in full and that everything executed across the board without issue. If something fails, I then know where it failed, and in what state it should be brought back to before continuing.)
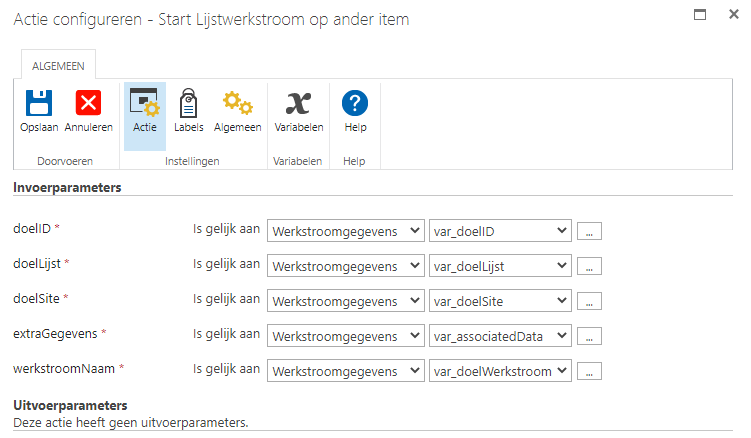
Last but not least we invoke the UDA that we made earlier with all of the values we set in the variables here:
One workflow down, one to go. Let’s work on the Cancellation workflow:
Just the variables for controlling the UDA are needed this go around:
The workflow itself is almost identical:
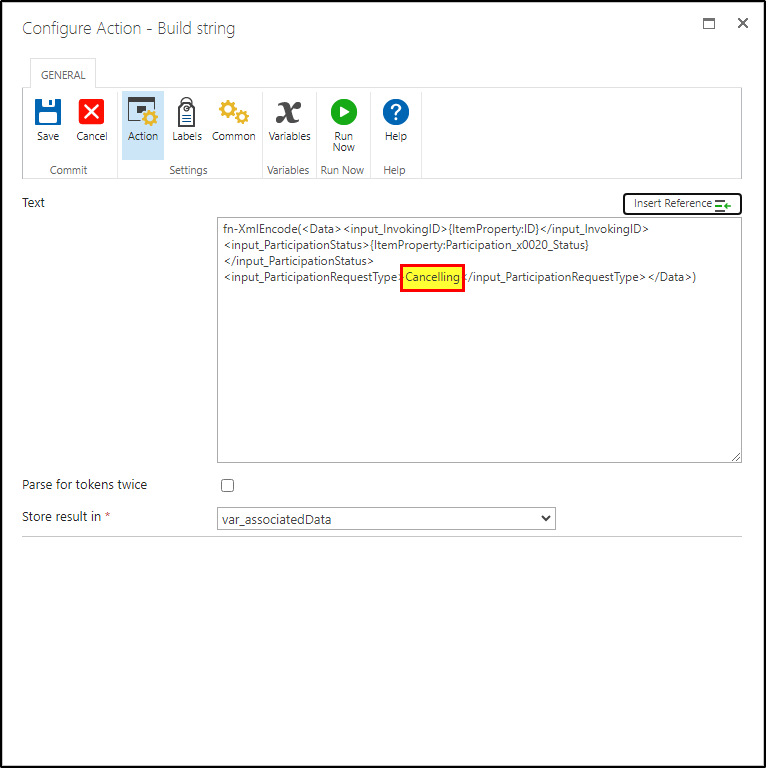
The exception being that the var_associatedData is slightly changed so that <input_ParticipationRequestType> equals Cancelling:
Now that we have our Lists and Workflows in place, let’s give it a go:
At first we see that it has sent the Request:
But a refresh later will show that things worked:
Looking at the Workflow History we can see everything is in the green:
What about the Event? We now have one participant for the Ketchup vs. Mustard event:
Alright let’s try to request 2 at the same time and see what happens:
Two different users signing up for 1 slot. Who will win!? Will it even work!? (I hope so otherwise I have written a lot of words for nothing!)
Upon first glance everything is the same with two new items both Requesting Placement:
But after a refresh:
We see that one of them has won! What’s the other one doing? Let’s check the emails that I have the UDA (well… the actual one I use, not the example one I’ve exported and attached) sending me:
As we can see, the Web Service action ran into an error and the ErrorText informs us that because the workflow was already running when it tried to invoke it, it failed. Now we know that the UDA should be sitting around on the Pause for 5 minutes action. Let’s see what happens in 5 minutes.
… We get another email showing that ID 18 has finally gone through:
ignore the topmost UDA error. In my environment I have it send me the error email Before the UDA Pauses and after it pauses, which is useful when you’re trying hammer it with an unreal amount of requests at once. While this shows the Error message as being *after* the success, that’s just outlook not keeping up with the times correct.
As expected, several minutes apart, the Request does resolve. And while it doesn’t happen instantly (or even, technically, 5 minutes from when it initially errored), it’s better than me having to manually restart things! Also, the timing differences can be attributed to SharePoint Environments, load, etc.
Meanwhile back at the Event List, everything looks like it should. 2 Participants, 1 in Queue:
Now let’s try to cancel a Request. Back to the Events Signup List:
And the Results. ID 18 has become a Participant:
We no longer have a Queue:
Closing Notes
This is a relatively simple but incredibly effective way of ensuring that a bunch of children items can talk to a parent item without needing to worry about race-conditions. In my own work I have a system setup that creates an association between a single parent item and a *variable* amount of child items that can all be worked on to completion asynchronously. Without this UDA alongside another more specialized per-list workflow to facilitate reliable communication between these items, I’m honestly not sure that we could use Nintex to the degree that we do.
I hope that this helps you to accomplish what you’re doing and provides others a way forward to making their Nintex installation work a little better for situations like this. Perhaps one day Nintex will include some tooling and actions that are more specialized to allow for things like this to happen without the need for obscure workarounds, but until then, where there’s a MegaJerk there’s a way ;)
Not really. I’m unsure if the goal in the linked post is the same as what I’m aiming for. I’ve also never done anything with SQL before and don’t have the knowledge to know how to use it. In other words, the linked post is a bit too advanced in its writing and target audience for me and I’m unsure if it applies sufficiently to what I’m doing.
There is an out of the box way of solving this I believe but it will require me to gather a few more details. Do you have a mockup, screenshot, or any info you can share about the secondary Events List?
I want to make sure that if I make a write up of how to solve this it's explicit enough for you to apply to your use case, so knowing stuff like:
1. Does the target list of Events only hold a count of participants or does it also carry some sort of list that shows their names as well?
2. Is there any tangible association between the Events list items and the Request List items? Like, when a person makes a request item, does it's id get referenced by the Events list item or vice versa?
3. Or are the request items deleted immediately after their workflows finish doing the work to count them as a participant in any given event?
The more I know the better but please don't feel as if you need to share company secrets here. A rough outline or mockup will do if that's the safest way to go.
i think you are facing a Race condition here, where submit ( i.e saving the Item ) while Query List ( a CAML query on the list ) lag in time to get the correct info.
I would suggest adding a “Pause” action ( may be 1~2 min) at the very Top of the WF design to allow WF Engine to handle Race Condition ...please let us know if that will work for you :)
Thanks,Majid
they 100 percent are running into a race condition. my solution doesn’t require pausing unless it can not be prevented, and will otherwise work in real time. I just want to be able to craft an example that will be easy for the OP to work through as my answer will be somewhat technical
for more info about the solution however, see this thread I made a long time ago.
There is an out of the box way of solving this I believe but it will require me to gather a few more details. Do you have a mockup, screenshot, or any info you can share about the secondary Events List?
I want to make sure that if I make a write up of how to solve this it's explicit enough for you to apply to your use case, so knowing stuff like:
1. Does the target list of Events only hold a count of participants or does it also carry some sort of list that shows their names as well?
2. Is there any tangible association between the Events list items and the Request List items? Like, when a person makes a request item, does it's id get referenced by the Events list item or vice versa?
3. Or are the request items deleted immediately after their workflows finish doing the work to count them as a participant in any given event?
The more I know the better but please don't feel as if you need to share company secrets here. A rough outline or mockup will do if that's the safest way to go.
I don’t really have screenshots or mockups right now, but I can try to explain what I had as much as possible. I made a “Master” content type that contained nothing but the choice column for the different events, then two sub-content types that both used this master as an upper content type (I’m not sure if that’s the correct terminology, we use Sharepoint in Dutch). One of these sub-types had in addition to the choice column from the master a column listing the entry limits for each session, a simple numbers column. The other sub-type had in addition to the events choice column, a column for the applicant name, so a person column.
With that I created four lists:
-Event Details (runs on the first sub-content type, read only for users), has one entry for each event that just lists the entry limit and is there so Nintex can look it up and know what the limit is. Like entry 1 is Event A, limit 10, entry 2 is Event B, limit 25… and so on, the exact number of events or maximum people attending isn’t that important for the argument I think.
-Applicant list (runs on the second sub-content type, users can contribute their own stuff), this is connected to the entry workflow that runs when users apply. This should look at the applicant and backup lists to see if there are already entries for the same session by the same user, delete the current item if there are, and otherwise look if the limit for the session has been reached already. If it has, copy current item to the backup list and delete current item from the applicant list, if it hasn’t, simply leave the item on the applicant list.
-Backup list (runs on the second sub-content type, users can contribute their own stuff). No workflow runs on this, entries from the applicant list should get copied here if the applicant exceeds the limit for that session
-Cancellation list (runs on the second sub-content type, users can contribute their own stuff). Users get linked to item creation here when they press the button to cancel their own entry. A workflow runs on this on item creation that searches the applicant and backup lists for any entries with the same session and applicant name and deletes them. If it deleted an item from the applicant list, it looks for entries on the backup list with the same session but different name and copies that to the applicant list (the least recent entry on the Backup list filling those requirements), then deletes it from the backup list afterwards and sends an email to the backup person informing them a spot opened up.
Okay. I am not going to be able to recreate it exactly one to one but I can show you most of major functionality between two lists that should make it apparent how things are working.
Depending on the work load this week I'll try to have something asap
Okay, so this is going to get a bit technical here and there, but I’ll try to break things down the best that I can. The examples I’ll provide should give you enough information where if you wanna do things in a different way you should be able to customize it for your own purposes, but the focus remains the core problem of “how can I ensure that things multiple things happen one-at-a-time as to prevent race-conditions and correctly handle any number of requests”.
The Sharepoint Setup
I have created two lists on a testing site.
Events List will contain Event Items which have the following columns of Title, Event Details (Multine Text), Max Participants (Number), Current Participants (Number), and Queued Participants (Number):
Showing the Events List with a few already made events!
And the Events Signup List, in which items represent a User’s Request for Participation to a given Event from the Events List. Each Signup Request has the following columns - Title, Applicant (Person), Participation Status (Choice), Event Name (Single Line Text), Event ID (Single Line Text):
Showing the Events Signup List with no items / participation requests.
To make things explicit, the [Participation Status] column is configured with following choices in the following way:
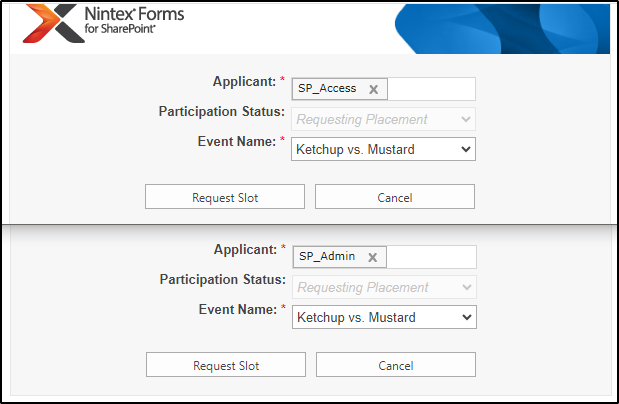
Additionally, each List has its own (very simple) Nintex Form for ease of use.
The Events List:
The Event Signup List:
Note 1: the Event Signup List uses a Lookup Field for the Event Name, which saves the Title of the Event to [Event Name] column and the ID of the Event to the [Event ID] column. You can see this in the configuration:
Note 2: Also the [Participation Status] is configured to default to “Requesting Placement”, and is not changeable by the user. So making a new request is *always* making a new request.
How It Should Work
What I want is for a user to create a new “Request” using the Event Signup List’s new item button. They will select from the existing Events in the lookup, and once they hit “Request Slot”, it should attempt to add them to the Current Participants back on Events List, or if there is no more room, to the Queued Participants value.
To Cancel a Request I want the user to run the Cancel Request workflow from the Item and it should do the following:
If the current Request Item has a Participation Status of:
Requesting Placement - do nothing
In Queue - Reduce the Queued Participants column of the Events List by 1
Participating:
If Queued Participants is greater than 0
Find lowest Queued person for the event, and promote them to “Participating”, then reduce Queued Participants count by 1.
If Queued Participants is 0
Reduce the Current Participants column of the Events List by 1
Then I want to DELETE the Item of the Request that cancelled
Making A On-At-A-Time UDA
Because there will potentially be a lot of new and existing items (Event Signups) all trying to communicate back to one central Item (Event), we need to ensure that they are doing so one item at a time. While there is no obvious way to do that, the “StartWorkflowOnListItem” operation of the Workflow web service has a particularly useful bit of functionality we can use to our advantage. If you attempt to start a Workflow on an item using this service, and the workflow is already running on said item, it will FAIL and throw an error. And because the Web Service workflow Action has the ability to CAPTURE errors gracefully (without erroring out the workflow), we now have a way to know when the Item we wanna run something on is busy!
With this information we can start to craft a reusable UDA (User Defined Action) that will take a few parameters, and will run a workflow on any given item anywhere in sharepoint with the payload of our choosing and in a way that ensures that only one item at any given time has access to the workflow in question. If two items try to run the same workflow at the same time, one of them will fail and will wait its turn before trying again.
(NOTE: I will attach the exported version of this UDA to this post so that you can import it into your environment. Just remember that you’ll likely need to Promote it to the Site Collection Level in order to make it available to all of the Sites!)
To make this UDA I’ll need a few Parameters:
These will be the values that we MUST fill out if we’re going to use the UDA in one of our workflow. The meaning of each parameter is as follows:
associatedData: Used to pass information to the target workflow. If information is passed it must be done using an Encoded XML string! Failure to encode will result in the UDA stopping preemptively as a failsafe against unwanted looping.
targetID: The ID of the Item you want to run the workflow on.
targetList: The Name of the List where the Item is located.
targetSite: The Name of the Site of the List where the Item is located.
workflowName: The Name of the Workflow you want run.
Additionally we’ll need a few workflow variables to hold some of the data that the UDA needs to function:
Now let’s get into the Actions. First thing first, we’ll initialize var_RequestError to Yes (or true), and var_LoopCount to 0:
Then we’re going to do a quick check to see if anything has been sent to us in the associatedData parameter, and if so, make sure that it’s encoded properly:
Let’s break that down. First check that the parameter isn’t empty:
If it isn’t empty then we do some regex to check to see if there are any non-encoded characters in the body of the text, and save the results of this (true or false) to the var_NeedsEncoding variable:
If var_NeedsEncoding is true, then we set an error message and STOP the UDA:
You can send this error message to yourself in an email or do any number of fancy things with it… I probably should have here, but this is already big!
Assuming that our associatedData is either empty or correctly encoded, we then continue onto the next part… the LOOP
Pretty simple huh?
This is what enforces our one-at-a-time compliance. First the guts of loop:
Because we initialized var_RequestError to be set to “Yes” and var_LoopCount to equal 0, we’re always going to loop at least once. However, in the event that we loop again, or again again, the MAX number of loops is dictated by the value that var_LoopCount should be less than to continue. In this case that’s 5. So, it’ll loop at a maximum of 5 times before giving up, and because I’ve never been able to get items to loop more than twice, I suspect that this should be okay for your environment (but if it isn’t then you can change the loop amount here!).
The first thing we do in the loop is to use the Call Web Service action:
don’t worry about that note just yet. we’ll get to that...
Inside it’s pretty straight forward:
Before I get into explaining what each part of this does, let’s take a little time to dive into JUST the URL portion. A UDA is not necessarily associated to any given Site or List, and therefore sometimes you need the things inside of them to behave dynamically. In this case we want the URL to *change* based on the “targetSite” value. However, for the Call Web Service action to work, it needs to be pointed towards a valid Endpoint at least once so that it can produce a dropdown list of valid service methods for you to use. The initial URL used for this can not use (non-common) parameters or workflow variable references in the URL field when doing this! So, let’s say I have a new Call Web Service action that I wanna point to a dynamic site:
If I insert the following references and string in the URL bar:
and then hit Refresh:
We can see that the URL it’s trying to use has inserted our parameter reference into it:
And while the rest of the URL is fine, hitting okay will tell us that we’re in trouble
To bypass this, we first replace any instance of a non-common reference with a known value:
Now when we hit refresh we see that we have a valid URL:
and can make a selection from the drop down:
Once we’ve made the selection, we can then CHANGE the URL value BACK to using a dynamic reference:
Notice how we still have our method selected? Now the action is configured to work with a URL that can be dynamically changed with a parameter!
While I do not think that you will have to go through any of this, I felt like it was important to say in the event that you need to modify that URL value in some specific way, because it could cause you to pull your hair out if you don’t know any of this.
Moving on with our ACTUAL Call Web Service Action, you’ll need to have some Credentials setup to run the Call Web Service Action.
You can do this by either typing in a username and password outright, or by setting up some Credential Workflow Constants in the Nintex Administration portion of your SharePoint’s Central Admin. To use the Workflow Constants here in this action, simply click on the Lock Icon to the right.
Next up you can see that we’re using the already talked about “StartWorkflowOnListItem” method. Because it’s a little easier to not fuss about with building up a big payload of XML to send to the webservice, I am opting to use the SOAP Builder option, which will present all of the configurable options for a given method to use as discreet inputs, which are populated with our parameters:
The Results of our Web Service Call are stored in a variable:
Lastly, and perhaps most importantly, we make sure that Errors are being captured and that the error occurrence is being stored in the var_RequestError variable:
This is important for a few reasons. The most obvious is that we know when we’ve encountered an error! However the less obvious reason is that when the Workflow we want to run actually succeeds, this value is set to FALSE, meaning, no errors were encountered. Remember, we want to loop through and keep making this call so long as there is an error and var_RequestError is initialized to TRUE. So when everything works right, and the workflow is ran, it’s set to FALSE and indicates that our loop should not loop again. And that’s it for the Call Web Service action.
Now it’s just a little bookkeeping. We check to see if var_RequestError is *still* set to True (meaning that we *did* encounter an error in the call web service):
Then we increment the var_LoopCount by 1, and wait 5 minutes. Once the 5 minutes is up we will run the loop again to try running the workflow once more.
So there it is. The entire UDA explained. Incredibly simple but very very useful. Now let’s put it to work!
The List Workflows
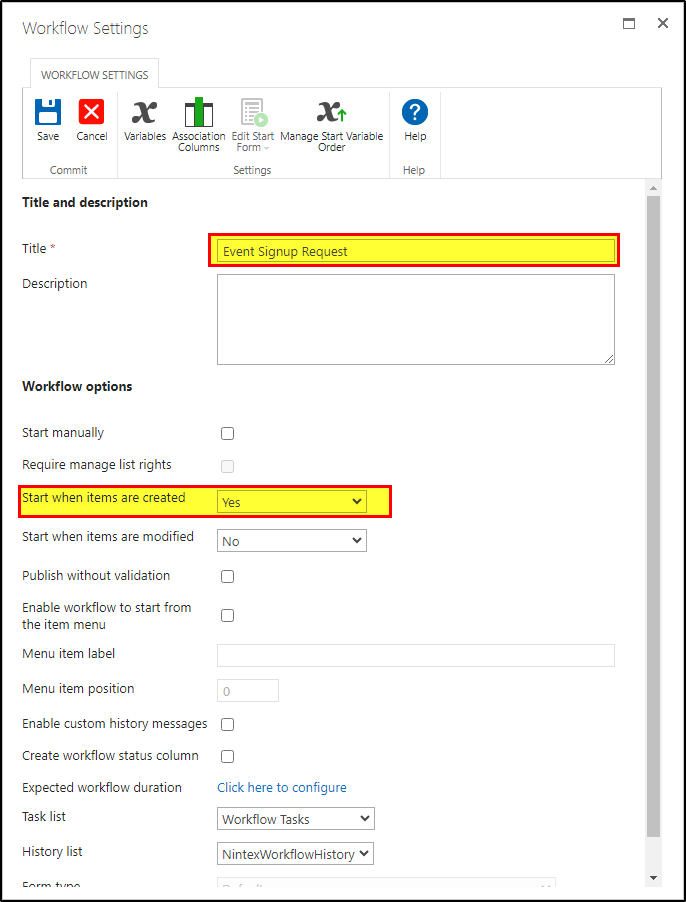
First we’ll start with the Event List and it’s single Workflow:
Really? That’s the name we’re going with? Yeah!
As I described back in the “How it should work” section, we want to take incoming requests from the Event Signup List Item and process it in some meaningful way. To that end, we’ll need a way of knowing which Event Signup Item is invoking this workflow, and so that is reflected in our variables:
We have three “Starting” variables
input_InvokingID: the ID of the Signup Item that invoked this workflow
input_ParticipationRequestType: the type of request being made by the Signup Item
input_ParticipationStatus: the *actual* [Participation Status] value of the Signup Item
The other variables will hold data about the current state of our Event Item
var_EventFull: Default - No, indicates if the Event is full
var_QueuedParticipatns: current number of [Queued Participants]
var_CurrentParticipants: current number of [Current Participants]
var_FirstInQueueID: used to get the ID of someone in Queue who is “first in line” to promote them to Participating.
As for the workflow actions, it’s pretty straight forward:
We initialize the var_CurrentParticipants and var_QueuedParticipants to their respective Current Item Lookup values:
And then set the value of var_EventFull to Yes IF the [Max Participants] column value equals the [Current Participants] column value:
Next up we have several Conditional branches:
Let’s start with the Top three:
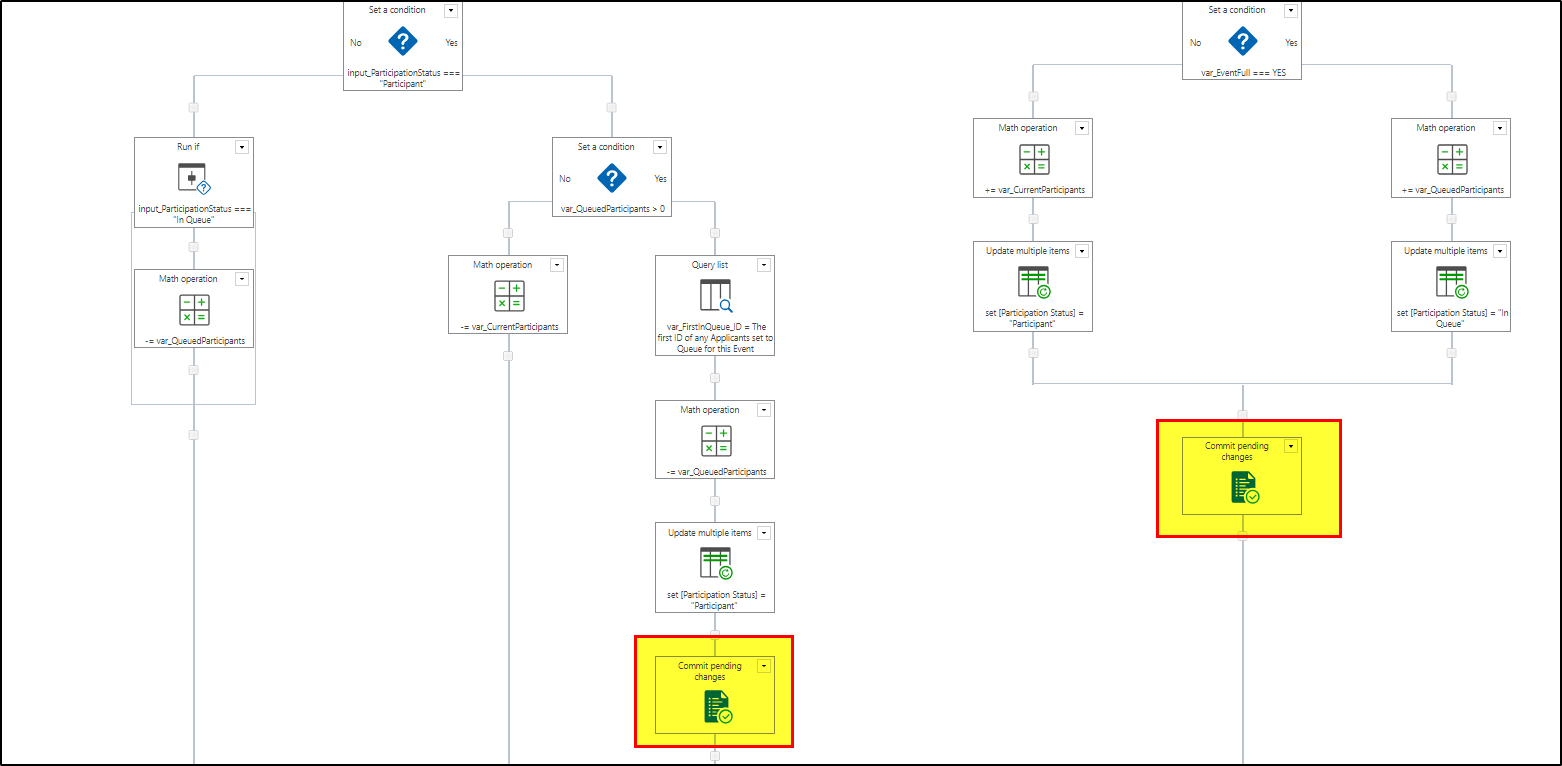
First we check to see if the input_ParticipationRequestType equals “Requesting Placement”. If it does then we check to see if the var_EventFull equals “Yes” or “No”
If the event is Full then we need to add 1 to the var_QueuedParticipants value and then Update the Event Signup List Item’s [Participation Status] to “In Queue”. However if the Event is not Full then we only need to increment the value of var_CurrentParticipants by 1, and update the Event Signup List Item’s [Participation Status] to “Participating”
Note that when we set the [Participation Status] on the Event Signup List Item we use the input_invokingID as the value used to specify the item:
On the flip side, if input_ParticipationRequestType does NOT equal “Requesting Placement” then the user has sent a Cancellation, and we’ll need to then check if the input_ParticipationStatus equals “Participant”.
If it does, that means we’ll need to check and see if there are any existing people in Queue for this Event, and we can easily do that by looking to see if the var_QueuedParticipants value is greater than 0.
If it is, we Query the Events Signup List where the Event ID is equal to the ID of the current Event the workflow is running on, and the [Participation Status] = “In Queue”
Then (in the same action!) we get only ONE item (the lowest ID) and save it to our var_FirstInQueue_ID variable:
Now that we have an ID for the person who will be promoted to Participant, we decrement the value of var_QueuedParticipants by 1, and Update the Events Signup List Item’s [Participation Status] where the ID of the item is equal to the value in var_FirstInQueue_ID:
But if someone has Cancelled and there are no other people waiting in Queue, then we simply need to decrement the var_CurrentParticipants value by 1
On the other branch where the input_ParticipationStatus does NOT equal “Participant”, we don’t need to do anything unless the invoking item’s current [Participation Status] value is set to “In Queue”, at which point we decrement the var_QueuedParticipants value by 1:
Lastly, for the Cancellation side, we Delete the Events Signup List Item using the input_invokingID as the target:
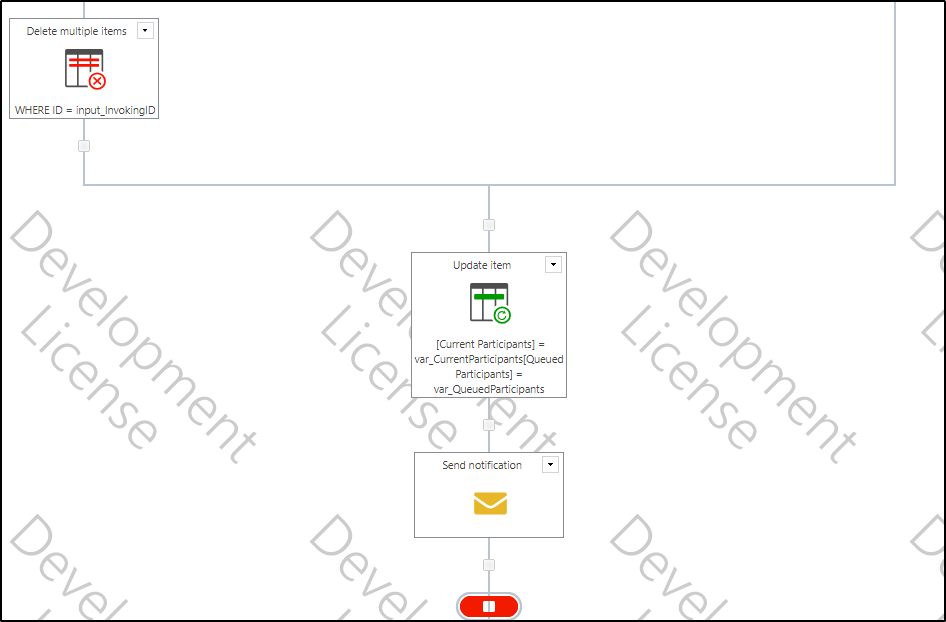
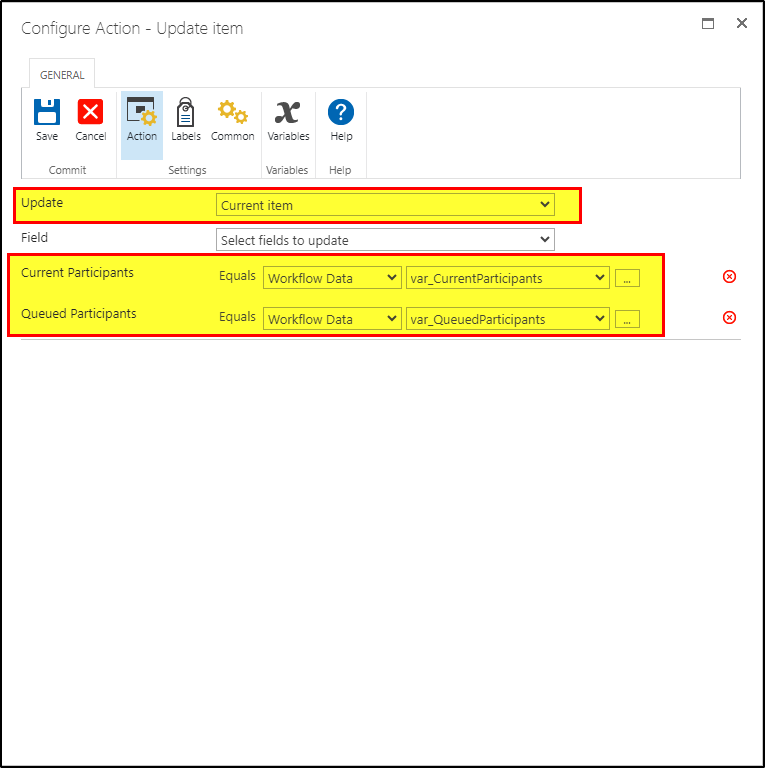
Last but not least we update the current Event List Item’s [Current Participants] and [Queued Participants] values:
UPDATE: Nope we’re not finished yet. I went back and added a Commit Pending Changes to the end of both places where the workflow updates the child Event Signup List Item, and it’s actually way more performant!
I don’t wanna redo every screenshot I made up there, so, um… add em in!!!
Moving on...
Now that we have the Event List Workflow out of the way, let’s setup the two workflows on the Event Signup List.
First up is the workflow that will handle Requests:
Which has the following variables:
And is configured thusly:
A parallel action with the left branch dedicated to a “Wait for Item Update” action that will wait for the [Participation Status] value to equal something other than “Requesting Placement”, and on the other branch an Action Set.
Inside of the Action Set are a few actions:
Let’s go through it one by one
First up are all of the Set Variable actions:
From Left to Right, we set the var_associationData like so:
This is the data (specifically, the starting data) that will be sent to the target Workflow that we want to start. We’re sending our current Item’s [ID] as the value for “input_InvokingID”, the current Item’s [Participation Status] as the value for “input_ParticipationStatus”, and the value “Requesting Placement” for a starting var called “input_ParticipationRequestType”. All of those starting variables we have discussed previous in the Events List workflow we made earlier.
Next up is var_TargetID, that is, the ID of the Item where we want to RUN the workflow. In this case we want to run this workflow on an Event List item, and so the value we use will be whatever value the Event ID has been set up by the user when they selected the Event that they want to be a part of:
var_targetList is just the name of the list of the targetID were the workflow will run. in this case is the Event List:
Then the var_targetSite. Same thing as above but the site:
Note: this should never end with a slash “/”, but can contain one if you’re targeting a sub-site like, say there is a site that is a child of the above Sandbox_2 that I wanted to target called “ChildSite”, then I might type “Sandbox_2/ChildSite” as my value.
And lastly, var_targetWorkflow is just the name of the workflow we wanna start:
After we’ve set all of those values, we need to do one last thing before we start the UDA. This is one of the biggest oddities of using this method, but if we for some reason want to Wait for this Item to update as we have it setup currently, then we need to ensure that the “Wait For Update” ‘sees’ that the Item is in *some* sort of current state. To do this, we just Update the item’s current [Participation Status] to what it ALREADY IS and then Commit Pending Changes.
For whatever reason this ensures that the Wait For Update will see the updates that our Events List workflow makes to the Item, and allows the workflow to fully complete. Without doing this, this workflow will always hang on the Wait for Change action and will never complete!
(Note: You don’t have to use the Wait for Item Update action in your workflow. In fact, for the next workflow we don’t use it at all. But, because in my own environment and experience, I *need* to know when some part of something isn’t working, this ensures that communication between each item has happened in full and that everything executed across the board without issue. If something fails, I then know where it failed, and in what state it should be brought back to before continuing.)
Last but not least we invoke the UDA that we made earlier with all of the values we set in the variables here:
One workflow down, one to go. Let’s work on the Cancellation workflow:
Just the variables for controlling the UDA are needed this go around:
The workflow itself is almost identical:
The exception being that the var_associatedData is slightly changed so that <input_ParticipationRequestType> equals Cancelling:
Now that we have our Lists and Workflows in place, let’s give it a go:
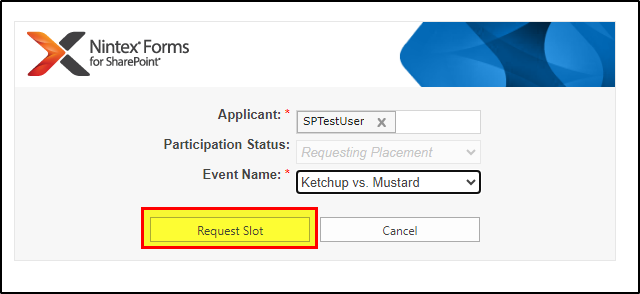
At first we see that it has sent the Request:
But a refresh later will show that things worked:
Looking at the Workflow History we can see everything is in the green:
What about the Event? We now have one participant for the Ketchup vs. Mustard event:
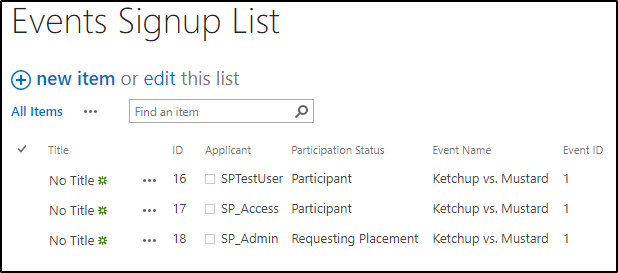
Alright let’s try to request 2 at the same time and see what happens:
Two different users signing up for 1 slot. Who will win!? Will it even work!? (I hope so otherwise I have written a lot of words for nothing!)
Upon first glance everything is the same with two new items both Requesting Placement:
But after a refresh:
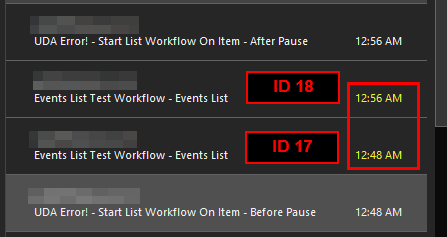
We see that one of them has won! What’s the other one doing? Let’s check the emails that I have the UDA (well… the actual one I use, not the example one I’ve exported and attached) sending me:
As we can see, the Web Service action ran into an error and the ErrorText informs us that because the workflow was already running when it tried to invoke it, it failed. Now we know that the UDA should be sitting around on the Pause for 5 minutes action. Let’s see what happens in 5 minutes.
… We get another email showing that ID 18 has finally gone through:
ignore the topmost UDA error. In my environment I have it send me the error email Before the UDA Pauses and after it pauses, which is useful when you’re trying hammer it with an unreal amount of requests at once. While this shows the Error message as being *after* the success, that’s just outlook not keeping up with the times correct.
As expected, several minutes apart, the Request does resolve. And while it doesn’t happen instantly (or even, technically, 5 minutes from when it initially errored), it’s better than me having to manually restart things! Also, the timing differences can be attributed to SharePoint Environments, load, etc.
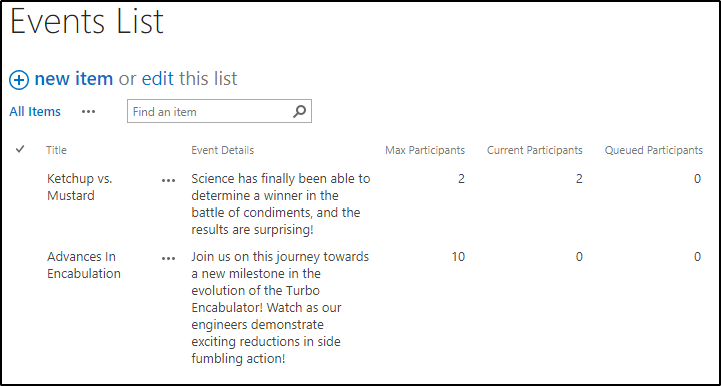
Meanwhile back at the Event List, everything looks like it should. 2 Participants, 1 in Queue:
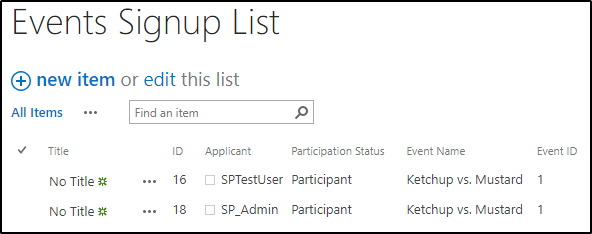
Now let’s try to cancel a Request. Back to the Events Signup List:
And the Results. ID 18 has become a Participant:
We no longer have a Queue:
Closing Notes
This is a relatively simple but incredibly effective way of ensuring that a bunch of children items can talk to a parent item without needing to worry about race-conditions. In my own work I have a system setup that creates an association between a single parent item and a *variable* amount of child items that can all be worked on to completion asynchronously. Without this UDA alongside another more specialized per-list workflow to facilitate reliable communication between these items, I’m honestly not sure that we could use Nintex to the degree that we do.
I hope that this helps you to accomplish what you’re doing and provides others a way forward to making their Nintex installation work a little better for situations like this. Perhaps one day Nintex will include some tooling and actions that are more specialized to allow for things like this to happen without the need for obscure workarounds, but until then, where there’s a MegaJerk there’s a way ;)
First: If you need help with any of the BOOK above you, ask me. I can help.
Second: I’ve never really felt comfortable sharing this method because I simply have no idea whether or not it would even work for anyone else. but because I have used it so much in my own work and because every test I make with it seems to do what I expect it to, here we are… also I don’t like hoarding answers. But all that aside, if it doesn’t behave in a way described, pipe up and tell me because for all I know this could be some strange ‘my servers only’ sort of deal where it works when I’m looking at it, but not for anybody else.
In other words, until it works for you, anyone who looks at this, please understand that your millage may vary!
Yes this helps a lot. If I understand correctly, instead of attaching the main workflow to the items users create, you attach it to the list that keeps track per event people can sign up for, and you start that workflow externally from the workflow that starts when a user tries to sign up. Because that’d be on the same event item that main workflow cannot run for multiple signups on the same item simultaneously, and with that loop in the UDE you then let it try again later if it’s already busy, forcing everything to go sequentially. I’ll test it out a bunch to see how it works.
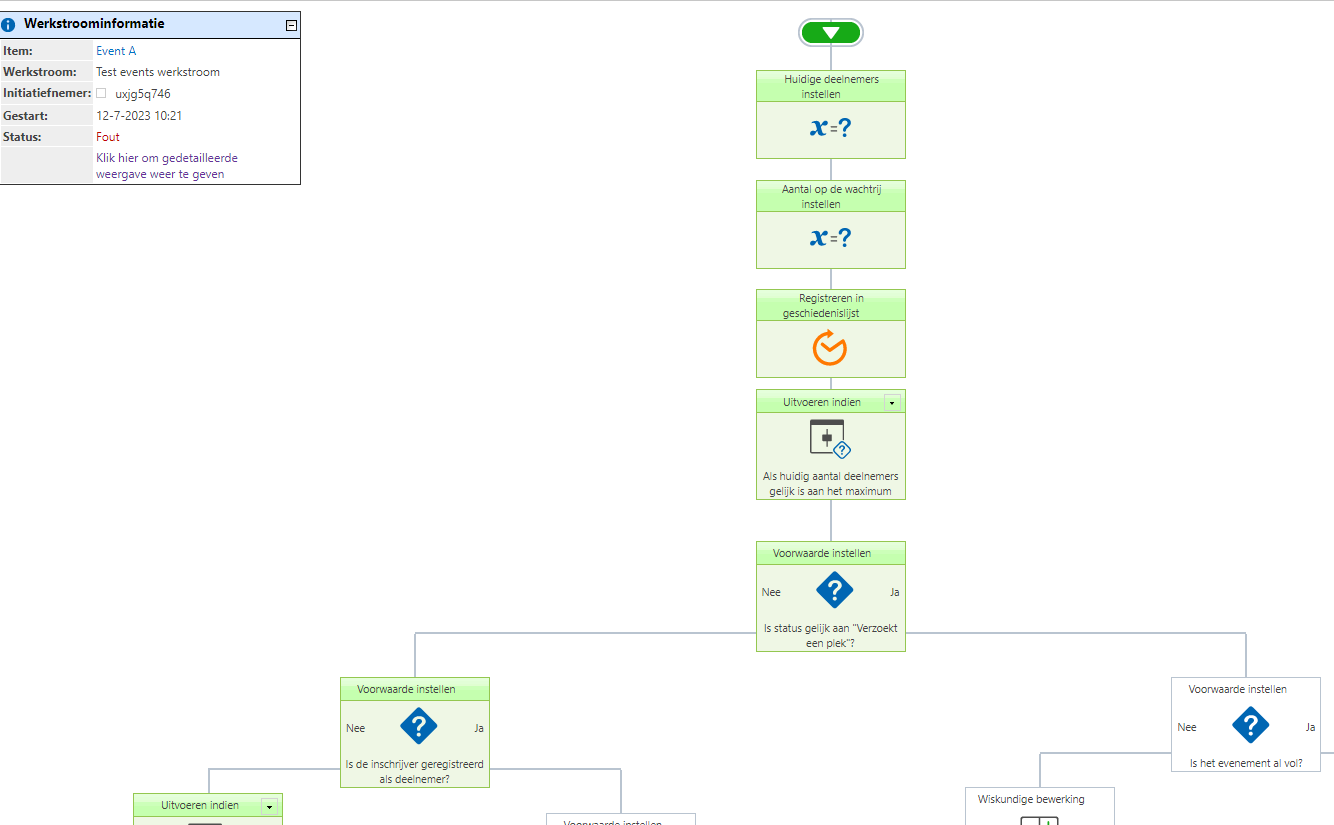
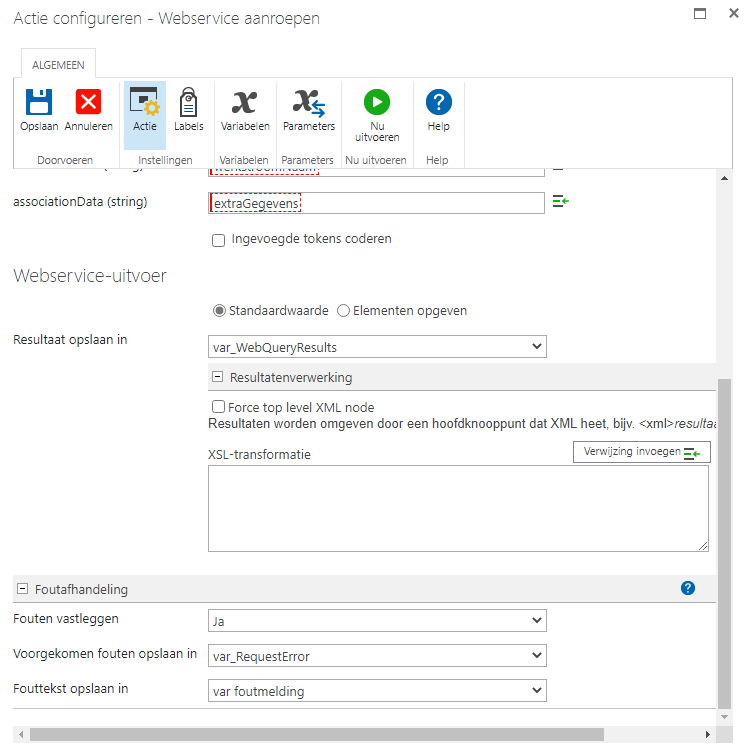
Are you sure the syntax on the xlm encode is correct? The UDA seems to start the workflow correctly, but the called workflow does not appear to receive any of the input variables properly. I’m using Nintex on Sharepoint 2019, could the syntax vary between versions? This is the workflow history I’m getting on the workflow started by the UDA
It errors out further on when it attempts item deletion and fails to do so. My best guess is that the input variables don’t reach this workflow properly, and that is why it fails to delete the origin item and goes down the incorrect path.
I would need to see how you’ve configured the action for the xml you’re using to pass along the data with, and several other actions. I would also need to see how you’ve configured the Call Web Service action. remember that if you’ve the “encode inserted tokens” checked, then it is not going to work because it’ll doubly encode things with the way I had shown them setup.
beyond that, you could always create two test workflows on different lists, use a web service call on list A to start a workflow on list B. setup the workflow on list B to just send you an email with the values of the variables that are exposed as starting variables.
Sorry for not posting on this issue, but there is a lot of real life stuff happening with me at the moment and there are simply too many spinning plates.
I don’t see any immediate issues with the XML. Were you ever able to just test with getting a workflow to run (with association data / starting vars) with a junk test workflow?
On the most barebones test workflows that just send data to another workflow I am managing to get it to work properly, I’m honestly not sure what I’m doing differently (though it does rule out issues with the UDA). Maye it’s just one of those oddities that if you delete and rebuild it the exact same way it suddenly works. I’ll mark your big post as an answer and figure it out from here. Thanks a lot for the help!
If you can get it to work with a diff workflow, then I would then try to test to the target workflow you were trying to get going with the UDA, to see if that works.
If it does, then maybe just try replacing the XML from your very first example with the working xml in the test. The reason I say this is because a long long time ago I found that build string actions can insert hidden / non visible space characters into the body of text, which breaks things but in a way that is completely invisible!
Keep us posted on your progress and always feel free to ask questions here