Intro
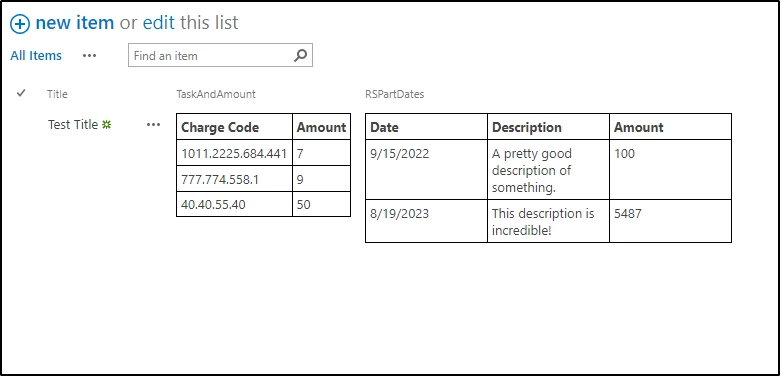
Alright, I now have a fairly thorough and working solution to the problem of how one might convert a Repeating Section Control's data into an HTML Table that can be rendered in a List View (or anywhere HTML is rendered really).
There are a thousand and one ways to approach this problem, but I went with what felt useful to me and seemed like the most simplistic and straight forward "drop in" solution that still offers some flexibility without becoming an entire side-project.
Though I will attempt to explain this in as much detail as possible, feel free to ask questions about anything you're not sure about.
Solution
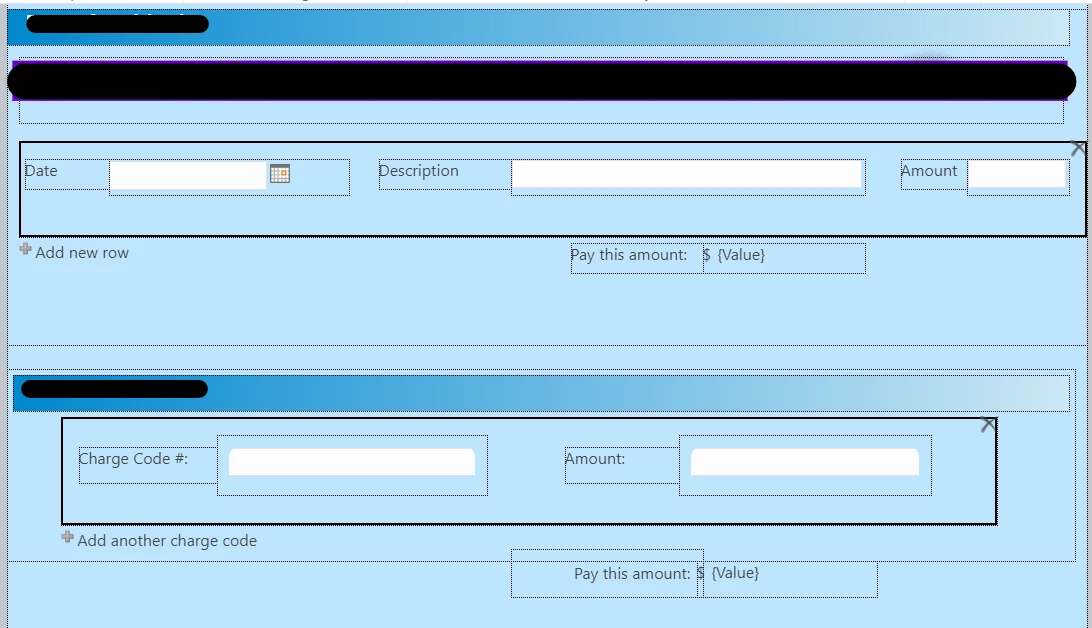
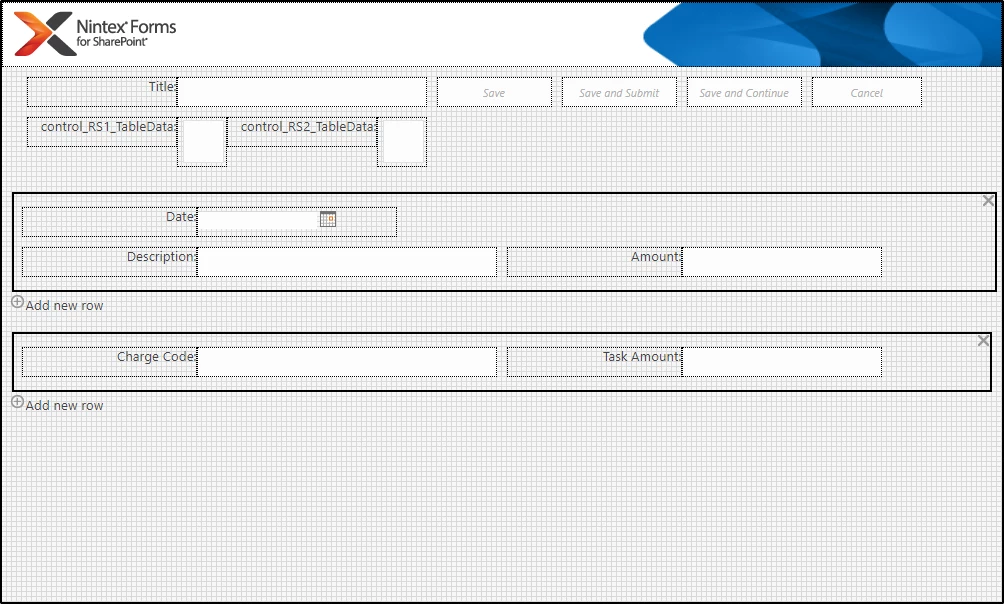
For the solution I have created a test form containing, primarily, two Repeating Section Controls, each with their own internal Controls, as well as two Multiline Text Controls:
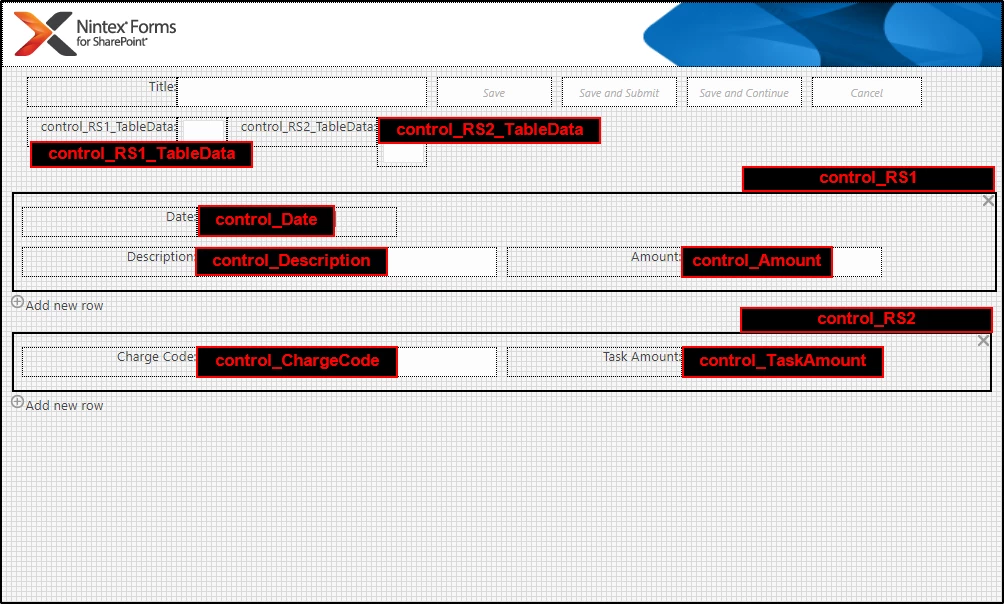
The names of all the controls is incredibly important as we will be using Control Names to do a lot of work for this solution. Because of this I have tried to keep the names as clear as possible:
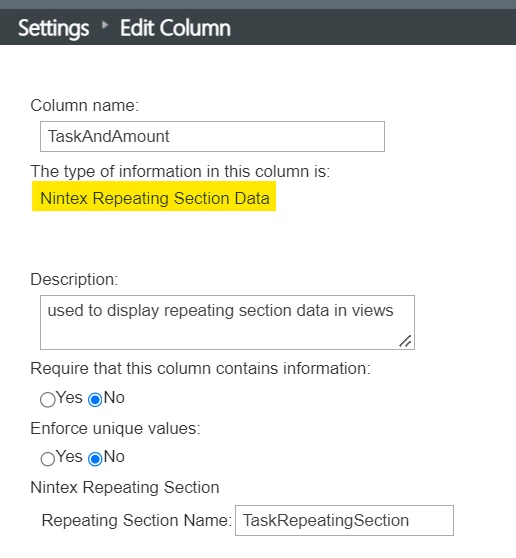
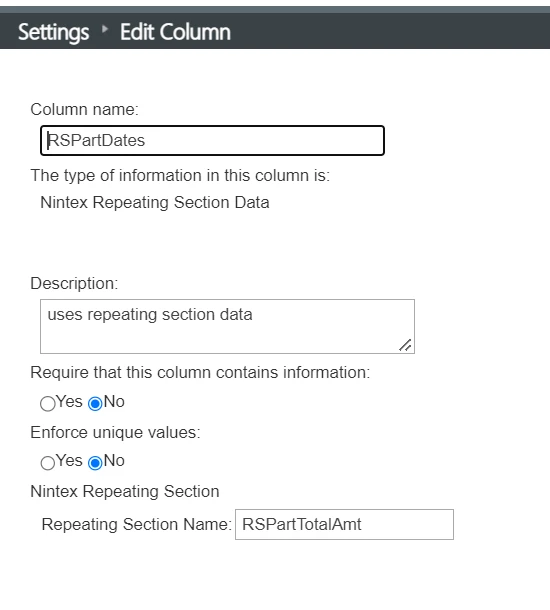
Each of the MLT (Rich Text) Controls are connected to its own MLT Rich Text Column:
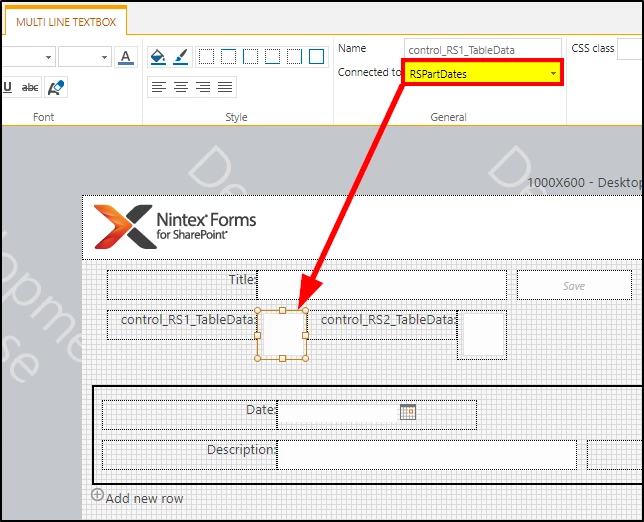
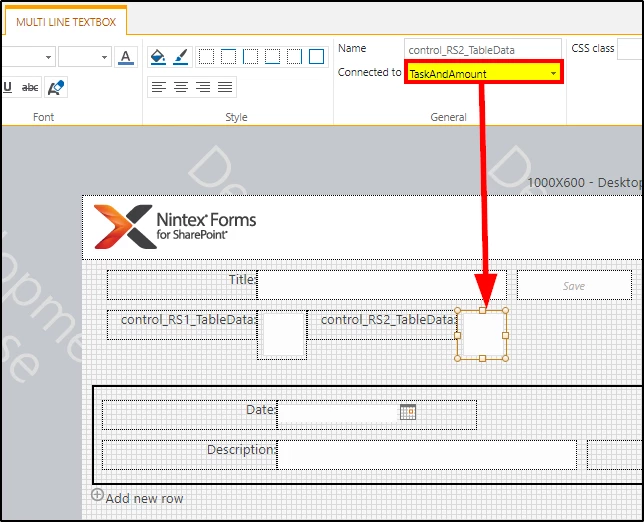
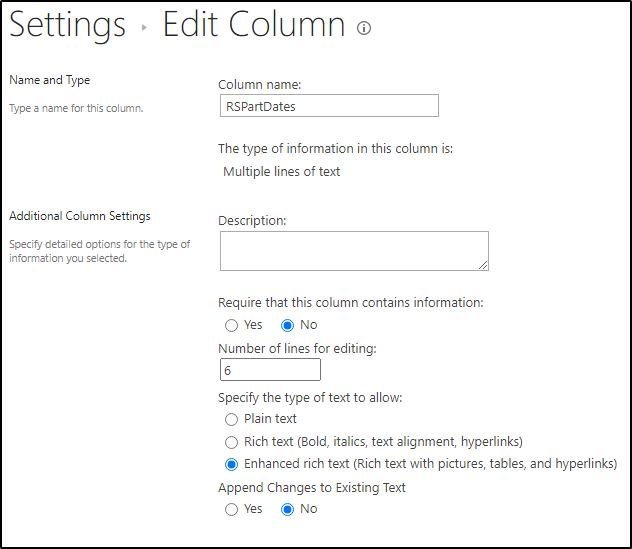
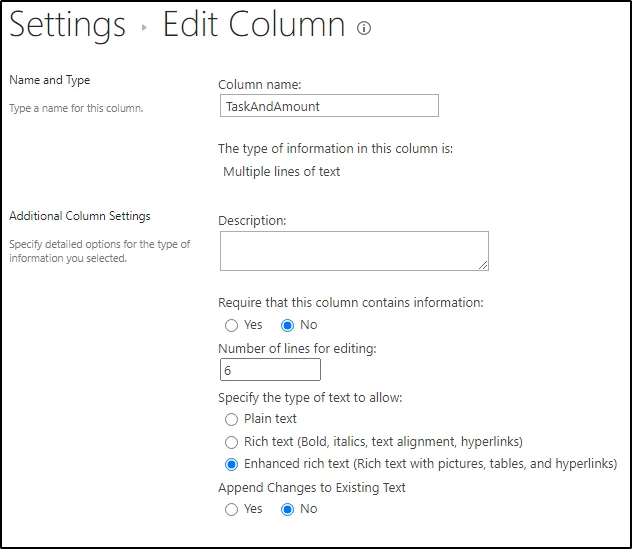
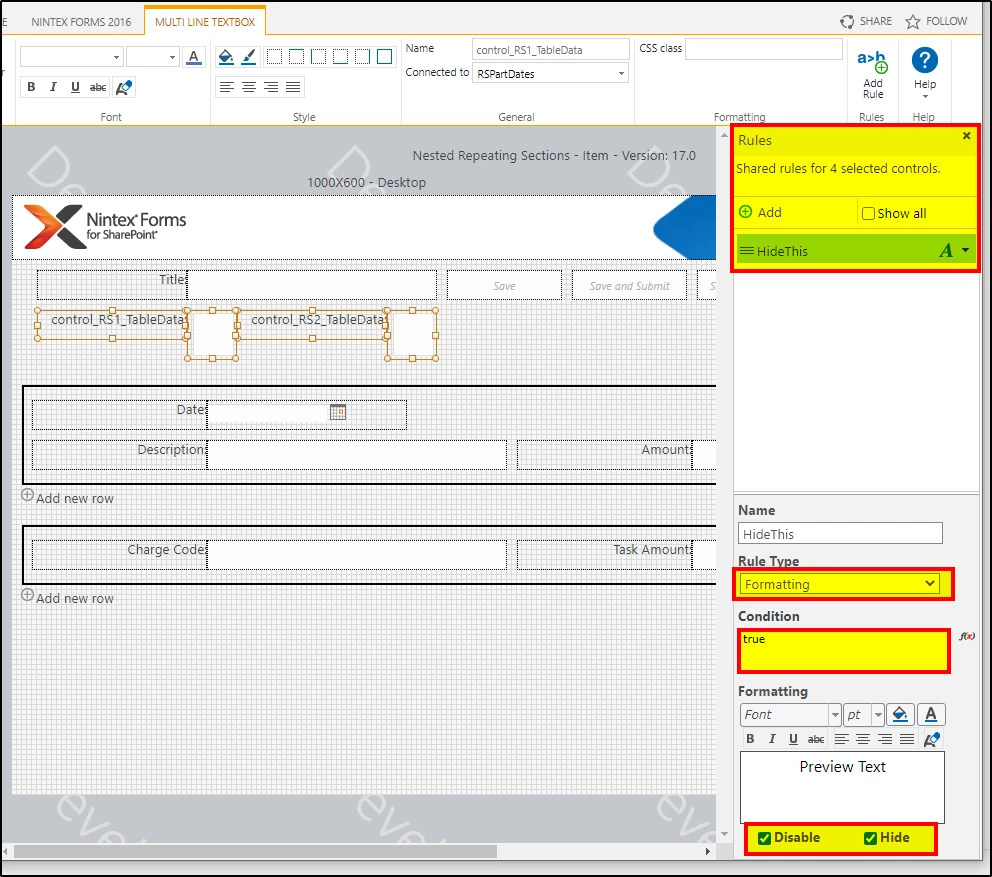
Additionally, the MLT (Rich Text) Controls that I'll be using for the Table HTML data have a rule applied to them that both Disables them and Hides them:
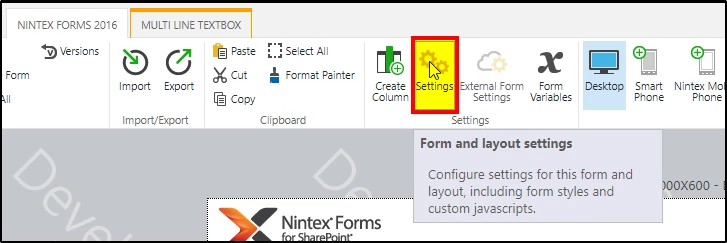
In the Form Settings I have some Custom JavaScript Running:
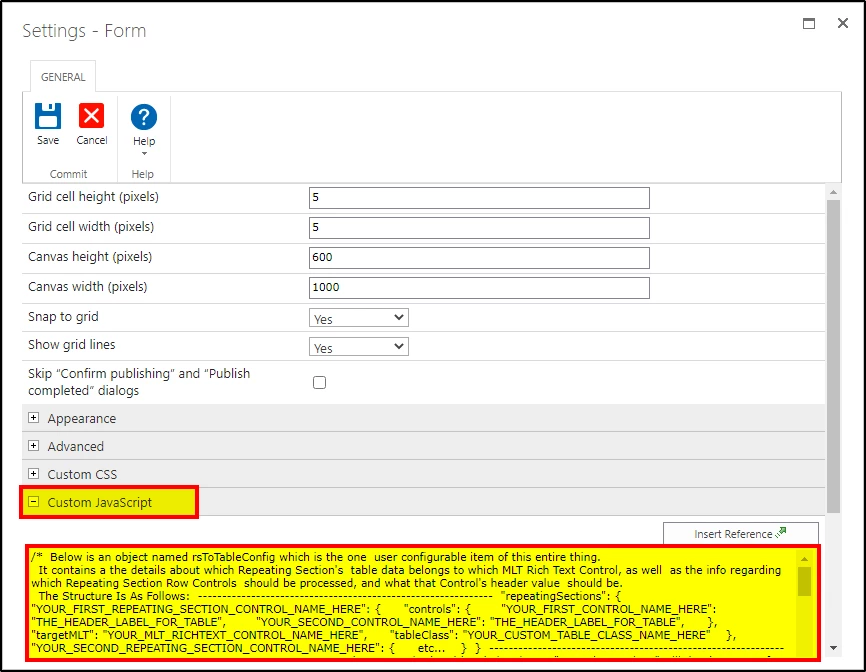
The Code is as follows:
/*
  Below is an object named rsToTableConfig which is one of
  two user configurable items of this entire thing.

  It contains a the details about which Repeating Section's
  table data belongs to which MLT Rich Text Control, as well
  as the info regarding which Repeating Section Row Controls
  should be processed, and what that Control's header value
  should be.

  The Structure Is As Follows:
  -------------------------------------------------------------
  "repeatingSections": {
    "YOUR_FIRST_REPEATING_SECTION_CONTROL_NAME_HERE": {
      "controls": {
        "YOUR_FIRST_CONTROL_NAME_HERE": "THE_HEADER_LABEL_FOR_TABLE",
        "YOUR_SECOND_CONTROL_NAME_HERE": "THE_HEADER_LABEL_FOR_TABLE",
      },
      "targetMLT": "YOUR_MLT_RICHTEXT_CONTROL_NAME_HERE",
      "tableClass": "YOUR_CUSTOM_TABLE_CLASS_NAME_HERE"
    },
    "YOUR_SECOND_REPEATING_SECTION_CONTROL_NAME_HERE": {
      etc...
    }
  }
  -------------------------------------------------------------
  -------------------------------------------------------------
  Each property in the object belonging to "repeatingSections" will
  be the name of a Repeating Section Control on your form.

  That Repeating Section's Control Name property will equal an object
  that then contains three more properties: "controls", "targetMLT",
  and "tableClass" (which is an optional property).

  "controls" equals an object which will contain the Key Value Pairs
  of "Control Name" : "Header Name". If a Control in the Repeating
  Section needs to have its value included in the Table HTML then
  this will be where you specify it.

  "targetMLT" is the Control Name of the MLT Rich Text where this
  Repeating Section’s resulting Table HTML will be pushed into.

  "tableClass", and optional property, is just a string that will
  be used as a class name for the resulting table HTML, useful
  for styling and manipulating the table later on.
  -------------------------------------------------------------
  -------------------------------------------------------------
*/
var rsToTableConfig = {
  "repeatingSections": {
    "control_RS1": {
      "controls": {
        "control_Date": "Date",
        "control_Description": "Description",
        "control_Amount": "Amount"
      },
      "targetMLT": "control_RS1_TableData",
      "tableClass": "tableData_RS1"
    },
    "control_RS2": {
      "controls": {
        "control_ChargeCode": "Charge Code",
        "control_TaskAmount": "Amount"
      },
      "targetMLT": "control_RS2_TableData",
      "tableClass": "tableData_RS2"
    }
  }
};

/*
  customCSS is a customizable object that is used once
  the tableHTML has been generated to style the elements.

  The object at the "selectors" property contains a series of
  key/value pairs with the key being a jquery-selector, and
  the value being an object of css to apply to elements
  returned by said selector.

  Below is just a little test Table CSS stolen from the net.
*/
var customCSS = {
  "selectors": {
    "table": {
      "width": "100%",
      "border": "1px solid #000000"
    },
    "th, td": {
      "width": "25%",
      "text-align": "left",
      "vertical-align": "top",
      "border": "1px solid #000",
      "border-spacing": "0",
      "border-collapse": "collapse",
      "padding": "0.3em"
    }
  }
};

/*
  This is a helper function that will get a control's value by way of its Control Name
*/
var getControlValueByName = function (controlName, sourceContext, getValueAsString) {
  if (getValueAsString) {
    getValueAsString = "string2";
  }

  sourceContext = (sourceContext || NWF$(document));

  var targetFormControlID = sourceContext.find("[data-controlname='" + controlName + "']").attr("formcontrolid");
  NWF.FormFiller.Functions.GetValueContextCache(sourceContext)[targetFormControlID] = undefined;
  var rawValue = NWF.FormFiller.Functions.GetValue(targetFormControlID, sourceContext, getValueAsString);
  return rawValue;
};

/*
  This is a helper function that can update a MLT control that has been
  set to accept Rich Text.

  Its arguments are essentially:

  control (jQuery Object): The MLT Control you want to update.

  richText (string): The HTML or text you want to insert into the MLT Control.

  triggerUpdate (boolean): A boolean that, when set to true (default), will
  trigger an update on the MLT Control that fires any Form Rules which
  have a dependency on it. Set to false to prevent this behavior.
*/
var updateRichMLT = function (control, richText, triggerUpdate){
  var richTextContainer = control.find("[role='textbox']");
  richTextContainer.html(richText);

  if (triggerUpdate !== false) {
    richTextContainer.trigger("blur");
  }
  return control;
};

/*
  This is the actual heavy lifter. This function is what generates the HTML
  from a given Repeating Section Control.

  The Arguments are as follows:

  rsControlName (string): The Control Name of the Repeating Section you'd
  like to generate an HTML Table out of.

  tableConfig (object): An object containing Key Value pairs of Control Names (key)
  and their subsequent Header Name (value) as you want displayed in the table.

  tableClass (string): An optional string that will be applied to the resulting
  table HTML as a class on the <table> element. Useful for css styling.
*/
var repeatingSectionToTable = function (rsControlName, tableConfig, tableClass) {

  /*
    We need to get a few things ready so here at the start we'll make a variable
    called "table" which will hold the outline of our Table.

    We'll also get all of the Control Names that we want to target in any given
    row within the Repeating Section, as well as the Header Names associated
    to each Control Name.
  */
  var table = NWF$("<table><thead></thead><tbody></tbody></table>");
  var tableControls = Object.keys(tableConfig);
  var tableHeaders = tableControls.map(function(tableControl){return tableConfig[tableControl];});

  /*
    At this point we can grab the Repeating Section Control which has
    the name of whatever was passed into the rsControlName argument.

    After that we will get all the Rows of that Repeating Section
    with the exception of the Hidden Row which is placed at the start
    of every Repeating Section and is used by the internal Nintex code
    as template to duplicate from whenever you click on the Add Row button.
  */
  var repeatingSection = NWF$("[data-controlname='" + rsControlName + "']");
  var rsRows = repeatingSection.find(".nf-repeater-row:not" + "(.nf-repeater-row-hidden)");

  /* With all that out of the way, it's time to make our Table Headers */
  table.find("thead").append("<tr>" + tableHeaders.map(function(header){return "<th>" + header + "</th>"}).join() + "</tr>");

  /* Add our custom class to the table if it (the class argument) exists */
  if (tableClass) {
    table.addClass(tableClass);
  }

  /* Then we need to go through each row of the Repeating Section */
  rsRows.each(function(index, rsRow) {

    /*
      I'm going to collect the table data <td> for a given row
      inside of an Array called rsRowTableData.

      To do this I will iterate through the array of Control Names
      we have saved to the "tableControls" variable. I will then
      get the value of said control, and return that value as a String
      nested inside of the opening and closing <td> elements.

      If the value is a Date, then I will convert it to
      a local date string before returning it.
    */
    var rsRowTableData = tableControls.map(function(tableControl){

      controlValue = getControlValueByName(tableControl, NWF$(rsRow));

      if (controlValue instanceof Date) {
        controlValue = controlValue.toLocaleDateString();
      }

      return "<td>" + controlValue + "</td>";
    });

    /*
      Once all of the table data elements have been put into the array
      I'll append it to the last row that's in the table's tbody
    */
    table.find("tbody").append("<tr></tr>").find("tr:last").append(rsRowTableData);
  });

  /* Once all of the RS Rows have been processed, we return the table */
  return table;
};


/*
  We want to make sure that this is attached once we can ensure that the Form is
  absolutely ready and all of the Controls are populated / working / there.

  To do that, we'll use the Form Event "RegisterAfterReady"
*/
NWF.FormFiller.Events.RegisterAfterReady(function () {

  /*
    We want to update the MLT Controls before the Form has been submitted
    so we'll just handle the onsubmit event here with some custom code
    that looks at the tableDataControls and updates each one whenever
    a user clicks on the Save button.
  */
  NWF$("form").on("submit", function(event){

    /*
      Now we're going to loop through all of the properties in the
      rsToTableConfig.repeatingSections Object, IE: the Repeating Section
      Control Names.
    */
    Object.keys(rsToTableConfig.repeatingSections).forEach(function(rsName){

      /* For every Repeating Section Control Name... */

      /* Get the Object from the rsToTableConfig Object */
      var rsConfig = rsToTableConfig.repeatingSections[rsName];

      /* Get the controls value */
      var rsConfigControls = rsConfig.controls;

      /* Get the targetMLT value */
      var rsConfigTarget = rsConfig.targetMLT;

      /* Get the tableClass value */
      var rsConfigTableClass = rsConfig.tableClass;

      /* If both the controls and targetMLT properties had a value, then... */
      if (rsConfigControls && rsConfigTarget) {

        /* Invoke the repeatingSectionToTable function and store the results in a var */
        var tableHTML = repeatingSectionToTable(rsName, rsConfigControls, rsConfigTableClass);

        /*
          Now that we have the tableHTML we can apply the custom CSS styles that are
          in the customCSS variable.
        */
        Object.keys(customCSS.selectors).forEach(function(selector){
            var selectorCSS = customCSS.selectors[selector];
            tableHTML.find(selector).css(selectorCSS);
            console.log(selectorCSS);
        });

        /*************************************************************************/
        /* IF YOU NEED TO MAKE CHANGES TO THE TABLE HTML YOU CAN DO SO DOWN HERE */
        /*************************************************************************/


        /*************************************************************************/


        /* Push the Table HTML to the target MLT Rich Text Control */
        updateRichMLT(NWF$("[data-controlname='" + rsConfigTarget + "']"), tableHTML);
      }
    });
  });
});
That same code but without comments:
var rsToTableConfig = {
  "repeatingSections": {
    "control_RS1": {
      "controls": {
        "control_Date": "Date",
        "control_Description": "Description",
        "control_Amount": "Amount"
      },
      "targetMLT": "control_RS1_TableData",
      "tableClass": "tableData_RS1"
    },
    "control_RS2": {
      "controls": {
        "control_ChargeCode": "Charge Code",
        "control_TaskAmount": "Amount"
      },
      "targetMLT": "control_RS2_TableData",
      "tableClass": "tableData_RS2"
    }
  }
};

var customCSS = {
  "selectors": {
    "table": {
      "width": "100%",
      "border": "1px solid #000000"
    },
    "th, td": {
      "width": "25%",
      "text-align": "left",
      "vertical-align": "top",
      "border": "1px solid #000",
      "border-spacing": "0",
      "border-collapse": "collapse",
      "padding": "0.3em"
    }
  }
};

var getControlValueByName = function (controlName, sourceContext, getValueAsString) {
  if (getValueAsString) {
    getValueAsString = "string2";
  }

  sourceContext = (sourceContext || NWF$(document));

  var targetFormControlID = sourceContext.find("[data-controlname='" + controlName + "']").attr("formcontrolid");
  NWF.FormFiller.Functions.GetValueContextCache(sourceContext)[targetFormControlID] = undefined;
  var rawValue = NWF.FormFiller.Functions.GetValue(targetFormControlID, sourceContext, getValueAsString);
  return rawValue;
};

var updateRichMLT = function (control, richText, triggerUpdate){
  var richTextContainer = control.find("[role='textbox']");
  richTextContainer.html(richText);

  if (triggerUpdate !== false) {
    richTextContainer.trigger("blur");
  }
  return control;
};

var repeatingSectionToTable = function (rsControlName, tableConfig, tableClass) {
  var table = NWF$("<table><thead></thead><tbody></tbody></table>");
  var tableControls = Object.keys(tableConfig);
  var tableHeaders = tableControls.map(function(tableControl){return tableConfig[tableControl];});
  var repeatingSection = NWF$("[data-controlname='" + rsControlName + "']");
  var rsRows = repeatingSection.find(".nf-repeater-row:not" + "(.nf-repeater-row-hidden)");
  table.find("thead").append("<tr>" + tableHeaders.map(function(header){return "<th>" + header + "</th>"}).join() + "</tr>");
  if (tableClass) {
    table.addClass(tableClass);
  }
  rsRows.each(function(index, rsRow) {
    var rsRowTableData = tableControls.map(function(tableControl){

      controlValue = getControlValueByName(tableControl, NWF$(rsRow));

      if (controlValue instanceof Date) {
        controlValue = controlValue.toLocaleDateString();
      }

      return "<td>" + controlValue + "</td>";
    });
    table.find("tbody").append("<tr></tr>").find("tr:last").append(rsRowTableData);
  });
  return table;
};

NWF.FormFiller.Events.RegisterAfterReady(function () {
  NWF$("form").on("submit", function(event){
    Object.keys(rsToTableConfig.repeatingSections).forEach(function(rsName){
      var rsConfig = rsToTableConfig.repeatingSections[rsName];
      var rsConfigControls = rsConfig.controls;
      var rsConfigTarget = rsConfig.targetMLT;
      var rsConfigTableClass = rsConfig.tableClass;
      if (rsConfigControls && rsConfigTarget) {
        var tableHTML = repeatingSectionToTable(rsName, rsConfigControls, rsConfigTableClass);
        Object.keys(customCSS.selectors).forEach(function(selector){
            var selectorCSS = customCSS.selectors[selector];
            tableHTML.find(selector).css(selectorCSS);
            console.log(selectorCSS);
        });
        updateRichMLT(NWF$("[data-controlname='" + rsConfigTarget + "']"), tableHTML);
      }
    });
  });
});
That's it really. Now let's run the form and see what happens.
The Results
I have created a new Item and filled out some arbitrary data:
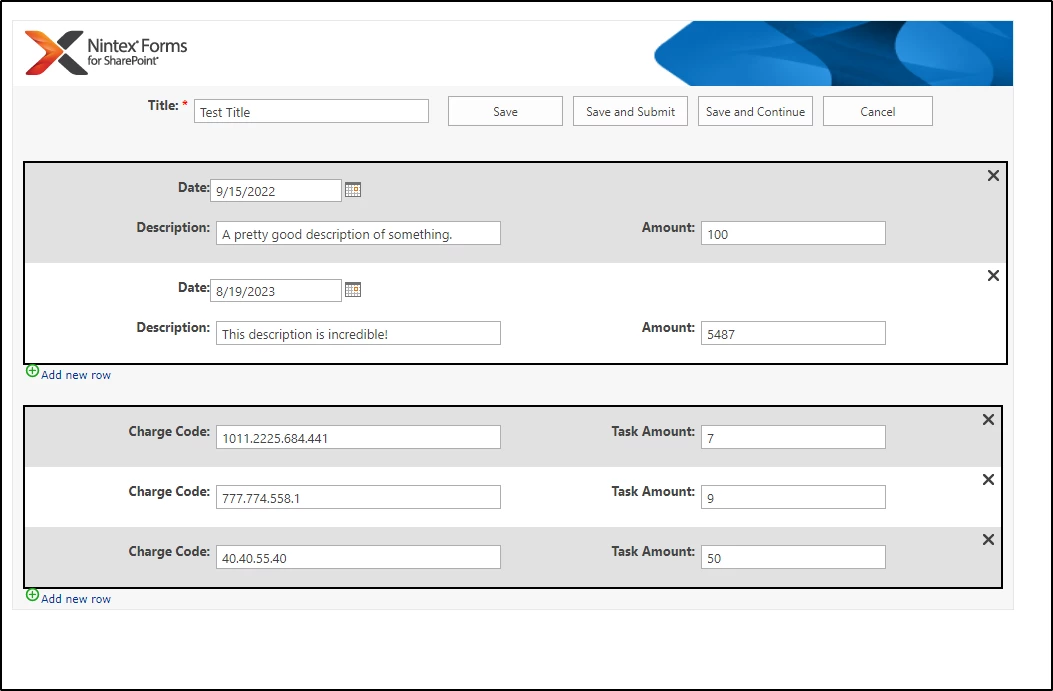
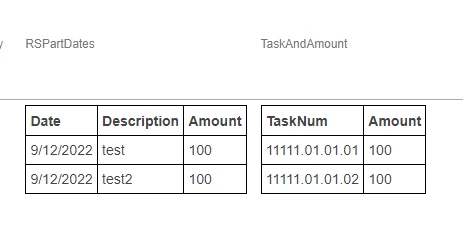
Once I hit any of the Save Buttons I am shown that our data was indeed placed into tables.
Final Thoughts
Though it looks like a lot of code, the most important part is perhaps at the top:
var rsToTableConfig = {
  "repeatingSections": {
    "control_RS1": {
      "controls": {
        "control_Date": "Date",
        "control_Description": "Description",
        "control_Amount": "Amount"
      },
      "targetMLT": "control_RS1_TableData",
      "tableClass": "tableData_RS1"
    },
    "control_RS2": {
      "controls": {
        "control_ChargeCode": "Charge Code",
        "control_TaskAmount": "Amount"
      },
      "targetMLT": "control_RS2_TableData",
      "tableClass": "tableData_RS2"
    }
  }
};
You may have noticed that a lot of those values are using the names of the Controls on my form. That's because this Object structure defines how our table should be generated and which Repeating Section's resulting Table HTML belongs to which one of the MLT (Rich Text) Controls on the form.
If I were to add a new control to any of those two repeating sections on the form, then I would need to update my code if I wanted to include it in the html table I'm making.
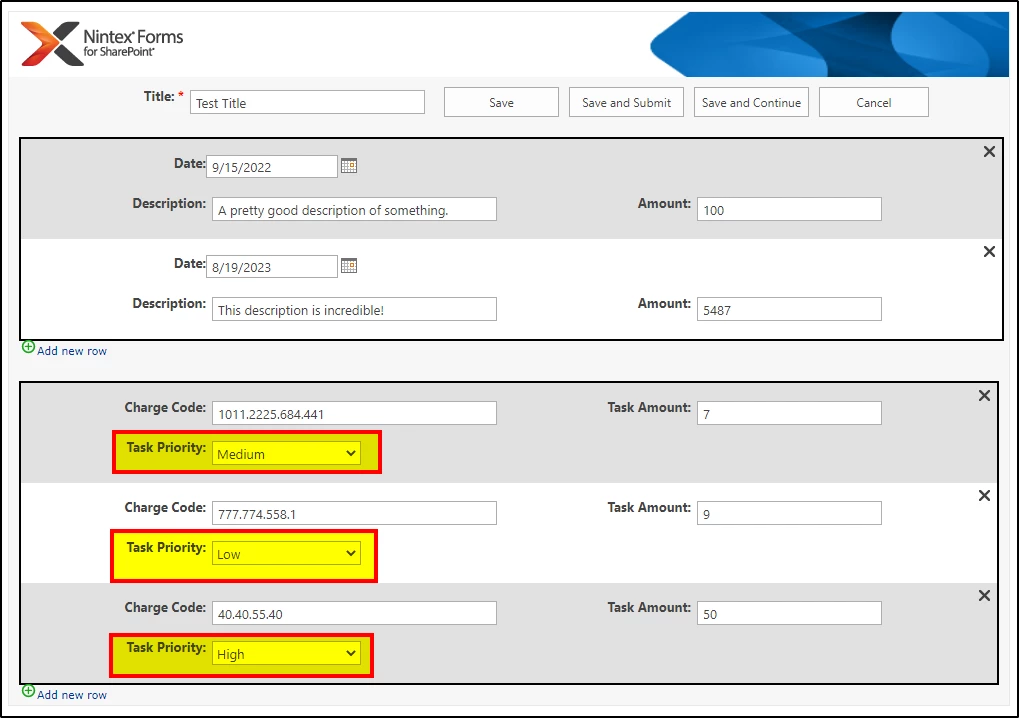
Let's say that I add a Choice Control called "control_TaskPriority" in the Second Repeating Section (control_RS2) that presents three priority levels for the user to choose:
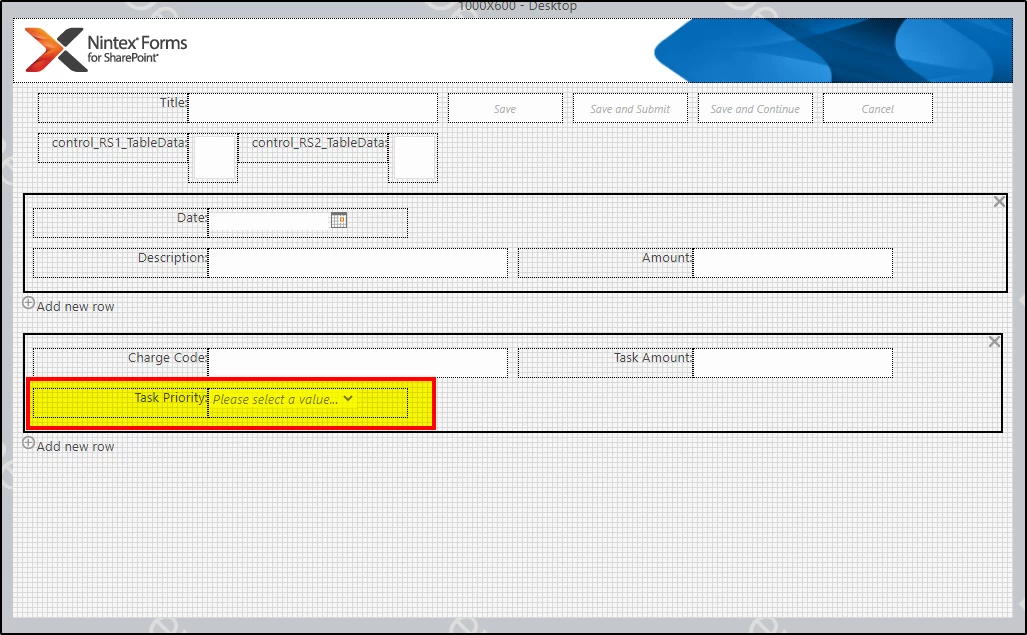
Let's update our Item with to give a priority to each Task in the Repeating Section, and Submit it:
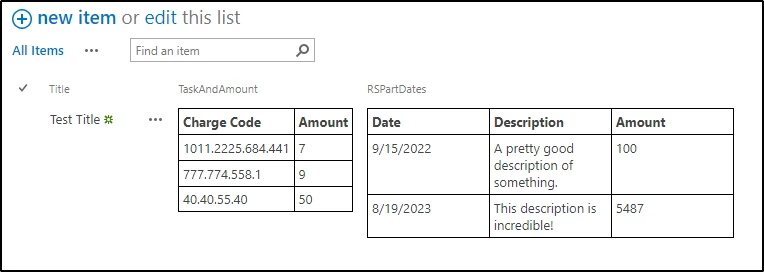
hmm... Nothing Changed:
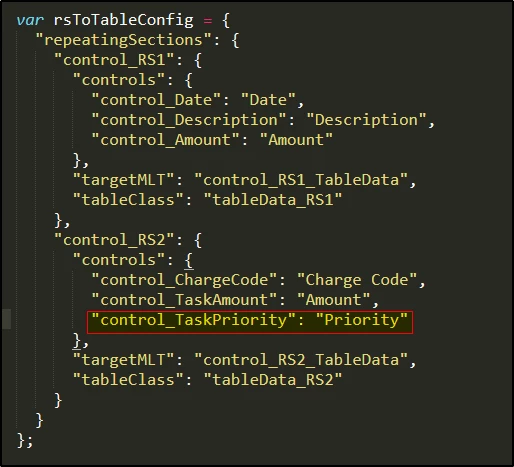
This is because we didn't update the rsToTableConfig object. Let's add the control there:
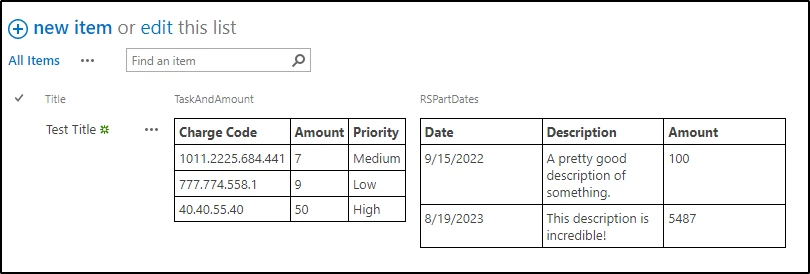
Now I can just Edit and Resubmit the form:
Outro
So there you have it. I know it looks like a lot of work, but most of it (naming your form controls) are things that you are likely to be doing any way. Once the work of building out that Object is done and inserting the names of your Controls into it, making changes later is pretty easy.
Let me know if you have any issues getting this up and running, or if you have any questions in general about specific things in the code. I didn't really want to spend too much time digging into it here because I tried to leave detailed comments on how it's working in the code itself with the exception of some of the "helper" functions I have in there.
Hope that this solves your issue.


