KB002670
PRODUCT: K2 Cloud, K2 Five
You can use the powerful workflow capability in K2 to build different types of workflows. This article describes some common workflow execution models and design patterns that you can build with K2. This is not intended as an exhaustive list of all supported models and patterns, but rather examples of some common ones you can build using the K2 Workflow Designer.
This article is an update of the previous Workflow Design Patterns Quick-Reference Sheet, and describes common workflow models and patterns, using the browser-based workflow design tool in K2 Five. If you are working in K2 Studio or K2 for Visual Studio, please refer to the previous quick-reference sheet.
This article focuses on overall workflow design. If you want to learn more about the capabilities for configuring user tasks for more advanced scenarios like multiple recipients, reminders, voting and more, please see the Task Step and Using Task Recipients and Responses topics in the product documentation.
Workflow Execution Models
- Serial (Sequential) Steps
- Parallel (Simultaneous) Steps
- Hybrid Execution
- Parent-Child
- Parent-Children
Workflow Design Patterns
Download the sample workflows
You can download a deployment package containing these sample workflows from here: https://help.k2.com/files/16237. Deploy the package to a K2 environment, and then use K2 Designer to edit the workflow and understand how the workflows are built at design-time. You can also use the K2 Management site and K2 Workspace to run the workflows and understand how the workflows behave at runtime. The text above the workflow screen-shot is the name of the workflow in the package.
Workflow Execution Models
Workflow Execution refers to the way in which steps in a workflow run, mostly in serial or parallel fashion. Below are four examples illustrating how different execution models behave.
Serial (Sequential) Steps
The Sequential (or Serial) workflow step model is typically the most common workflow execution model. In this model, steps in the workflow flow from one to the other, based on the lines that connect the steps and the logic that determine how the workflow flows from one task to the next, and steps wait for the preceding step to complete. Sometimes, steps may execute rapidly in sequence such as for a series of server-side steps, and sometimes steps may cause the workflow to wait for something to happen, such as during a user task where the workflow waits for a user's input, or a wait step that pauses the workflow for some amount of time.
What does this workflow do?
Essentially, in this workflow, each approval step waits for the preceding step to complete.
The workflow starts and the First Approval step is reached. If rejected, the workflow goes to the End step. If Approved, the workflow continues to the Second Approval. If Second Approval results in Rejected, the workflow goes to the End step. If the Second Approval is results in Approved, the workflow goes to Third Approval. If Third Approval results in Rejected, the workflow goes to the End step. If the Third Approval results in Approved, the workflow sends an email to the originator and then goes to the End Step.
When would I use this?
- Serial (sequential) approval steps
- A sequence of server tasks, in a specific sequence
Sequential Execution Model
Parallel (Simultaneous) Steps
The Parallel steps model is mostly used when a workflow might have multiple paths active at the same time. In this pattern, the workflow splits at some point into separate paths, each of which may contain multiple steps. At some point, these paths may merge back together again. At the merge point, you can decide whether the workflow should wait for all preceding paths to complete, or whether the workflow should continue as soon as the first path reaches the merge point and expire any other active paths. You can even build more advanced logic to determine what should happen at the merge point in the workflow. To implement this model, you would use the Split and Merge workflow steps.
What does this workflow do?
This workflow splits into two parallel paths of tasks, and the workflow waits for the two paths to complete before it continues.
The workflow starts, and it splits into two paths: Parallel Path 1 and Parallel Path 2. Both paths contain a user task step and an email step. Suppose the user in Parallel Path 2 completes Parallel Path 2 Task. The workflow sends an email in Send Path 2 Email, and then reaches the merge point. Since the merge point was configured to wait for all followed paths, the workflow waits for Path 1 to complete. At some point, the recipient for Parallel Path 1 Task completes their task, and the workflow sends an email. The workflow reaches the merge step again and now that both parallel paths have completed, the workflow continues to the End Step.
When would I use this?
- Workflows with parallel paths, where different recipients can complete their work simultaneously and independently of one another.
- Example: In an employee on-boarding workflow, it may be possible for both IT and Facilities to prepare resources for a new employee simultaneously and independently from one another. But you may want the workflow to wait until both IT and Facilities complete their independent tasks before the workflow continues to the Security team to set up security access for the new employee.
Parallel Execution Model
Hybrid Execution
You can combine both Serial and Parallel execution in one workflow, where one part of the workflow executes in in parallel, while another part of the workflow executes serially.
What does the workflow do?
This workflow contains two parallel paths, but the second path contains steps that execute serially and based on a decision made by a user in Path 2.
In this example, the workflow starts and immediately splits into two parallel paths. Path 1 contains a single user task and when this task is completed, the workflow proceeds to wait at the merge step for Path 2 to complete. Path 2 starts when the workflow splits, and there is a user task. Depending on the decision made by the user in Path 2 Task 1, the workflow might go to Path 2 Task 2A or Path 2 Task 2B (This is the serial part of the hybrid workflow). Once the relevant task has completed, the workflow sends an email. When both Path 1 and Path 2 are complete, the merge step succeeds, and the workflow ends.
When would I use this?
- You may want to make a workflow more efficient by having some tasks in the workflow happen in parallel, but other parts of the workflow need to run serially.
- For example, in an employee onboarding solution, you may have IT and Facilities perform their tasks in parallel to prepare resources for the new employee, but as a separate (serial) work stream, you need HR to complete their tasks before Finance can perform their tasks. In this case, Finance must wait for HR, but not for IT or Facilities.
Hybrid Execution Model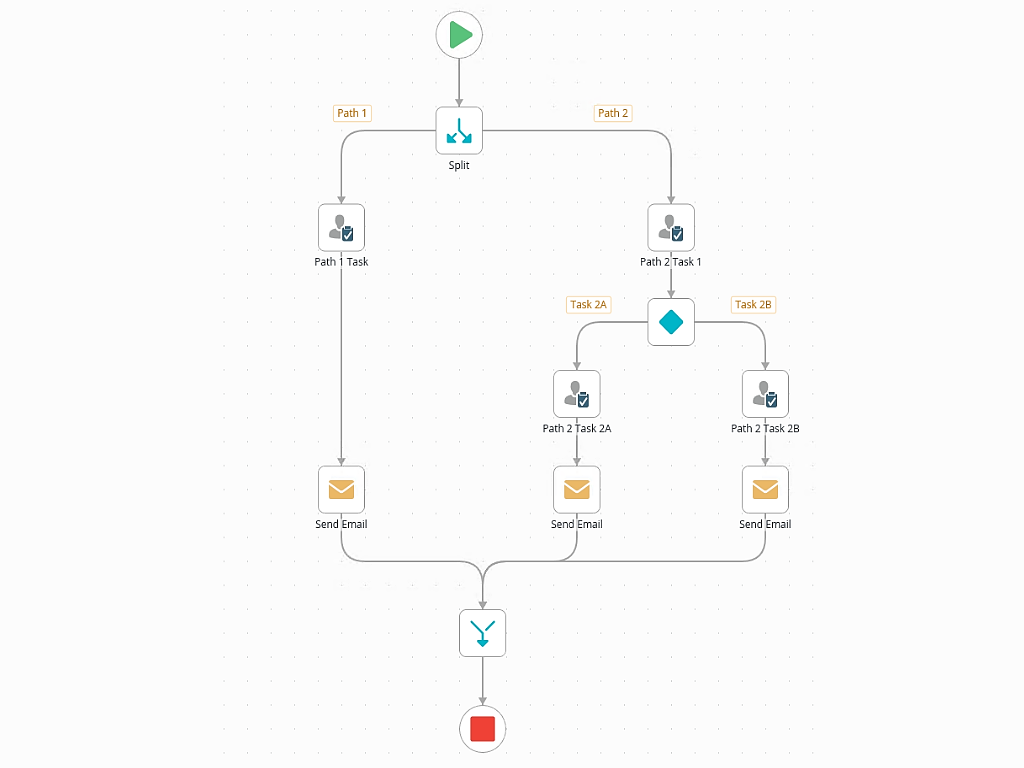
Parent-Child
You can use the Call Sub-Workflow step to build parent-child workflows (sometimes called Main and Sub workflow). When configuring the Call Sub-workflow step, you can tell K2 whether the parent workflow should wait for the child workflow to complete before it continues, or whether the parent should just continue after starting the child workflow (sometimes referred to as Fire and Forget). In either approach, you can pass data from the parent workflow to the child workflow. If the parent workflow waits for the child workflow to complete, you can also pass data back from the child workflow to the parent workflow.
The parent-workflow model is sometimes used to separate a very large workflow into mutiple, separate workflows, or to build patterns like the Façade Pattern.
What does this workflow do?
There are two workflows in this example. The parent workflow starts, sets a value for a variable (which is sent to the child workflow later), and sends an email to confirm that the parent workflow is started. Next is a user task where the task recipient can decide whether to start the child workflow. If they decide not to start the child workflow, the parent workflow sends an email to the originator and ends. If the task recipient decides to start the child workflow, the parent workflow calls the child workflow with the Call Sub Workflow step. Part of the step configuration is to tell the parent workflow to pass the value for the Parent String Datafield variable to the child workflow’s Child String Variable variable. The parent workflow is set up to wait for the child workflow to complete, and therefore the child workflow can pass its value for Child String Variable back to the parent workflow’s Parent String Datafield variable.
The child workflow is very simple. When it starts, it sends an email to the originator of the parent workflow, waits for 10 seconds and then completes. Once the child workflow completes, the parent workflow sends an email to the originator and ends.
When would I use this?
- You may want to simplify a large and complex workflow by breaking it up into smaller sub-workflows.
- To create re-usable generic/helper/utility workflows that can be called from different parent workflows with the Call Sub Workflow step.
- To implement the Business Facade Pattern.
- To encapsulate parts of a workflow such that they can be independently maintained and updated.
- When implementing the Parent-Child pattern, avoid nested Call Sub Workflow steps that may result in a Grandparent-Parent-Child scenario, since doing so, especially when starting multiple child workflows or in a high load environment, since this can negatively impact the performance of your K2 environment.
Parent-Child Execution Model (Parent and Child)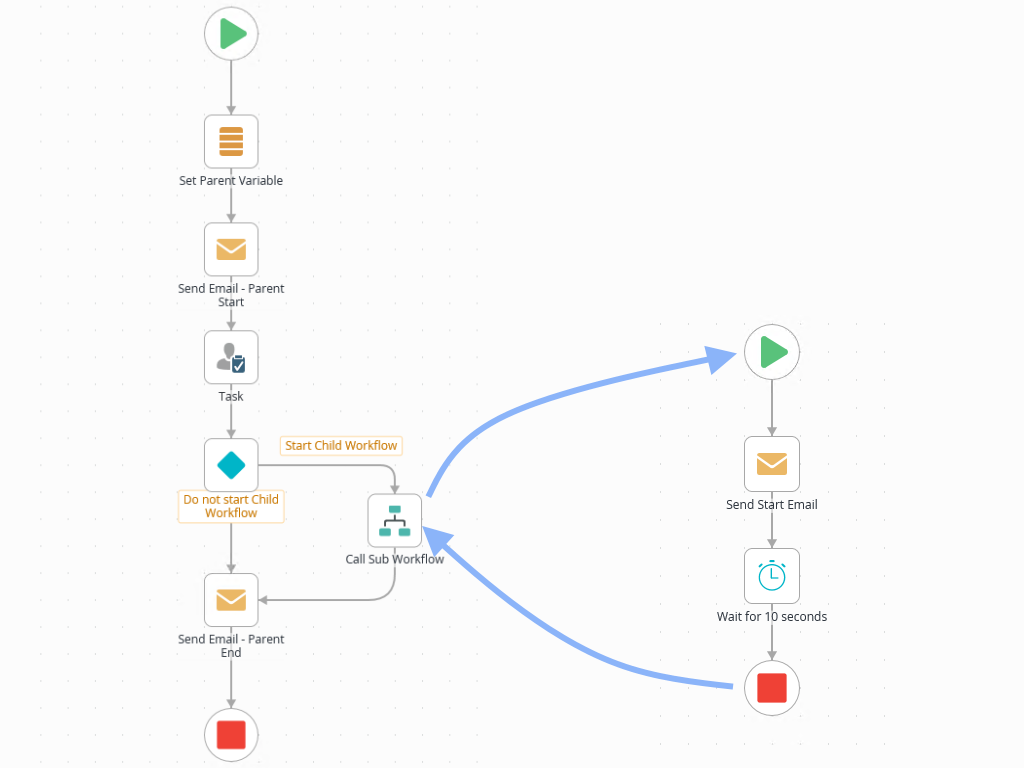
Parent-Children
You can also use the Call Sub-Workflow step to build single parent - multiple children workflows. In K2 Five 5.2 and K2 Cloud Update 6, the Call Sub-Workflow Step was enhanced to allow you to decide whether to start only one instance of the child workflow, or multiple instances. You would have to provide a list of items when configuring the Call Sub-Workflow step, for example a Reference that contains a list of items. At runtime, you can then pass an identifier of some kind from the parent workflow to each child workflow, so that the child workflow has some context of which specific item in the list it relates to.
What does this workflow do?
In this example, we have a parent workflow with a Call Sub Workflow Step which is configured to start multiple instances of the child workflow based on a list of items. In this example, the parent workflow starts, send an email, then calls the Process Definitions SmartObject to retrieve a list of workflows deployed in the environment, saving the results as an Item Reference. In the Call Sub-Workflow Step, we use the Item Reference and tell the parent workflow to pass the Process ID into the child workflow. This step is also configured so that the parent workflow will wait for all the children workflows to end before the parent workflow will continue. In each child workflow, the workflow will use the Process ID passed in from the parent workflow to retrieve more information about that specific item, send an email, wait for 10 seconds to simulate some long-running task, and then complete. Once all the children workflows have finished, the parent workflow will send a completion email and end.
When would I use this?
- The Parent-Children workflow pattern is often used when you need to start a sub-workflow for each item in a list or a collection.
- This is similar in concept to the Loop step, but instead of processing a sequence of tasks in a Loop, we have one step that starts multiple workflows in a 'loop'. The main difference, is that the parent workflow starts the child workflows immediately and then waits for them to complete, while the Loop pattern will process all steps in the loop for each item in the collection before it moves on to the next item.
Parent-Children Execution Model (Single Parent and multiple Children)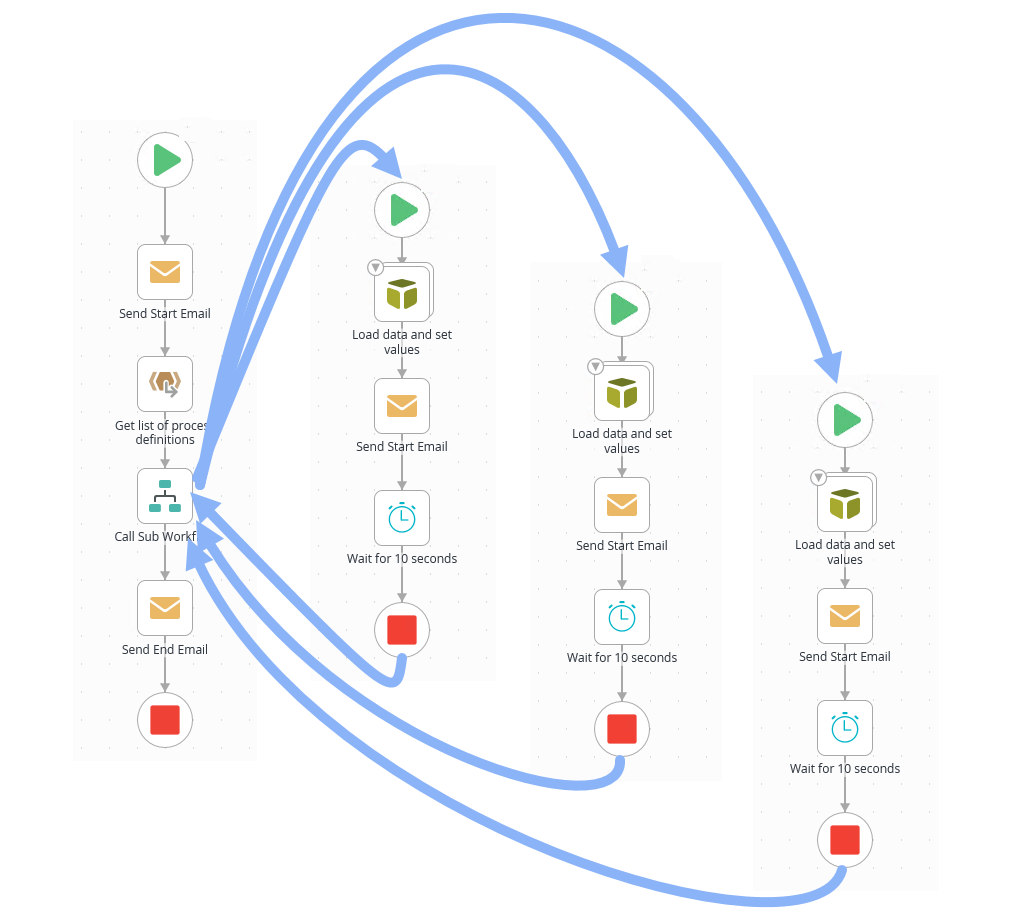
Workflow Design Patterns
Workflow Design Patterns refers to several common types of workflow patterns you may encounter when planning workflows, such as looping steps, rework loops, multi-level approvals and many more. In this section, we'll look at some common workflow design patterns that you can build with the browser-based workflow design tool in K2.
Rework
Sending requests back for rework is a common workflow pattern (for example in document review and approval workflows). You basically create a "loop" in the workflow to send a task back to someone (typically, the originator or a reviewer) to update or provide more information before it can be approved. The loop may run several times until the approver decides the request is approved or rejected. The key point here is that instead of sending the workflow back to the ‘Start’ step, you create a user task step in the workflow and send the workflow back to the same user task step. You may also want to leverage the comments and attachments feature in the workflow task panel to keep track of the review/approval/rework history.
What does this workflow do?
In this example workflow, the workflow starts and goes to the Approval step. The approver can decide whether the request is Approved, Rejected, or they can send it back for Rework. If they select Rework, the workflow goes to the Rework user task step, where the originator can adjust the request as needed, and Resubmit it for approval (in this example, the originator can also decide to Cancel the request completely if they don’t want to resubmit it). If the Originator resubmits their request, the approver can send it back for rework as many times as necessary, until the approver takes an Approved or Rejected action. In those cases, the workflow sends an Approved or Rejected email, and the workflow ends.
When would I use this?
- In situations where work can be sent back for rework several times.
- This pattern of often used in document review and approval workflows, or in workflows where an approver may send the request back for more information before they can action the request.
- You may want to include an "escape" path in the workflow, so that the person reworking the request can decide whether to resubmit their request or cancel it.
Rework Pattern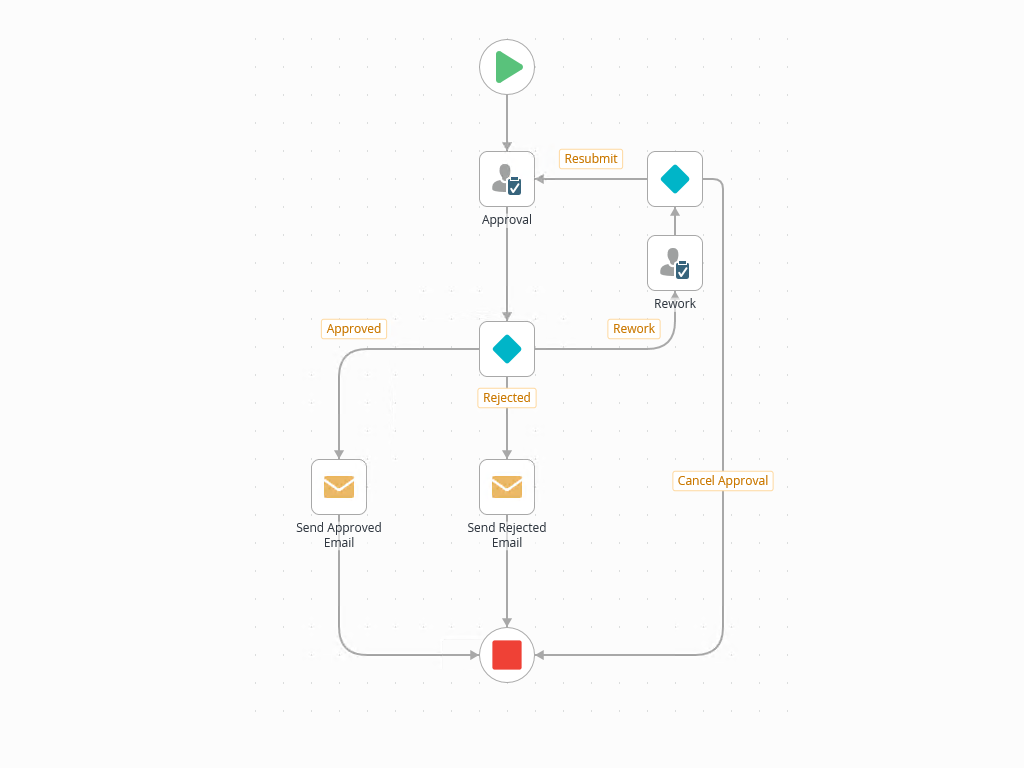
Looping (Iteration)
You may need a workflow that loops/iterates over a number of items in a list or collection, and perform one or more tasks for each item in the collection. Consider something like a sales order workflow, where you have a sales order that contains multiple items. Perhaps you need the workflow to perform some steps for each item in the sales order, such as assigning a manufacturing task for each item in the order.
The looping pattern is the appropriate mechanism to use for this scenario. You use the Loop step in conjunction with a Reference to a list of items and configure the loop to perform specific tasks for each item in the reference. Once all items are processed, the loop exits. You can also define your own condition determining when the loop should exit.
What does this workflow do?
This sample workflow starts and sends an email to the originator. In the Create Reference to list of items step, you call a SmartObject method to retrieve a list of all workflow definitions deployed to the current environment, which is an example of retrieving a list of items. Be aware that in some K2 environments, there may be hundreds of workflow definitions, so you may want to use caution before you run the sample workflow in your environment.
Once you have a list of Workflows in the reference, the loop step iterates over each workflow definition and performs tasks for each item. The first task is to decrement the value of a workflow variable. The workflow waits for one second to simulate something else happening, and then sends an email to the originator with the details of the current item being processed, such as the workflow name and ID, as well as the value of the variable. The loop returns to the loop step, the next workflow definition is picked from the list, and the steps repeat. You should see several emails come through as the workflow processes each workflow definition in your environment.
Finally, when there are no more items left to process, the workflow sends an email to notify you that it is complete, and the workflow ends.
When would I use this?
- Use the looping pattern when you need to perform a step or sequence of steps for items in a list.
- Use caution when working with lists, because it's easy to inadvertently spawn many workflow steps if the collection/reference contains hundreds or thousands of items.
- If the loop consists only of server steps and the list contains many items, you may add a lot of processing overhead on your K2 server when it iterates over the items in the collection.
- If the loop contains a wait step or a user task step, the loop does not continue until the wait step has completed, or the user has completed their task.
Looping Pattern - Iteration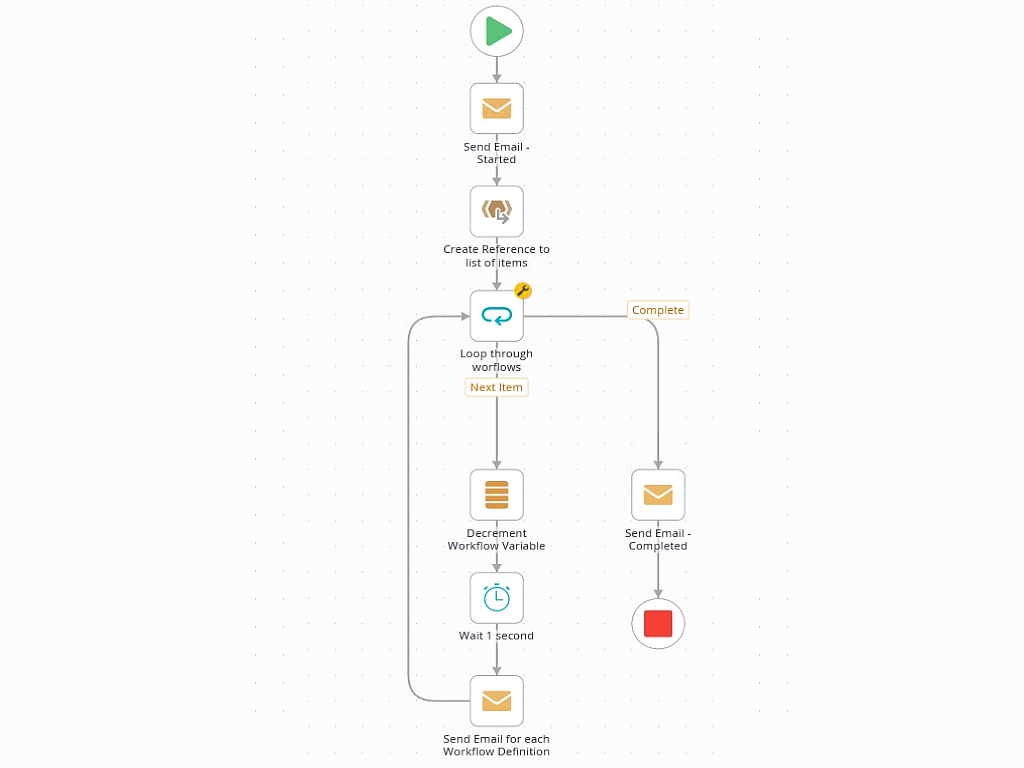
N-Level Approval
You may have solutions that require a workflow with an indeterminate (but finite) number of approval steps. For example, you may have an approval workflow that requires a request to pass one, two or three approvals. These decisions may be made by users (for example, approver 1 requesting a second approval) or by the system (for example, if the request amount exceeds a certain number, always send for second and third approval). Further, you may need to have each approval step distinctly separate in the workflow, and you want the workflow report to show how many levels of approval were required for any given request.
In cases like these, you can consider using the N-Level Approval pattern. Here, you use a sequence of user task steps, and decision steps between them to decide whether a subsequent approval is required.
What does this workflow do?
Our sample workflow represents an N-level Approval, where a request goes through at least one, but potentially up to three, levels of approval before it is approved. The participant at each approval step decides whether to approve or reject the request, or whether another level of approval is required. The workflow executes based on the decision in each step, and finally sends an approved or rejected email to the originator based on the final decision.
When would I use this?
- When you have a workflow that contains a maximum number of approval steps, but it is not guaranteed that all requests must pass all levels of approval; some may require one, others may require two or more approvals. However there is an upper limit to the number of approval needed.
- You want the workflow and view flow report to show the various levels of approval an item may have gone through. This can help your business users more easily understand how many levels a request needed.
- A typical example might be something like a purchasing request, where, depending on the amount of the purchase, the request should either go through one, two or three levels of approval before the purchase is processed.
- In the sample workflow, notice that the Send Email Rejected and Send Email Approved steps are the same regardless of what level of approval was needed. This keeps the workflow compact, but you can make the subsequent approval paths as complex as needed.
- If you need to build a workflow with an indeterminate and potentially infinite number of approvals, you should rather consider a looping pattern, where the workflow loops back to the same approval step multiple times, until a certain condition is satisfied.
N-Level Approvals Pattern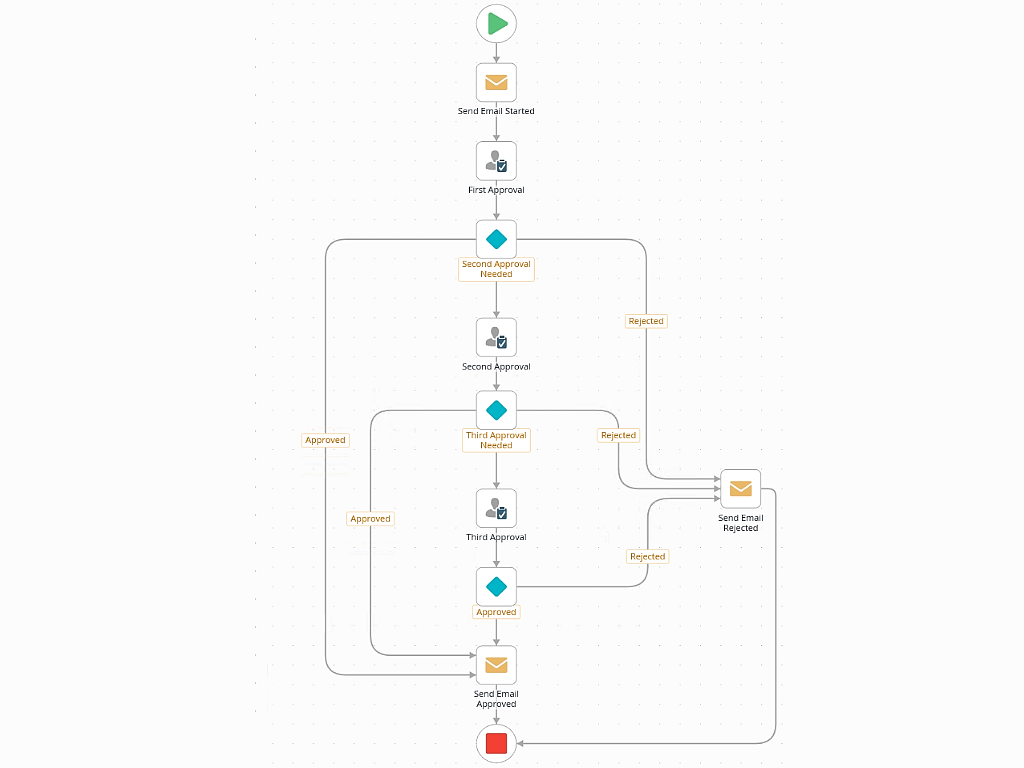
Business Façade
Some workflow designs can get quite large and complex once you have added all the system and user steps to a workflow. This can make it harder to understand the flow or current state of a workflow, especially when the workflow includes many system-only tasks that do not mean anything to a business user.
You can use the Business Façade pattern to create a simplified workflow model that hides the underlying complexities from your business users. With this Façade pattern, you separate the sections of the workflow that do not make sense to business users into sub-workflows, and then use the Call Sub Workflow step to call these other workflows. When the business user looks at the workflow in their reports, they see a simplified version in which the business process progresses as they understand it, while the more complex parts of the workflow occur behind the scenes.
What does this workflow do?
Our sample solution consists of three separate workflows. The Main workflow is the façade, and calls the underlying sub-workflows. The main workflow starts and sends you an email. Then, it creates a User Task where you can tell the workflow to continue, to simulate some user decision in the simplified business process. The workflow then calls the first sub-workflow, which does some system processing and returns a few seconds later. (For the purposes of this explanation, it doesn’t matter what the sub-workflows do, but they would typically be more complex than the simple sub-workflows shown here). Once the sub-workflow completes, the main workflow resumes and reaches the Approval Task. At this point, you can decide whether to approve the request (in which case K2 starts the second sub-workflow to perform additional processing) or reject it. Once the second sub-workflow has completed, or if you rejected the request, the main workflow sends an email and the workflow completes. From the business user’s perspective, they only need to see the report for the main workflow to get an overview of the overall business process. They don't need to concern themselves with the underlying system tasks performed in the two sub-workflows.
When would I use this?
- You can use the Business Façade Pattern when you need to hide more complex steps in the workflow from business users.
- This pattern is also useful if you want to encapsulate certain parts of a workflow into separate parts and call these sub-workflows from the main workflow. This also allows you to maintain the sub-workflows independently when requirements change.
- Consider a new customer onboarding workflow. There may be certain well-understood phases of the customer onboarding cycle, such as Intake Review, Contracting, Financials and Welcome Session. Each of those phases might involve many different steps (or even more complex workflows with other users’ input required), but from a higher level, you want to show a simple report that shows how a new customer is progressing through the onboarding cycle
Business Facade Pattern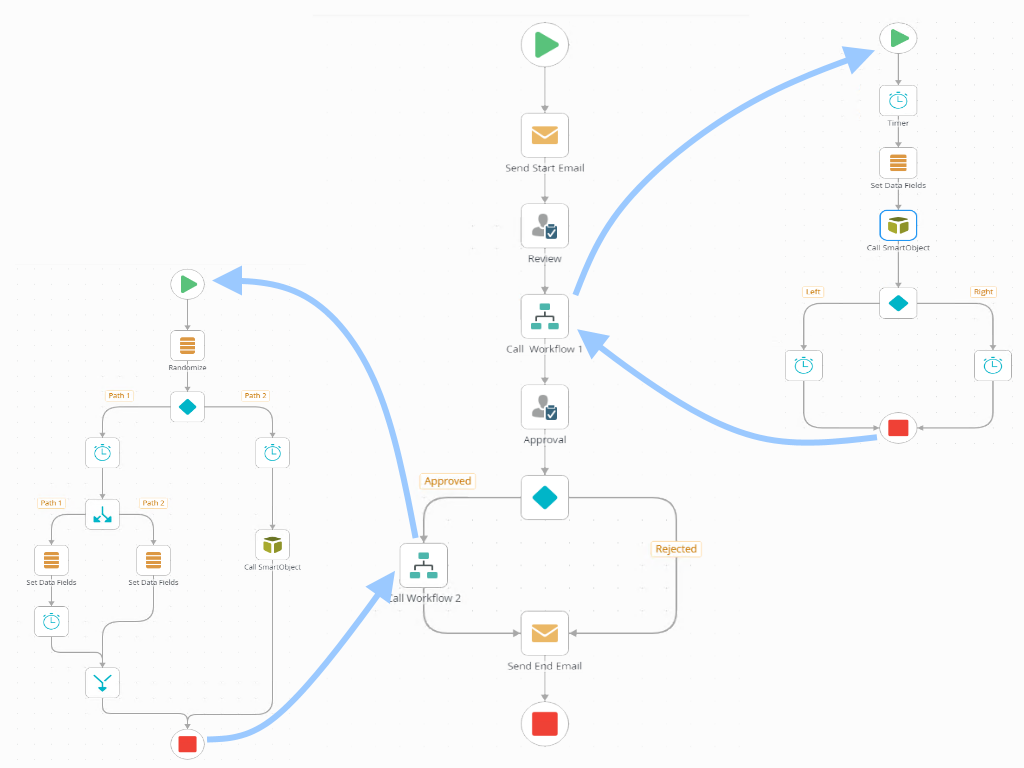
Spider (Controller)
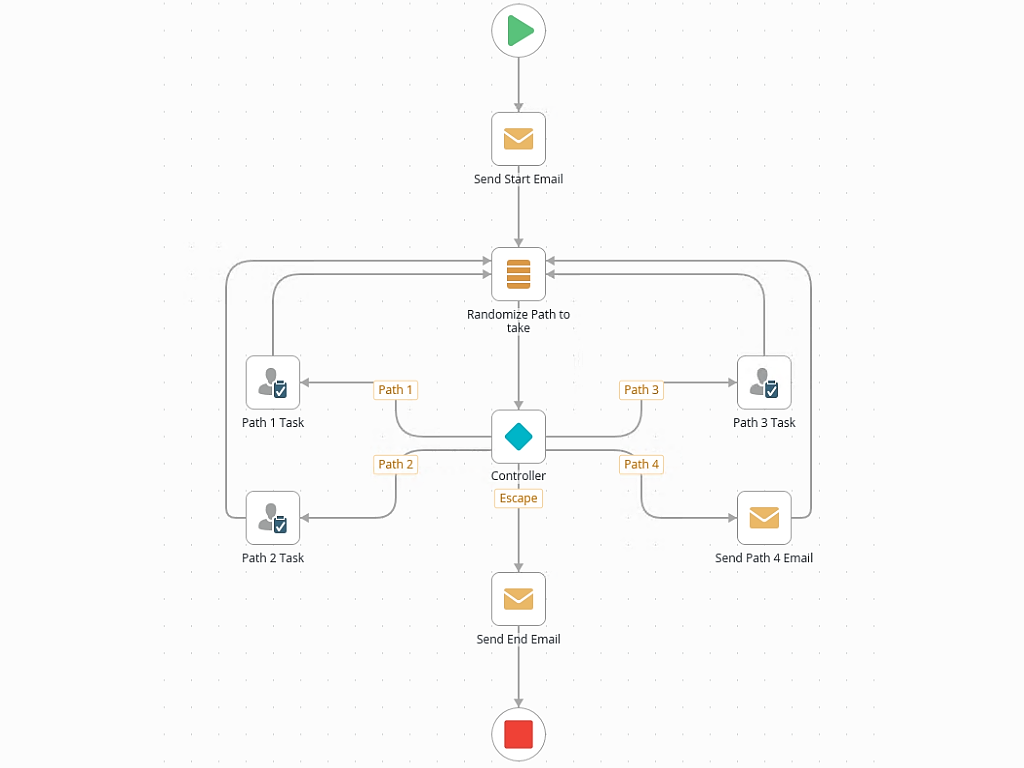
The Spider/Controller pattern is often used when a workflow is not well-defined as a sequence of steps. In other words, it is not always the case that certain steps always follow one another, and steps in the workflow may or may not be required. In this case, you may find the spider pattern useful. At the core of the spider pattern is the Controller step which makes the decision as to which subsequent step or sequence steps should be run.
Consider something like an case management or incident investigation workflow. In this case, subsequent steps of the workflow may not be required, depending on results from another path. Perhaps the workflow can skip some steps in the workflow and go straight to the final processing steps. Or, perhaps the workflow does not need any human interaction at all and can complete right away. The point is, trying to model all the possible ways this semi-structured workflow could potentially execute would result in a complicated workflow model. The spider pattern might is a good solution to this problem.
What does this workflow do?
Our sample workflow contains a variable that is randomly set to a value between 0 and 4 by the Randomize Path to Take step. The workflow starts and sends you an email, and then the randomizer will assign a value to the variable. The workflow continues to the Controller step, and based on the value of the variable, the controller tells the workflow to go down Path 1, Path 2, Path 3 or Path 4. If the variable is outside bounds (for example, it is 0), the workflow goes down the ‘Escape” path and sends you an email to tell you that it has completed.
The point is, you cannot predict which steps are required, in what sequence the steps run, or even if any task paths are followed at all. Essentially, the path this workflow will take is left up to chance.
When would I use this?
- When you have a workflow that does not have a well-defined sequence of steps, where steps may or may not be required, or where steps may or may not execute in a predefined sequence.
- When you must create random tasks based on some formula.
- For example, you may have a corporate audit workflow, where you want to randomly spawn tasks for participants to complete some auditing work. You do not want the workflow to always execute the same way, and you want to introduce a measure of randomness into the workflow.
Spider Pattern