I'm not sure what instructions you're looking at but you can generate a PDF from a SmartForm by adding a SmartObject event to your workflow and use the "PDF Converter" SmartObject. I have found this video which seems to explain it very well.
https://www.youtube.com/watch?time_continue=2&v=-94tcg1cfuY
If you wish to create a PDF from within a workflow you can create a smartobject from PDF convertor service object, and use a smartobject event wizard to call it from within the workflow.
Summary of steps to take:
1. Create a smartform to display your details in a print-friendly format. This form would be used as a snapshot for the PDF generation.
2. Create a smartobject from the PDF Convertor service object,
3. Call the Create PDF from URL] method using the smartobject event wizard in your workflow, with your smartform URL as parameter. Set the conversion delay setting to 30 (seconds) or longer to give the smartform enough time to load the data before taking the snapshot.
4. Save the generated PDF to another smartobject for storage, usually the PDF File] smartobject. Retrieved the returned ID.
5. In your email event, call the PDF File] smartobject (or wherever you saved the pdf file to) to retrieve the PDF file from your storage and attach it to your email event.
6. Remove the generated PDF file from storage for cleanup purposes, if required.
Details on the steps can be found here.
http://help.k2.com/kb001398
Hope this helps.
You would need to use the PDF converter smartobject to create the PDF and attach to your event.
Summary of steps
1. Create a smartform to display your details in a print-friendly format.This form will be used for PDF geenration.
2. Create a smartobject from the PDF Convertor service object.
3. From the smartobject, Use the eCreate PDF from URL] method to call the smartform. Set to conversion delay to 30s or higher so the form can be loaded completely before the snapshot is taken.
4. Save the pdf outpout to another smartobject, usually the PDF file smartobject.
5. Retrrieve the file from the PDF file smartobject and attach it in your email.
6. Delete the PDF file from the table, if required.
Details are described here.
http://help.k2.com/kb001398
Hope it helps.
Thank you @Victoria for the link to the video and @JamesKho for the written directions.
I have been able to make the PDF, but I think it must be exceeding in size or something as I only get a picture of the page actually trying to load. I've gone up to 55 with the delay and got the same picture back with the loading circle. It errors out if I go to 60 with the creation delay. Ironically when I do all of this with the SmartObject Tester (as showed in the
I think what I need to do is make a view that is read-only with a simple table format. I've tried that but I only get the labels back and not the data within the fields. I know that I've tried a lot of things to try to get the PDF to actually show the data and probably now need to step away from it as I'm getting myself hung up in circles. I need to actually get something into the hands of my supervisor and related staff ASAP, so my goal is to make what I have without the PDF work as well as it can (even if the email is ugly) and come back to the PDF afterwards.
I did come across a comment related to the PDF Converter with Forms with Tabs. I do have Tabs on the form that I'm trying to make into a PDF. If that is true, is there any quick way to create a view that is just a table of Fields in one column and the Data in the other column?
I always make a form and views specifically for saving PDFs. I want it to be "printer friendly" (all data in data fields with word-wraps enabled, no scrollbars or images, white background, etc). This is the best result for a clean looking PDF.
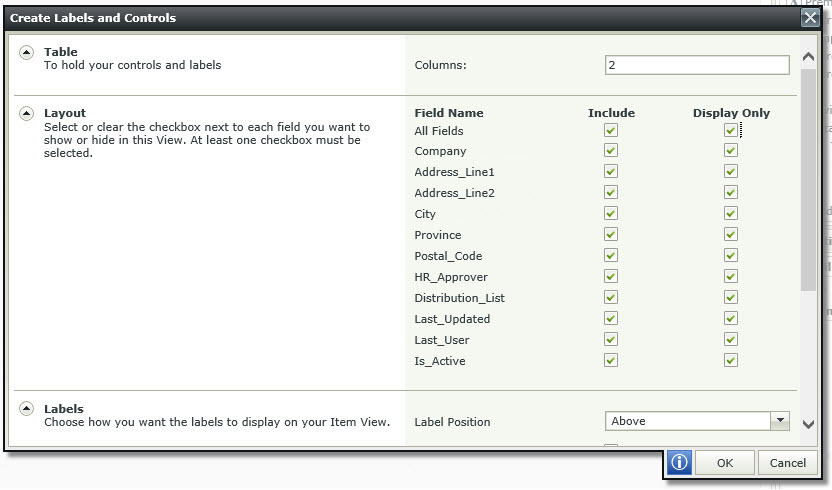
As for your fields, I'm not exactly sure what the issue is. If you're starting from a fresh view, select "Create labels & controls" and select the "Display Only" checkboxes. Once you specify how many columns you want and the label position click "OK". And then you'll have a simple table of all your fields, each with a field label and a field data label. Bam, you're done.

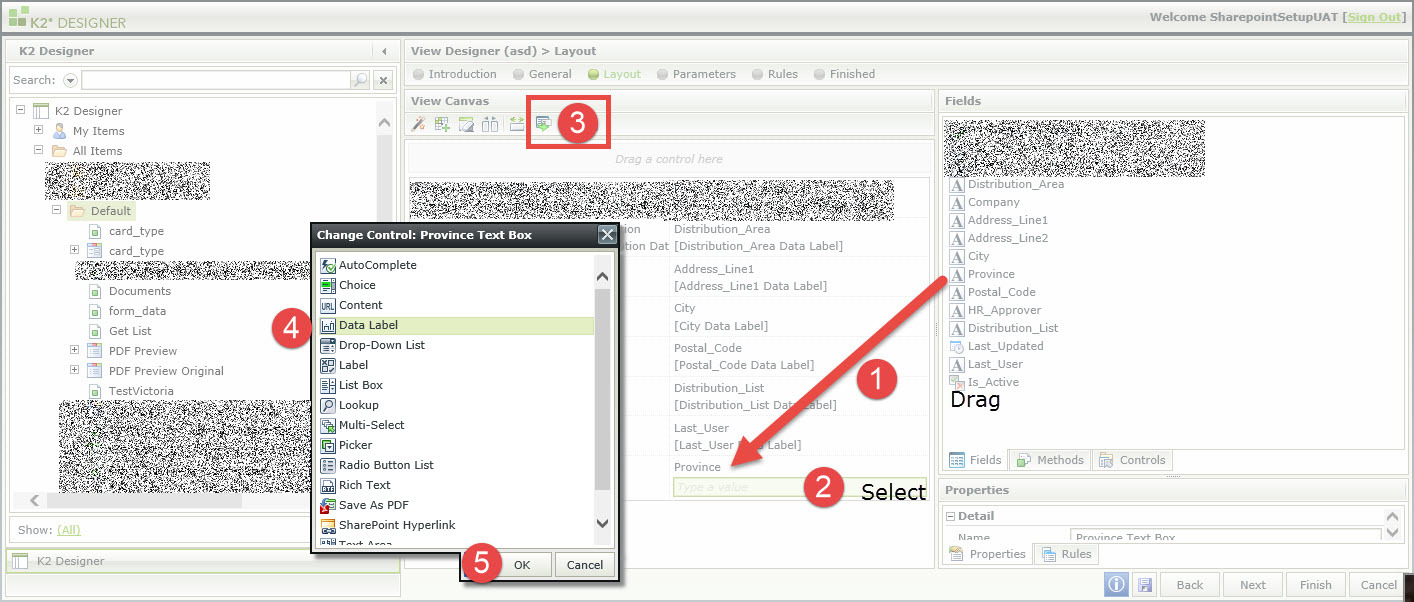
If this isn't an option you can drag each individual field from the right to the canvas, then click on the field and click "Change control" in the ribbon. Select data label and you're good. But you'll have to do each one individually in this case.

If this still isn't working then you should look at your form/view rules to ensure the data is being retrieved correctly. Just test running the form first before you run it through the PDF SO.
It is absolutely a rule issue that I"m having now. If I place the PDF View I created as a Tab within the Form, I can get it to load data. But since I only want that view and not the other tabs when it comes to the PDF, I'm struggling.
Is there a way to open up a View and have it load the Smart Object information outside of it being on a form?
When I place the rule of on PDF View, execute the Load method on the view itself, it can't open because it needs the ID. I have that rule within the When the Form is Initializing and it's working.
If it requires a parameter then you'll need to include the parameters in the URL, of course. Regardless if it's a form or a view. You can get the URL in K2 Designer by clicking "Run with parameters" and grabbing the URL from the bottom.
Views have their own runtime URLs. I've never tried converting a PDF from it but there's no reason you can't try.
If it doesn't work just make a new form for it and only put that view in it.
It took a while and a lot of trying options. I wanted to share how I ultimately got it to work right now in case someone else has tried several options.
I found that although I could add the option for a PDF Converter by URL within a Activity, I couldn't get it to work within an Activity. I had to make a separate activity just for the PDF Converter by URL.
Since this is now working, I didn't dare see if I could get it within another activity again - I'm fine with it being it's own separate Activity - It just makes the View Flow Page a bit longer/wider.


