


**The Xtension referenced in this article is now available in the Nintex Process Accelerator Gallery!!**
For those who are confused by the title; "The Final Countdown for Part 1 of a series?!? what's that all about?", I wanted to avoid the Recipe Blogger hate that seems to be rampant on the interwebs these days. If you want to get the finished Xtension and go, and you're not interested in how the sun shining off the snow capped mountains in the Olympic Peninsula inspired me to craft a specific line of swagger, then you can stop after this post! If you are interested in the build out, how we got to this point, and how the Oxford Comma affected my childhood development and love of Swagger, follow me in the community and check for new updates on the series (I'm planning on rolling out an entry every 1-2 weeks). Enough preface, lets get to it.
What We're Building
In this series I'll be walking through the build out of some additional functionality in the popular Messaging App Slack. The Swagger file attached to this post will help to enhance the out of the box functionality in Nintex Workflow Cloud (NWC) and will include two actions: Lookup User by Email, to be able to dynamically tag users in posts; and Post a Message, adding functionality like threading and Post as User (or app). There are a few assumptions here: 1) you have Nintex Workflow Cloud (get a trial here if you dont); 2) You have a Slack environment you can test with; 3) You enjoy extending (xtending?) your Nintex functionality / use cases (number 3 optional but recommended).
Create / Configure your Slack App
For this example we are configuring authentication to Slack using Oauth 2.0 (for more information on how Oauth 2.0 will work with Slack, please refer to their documentation). The first thing you will need to do is create and configure an app in Slack.
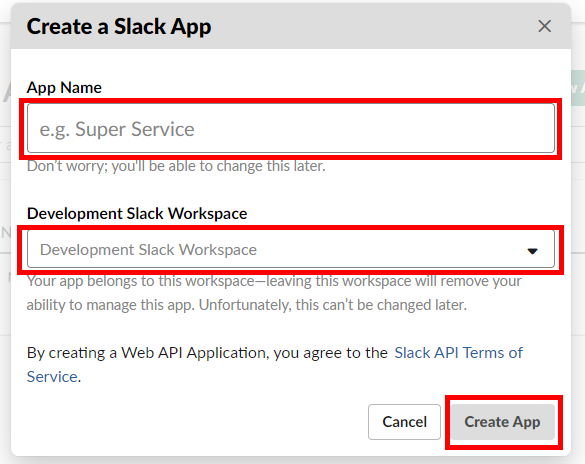
Create
- Go to the slack apps page
- Click "Create New App"

- Name your App (this is the name that will show up if you post as the app), select your Workspace, and create your app.
Configure
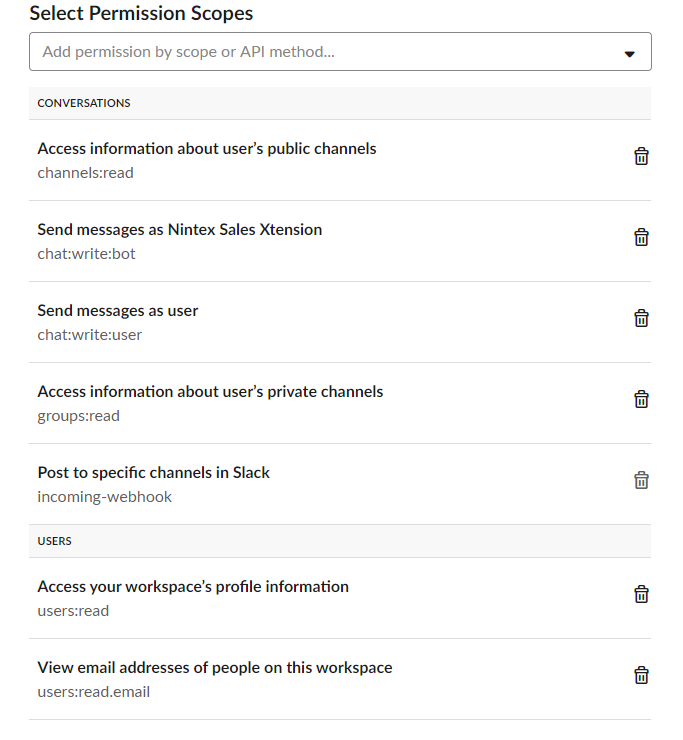
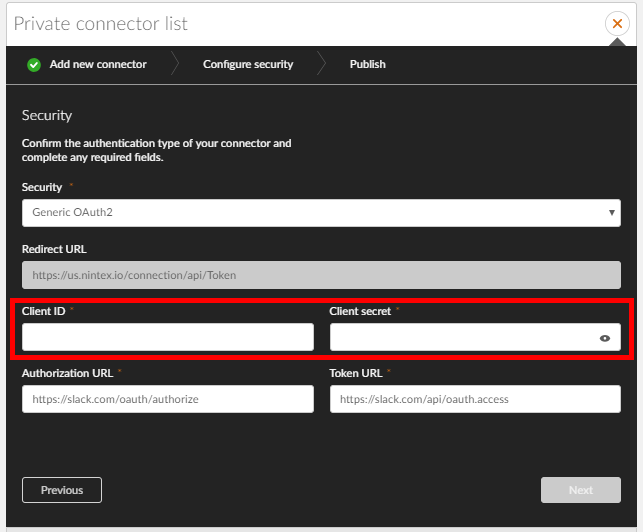
- Go to the permissions section

- Add https://us.nintex.io/connection/api/Token as your redirect URL (this can be found when you initiallly load your Xtension in NWC.

- Using the dropdown, add all of the Scopes shown in the image below and click the Save Button
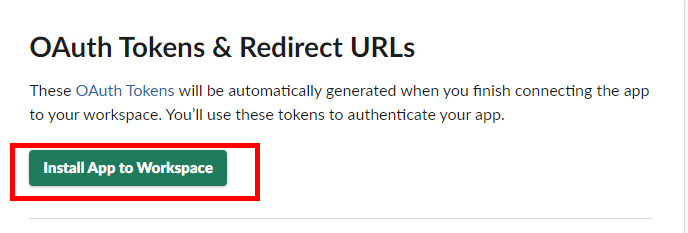
- Install the App in your workspace and click Authorize on the next page
- Go back to the Basic Information Tab now, and copy the Client ID and Client Secret (these will be needed for the NWC Configuration)
Alright! Slack is all setup. Now on to the Nintex Workflow Cloud side.
Add your Xtension and Setup your Workflow
This portion will be a quick walkthrough on adding / configuring the action and setting up these actions in a workflow.
Xtension Configuration
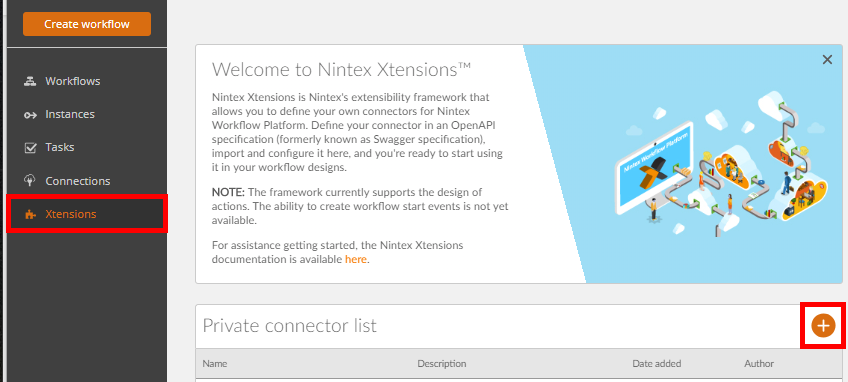
- Sign in to your Nintex Worklfow Cloud tenant and click on the Xtensions Section then click the Plus (+) sign
- From here, you'll want to select 'Choose a File' and select the SlackXtension.json file (may need to be extracted from the zip attached to this blog). Then hit the next button.
- The Next page will prompt to enter a Client ID and Client Secret. You will use the two bits you noted at the end of your Slack App Creation
- You can update the Name, Ddescription, and Icon for the next page if you so choose
- Click the Publish button
Use In a Worklfow (time to test!)
Going to run through most of this quickly as workflow build out is covered extensively throughout the community.
- Click the 'Create Workflow' button from the NWC landing page
- Configure a Form as the Start Event and add an email address and a text box
- Drag the 'Lookup User by Email' Slack Xtension Action to the canvas
- Click the Dropdown for connection and follow the prompts
- Add the Email variable from the start event in the email field
- Add a variable to the User ID field to capture the output **Team ID and Name will not be used in this example.
The action configured will look something like this: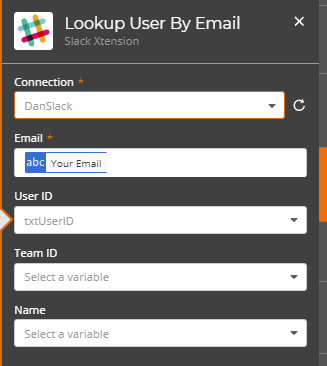
- Drag the 'Post Message' Slack Xtension Action to the canvas
- Select your channel from the 'Channel Name' Dropdown
- insert a <@ before your 'UserID' variable and a > after to tag this user in the slack message
- Insert the text variable after this to be included in the slack message
- Leave the thread text field blank
- Select Yes for Post as User to use the user who created the connection, or No to post as the app
- Add a variable for the thread output. The action configured will look something like this.
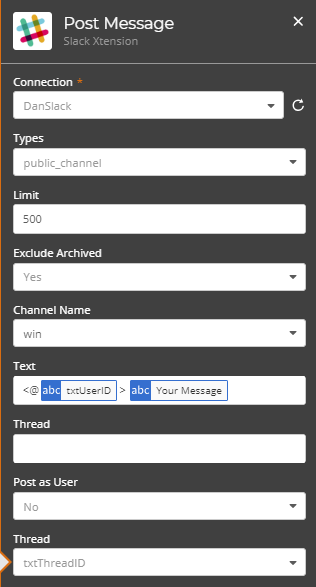
- From here, you can use the Thread ID variable stored in the original message and input in to the Thread text box in subsequent Post Message actions in the workflow. This wiill keep all slack messages confined to one Thread in your Slack Channel!
You now have the basic setup instructions for extending your Slack functionality. For the next parts in this series, I'll go into more depth on how the Xtension was built, how the authentication functions, as well as how to incorporate different functionality in your Nintex Xtensions (these will be linked here after subsequent posts).
