

Introduction
There will be certain circumstances where one would start an NWC process, have some records written to a third-party system and then pause processing of the NWC process while waiting for the external system to process these records. Once these records have been processed, NWC should then continue the process as these processed records can then be used by the process.
For example, if we have received some shipping containers, the contents will need to be inspected and the results entered into a separate system that cannot be called directly from NWC. There is a batch job that runs once every 30 minutes, which will process these items and mark them as inspected and received. Once that is completed, we need to tell the NWC process to continue down the payment process.
As a side note, this particular example could be a good fit for RPA, which can be initiated from NWC as well.
The Solution
A simple way to implement this is to use a task assigned to a system account. At the end of the day, a task is an asynchronous step, waiting for someone to make a decision at some unknown point in the future. But, instead of completing the task with a form or email, we will complete the task using the REST API that NWC exposes.
Use Case
For this example, a customer will submit a new order using an NWC form, but it may be a new customer. For existing customers, we will continue to the warehouse where the ordered items will be picked and shipped. However, for new customers, we will evaluate the company’s reliability by calling the Experian Business Credit service. If the company’s reliability is between 40 and 79, we will initiate a new process in K2 Cloud to evaluate the new customer’s company. Once the company has been validated and approved, the NWC process will continue to the warehouse, or closed if the company was not approved.
As a side note, we already had a New Customer Onboarding process in K2 Cloud that performed this validation and we decided to reuse this existing process, but it could have been built using NWC as well.
Setup
Before we get started on building this out, we will need to get a token that will allow us to access the APIs securely. To get this:
- In NWC, click Settings on the top navigation bar
- In the left menu, click Apps and tokens
- In the Personal access tokens section, click Add token
- In the Create new token section, provide a Name for the token
- Click Create to create the token
- Copy the token it creates and save it somewhere securely

Prepare the Worker Process to call NWC
As described later in this document, I will initiate an NWC process, move the data to where its needed, the worker process (which I will be building out in this section) is running and NWC is waiting for it to complete. The last part of the worker process will be calling the NWC’s API to complete the waiting task. This is done using the REST endpoints, detailed here:
https://developer.nintex.com/docs/nwc-api-docs/docs/gettingstarted.md
K2 Cloud makes it really easy to configure and consume REST endpoints, so it is a great fit for this scenario. You can of course create other applications or end points like Azure functions to perform the task, just follow the same steps but using the NWC REST API to perform these tasks.
- Save the the NWC Workflow Xtension available here to a location that is accessible from the K2 Cloud instance (Azure Storage, etc.): https://gallery.nintex.com/5fff792f28910a003648bd5e/Nintex%20Workflow%20Cloud%20API%20v2
- In K2 Management, register a new REST Service Instance by navigating to Integration --> Service Instances and click Add
- Provide a Name
- Authentication Mode: Impersonate
- Add HTTP Request Header Property To Methods: True
- Descriptor Location: Location of file uploaded from point 1
- Click OK
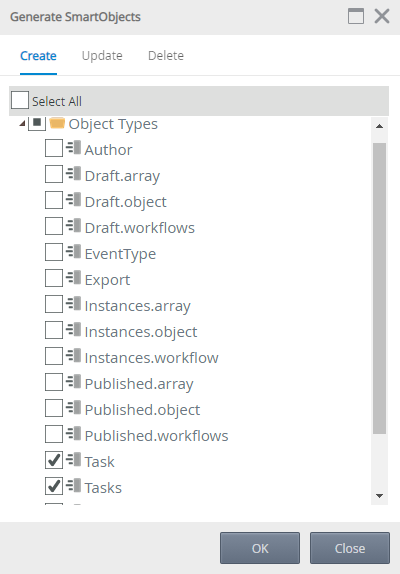
- Generate the SmartObjects. You can generate all but I just needed a couple so generating them selectively makes more sense. Select the Service Instance created in step 2 and click Generate SmartObjects. Select Task and Tasks under Object Types as well as HTTPHeader under System Types and click OK:
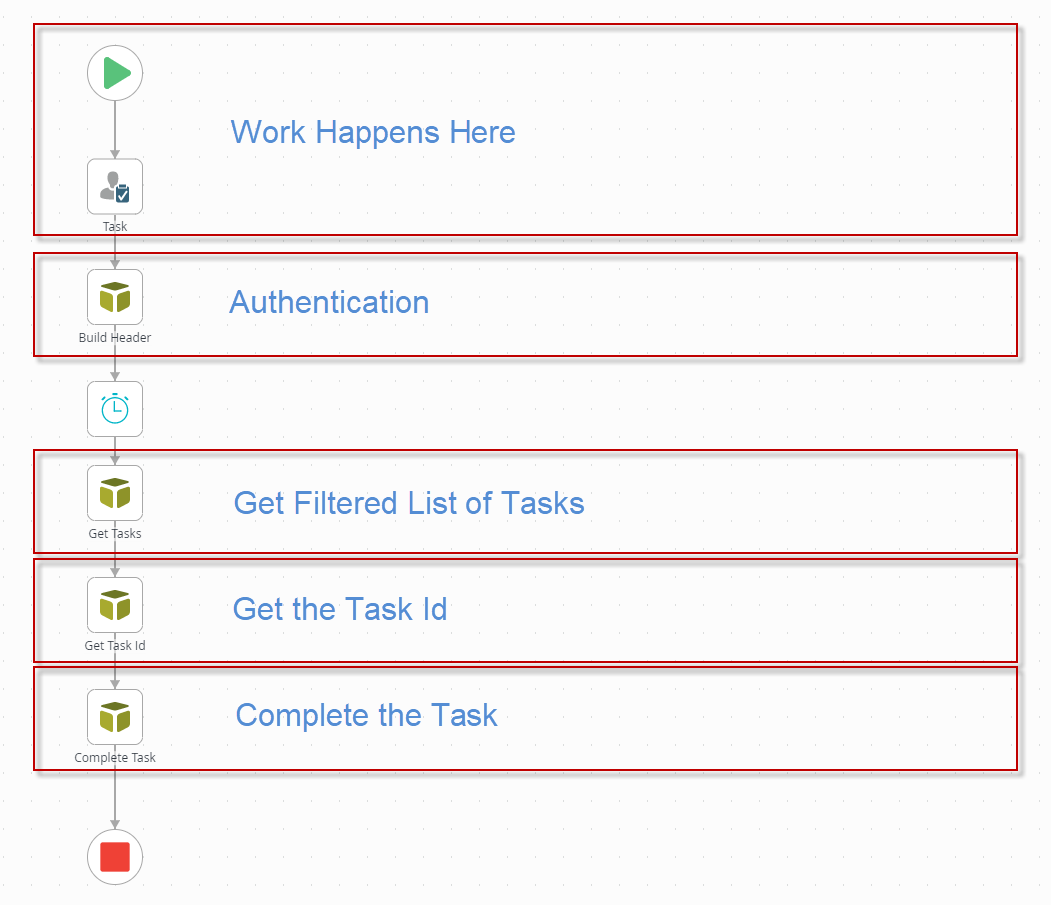
To complete the NWC task, we need a couple of steps to happen:
- Get the lists of tasks, but filter by the Process Instance Id passed to K2
- Get the task’s ID
- Complete the task
I’ve split these up in separate steps to make documentation more detailed. Here is the final process I am working toward:
The same steps can of course also be performed from a form or custom code.
Worker Process Preparation
Create a new K2 process and add the following data fields:
- Header: Text - Ensure that the Hidden in Reports checkbox is checked:

This ensures that the value is never accessible through the reports. - HTTP Result: Text – Used for storing the response codes of the REST calls. Not critical but useful when the call fails
- Process Instance Id: Text – Id of the NWC process that started this K2 process
- Task Id: Text – Id of the task to be completed
- Tasks: Text – List of tasks returned by the Get Tasks call
Authentication
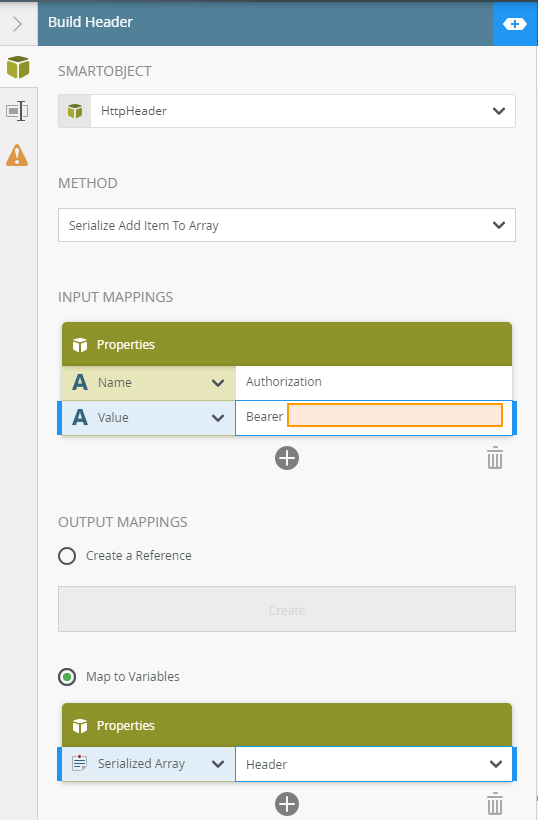
For all these calls to NWC, authentication is needed. That is where the token generated in the Setup stage is used and passed in as a header. It is recommended that this value be stored somewhere where only authorized users and service accounts will have access to it. In this example, I am going to enter it directly in the method but a better approach would be to keep it in a SmartObject (with restricted access) and call that lookup whenever the token is needed.
To get the header needed for the calls, simply:
- Add the HTTPHeader SmartObject to the design canvas
- Execute the Serialize Add Item To Array method, using the following values:
- Name: Authorization
- Value: Bearer {token from Setup}
- Save the value in the Header data field created earlier.
Get Filtered List of Tasks
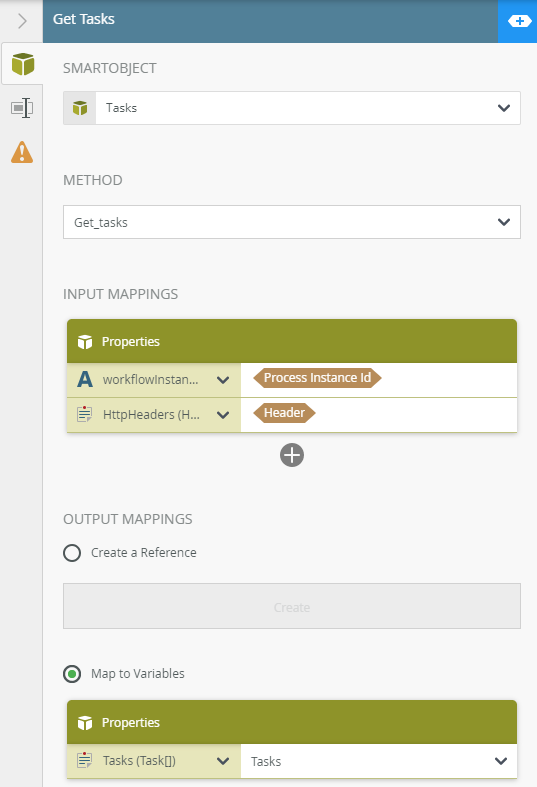
To get the list of tasks, which should always be only 1 tasks since I am filtering the list by the process instance id, is configured by:
- Adding the Tasks SmartObject to the canvas
- Executing the Get_tasks method
- Passing in:
- workflowInstanceId: Value passed in from NWC (Process Instance Id data field)
- HttpHeaders: value from the Authentication step, stored in the Header data field
- Mapping the output to the Tasks field
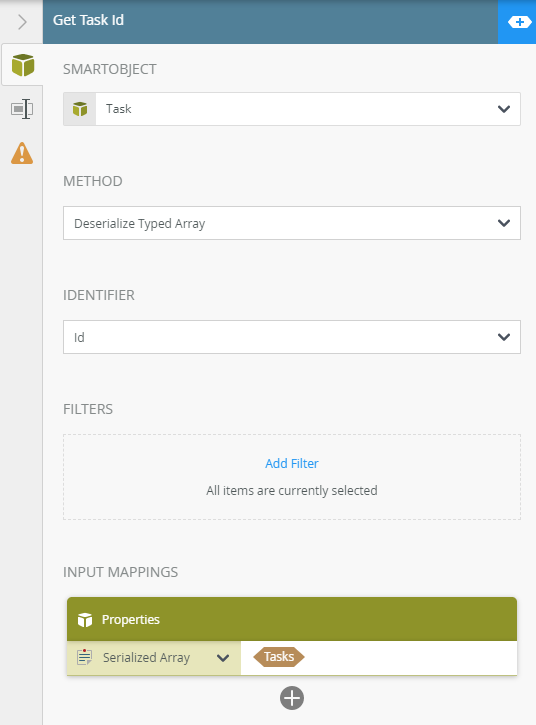
Get the Task Id
Since the task is returned as an object, we will need to get the id from it. The Task object allows me to pass in the object I got from the call and extract its properties, the Id in this case, since we need the task id to complete the task.
- Add the Task SmartObject
- Execute the Deserialize Typed Array method. Remember, the method is designed to return a list of items, so even though the expectation is to get a single record back since it is a filtered result, I still need to handle it as if it was a list
- Select the Id property as the identifier
- Provide the Tasks field populated in the previous step as the input for the Serialized Array property
- Map the Id property to the Task Id field created in step 1
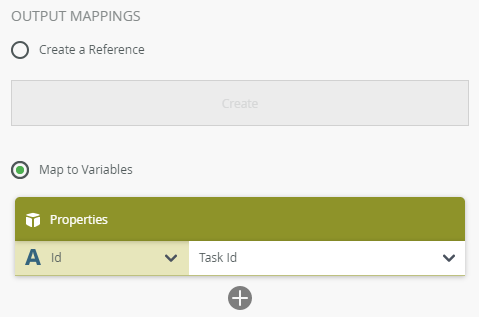
Complete the Task
Now that I have all the information I need, that last part is to complete the task in order for NWC to continue processing.
- Use the Tasks SmartObject again
- Execute the Patch_tasks__task_id_ method
- Set the following properties
- Outcome: {"outcome": "Completed"} – Change this if you have different outcomes
- Task_id: Task id data field populated by the previous step
- HttpHeaders: Value from the Authentication step (Header data field)
- It is sometimes useful when troubleshooting to keep track of the Http Response Codes the web service returns. I would recommend this is done on all Http calls, but I left it out for brevity’s sake in the previous steps. In the screenshot below, I used the Http Result data field to store the HttpResponseCode property of the SmartObject. You can reuse the same data field on the authentication and Get Tasks calls.
Now that the worker process is configured, deploy it in order for the assets to be available in NWC.
Configuring the NWC workflow
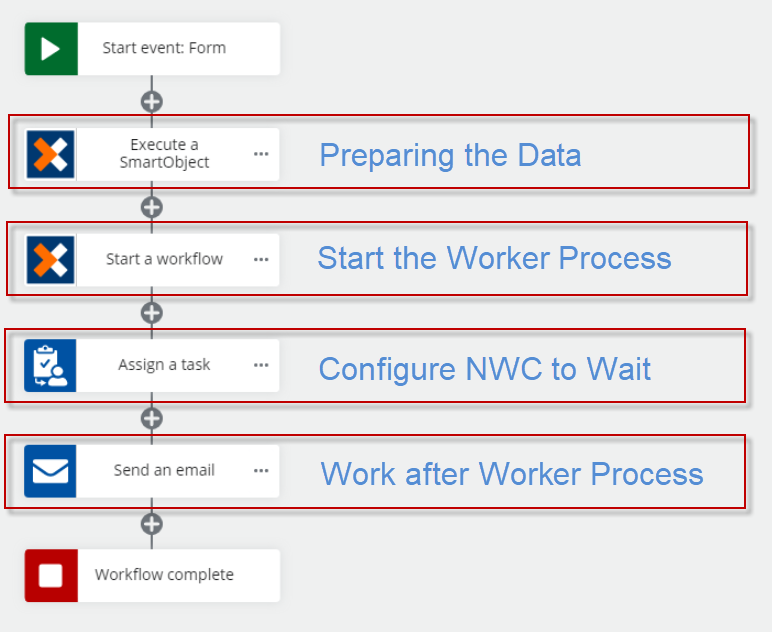
The NWC process in this example consists of four main parts, potentially three if there is no need to store data in an external system:
The steps below is how I configured these for my use case.
NOTE: I did not explicitly cover setting up the Connections to K2. Those are very simple to configure and well documented here:
https://help.nintex.com/en-US/nwc/Content/Designer/Connectors/K2SmartObjectConnector.htm and
https://help.nintex.com/en-US/nwc/Content/Designer/Connectors/K2WorkflowandTaskConnector.htm
The NWC actions used expect that you have already configure the K2 SmartOIbject and K2 Workflow and Task connections.
Since I am using NWC and K2 Cloud, passing the data and initiating the worker process is simple. Depending on your scenario, things might be more complex, but the key parts to pass over are:
- Preparing the data to be used, preferably in a line of business system like SQL or SharePoint that the worker process can access
- Initiate the worker process, passing along:
- The key of the record or all the data if a line of business system is not used
- The NWC process instance id, to be used when telling the NWC process to continue
Preparing the Data
From the worker process’s point of view, it will most likely need data captured by the NWC forms to perform its tasks. There are two ways to move this data over:
- Send all the information through to the worker process as part of that process’s initiation variables. This is useful when the application doing the asynchronous work does not depend on another system to pull the data from.
- Send the data to the line of business system the subsequent worker process or application makes use of, then initiate the process or app and just send the primary key along. This is the preferred approach where possible since there will be no duplication of data and a single source of truth.
In this case, K2 Cloud makes use of SmartObjects to keep track of the records, so in the NWC process, we will use the Execute a SmartObject action to send the data to K2. I will not go into detail on how this is configured, in essence it is a way for us to make the data accessible to the process. Here is a screenshot of the configuration and some inputs being sent over:
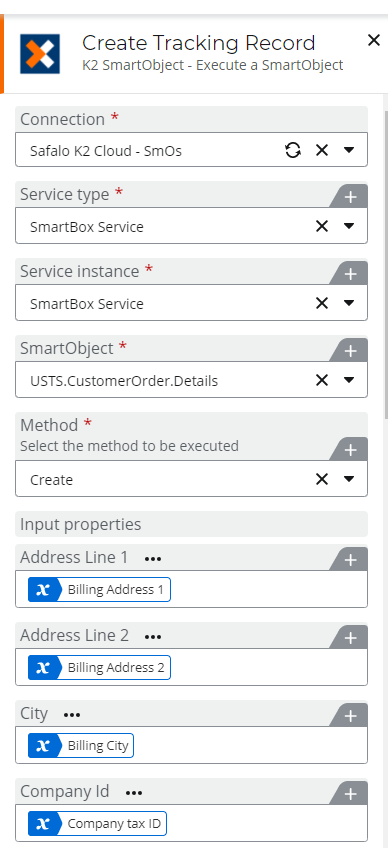
What is important to note is that we save the Output to the Tracking Record field so we can use it later when we start the process.
Start the Worker Process or Application
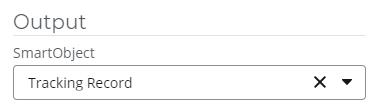
Since the data needed has been made available (or will be passed in directly), the actual worker application can now be initiated. In this case, I will start a K2 workflow from NWC using the Start a Workflow action. Again, details aren’t that important apart from the primary key I will use to reference the data in the worker process, K2 Cloud in this case. Here is a screenshot of the configuration, note the ID passed into the Data Field: Instance ID field, the primary key of the record created in the previous SmartObject step:
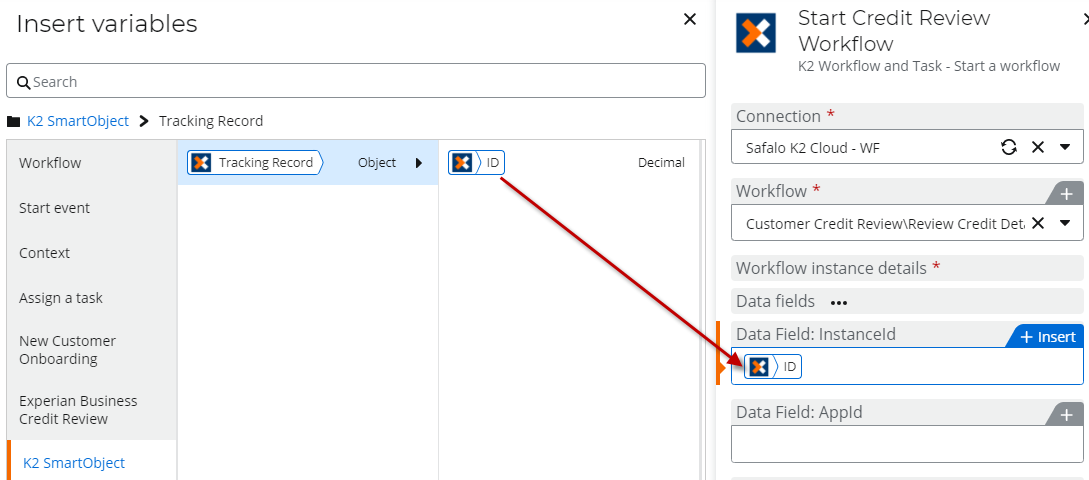
The other key part needed to match the processes up is the NWC process instance id. This is accessible from the Context Fields and is sent to the worker process’ Workflow Instance Id field:
Configure NWC to Wait
As mentioned during the introduction, a service account will be used to keep track of the “wait” actions in the workflow. Steps here are
- Drag an Assign a Task below the actions that saved the data and initiated the worker process
- Task type will be Express approval
- Key areas of the Task configuration
- Task Name – Your choice, but something along the lines of Await Completion will make it clear for others what we’re doing at this step
- Outcomes – Completed, Canceled
- Default outcome - Completed
- Assignee – Service Account
- Subject – Doesn’t matter, but a simple description might help other builders later on
- Message Body – Doesn’t matter, but a simple description might help other builders later on
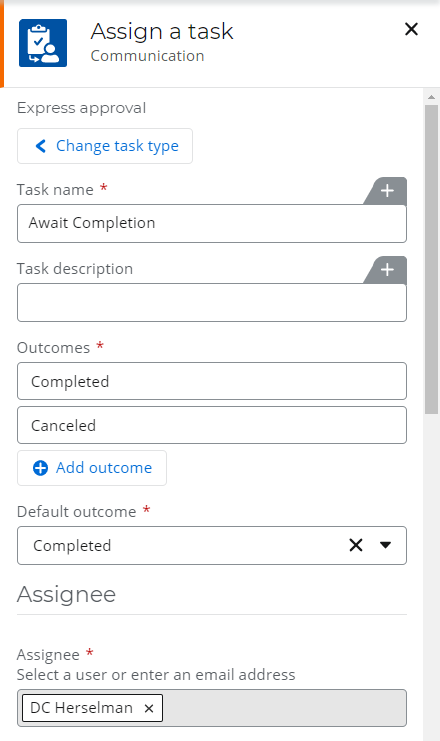
The Canceled outcome can be used to indicate failures or unexpected outcomes in the worker process, but is not used in this article. Here is what this part of the NWC process looks like:
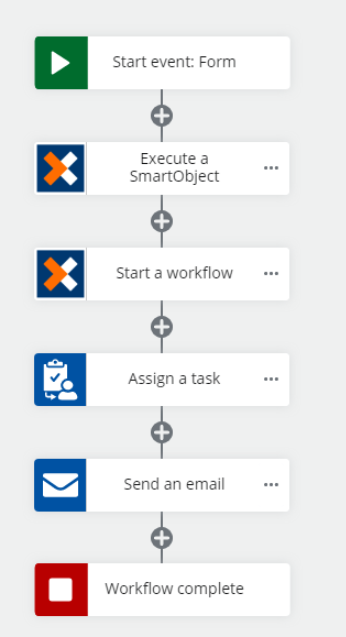
And configuration is done. Whenever the NWC process runs, it will pass the necessary data across, start the worker process, the worker process will do its thing and the NWC process will be instructed to continue once the worker is done.
Additional Information
In the K2 process, there is a Timer action. I added this to give NWC enough time to make the task available through the API. In most scenarios it won’t be a problem but for this demo scenario I didn’t really do any work in the process so the K2 process tries to get the NWC task before it exists (the K2 process is started before the task is created in NWC). The K2 process can be built to handle this scenario by checking if the Task exists before completing it. If it doesn’t exist, wait a few seconds and try again:
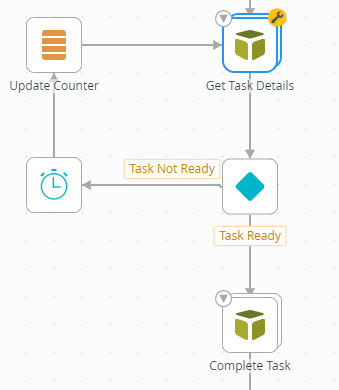
The Task Ready Decision step checks two things:
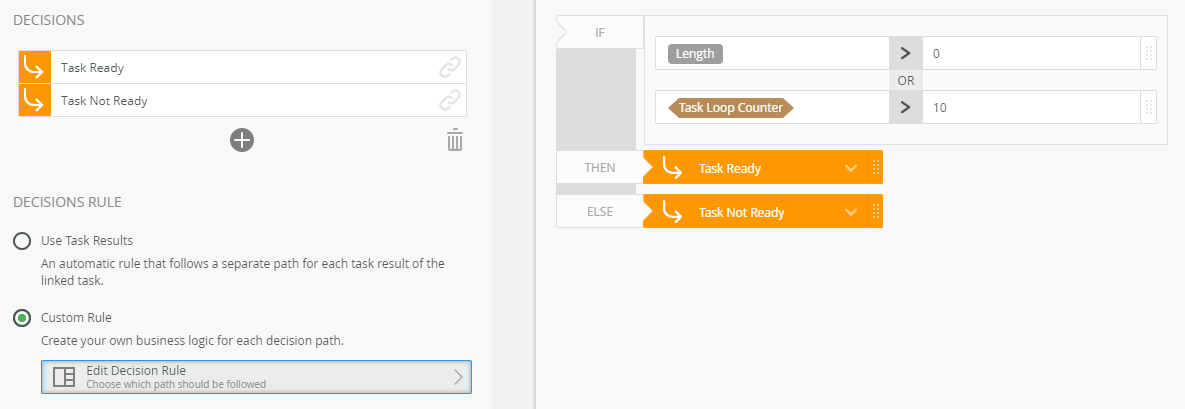
- Is the length of the Task Id data field > 0 (i.e. it has been found)
- Did we reach the maximum number of tries. For this I added a Task Loop Counter data field and increment it on every loop. This prevents the process from looping indefinitely if something went wrong.
Ideally, one would handle the maximum number of loops as a separate path to handle scenarios where NWC could not be triggered, like adding a human in the loop to troubleshoot.