Hello,
Today I am going to explain how you can add a simple state machine design to allow a workflow to resume where it left off after a failure or perhaps a re-open request, this can be used with both the restart instance capability with the instance manager and manually restarting the workflow via an external source.
The only requirement for this to work is to have a place to store the workflow data, in my example I am using SharePoint but you can just as easily use Salesforce or even SQL.
The start event:
It is not important what the start event is as you want to build the workflow to be re-usable by design.
if you do however want to restart the workflow from a target system then you will only be able to use a start event that can begin based on a connector and configure to start when an item is new/update.
Otherwise you will be restricted to only being able to resume the instance using the instance manager.
If you want to add this same capability to a workflow started via a Nintex form then you will need to generate a unique ID in the start form that can be used to identify the instance in your stored data, this can easily be done by using the newGuidAsString function and storing that with your workflow data.
In my example I will go with the most common user case where a workflow starts from a Sharepoint item.
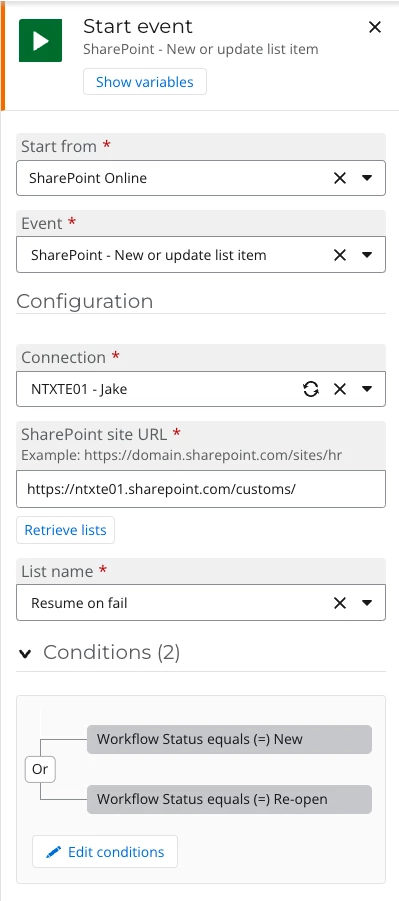
In my example my workflow will start when an item is created/updated in the ‘resume on fail’ list, it will only start if the workflow status is New OR Re-open.
Preventing an infinite loop/infinite instances:
Building the start event in this way designs the workflow to start potentially multiple times and even cause multiple instances to generate, to ensure this does not happen we need to change the workflow status on the starting object to ensure new instances are not created whilst a workflow is running, this can easily be done by using a update items action configured as follows as the first action in the workflow.
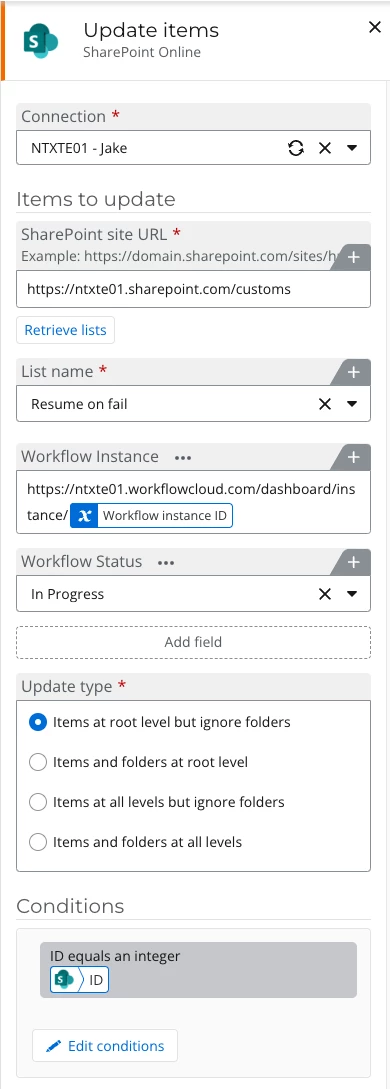
I always like to store the workflow instance ID for reference but this is not required.
It is important this is the first action to reduce the possibility of duplication.
Get the latest information for this instance
As the workflow may be resuming from a cold start or part way through a process the original start event data might not be valid anymore, to solve this we can easily just add a Sharepoint retrieve an item action.
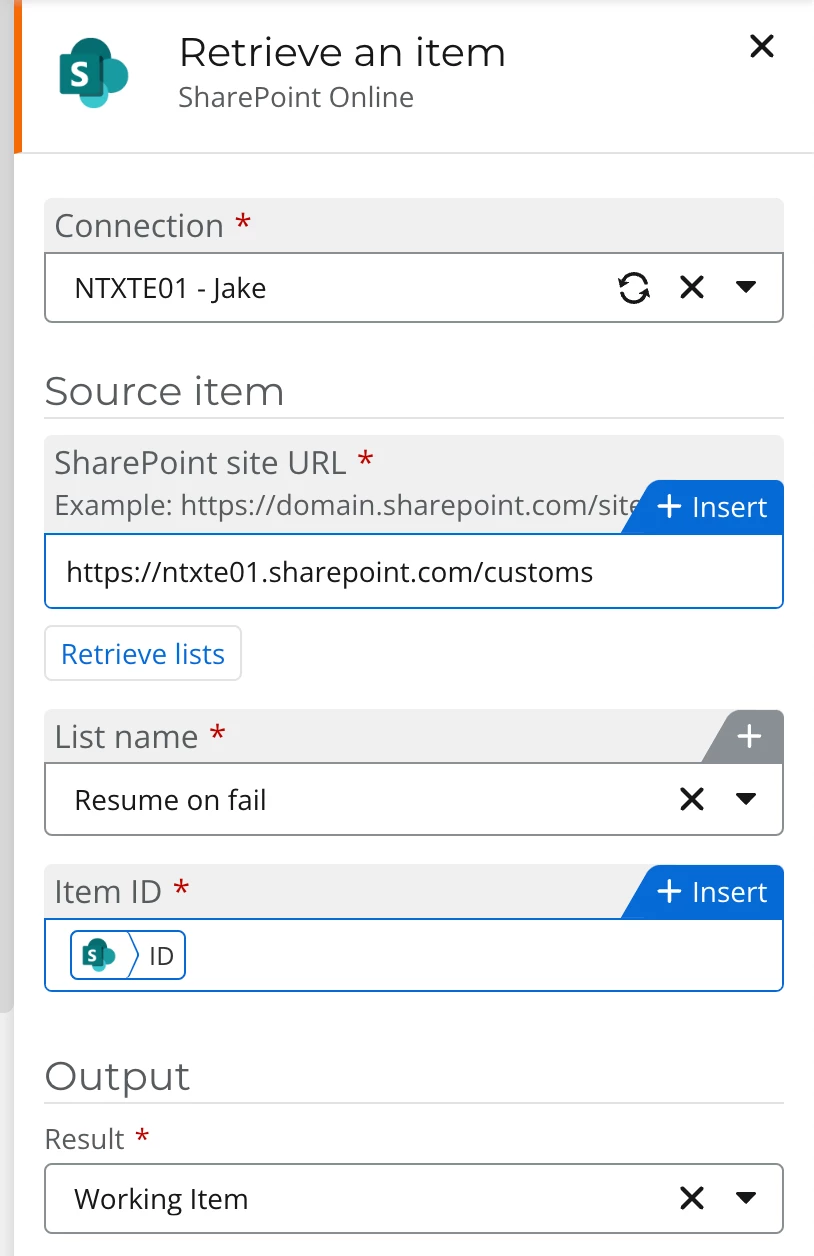
I store the output of this in an object called ‘Working item’ going forward I will reference this as my ‘start data’
Required logic data
It is important that whatever system you are using to store the data for the workflow has fields for all of the fields you are using the workflow but there are 2 additional fields required to allow this workflow to resume.
On my SharePoint list I have added the 2 required fields as follows but you can name them as you like.
- Choice named Workflow Status [New, In Progress, Re-open, Closed] (default value must be New)
- Choice/Single Line text named Step (default value must be ‘Approval 1’ in my example but this is just the name of the first branch you want a new item to run)
I also have 3 approval status fields to represent data in the workflow being updated between instances an a boolean field called ‘Error workflow’ to cause an error to simulate a failed workflow that we will use later.

Building the workflow logic:
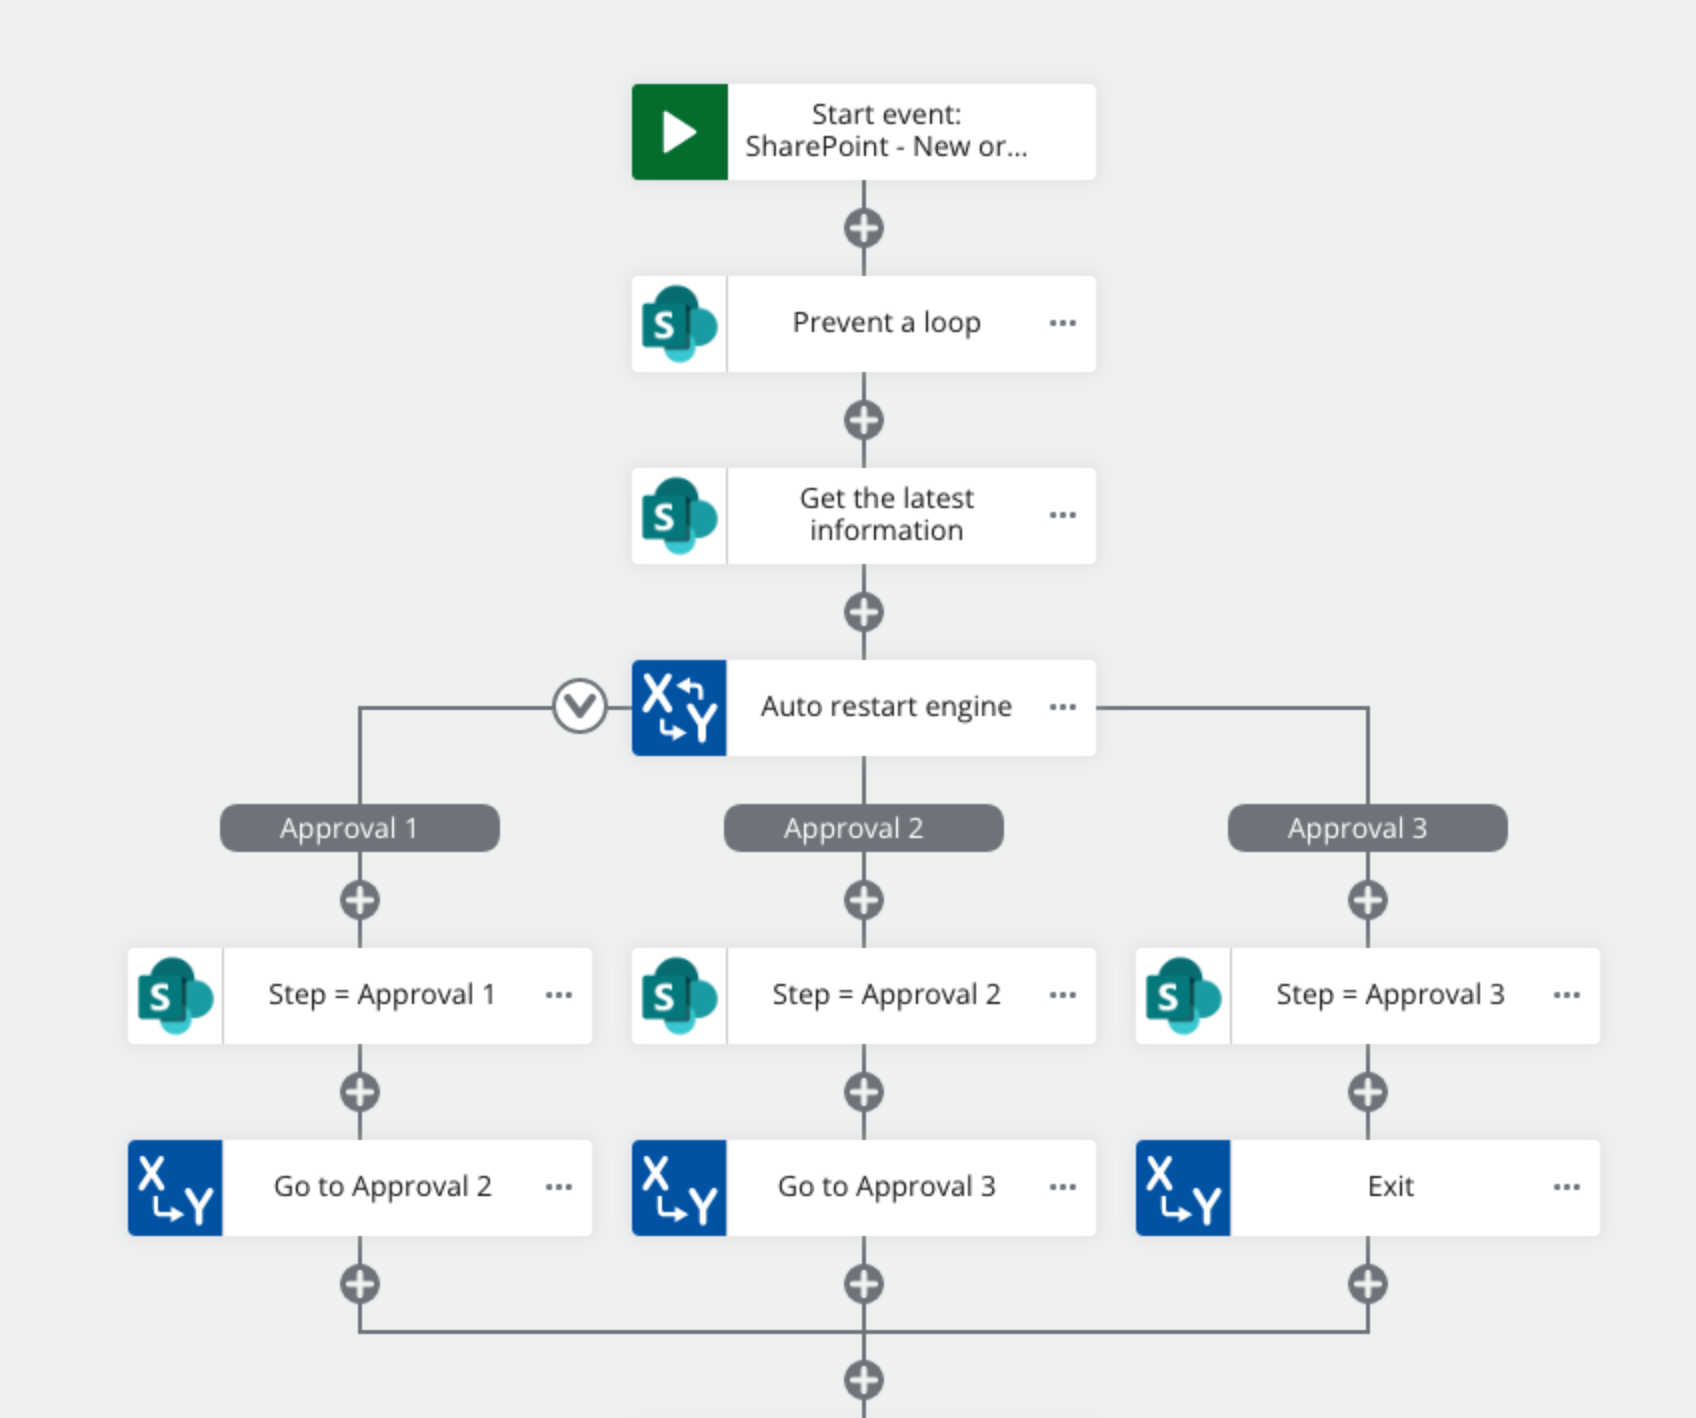
Next in the workflow designer canvas we will start by adding in a new state machine (branch by stage) and for my example I will have 3 branches for each of the 3 approval steps.
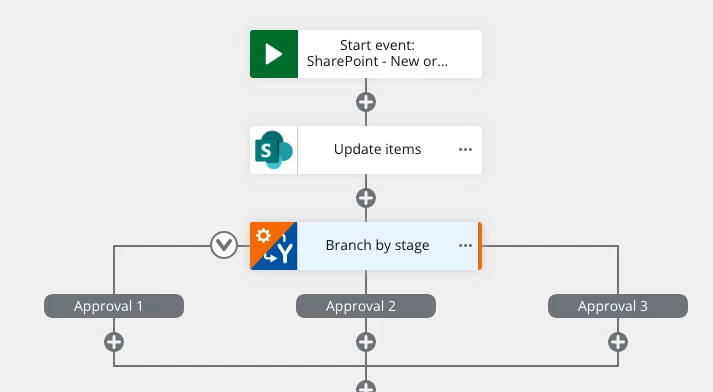
Now the most important part is to set the ‘initial stage’ of the state machine to the Start events Step variable.
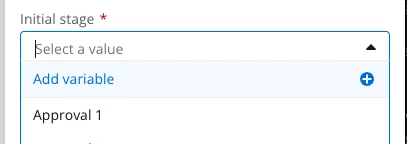
To do this, click on initial stage then ‘add variable’
Navigate to the SharePoint>Working item>Step and hit insert
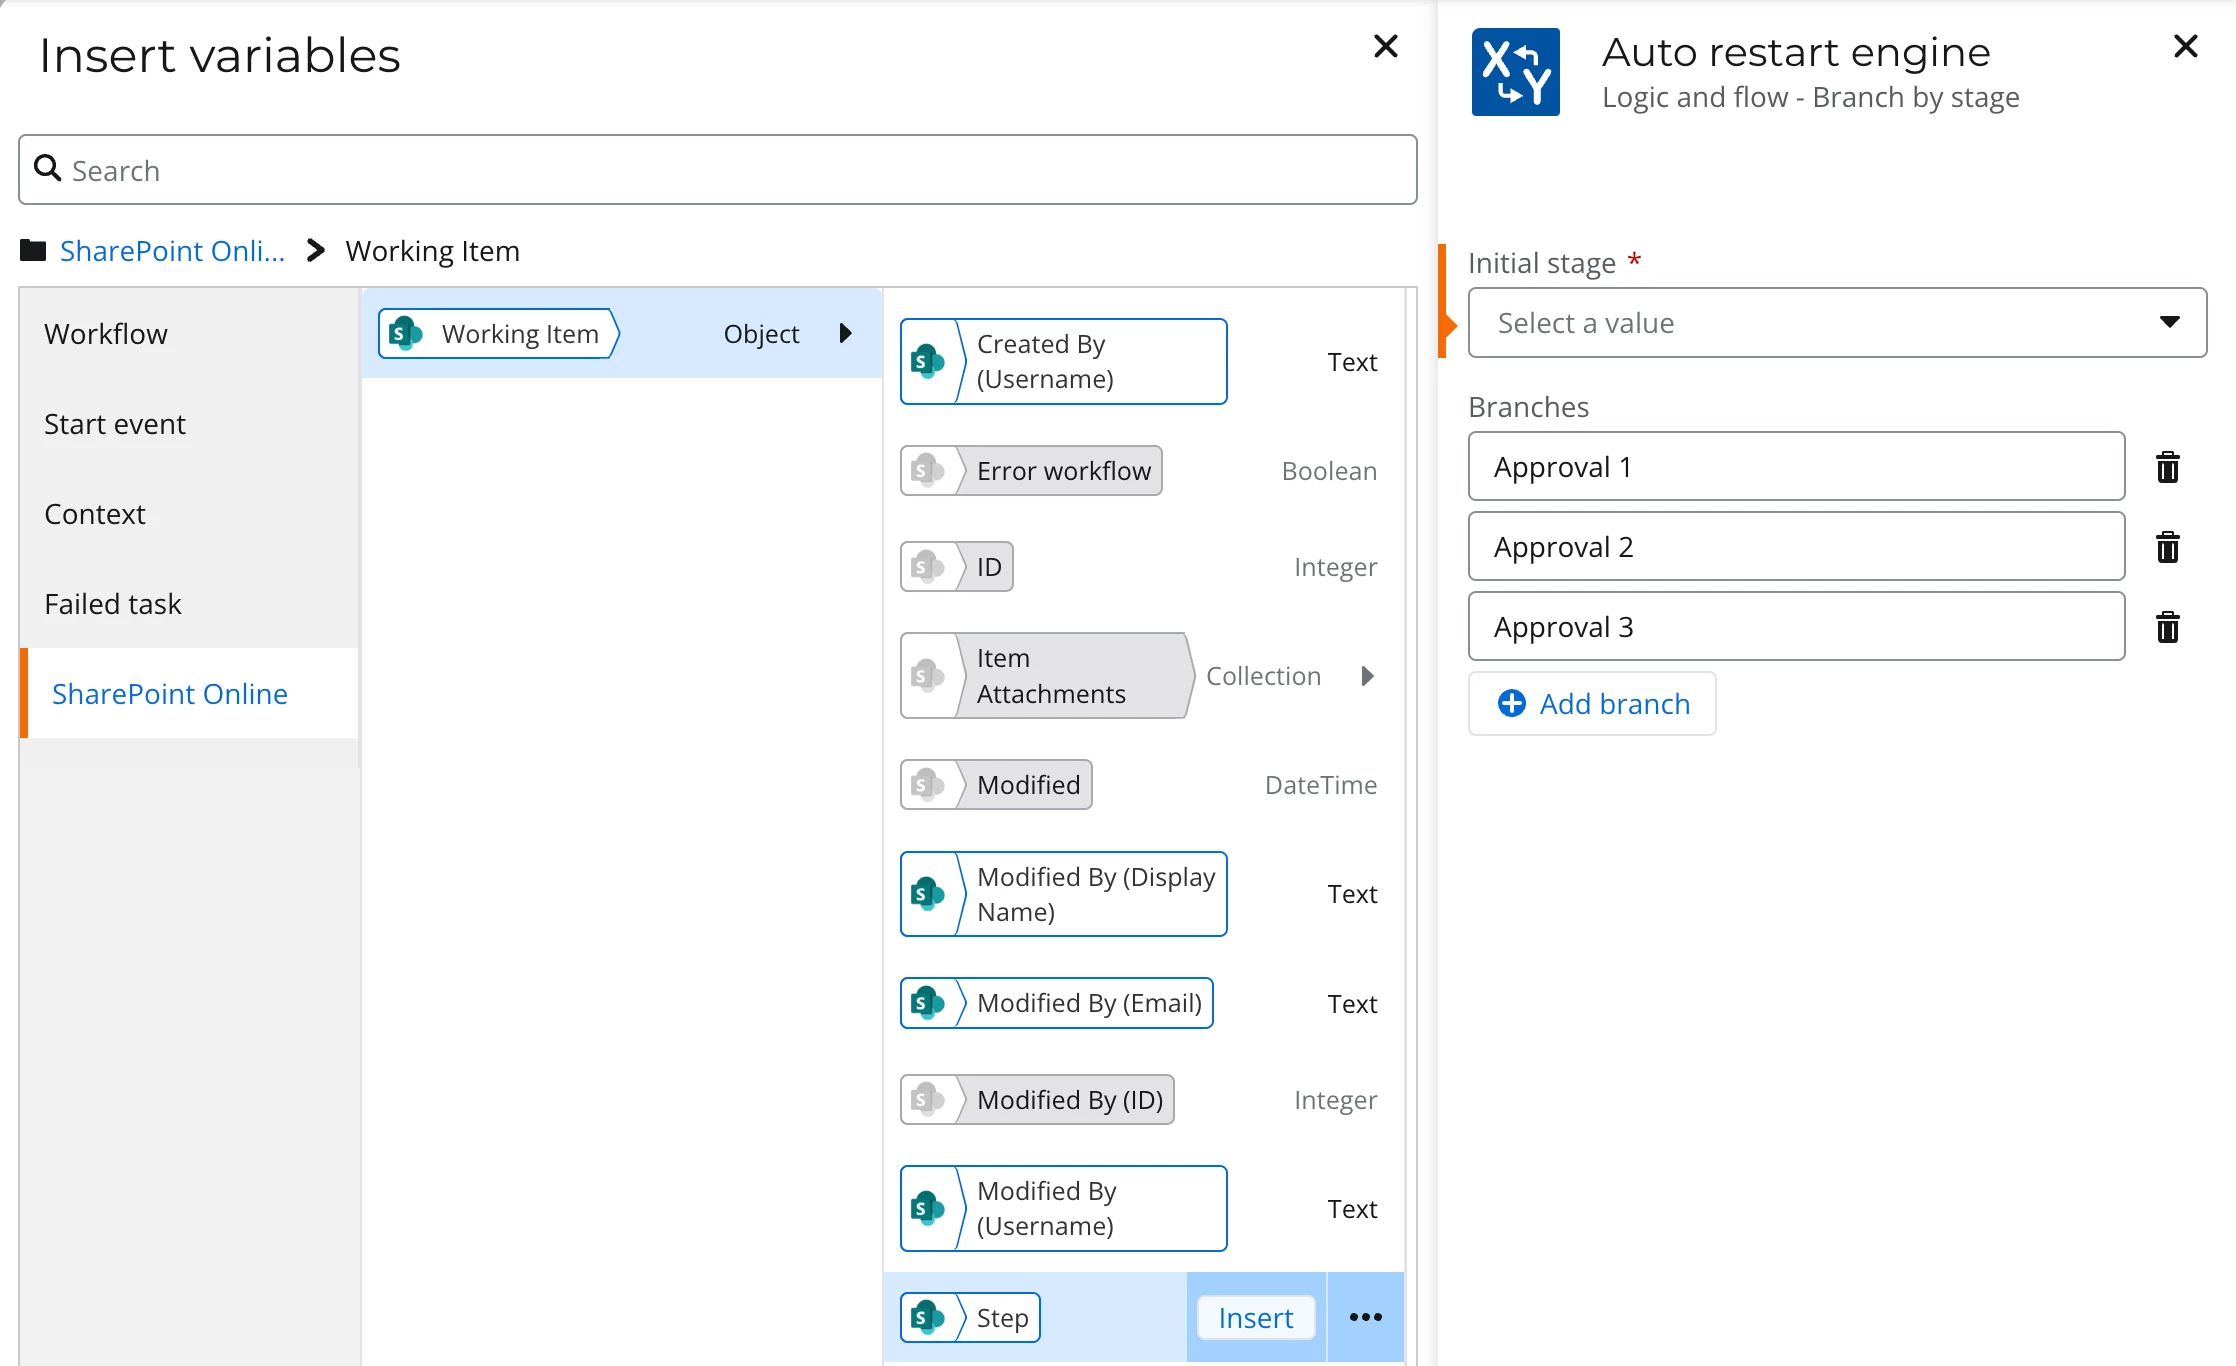
It should now look like this:
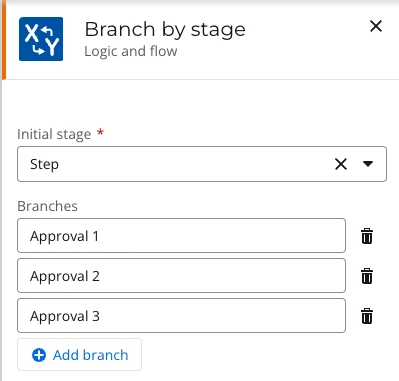
By doing this you are telling the state machine that, whichever value is stored in the Step field will be used to direct the state machine to that branch when it is used.
So with this logic if the start event items Step field contains Approval 1 as it should because it is the default value, the state machine will begin the ‘Approval 1’ branch, if it were Approval 2 it will go to the ‘Approval 2’ branch and so on.
This is the basis of the resume on fail capability that when the workflow is to restart it will resume on the value stored in Step.
The reason I advise using a state machine and to resume on a branch is to allow you to design the workflow to resume each branch independently without the need for another branch to run, you want to avoid making data generated in one branch effect another just in case on resume this data is no longer available and will cause a failure.
An example of this would be a query action to get members of an AD group for a task, If i placed this action on the first branch but the task on the 2nd branch resuming the workflow will result in a failure, this is why each branch needs to be self dependent and may require some re-design to work well.
Now for the second part is add an action to the workflow to store the current step reached, In my example I just used a simple update item action to change the step on the starting item to the current state machine branch.
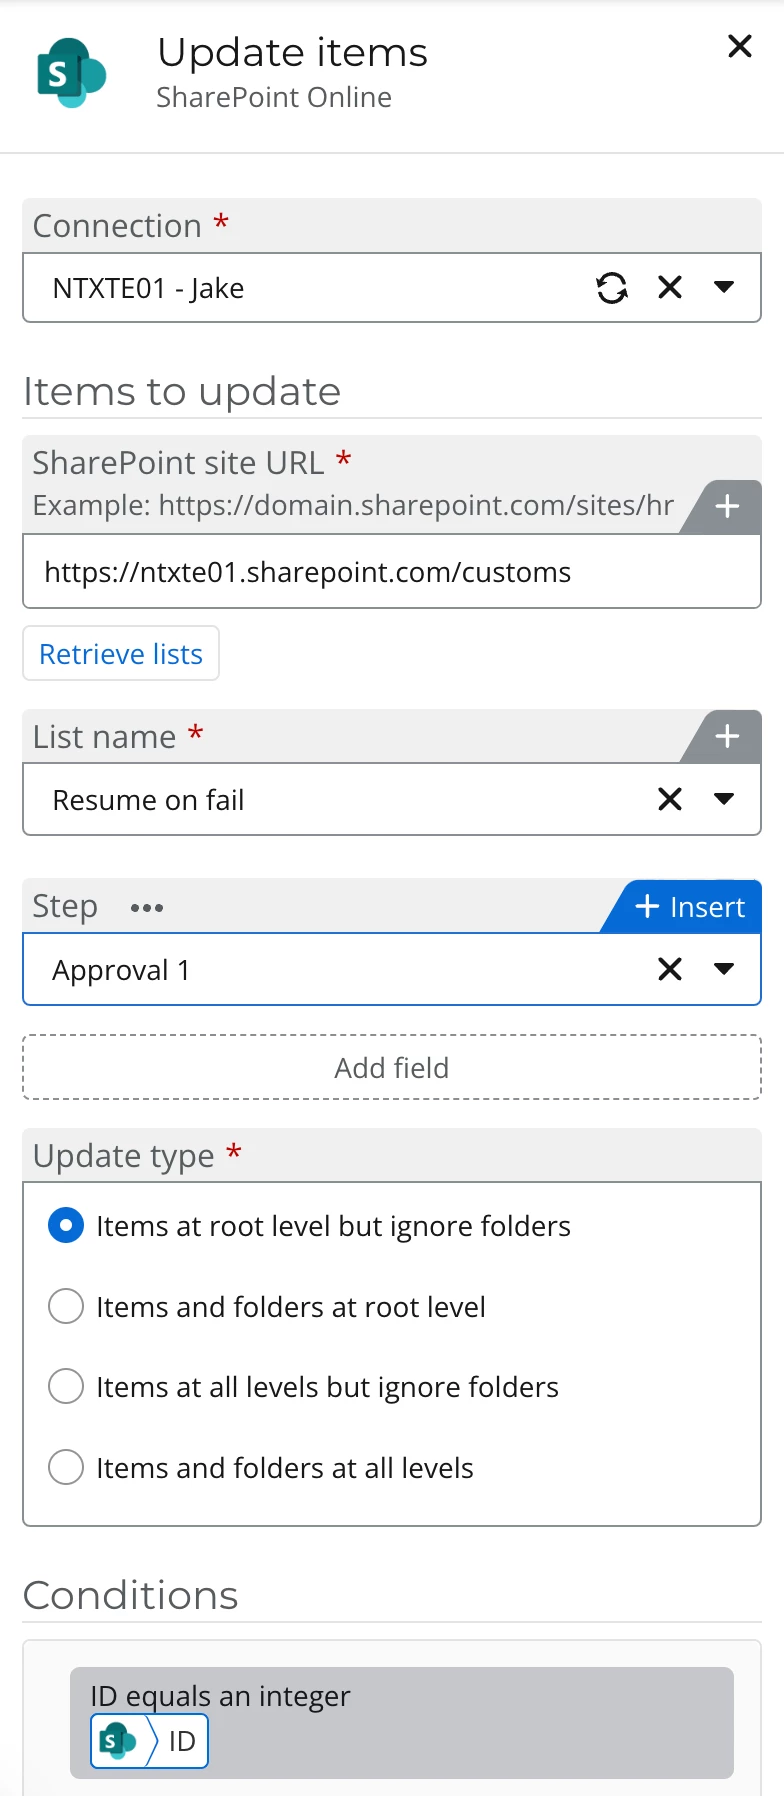
This action can either be the first or last action in a branch, If you choose to enter it as the first action it should contain the current branch, If you choose to use it as the last action then store the next branch, for example as the update is the first action in my Approval 1 branch, I want to store ‘Approval 1’, If it were the last I would store ‘Approval 2’
Where you place these actions is also important for storing data back into the SharePoint, Perhaps you performed an approval and gathered some comments, you do not need to do this again but wish to store that back for reference later, it would then make most sense to store the data after the approval.
After adding the update actions we just need to finish off the state machine by adding the changes stages actions as normal and you should end up with a workflow looking like this:
This is the basic structure needed to resume a workflow on a particular branch, You can add or remove branches as you wish and even skip over state machines all together with use of run-ifs or even an exit branch.
To test the workflow, I like to add a simple run-if check for the ‘Error Workflow’ boolean on my start event.
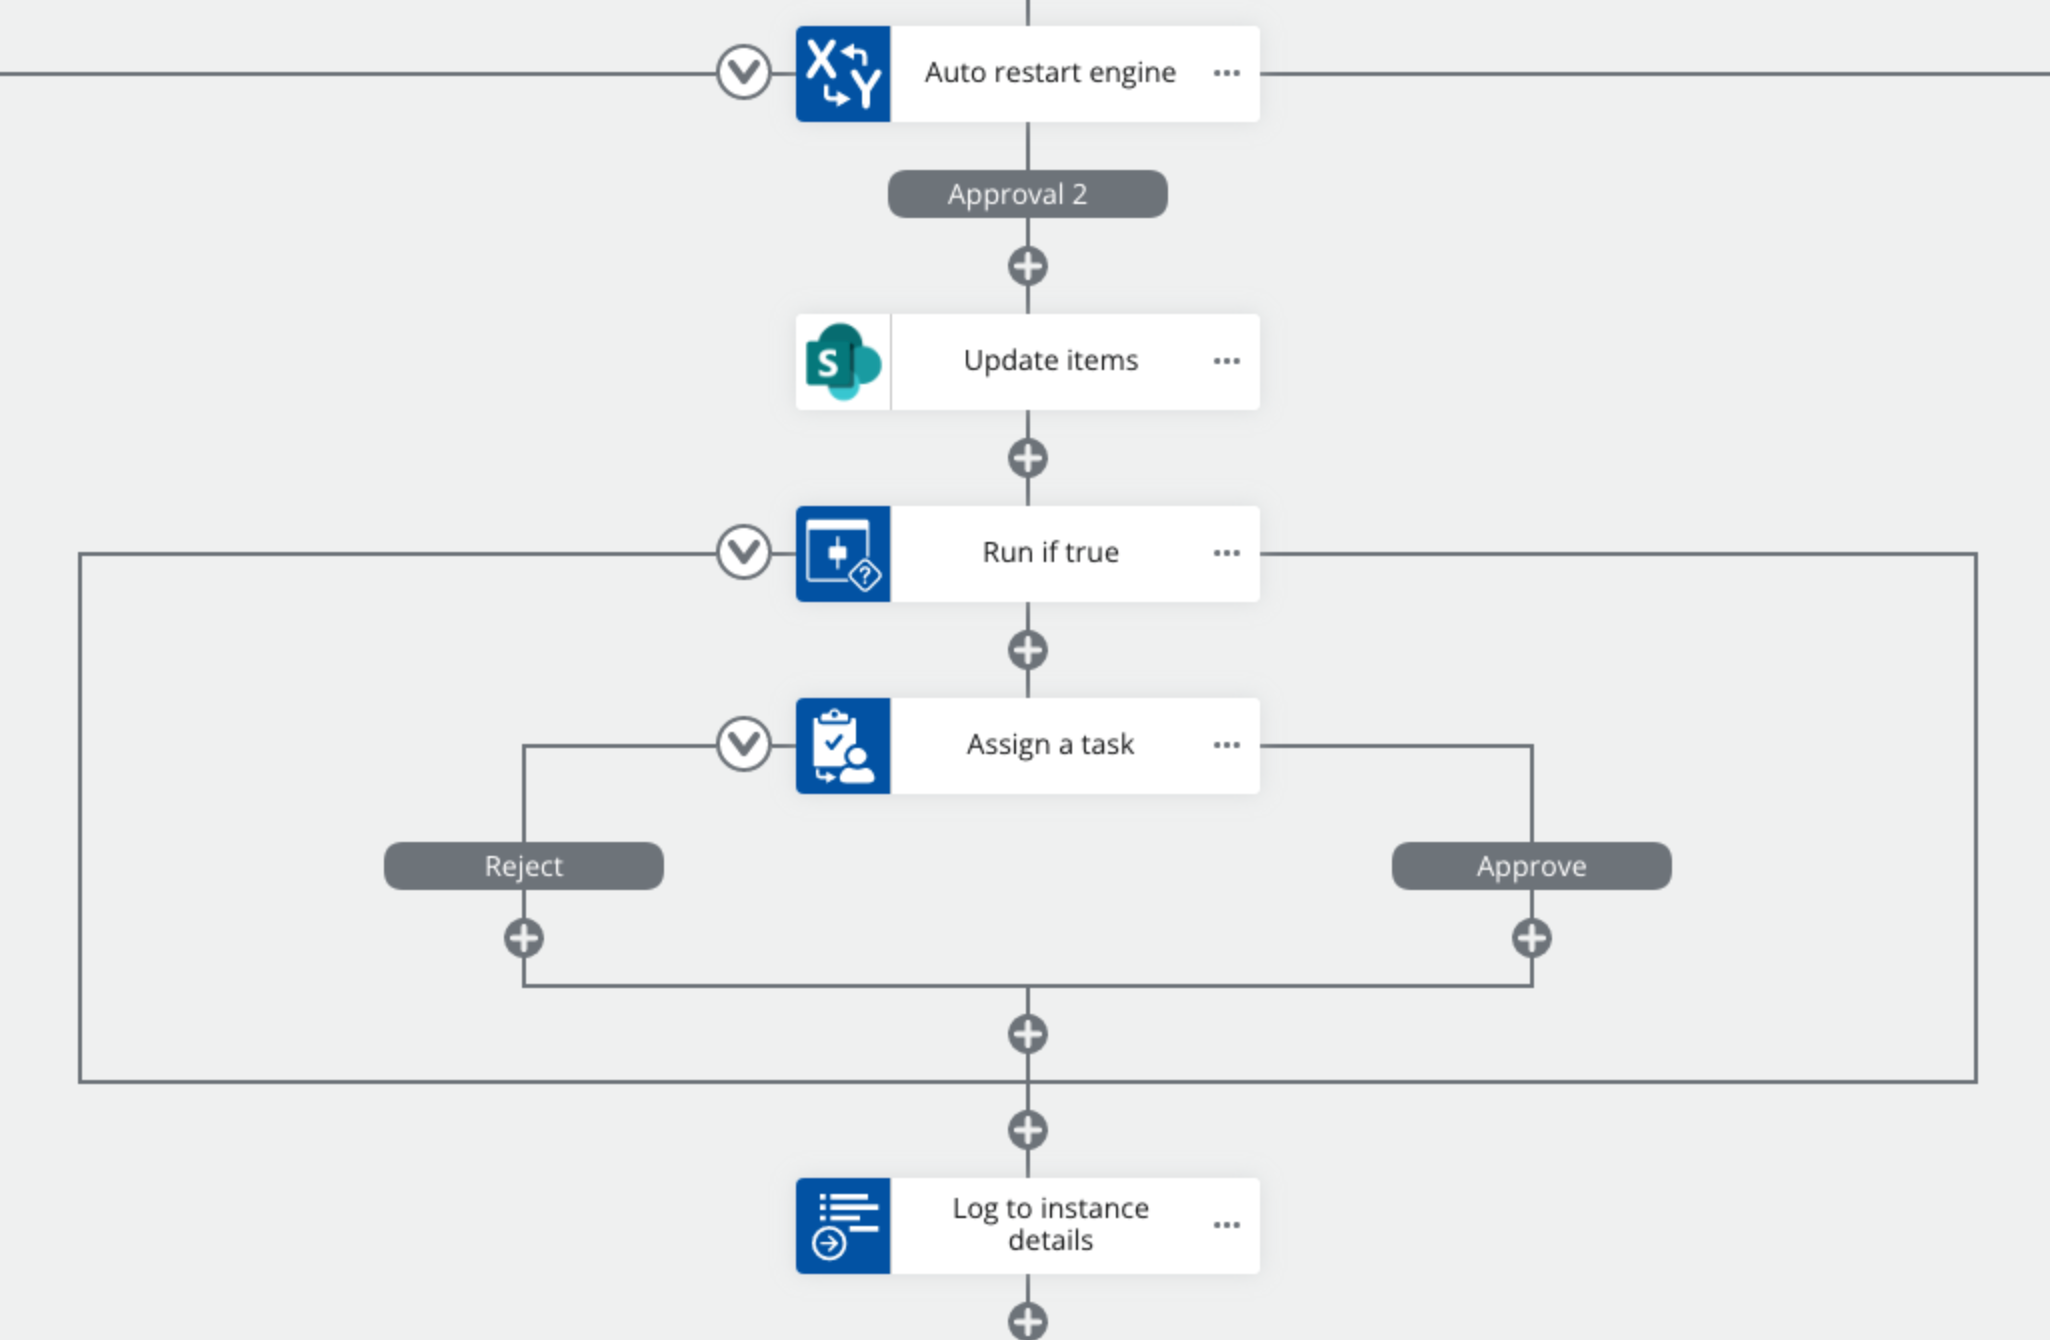
Inside this I have a task that is assigned to an external email but authentication is turned on inside the task.
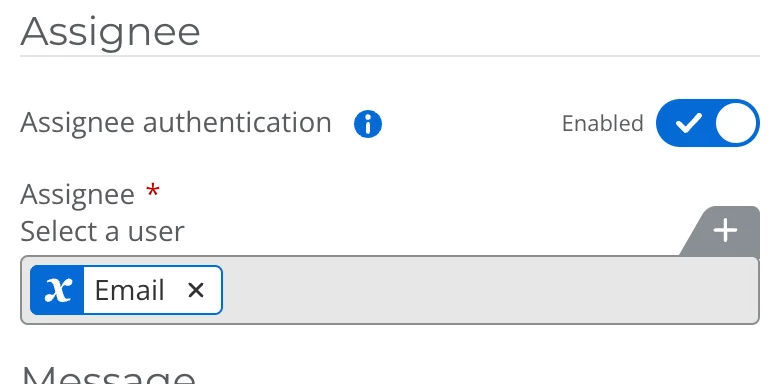
This will cause an error as the workflow cannot assign an authenticated task to a non authenticated user, this is obviously not require but just an easy way to simulate an error.
Now if the workflow errors you can resume it in 2 ways, either by changing the Workflow status field on the Sharepoint list item to New/Re-open or using the resubmit button on the instance page.

I hope you found this tutorial helpful and if you have any questions please feel free to respond below.


