FORMATTING AN HTML EMAIL WITH LIST ITEMS USING NINTEX “CALL WEB SERVICE”
There are a few to many different ways to accomplish this, and I assume as long as you know how to use a Web Service, you can somewhat figure out how to do the same thing as what I’m about to show you even if you don’t own Nintex. I’ve always wanted to be able to do this and had some requirements given to me that required it. It took a lot of research and I combined a few different ways noted by other bloggers. I also had to research and find some specifics for myself. Hopefully this will help someone out.
CALL WEB SERVICE
So, what you are going to want to do is…
- Create a site workflow in Nintex.
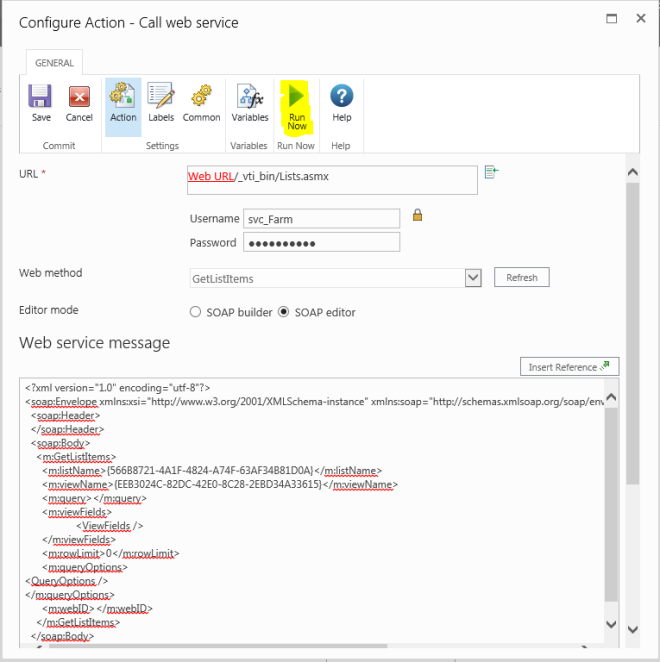
- Add a “Call web service” action
- In the URL add, “Web URL/_vti_bin/Lists.asmx”
- For the UN and PW – Use an account that has administrative rights and a non-expiring pw/account
- Click “Refresh”
- Web method drop down should’ve populated. Select – “GetListItems”
- Change the editor mode to “SOAP editor” – I haven’t had much luck with the “SOAP Builder”
- Copy/Paste this into the SOAP Editor (minus the “1.”)
- <?xml version=”1.0″ encoding=”utf-8″?>
<soap:Envelope xmlns:xsi=”http://www.w3.org/2001/XMLSchema-instance” xmlns:soap=”http://schemas.xmlsoap.org/soap/envelope/” xmlns:m=”http://schemas.microsoft.com/sharepoint/soap/”>
<soap:Header>
</soap:Header>
<soap:Body>
<m:GetListItems>
<m:listName></m:listName>
<m:viewName></m:viewName>
<m:query></m:query>
<m:viewFields>
<ViewFields />
</m:viewFields>
<m:rowLimit>0</m:rowLimit>
<m:queryOptions>
<QueryOptions />
</m:queryOptions>
<m:webID></m:webID>
</m:GetListItems>
</soap:Body>
</soap:Envelope>
- <?xml version=”1.0″ encoding=”utf-8″?>
- Get the List GUID and View GUID (very important to use the view guid, I’ll explain why later) – add the List GUID to “<m:listName></m:listName>” and the View GUID to “<m:viewName></m:viewName>”
- You can get the List GUID by going to https://yoursite/subsite/_layouts/15/mcontent.aspx and copy the link to the list. The GUID will look something like this – {566B8721-4A1F-4824-A74F-63AF34B81D0A}
- You can get the View GUID by using an awesome View ID “decryptor” – follow the instructions at this site. – the View ID is in the same format as the List ID
- Now that we all all of that in place, lets select Run Now at the top and see if we can pull some results.


- Awesome! We have results returned! Now we need to create a Multi-line Variable and name it whatever you want. This is where we are going to store the XML we just asked for. (Hint : In the results portion, copy the XML to Notepad++ (set to XML) so we can reference it later)
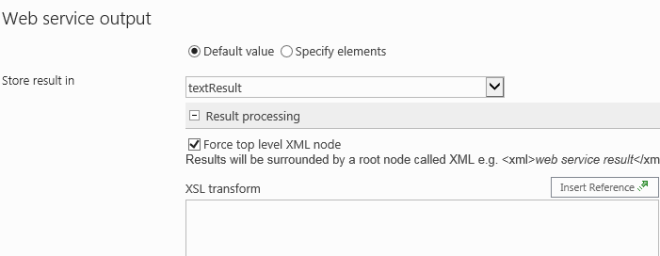
- Now we are going to transform it! The fun part, right!? Go back to the main window for the Call Web Service and at the bottom is a section for Web service output. For “Store result in” click the drop-down and select your newly created Multi-line Variable. In my case it’s “testResult” – Make sure you also select “Force top level XML node” this will surround the results with root node XML.
 So this next part was taken by a Nintex blogger that I reference a lot, http://www.vadimtabakman.com – It’s an amazing source for cool Nintex things you want to do.
- In the XSL transform section. Add this : (Remove anything in red)
- <?xml version=”1.0″?>
<xsl:stylesheet xmlns:xsl=”http://www.w3.org/1999/XSL/Transform” version=”1.0″>
<xsl:output indent=”no” method=”html”/><xsl:template match=”/” name=”ShowVariables”>
<html>
<body>
<h2>Monthly Draw Donations</h2> Table header, change to whatever you want
<table border=”1″>
<tr bgcolor=”#4da6ff”>
<th>Name</th> Columns for your table, name them to reflect the xsl:value below
<th>Staff Title</th> Columns for your table, name them to reflect the xsl:value below
<th>Contribution Option</th> Columns for your table, name them to reflect the xsl:value below (to created)
<th>Payroll Deduction Option</th>
<th>Monthly Amount</th>
<th>US Citizen?</th>
<th>Authorized?</th>
<th>Created</th>
</tr>
<xsl:for-each select=”//*[name()=’z:row’]”> This will select every row in the VIEW
<xsl:sort select=”@ows_Created_x0020_Date” order=”descending”/> Sorts list items (needs to be before xsl:if statement)
<xsl:if test=”@ows_DrawChoice = ‘Monthly'”> xsl:if test = (this is filtering the table data to only show users who selected Monthly as their draw choice)
<tr>
<td>
<xsl:value-of select=”@ows_ReportName”/> The @ows_ comes for the XML we queried and copied to NP++
</td>
<td>
<xsl:value-of select=”@ows_StaffTitle”/>
</td>
<td>
<xsl:value-of select=”@ows_ContributionOption”/>
</td>
<td>
<xsl:value-of select=”@ows_DrawChoice”/>
</td>
<td>$<xsl:value-of select=”format-number(@ows_DrawDeduction,’#,###.00′)”/></td> Formats to show as $0,000.00
<td>
<xsl:value-of select=”@ows_ReportCitizen”/>
</td>
<td>
<xsl:value-of select=”@ows_ReportAuthorize”/>
</td>
<td>
<xsl:value-of select=”@ows_ReportCreated”/>
</td>
</tr>
</xsl:if> End of if
</xsl:for-each> End of for-each
</table>
</body>
</html>
</xsl:template>
</xsl:stylesheet>
 I spent forever trying to figure out how to format the output to only show data from the last week. I browsed everything I could related to xslt – xsl:choose/xsl:if – I couldn’t find anything! Then it hit me… the web service asks for a view ID – it’s easy to only show a weeks worth of data in SharePoint! I’ll filter the view! So I edit the view and change the filter for the “Created” field to be “is greater than or equal to” “[Today]-7” – AWWWWW YEAH! The view is only showing today – 7 days. But will the HTML table show only the data from the view? You bet it does! The query will only pull what it can see on the view. Damn… that was easy.
OK BACK TO THE TUTORIAL…
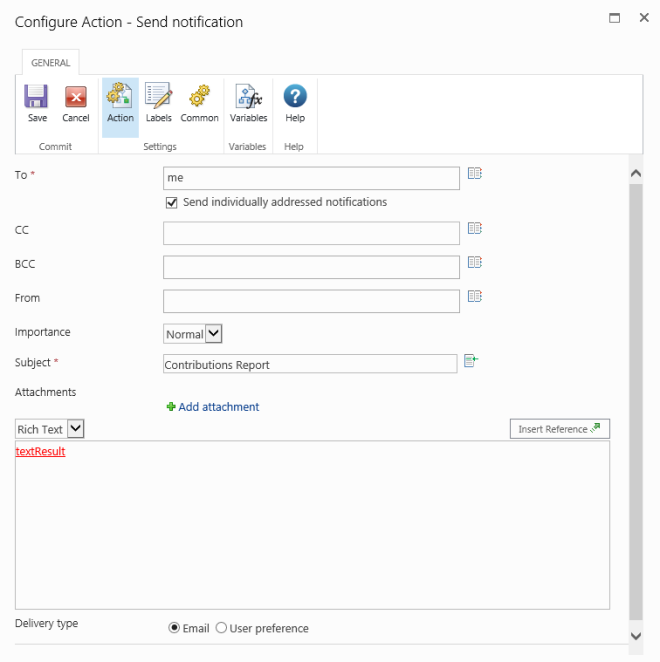
- Now that your view is set up and you have your HTML/XSLT formatted. Let’s add the output variable to a notification. Obviously replace “me” with whomever needs the report. But that’s all you need, just add the variable. You can also make new/separate calls and put them in their own variables. Just add those to the email as well and it will create multiple tables.

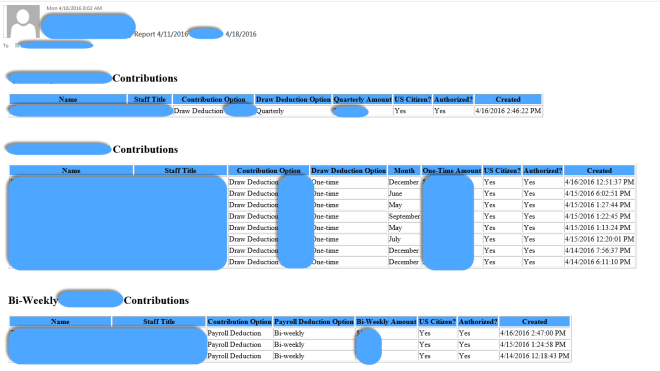
Here is an example of the email report with multiple web calls used(sorry I had to block some of the stuff out… probably took me longer to do this than to make dummy data) Looks stupid, but you get the idea! :

Let me know if you have any questions or find a better way to do something!


