Recently, I created my first connection to Microsoft SQL Server from Nintex Workflow Cloud. My target database was hosted in SQL Azure. Because I was using SQL Azure, I encountered a few minor snags that I thought I would share to save others some time.
As you might expect, setting up a new SQL connection requires 6 values to be specified:
- Connector - Select Microsoft SQL Server from list of available connectors
- Connection - Give the connection a friendly name
- Database Host - Server hosting the database
- Database Name
- Username
- Password
My first attempt to create the connection returned a generic error message:
Connection Error
An error has occurred with creating your connection. Please try again later.
To troubleshoot this the first thing I looked at was the format of the value of the Database Host value. This value corresponds to the "Server" attribute of the SQL connection string. For SQL Azure, the standard format of the server attribute is: tcp:[serverName].database.windows.net,1433
So this is the format that I initially entered in the Database Host field for the connection. When it failed the first time, I figured that NWC was looking for a different format, so I tried a few variations, such as:
- [serverName].database.windows.net,1433
- tcp:[serverName].database.windows.net
- [serverName].database.windows.net
Initially, all of these values resulted in the same error, so I was baffled because I confirmed that I could connect to this database in SQL Management Studio using these settings.
Then I remembered that I would need to configure firewall rules in SQL Azure as well. These firewall settings must be configured for the IP address for any machines that will connect to SQL Azure. Nintex recently published the IP addresses used to host the NWC servers in the NWC Help files. There are quite a few servers hosting NWC, please refer to Source Addresses for NWC to obtain the full list. You will need these IP addresses to update the firewall rules for your Azure SQL database in order use the "Microsoft SQL Server - Execute a query" action against your Azure SQL database.
If you are not familiar with the firewall rules in SQL Azure, I've outlined the configuration steps below. But after updating the firewall rules, I returned to create my SQL Connection in NWC, and now it worked. As it turns out this the correct format for the database host setting: [serverName].database.windows.net
Update Firewall rules in SQL Azure
Once you have the IP addresses, you can configure the firewall rules for your SQL Azure database:
- Navigate to your SQL Azure database in the Azure portal
- Click the Set server Firewall link (figure 1)
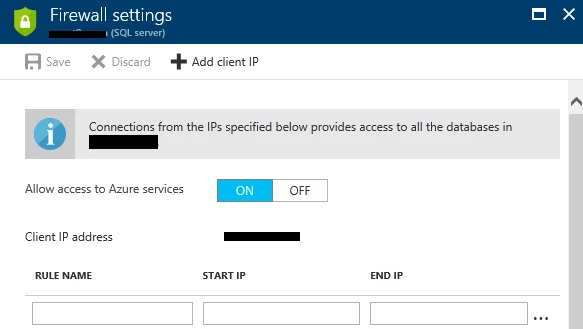
- From the Firewall settings page, you'll need to enter a separate rule for each IP address, since the addresses are not consecutive. (Figure 2)
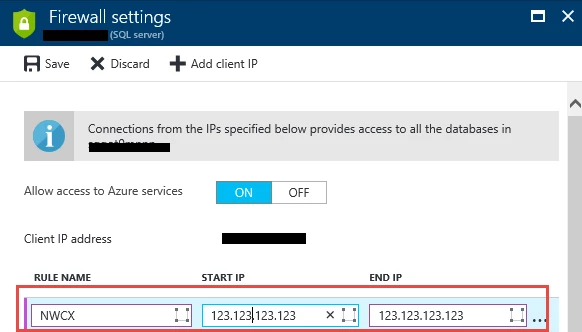
- Each rule needs three values: Rule Name, Start IP, End IP. For rule name, I just used a convention of NWC1, NWC2, etc. and I entered the same IP address for the Start and End IP values. (Figure 3)
Tip: Click the Save button after entering each rule. Initially, I entered all of my rules first and then clicked Save. But Azure gave an error saying that only one rule could be saved at a time and it forced me to start over.

Figure 1

Figure 2

Figure 3


