How to retrieve client IDs and Redirect URIs for use in OAuth against K2 APIs
KB003612
PRODUCT
Since the June release, K2 Cloud has started using Open ID Connect (OIDC) to authenticate and authorize users. With this change, the OAuth flow that used to be based on an Azure flow changed. Basic authorizations continue to function as they did before, but if you were using OAuth, or need to use OAuth in a new application that uses these APIs, you’ll need to configure Postman and/or your code to use the new client IDs and redirect URIs. This article describes how to retrieve the values you need to set up PostMan or configure an OAuth Resource for the K2 APIs.
Obtaining the Client ID and Redirect URI Values
There are two ways to retrieve the values you need to initiate an OAuth flow.
- Submit a support ticket asking for the OIDC client ID and redirect URI
- Use your browser’s developer console tools to extract them. The rest of this article describes how to use the developer console as well as using the values in Postman.
Using the Developer Console in a browser to retrieve the Client ID and Redirect URI
To find the client ID and redirect URI, follow these steps:
- Browse to the K2 Management site
- Open an incognito/private browser and then open the developer console in your browser (F12). These examples show Google Chrome, but any browser developer console will show a similar interface.
- Check the option to Preserve log and click the All button as shown here

- Browse to a K2 site
- Go to Network and right-click the line that begins with authorize?

- Select Copy > Copy link address
- Decode what you copied using an online tool like https://www.urldecoder.org/
- Copy the first part of the value in the decoded text as shown in the following image (your values will be different)

- The first part ending with connect/authorize is your authorization URL
- The second part starting with idt. and up to the first ampersand (&) you see is your Client ID
Using these values in Postman
Once you have the values you need, set up the flow in Postman to test your API calls.
Open the Get New Access Token dialog in Postman and configure the following values
- Token Name: K2 IDT Flow (or a name of your choosing)
- Grant Type: Implicit
- Callback URL: https://[KUID or Vanity Name].onk2.com/management/account/signin-oidc
- Auth URL: The link you decoded in step 9 above, such as https://identitytokenservice.k2central.com/77777777-7777-7777-7777-777777777777/connect/authorize
- Client ID: The client ID you decoded, such as idt.AA0A+A00a/000A0Aa0/Aaa0000a0a0AAaAAaA0aaaAa=
- Scope: https://api.k2.com/ (Note: this value must include the trailing slash, make sure to trim any trailing spaces)
- State: (leave blank)
- Client Authentication: Send as Basic Auth Header
Your Postman dialog should look similar to the following
When you click Request Token, you’ll be prompted to log in and should receive a bearer token to use in your Postman requests
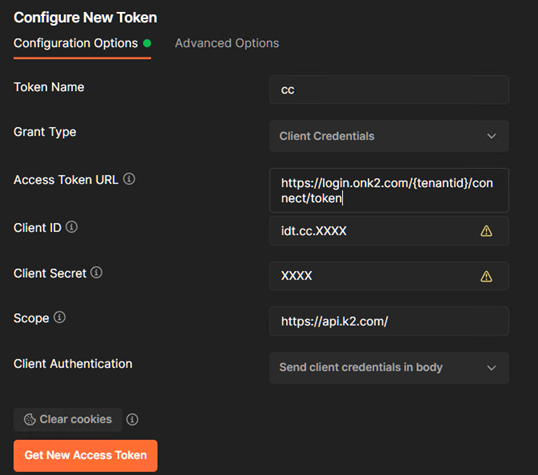
Testing client credentials in Postman
Once you have the values you need, set up the flow in Postman to test your API calls.
Open the Configure New Token dialog in Postman and configure the following values
- Token Name: A name of your choosing.
- Grant Type: Client Credentials
- Access Token URL: https://login.onk2.com/{tenantid}/connect/token (The access token URL needs to end with token and not authorize)
- Client ID: The client ID you decoded, such as idt.AA0A+A00a/000A0Aa0/Aaa0000a0a0AAaAAaA0aaaAa=
- Client Secret: The client secret given to you by the API provider.
- Scope: https://api.k2.com/ (Note: this value must include the trailing slash, make sure to trim any trailing spaces)
- Client Authentication: The client authentication should be set to send client credentials in the body.

When you click Get New Access Token, the configuration information is saved along with the access token and will be used every time the token is refreshed.


