Nintex Community Menu Bar
 

How to use a SmartObject as a Lookup Object with Data Level Security

KB000192

DOWNLOADS
DOWNLOADS
PRODUCT
K2 blackpearl
TAGS
Data Handling
LEGACY/ARCHIVED CONTENT
This article has been archived, and/or refers to legacy products, components or features. The content in this article is offered "as is" and will no longer be updated. Archived content is provided for reference purposes only. This content does not infer that the product, component or feature is supported, or that the product, component or feature will continue to function as described herein.


Introduction

Within production environments it becomes essential to set data level security to protect, restrict or enable access to company data in a controlled manner. Within K2 blackpearl the SmartObject is used to represent real life instances of company data, such as organizations, customers, and regions.

K2 blackpearl allows the user to enable data level access when two or more SmartObjects are associated with each other. This feature provides the flexibility for Administrators to either enable or restrict access to SmartObjects. The developer must however be aware that certain settings must be enabled before this functionality can be used.

This KB Article contains a short demonstration describing how to configure security using the Lookup feature. There are two methods available to do this. The first method is done in the K2 Designer for Visual Studio and requires that specific settings are configured at design time before the SmartObject is deployed. Any changes that are required to the SmartObject’s configuration once it is deployed will require that the amended SmartObject be redeployed. The second method allows you to set the Lookup SmartObject settings in K2 Workspace after deploying the associated SmartObjects.

Note:
For advanced users, the brief description lead in should provide sufficient details for them to proceed.
For intermediate users, follow the instructions to ensure that the example functions.
For beginners, refer to the K2 Help file for more information about SmartObjects before continuing.


Implementation Example

Resources Required

To setup the example provided in this article a minimum of two SmartObjects are required:

  • A one-to-many (1:M) association is configured between the two SmartObjects
  • The Lookup feature is only configured on one of the SmartObjects

The SmartObjects are then deployed.

The steps required to create a SmartObject have been documented adequately in the K2 Help file. For detail on creating SmartObjects, refer to that resource.

It is not essential that the reader follow the naming in this example explicitly but it will assist with correlating the example with your real life project.

Step 1 - Create SmartObjects

When creating the SmartObjects, keep in mind the following tips:

  • To avoid the need for a process in your project, use a SmartObject project.
  • If you have opened a K2 Workflow Project, simply add a Server Event to your canvas and link the Start Activity to the Server Activity with a Line rule. No further changes are required, or simply delete the .kprx file from the Solution Explorer.
The two SmartObjects required have the following attributes:

Customer SmartObject

Fields

Datatype

CustID

AutoGuid

CustName

Text

CustNumber

Number


Region SmartObject

Fields

Datatype

RegionID

AutoGuid

RegionName

Text

Region Alias

Text


Step 2 - Configure the Lookup

Once both the SmartObjects are created (see above for property attributes) the lookup is then configured. To configure the lookup, open the Region SmartObject and follow the steps below:

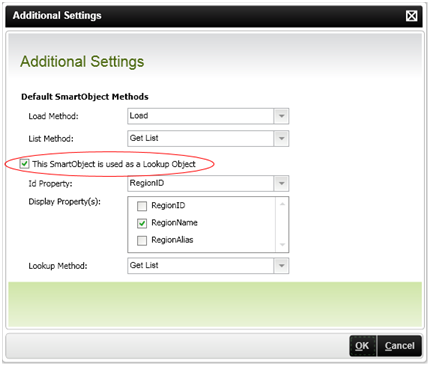
  1. Click on Additional Settings

  2. Check the box for This SmartObject is used as a Lookup Object


    >Figure 1. Additional Settings for the Region SmartObject]

  3. Select RegionID as the ID property

  4. Select RegionName as the display property (more than one property can be selected as the Display Name)

  5. Lookup Method is GetList, click OK to complete

Important: The Lookup settings configured in the K2 Designer for Visual Studio cannot be changed or edited in K2 Workspace. The Lookup configuration would need to be either disabled or reconfigured in the K2 Designer for Visual Studio and redeployed to the K2 Server.

Important: The Lookup settings configured in the K2 Designer for Visual Studio cannot be changed or edited in K2 Workspace. The Lookup configuration would need to be either disabled or reconfigured in the K2 Designer for Visual Studio and redeployed to the K2 Server.

Step 3 - Create Associations

An association is required between the Customer SmartObject and the Region SmartObject. To configure the association, the SmartObject selected is the SmartObject not configured as the lookup. For this example, select the Customer SmartObject to create the association with the Region SmartObject.

  1. On the Welcome Screen click Next

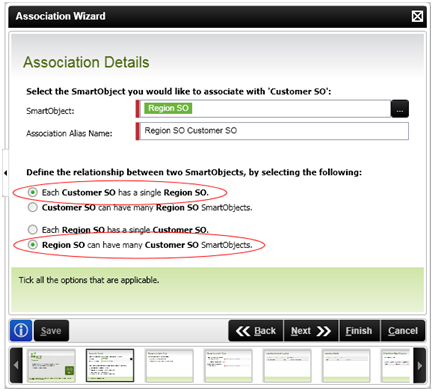
  2. On the Association Details Screen,
    a. SmartObject – Browse to the Region SmartObject using the Context Browser
    b. The Association Alias Name will auto populate

  3. Additional options will display (see the figure below)
    a. Select Each Customer SO has a single Region SO
    b. Select Region SO can have many Customer SO SmartObjects

  4. Click Next until the Finish screen is reached, then click Finish


    Figure 2. Association Details screen in the Association Wizard]


Step 4 - Deploy SmartObjects

Before deploying the SmartObjects do the following:

  • Check that the Region SmartObject has been configured as the lookup

  • Check that there is a one-to-many (1:M) association between the Customer SmartObject and the Region SmartObject

After the above have been checked, right click the project in the Solution Explorer and select deploy. This will run the deployment wizard. If you are unsure how to use this wizard, refer to the K2 blackpearl Help file for details on this wizard.


Step 5 - Data Level Mappings

Once the K2 SmartObjects are deployed to the K2 Server, open K2 Workspace.

  1. Open up the K2 blackpearl Workspace

  2. Click the Management Console

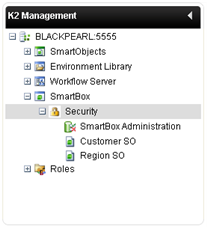
  3. Expand the nodes for <5555> > SmartBox > Security</5555>

    Note: The above instructions should have brought you to the location within K2 Workspace as shown below:


    bFigure 3. The SmartBox Security node in the K2 Workspace]

  4. Select the Customer SmartObject

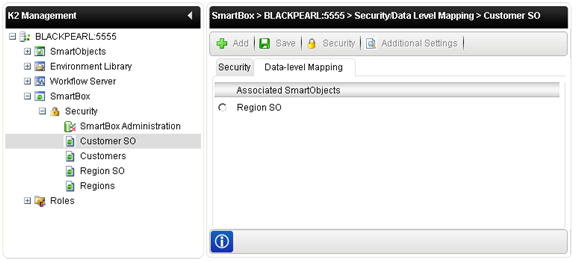
  5. Click on the Data-level Mapping tab

  6. Under Associated SmartObjects select Region SO

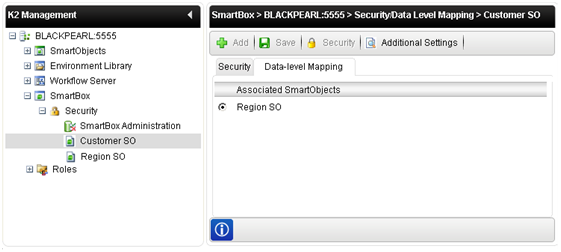
    Note: The Security/Data-level Mapping page looks like the following figure:


    Figure 4. The Security page for the Customer SmartObject in K2 Workspace]


    Note: The Security button should now be active.  


Step 6 - Permissions

Note: Permissions can only be set for SmartObjects that contain data. If either of the SmartObjects does not contain data, they must first be populated.


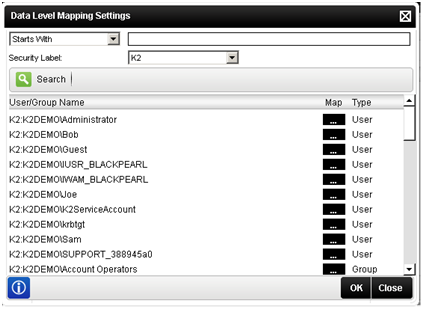
2Figure 5. The Data Level Mapping Settings page in K2 Workspace]

The Data Level Mapping Settings page will display all users that can be given permissions on the SmartObjects. To set permissions on the Lookup object for a specified user, do the following:

  1. Identify the user (e.g. Administrator)

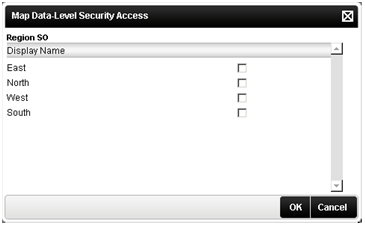
  2. Click on the ellipsis button in the Map column, and the following user page will display:


    >Figure 6. The Map Data-Level Security Access page in K2 Workspace]

  3. Select the Regions that the designated user will be able to view by checking the corresponding check box

  4. Click OK to complete the Data Mapping

  5. Click OK again to complete and close the User Security Page

Step 7 - Viewing User Permissions

To View the user permissions, do the following:

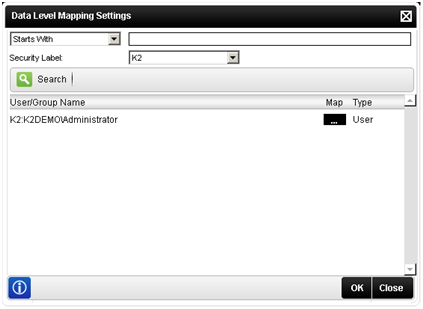
Open up the Security Tab, and you will see the users that you have given permissions to view at least one item from the Lookup SmartObject. As a result of applying security (i.e., giving one user access), no other users are able to view the data in the lookup, unless they have been given explicit access rights. Additional users can be added using the steps in Step 6 above.  


4Figure 7. The Data Level Mapping Settings page showing the users who have been given view access to data in the Lookup SmartObject] 

Setting the Lookup SmartObject from K2 Workspace

If the SmartObject Lookup configuration was not performed in the K2 Designer for Visual Studio, the Lookup SmartObject settings can be set from K2 Workspace.

To configure the Lookup do the following:

  1. Open up K2 Workspace

  2. Select K2 Management Console

  3. Expand the nodes for <55555> >SmartBox > Security</55555>

  4. Select the Customer SmartObject

  5. Select the Data-Level Mapping tab

  6. In the Associated SmartObjects list, select Region SO

    Note: Your page should resemble the following:


    Figure 8. The Association between the Customer and Region SmartObjects, with the Additional Settings button active]

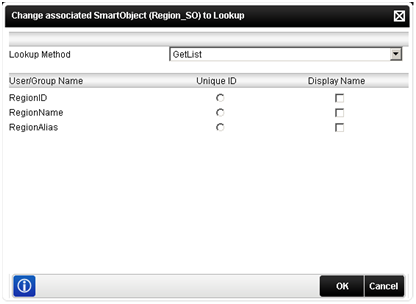
  7. Click on the Additional Settings button which is now enabled

  8. Set the following configuration:
    Lookup Method:  Get List
    Unique ID:  RegionID
    Display Name:  RegionName

    Note: Your page should resemble the following:


    hFigure 9. The Lookup information for the Region SmartObject on the Customer SmartObject settings]

  9. Click OK to save the settings

After the lookup has been configured in K2 Workspace, you can set the security permissions. The previous section, Step 6, detailed how to perform this task.

Final Items for Consideration

Security Considerations

Before the lookup is configured, all users are able to view the contents of the Lookup SmartObject. Once the security on the lookup is configured, only those with view rights will be able to view the data. Users without rights will be unable to view the contents of the lookup. Be sure to set the necessary data access for all users who require it.  

Configuring the Lookup in K2 Workspace

Once the lookup is configured from K2 Workspace, the Additional Settings button disables and the Lookup configuration cannot be changed. This is by design and if changes to the particular lookup are required they can be implemented by using the K2 Designer for Visual Studio to perform the following tasks:

  • From within K2 Object Browser, save the SmartObject locally by right-clicking on the SmartObject and then clicking Save To Local. This will copy the SmartObject into the current project.
  • Make the changes required on the local copy
  • Redeploy the SmartObject to the K2 Server

Once the SmartObject is available in the K2 Designer for Visual Studio, the Lookup can be configured there and redeployed. After the SmartObject is redeployed, the lookup can be reconfigured once again in K2 Workspace.  

User Project Example 

Note: The project examples have been built using a standalone K2 Installation. You may need to modify the project to suit your environment, although every endeavor has been made to ensure that the projects are as generic as possible.

Accompanying this article are project files that will enable the user to perform the steps in this article. The attached project files require K2 blackpearl Hotfix1 or later. The attachment includes the following:

K2 Designer for Visual Studio Project

  • This project contains the project files for the K2 Designer for Visual Studio. The project is a K2 SmartObject project and contains the two SmartObjects used in this article

  • The SmartObjects contain no data and these will need to be populated manually or via the ADODataProvider

  • Open the project in the K2 Designer for Visual Studio and deploy the project to your K2 Server
    NOTE: The lookup feature is NOT enabled in the K2 SmartObject Project. See the text of this article for details on how to set this feature, either in the K2 Designer for Visual Studio or in the K2 Workspace.


Web site Projects

  • The web site project contains pages that enable the developer to view the data via an APSX page for different users. This will demonstrate how data can be displayed for different users and how the lookup feature enables the user to view data and / or excludes certain users from viewing data.

  • A web site must first be created in IIS to host the web pages. See Appendix A for information on how to create a web site.

Appendix A - Create a Web Site

The Lookup security capabilities are best demonstrated using a site with user controls that return data from the deployed SmartObject based on the Lookup security settings. The project examples included with this article contain the project page; a site is required to host the page. Follow the instructions below to create the site.

  1. Start > All Programs > Administrative Tools and Select Internet Information Services (IIS) Manager

  2. Expand the {Local Computer} node, right-click on Web Sites folder and select New > Web Site

  3. Click Next button, enter a name for the web site (e.g., LookupWebSiteVS) and click Next button

  4. Change the TCP port to 8082 (or any other port not already in use) and click Next

  5. Click the Browse button, go to C:Inetpub and click on Make New Folder button. Give it the same name as the web site (e.g., LookupWebSiteVS). Uncheck Allow Anonymous access checkbox and click Next twice and then Finish button

  6. Right-click on newly created web site and select Properties

  7. Go to Home Directory tab and select 'Scripts and Executables' in 'Execute permissions' dropdown and click OK

  8. Close IIS

Once the site exists, open the ASP.NET page example within Visual Studio and publish the page to the following site 8082 (or the port you created the website on). Once the page is published, browse to the site http://localhost:8082 to view the page. If set up correctly, the data within the lookup SmartObject will be displayed on the page based on the permissions of the user logged in.


Appendix B - Create a User Page

A user site can be created to demonstrate the Lookup security features. The Lookup security is best demonstrated when you compare the security settings for two different users with different security settings. This requires that at least two users are added in K2 Workspace and they are provided with different security settings.

Create the project

  1. Double click on the K2 Designer for Visual Studio icon on the Desktop and click on File > New > Web Site

  2. Select the ASP.NET Web Site template

  3. Select the location to save your project to (e.g., C:TutorialsData Level SecurityWebsite)

  4. Click OK

Add the controls and configure the data source

In the Toolbox click on the Data Tab:

  1. Double-click on SQLDataSource

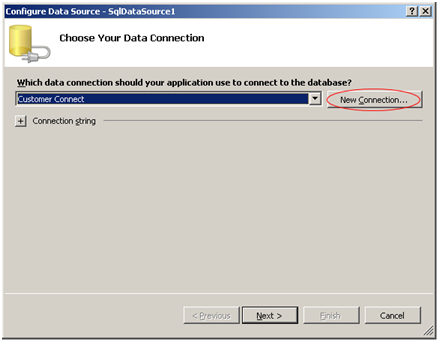
  2. Click on the drop down arrow displayed in the top-right corner, click on Configure Data Source

  3. Click on New Connection

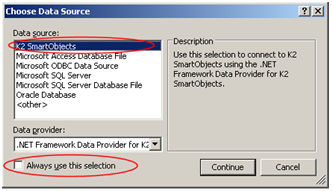
  4. Select K2 SmartObjects

  5. Uncheck Always Use this selection

  6. Click on Continue

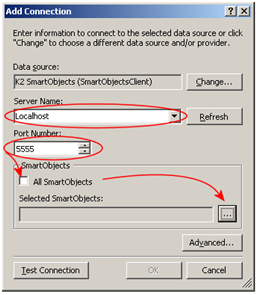
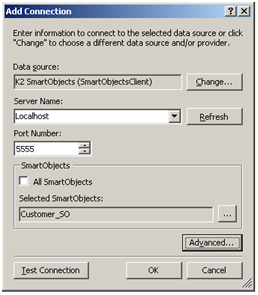
  7. From the Add Connection Screen, do the following:


    a. Change the Server Name to Localhost
    b. Change the port number to 5555

  8. In the SmartObjects area, uncheck the All SmartObjects checkbox
    a. Click the ellipse button to load the available SmartObjects
    b. Click the OK button and then click on the Select… button in SmartObjects frame

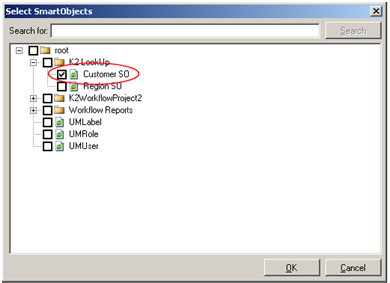
  9. Expand until you find the Customer SmartObject, select it and click OK

  10. Click OK to close the Select SmartObjects dialog

  11. Click OK on the Add Connection dialog

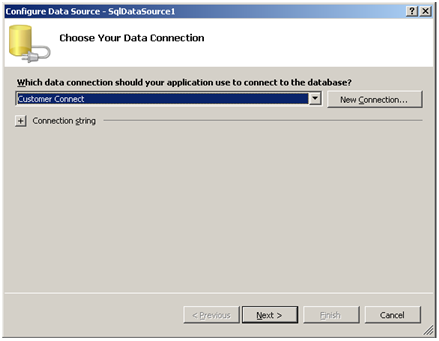
  12. Check the Yes, save this connection as checkbox and give it an appropriate name (e.g., CustomerConnectVS), then click Next

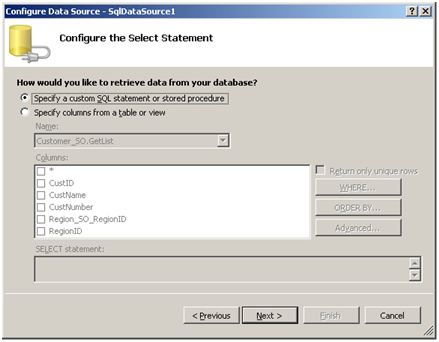
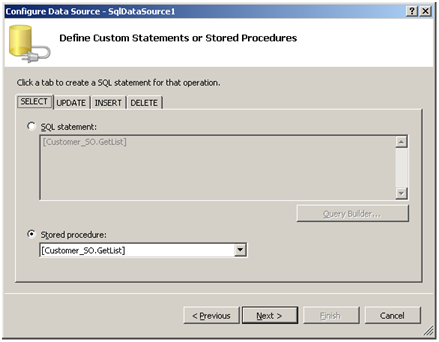
  13. Select the Specify a custom SQL Statement or Stored Procedure option

  14. Click Next

  15. Select the Stored procedure Radio Button

  16. Select the Get List Method from the drop down menu

  17. Click Next twice

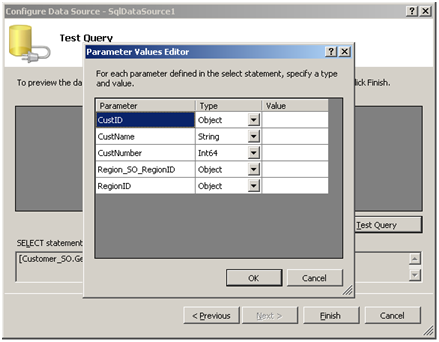
  18. Click on the Test Query button and then OK

  19. Click Finish


Final Data source configuration

  1. Select the newly added SQLDataSource and change the CancelSelectOnNullParameter property to False

  2. Double click on the GridView control in the toolbox to add it to the canvas

  3. Next to Choose Data Source, select the SQLDatasource you've just added


Web.Config configuration

  1. In the Web Site project, double-click on the web.config file in the Solution Explorer

  2. Add in the node and save

  3. Click on the play button to build the solution

  4. Close the web page


Publish the Web site

  1. Right-click on the project in the Solution Explorer and select Publish Web Site

  2. Enter the Web site that you created (e.g., http://localhost:8082) in the Target Location textbox and click OK


Be the first to reply!

Reply