

The new responsive forms can be cumbersome at times. It is locked down, and very little control is allowed over the layout. I always believe I can bring a bigger hammer to the party and make it work. Once I brought Mjölnir along, I figured out how to add CSS to the form and build better email messages using HTML and CSS using rules and variables.
So, I am guessing you are wondering how I can apply styles to the form. This happened to me by accident. While I was trying to figure out how to create an HTML email, I applied some of these techniques to the form styles and noticed changes. I do not recommend trying to apply styles to the entire form, but minor tweaks have helped greatly with form and function.
Let me start by explaining my email body. This can all be achieved through the workflow, but if you have ever tried this, it is a nightmare and not easy to manage. But building all this in the form is easy to do, build, and test, all without triggering the workflow.
By creating a variable in the form, to allow for content, the variable can be added to a label and displayed in the preview mode. Another benefit is that the workflow only has to use one field for the email body; none of the other fields have to be connected to a SharePoint column.
Now we can start by talking about the variables. Initially, I started off with two variables: a varStyles, and a varEmailBody. I wanted my styles separate because I wanted the styles to be reusable in other variables. in my varStyles I have the open and closed style tag, which is required. then I decide on my classes or even a form class/id.
"<style>" +".labelcontent { font-size:11.5pt; color:#002855; font-weight:normal; font-family:Calibri; padding-bottom:15px; background-color:#EEEEEE; }" +".tablelayout { font-family: Calibri; font-size:11.5pt; border-collapse: collapse; width: 750px; background-color: #ffffff;}" +".tablelayout td, .tablelayout th { border: 1px solid #002855; padding: 5px;}" +".tablelayout td { width:45%; vertical-align:top;}" +".tablelayout .col1 { width:10%; vertical-align:top; text-align:center;}" +".tablelayout tr:nth-child(even){background-color: #eef6fa;}" +".tablelayout tr:hover {background: #fff4cb;}" +".tablelayout th { padding: 8px; text-align: left; background-color: #002855; color: #ffffff;}" +"</style>"
I lay it out this way for readability; you can see by the rules that this is for a table layout.
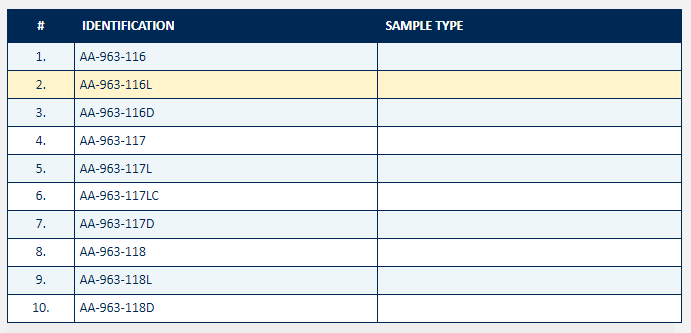
Then I build my table. Here I can check if a field value is not null and create a table row. if it is null, no row is created.
[Form].[varStyles] +"<div class='labelcontent'>" +"<table class='tablelayout'>" +ifElse(not(isnullorempty([Form].[Identification1])) , "<tr><th class='col1'>#</th><th>IDENTIFICATION</th><th>SAMPLE TYPE</th></tr>" +"<tr><td class='col1'> 1.</td><td>"+[Form].[Identification1]+"</td><td>"+[Form].[SampleType1]+"</td></tr>","") +ifElse(not(isnullorempty([Form].[Identification2])) , "<tr><td class='col1'> 2.</td><td>"+[Form].[Identification2]+"</td><td>"+[Form].[SampleType2]+"</td></tr>","") +ifElse(not(isnullorempty([Form].[Identification3])) , "<tr><td class='col1'> 3.</td><td>"+[Form].[Identification3]+"</td><td>"+[Form].[SampleType3]+"</td></tr>","") +ifElse(not(isnullorempty([Form].[Identification4])) , "<tr><td class='col1'> 4.</td><td>"+[Form].[Identification4]+"</td><td>"+[Form].[SampleType4]+"</td></tr>","") +ifElse(not(isnullorempty([Form].[Identification5])) , "<tr><td class='col1'> 5.</td><td>"+[Form].[Identification5]+"</td><td>"+[Form].[SampleType5]+"</td></tr>","") +ifElse(not(isnullorempty([Form].[Identification6])) , "<tr><td class='col1'> 6.</td><td>"+[Form].[Identification6]+"</td><td>"+[Form].[SampleType6]+"</td></tr>","") +ifElse(not(isnullorempty([Form].[Identification7])) , "<tr><td class='col1'> 7.</td><td>"+[Form].[Identification7]+"</td><td>"+[Form].[SampleType7]+"</td></tr>","") +ifElse(not(isnullorempty([Form].[Identification8])) , "<tr><td class='col1'> 8.</td><td>"+[Form].[Identification8]+"</td><td>"+[Form].[SampleType8]+"</td></tr>","") +ifElse(not(isnullorempty([Form].[Identification9])) , "<tr><td class='col1'> 9.</td><td>"+[Form].[Identification9]+"</td><td>"+[Form].[SampleType9]+"</td></tr>","") +"</table>" +"</div>"
I start the first line with my style variable, then dynamically build the table. you can see in the code that I am using HTML and CSS, the only real difference is all the code uses a single tick, not double quotes.
this is the form output, what the end-user can see:
if wanted to put this in an email message, I could use a rule, and update a SharePoint multiple-line, plain text field, and the workflow can now send HTML in the email.
So, I started off talking about applying styles to the form, so now that I explained all this, let me explain how I hide the delete button on the form. If you have ever done any kind of development, you should be familiar with Developer Tools, this is an extension of the browser, it allows you to see how a page is built and functions. when I was poking around at the top of the form where the buttons are, I found that Nintex uses a class to identify this as a command bar. this is good because it is the same for all three form modes, well, at least two. The New Form does not have a delete button. now that I know the class, I can apply a relative selector to hide the delete button. the buttons are coded in an unordered list, so my relative selector can target the list item. without showing all the HTML, here is a snippet of the code for the Delete button
<li title="Delete" class="ng-star-inserted"> <a class="nx-command-bar-item" data-e2e="runtime-menu-delete"> <ntx-icon class="nx-icon" _nghost-klr-c10="" role="img" aria-label="delete"> <div _ngcontent-klr-c10="" class="nx-hide-icon-text">delete</div> <svg _ngcontent-klr-c10="" version="1.1" width="100%" height="100%" xmlns="http://www.w3.org/2000/svg" xmlns:xlink="http://www.w3.org/1999/xlink" class="nx-icon--allow-events" data-e2e="delete"> <use _ngcontent-klr-c10="" href="#delete"></use> </svg> </ntx-icon> <span>Delete</span> </a> </li>
Now; if I add a new rule to target this list item, I can hide the Delete button. So what is the rule?
here you go:
+".nx-command-bar-group > li[title='Delete'] {display:none!important;}"
I initially tried to use the nth-child selector, but the Delete button's order differs from the Display mode vs. Edit Mode. By using the attribute selector, it does not matter where it shows up in the list.
The last step to make this work is the varStyles have to be placed in a label on the form so the styles can be applied.
Happy Coding!
