Nintex Community Menu Bar

Hello,


I am using Nintex 2016 version on SharePoint 2016.

I have a repeating section on nintex form . and the repeating section has a list look up.

I have written a js code to fire change event whenever a value is changed in list lookup inside repeating section. But i see that that event is firing twice.

Below is the sample code i tried.

NWF.FormFiller.Events.RegisterAfterReady(function(){

NWF$(".LookupClass").change(function(){

checkfordata();

})

})

function checkfordata()

{

alert("inside the function");

}

whenever i change value in the lookup field, i am getting alert twice due to which i am assuming that the function is being called twice. I even tried to place the change event in document.ready function but still no luck. 😞

Can anyone please share your thoughts to get this fixed to call the function once when there is change in value of the lookup?


Thank in advance.

Usha.

(Note: this post got a bit longer than I expected. If you wanna skip to the answer, just scroll down. You you can't miss it)


This happens when you place the class that you're targeting using the Ribbon instead of inside of the Settings of the Control. 

When you put the class onto the control from the Ribbon: 


It actually attaches the class to the Control's container (the outermost) <div> element.


It just so happens that Lots of controls have things happening in the background (by way of Nintex's own code) that involve making sure that the Controls are being updated, and those updates are usually performed using events, specifically the "change" event.


(here is a snippet of some internal js from Nintex's code in question): 


else if (displayType === "dropdownlist") {

item.unbind("change");

item.on('change', function() {

var changedControl = NWF$("#" + controlId)[0];

var oldValue = hiddenTextBox.value;

// Clear the hidden textbox if it is the Mask value

if (changedControl.selectedIndex === 0) {

hiddenTextBox.value = "";

} else {

var selected = changedControl.options[changedControl.selectedIndex];

hiddenTextBox.value = selected.value + ";#" + selected.text;

}

if (oldValue != hiddenTextBox.value) {

forceChangeEvent(hiddenTextBox);

}

});

}


You'll see that the "item" in the code is being given an on change event, handled right there by the function. In the case of the Lookup control the "item" is referencing the <div> element that contains the <select> element. 


When you change the <select> element by making a new selection, the change event bubbles upwards from there and immediately reaches the <div> containing it. The code above then kicks into gear and performs the logic as shown. You might notice though at the bottom how there is an if statement containing: 


if (oldValue != hiddenTextBox.value) {

forceChangeEvent(hiddenTextBox);

}


If this is the first time this event has been invoked then this will likely evaluate to true, which means that the function 'forceChangeEvent' will be invoked. Well... that means that now ANOTHER change event has started (this time on the hidden input box that actually contains the value of your lookup control). Now that starts to bubble up from the inside of the Lookup Control. It eventually reaches your event handler where you are alerted for the first time, and once it has finished bubbling, then the *original* event from the <select> change will start to make its way up the chain of elements and ALSO be handled by your event handler!


You can confirm this using the following code: 


NWF.FormFiller.Events.RegisterAfterReady(function() {

NWF$(".LookupClass").change(checkfordata);

});


function checkfordata(event) {

console.log(event.target);

}


Resulting in two different elements being shown in the console (first call on top (which is the <input> element)): 


So, this is why you're seeing two notifications. 


How do you fix it? 


THE ANSWER 


Instead of putting your class on the outermost <div> of the Control (ie: using the Control's Ribbon),


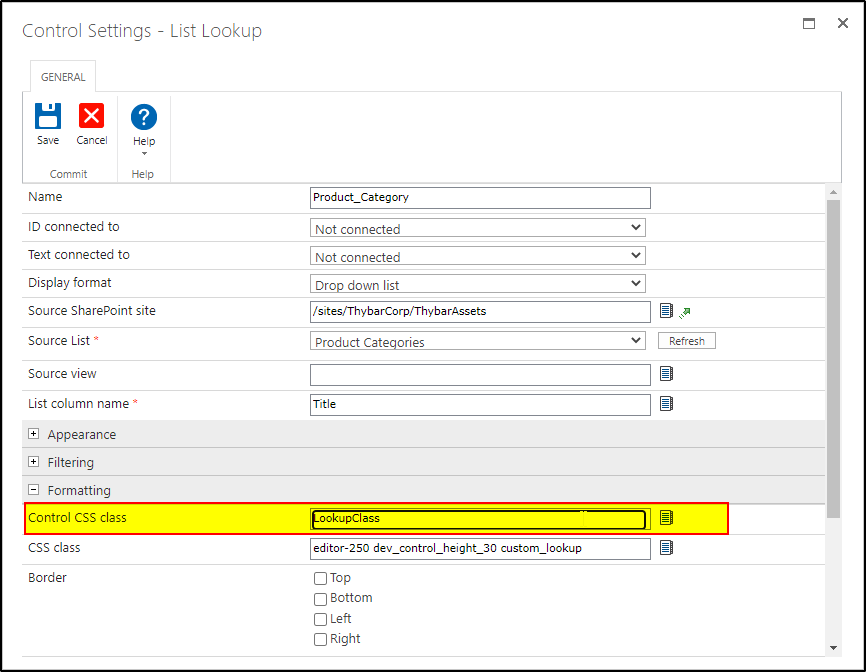
go to your editor and select the Control in question, and then open the Settings menu for that control. In there you will find a drop down section for *Formatting*. Open that, and place your class in the "Control CSS Class" input: 


I hope that this helps to solve your problem and provides a better understanding of how Nintex Forms work. 


Reply