Solved

Nintex Automation Cloud - Applying Page Break for Printing Form Using Custom CSS

  • 2 April 2024
  • 7 replies
  • 66 views

Badge +1

I have a ~20 page document that has variable content that I’m pulling from SQL server to populate data points throughout the document. I would like to use NAC to allow the user to select a location and then have it auto-populate all the dynamic content (this is all doable). 

The problem I’m running into is trying to set the document for printing. By default, even if you add pages to an NAC form, it just puts page breaks wherever they are needed rather than allowing me to define where I want those page breaks. 

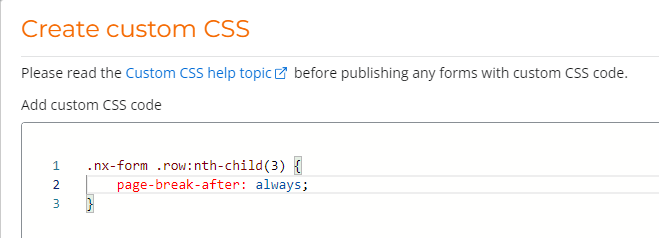
I tried creating custom CSS using “page-break-after: always;” but calling the style does not accomplish the goal. 

I also tried putting the style directly into the HTML but it strips it out whenever I click off the HTML form and it goes back to the WYSIWIG so it does not stay. 


I checked out the CSS Guidelines and I don’t see a way to do what I’m trying to do. Also, all the other posts out there don’t apply to NAC so I won’t bother posting them here as resources. 


Thanks in advance for any help you can provide! 

icon

Best answer by Deon 3 April 2024, 01:28

View original

7 replies

Userlevel 5
Badge +13

Hi @cwells 


I have also seen similar behaviour when it comes to controlling page breaks, I cannot say for sure but based on how I’ve observed the form rendering behaviour it seems that the way the form is rendered for runtime is not the same as that used for print media. 
 

this means a lot of the functions such as defining your own page breaks etc just don’t work. 
 

I think this might be related to the fact that NAC forms load dynamically and actually offload pages that are not in view, for typical use this has fantastic performance benefits and allows forms to be very complex and still performant if they are designed well but the downside is that kind of dynamic rendering is not friendly to print media as that must see everything. 
 

Again I am only stating what I have observed so perhaps someone else might advise more. 
 

the only approach I would advise might work well would be to make use of a plugin, if you are familiar with JS and web components they should be very easy to pick up and can be used to manually place a page break control, I would guess the print render has to react if it is a control as I think custom CSS is not always strongly applied for all rules. 
 

Jake

Badge +1

Thanks @Jake I appreciate the quick response, I’ll take a look at JS and see if anyone else has other ideas while I keep working on it! 

Userlevel 6
Badge +12

Another option is to use the document generation feature of Nintex Automation Cloud - that means you have full control on exactly what the printed output will look like.

Badge +1

Hey @Chris_Ben I am using the document generation object in my workflow, maybe I’m not doing it right? Can you provide some more details? Thanks!

Badge +8

Hello @cwells , I have found that injecting the page break css into a label as html does not work because the label is embedded in a div is embedded in a div is embedded in a div etc. 

And it won’t break a parent div, so I think the trick is to put the break in a first level div, which on a NAC Form is the rows.

So I have found that this can work if you can figure out on which row number you want the break, and then add custom CSS like this:


As Chris mentioned, depending on your use case, Doc Gen might work but that is happening disconnected from the User so you will need to upload/email the generated (filled) document to the user, it can’t be interactive like the user looking at the form and choosing print.

Userlevel 6
Badge +12

HI @cwells ,


There are two methods to “print a form”.  The first one would be the end user hitting the print button when the form is submitted.  As you’ve found out, you are limited in how much control you have over the output.


The second method is to take the data from that form submission (and possibly other places in the workflow) and populate a MS Office template with it.  That’s where the doc gen action would come in.  Here’s the help topic on doc gen which also includes a link to the Nintex University course which steps you through the process.  https://help.nintex.com/en-US/nwc/Content/Designer/Actions/GenerateDocument.htm

Badge +1

You are all so wonderful, thank you so much!

Reply