Nintex Community Menu Bar

Request Approval : Edit Task Form issue

  • February 18, 2016
  • 5 replies
  • 72 views

Forum|alt.badge.img+3

Hi All,

Can someone help me to fix the following issue that iam facing on Nintex Request Approval action ?

I created a new workflow where it generates checklist form and adds in share point list for the mangers approval. As part of this workflow i have added a Request approval action (as shown below) and customized the approval form using Edit Task Form --> Edit with Microsoft InfoPath 2010. it works fine on same sharepoint list where the workflow has been created.

But i get default form instead of my customized form when i tried to export the same workflow to other share point list and try to send checklist form for managers approval. Can someone guide em how can i fix this issue ? as i don't want to re-create the form each time i export the workflow. basically customization of this form takes 2 to 3 days to do.  I tried to save the template and import on new SharePoint list workflow but nothing seems to work fine.

177612_pastedImage_0.png

Thanks for the heads up on this issue..

5 replies

Forum|alt.badge.img+16
  • February 18, 2016

This worked for some people:

  1. Create an export for the workflow in dev.
  2. Go to [exportsite]/NintexWorkflows/[workflowname] and download the Infopath-form you modified
  3. Import the workflow in your new environment
  4. Go to [importsite]/NintexWorkflows/[workflowname] and delete the Infopath-form available there.
  5. Upload the form you exported in step 2.

Now the new form should show up when you use the flexitask.


Forum|alt.badge.img+3

Thanks Fernando.

But unfortunately we cannot import the info path form directly inside the workflow, Even i tried to open the form and publish to workflow but it doesn't allow me to change the publishing path.


Forum|alt.badge.img+3

Got the solution..

I think it might help someone to fix it as well. please see steps i have followed to fix this issue.

1. Get the backup of InfoPath form from the developed site

  • Open the Nintex workflow (where the info path form has been added).
  • For example, here I am taking "Request Approval action" inside the Nintex workflow where I have customized the form using info path form.
  • Save the customized form (added inside the Request approval action) to your local pc.

2. Import the InfoPath form (of Nintex workflow) to Live or other Site

  • You can deploy info path form (of Nintex workflow), only after importing & saving (or publishing) the Nintex workflow to the destination location.
  • Open the Nintex workflows collection location on the site, where you want to deploy your info path form. Eg : http://(Site Address)/NintexWorkflows/Forms/AllItems.aspx 
  • Open the Nintex Workflow folder. (you can see here each workflow holds separate folder with the same name as workflow name)

177743_pastedImage_1.png

You can enter the following values(for the above fields shown in image) based on your workflow and List
      Name --> Give  a relevant name to identify the form
      NWAssociatedWebID --> This ID is global & common to SharePoint 2010 & 2013. Enter the value “1d5afadd-d013-4d88-b3b2-38b570da9b6f
      NintexWorkflowID --> Open the “Site Actions (from the top menu ribbon)--> Site Settings --> Workflows gallery (under Nintex workflow section) --> Right click on workflow (where you have added the current form) --> Properties --> select all the text under General tab (as shown in below ) --> copy and paste on note pad --> extract workflow id (value after “WorkflowId” and before “&Category”. See example below marked in pink)”
      Eg: Preview.aspx?WorkflowId=2c684d6c-4a1b-4d8b-88db-1bc8ef02dd52&Category=List&ListId=1daf8978-b6a5-463d-9fb6-19a8b63bde8f

     AssociatedListID --> from the steps of NintexWorkflowID, you can get the list id as marked (in pink colour) in below example     

Eg: Preview.aspx?WorkflowId=2c684d6c-4a1b-4d8b-88db-1bc8ef02dd52&Category=List&ListId=1daf8978-b6a5-463d-9fb6-19a8b63bde8f

  • Now after entering all the values select " Check in --> Save "
  • Now under same url, select “Library (from the top menu ribbon) --> Open with Explorer”.
  • Here you can see the file name starting with “Request Approval_******** - Working” (which is default .xsn file). Now copy this name and keep on notepad rename this file with “default form”.
  • Now rename the uploaded .xsn file name to the copied name (“Request Approval_******** - Working” .xsn file name)
  • Now open the Workflow (where you want to customizer the form).
  • Select action “Request Approval --> Edit task Form --> Edit Task form With Info Path Form 2010”.
  • Now you will be able to see your customized form. If not you can go select "File --> Open --> Give the location (windows explorer path) of SharePoint where you have saved your InfoPath form --> open publish the form --> save & publish workflow".

Done. This is how you can deploy the customized form for Nintex workflow actions.


Forum|alt.badge.img+1

Hi,

I follow the steps given above, but i am getting error message as "no file" message when i click on edit task form with infopath. I am using SP 2013 and Nintex 2013. Can anyone provide me the solution to how to use customize infopath forms in Flexi Task or Request Approval Actions?


Forum|alt.badge.img
  • Nintex Partner
  • April 7, 2020

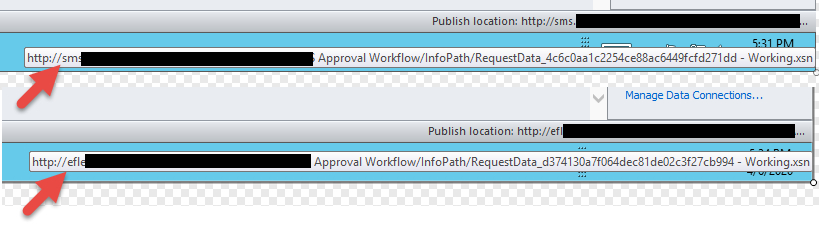
I've followed the instructions above and was able to access the updated form in my workflow, however when I try to publish it I get an error.  Looking at the form in InfoPath, I can see that the Publish location is still set to the original server where I copied the form from (current form vs. imported form):


7197iF0182C90F98BD3BD.png