


Credit where credit is due, this was inspired in part by Michael's post of similar nature using Nintex for Salesforce and Drawloop, find it here.
Introduction
Sometimes when creating a botflow in Nintex RPA, you might be required to interact with a website or application that isn’t ‘behaving’ as you might expect it to. Maybe the bullseye is pulling out too much when you drop it, or maybe it isn’t pulling out enough, or there is a list you need to iterate through but it isn’t contained in a table. There are all examples where using Excel as the middle-man can help out.
You might be questioning “Why use Excel? Why not Notepad or internal variables?”. The simple answer is that this is just the method I prefer. Nintex RPA has some really great interactions baked in that make working with Excel super easy. Sure you could use Notepad to accomplish the same goal, but then you’d be relegated to using directional arrow keystrokes to navigate around, Notepad’s find function, etc. It is 100% possible to do it this way, I just don’t find it as easy to do as using Excel.
This blog post will focus on the example of needing to iterate through a list that isn’t in a table. I plan to create a future post(s) based on the other examples listed above, and maybe others. This is based on a real customer scenario that I helped put together. The end goal for them was to be able to search cities in the US that meet a certain criteria, and catalog open housing in each. We’ll be focusing on the first half in this blog, finding those cities that match the criteria.
Figuring out when to use this method
We’ll first start by navigating to the site we want to work with. The user provided me with a site called “BestPlaces” that they use in the manual process, this site has all cites in the US and certain data points for each. The first step in the process is to search by state to pull up the list of cities. It is this search result page which is the “unfriendly” page that we will be using.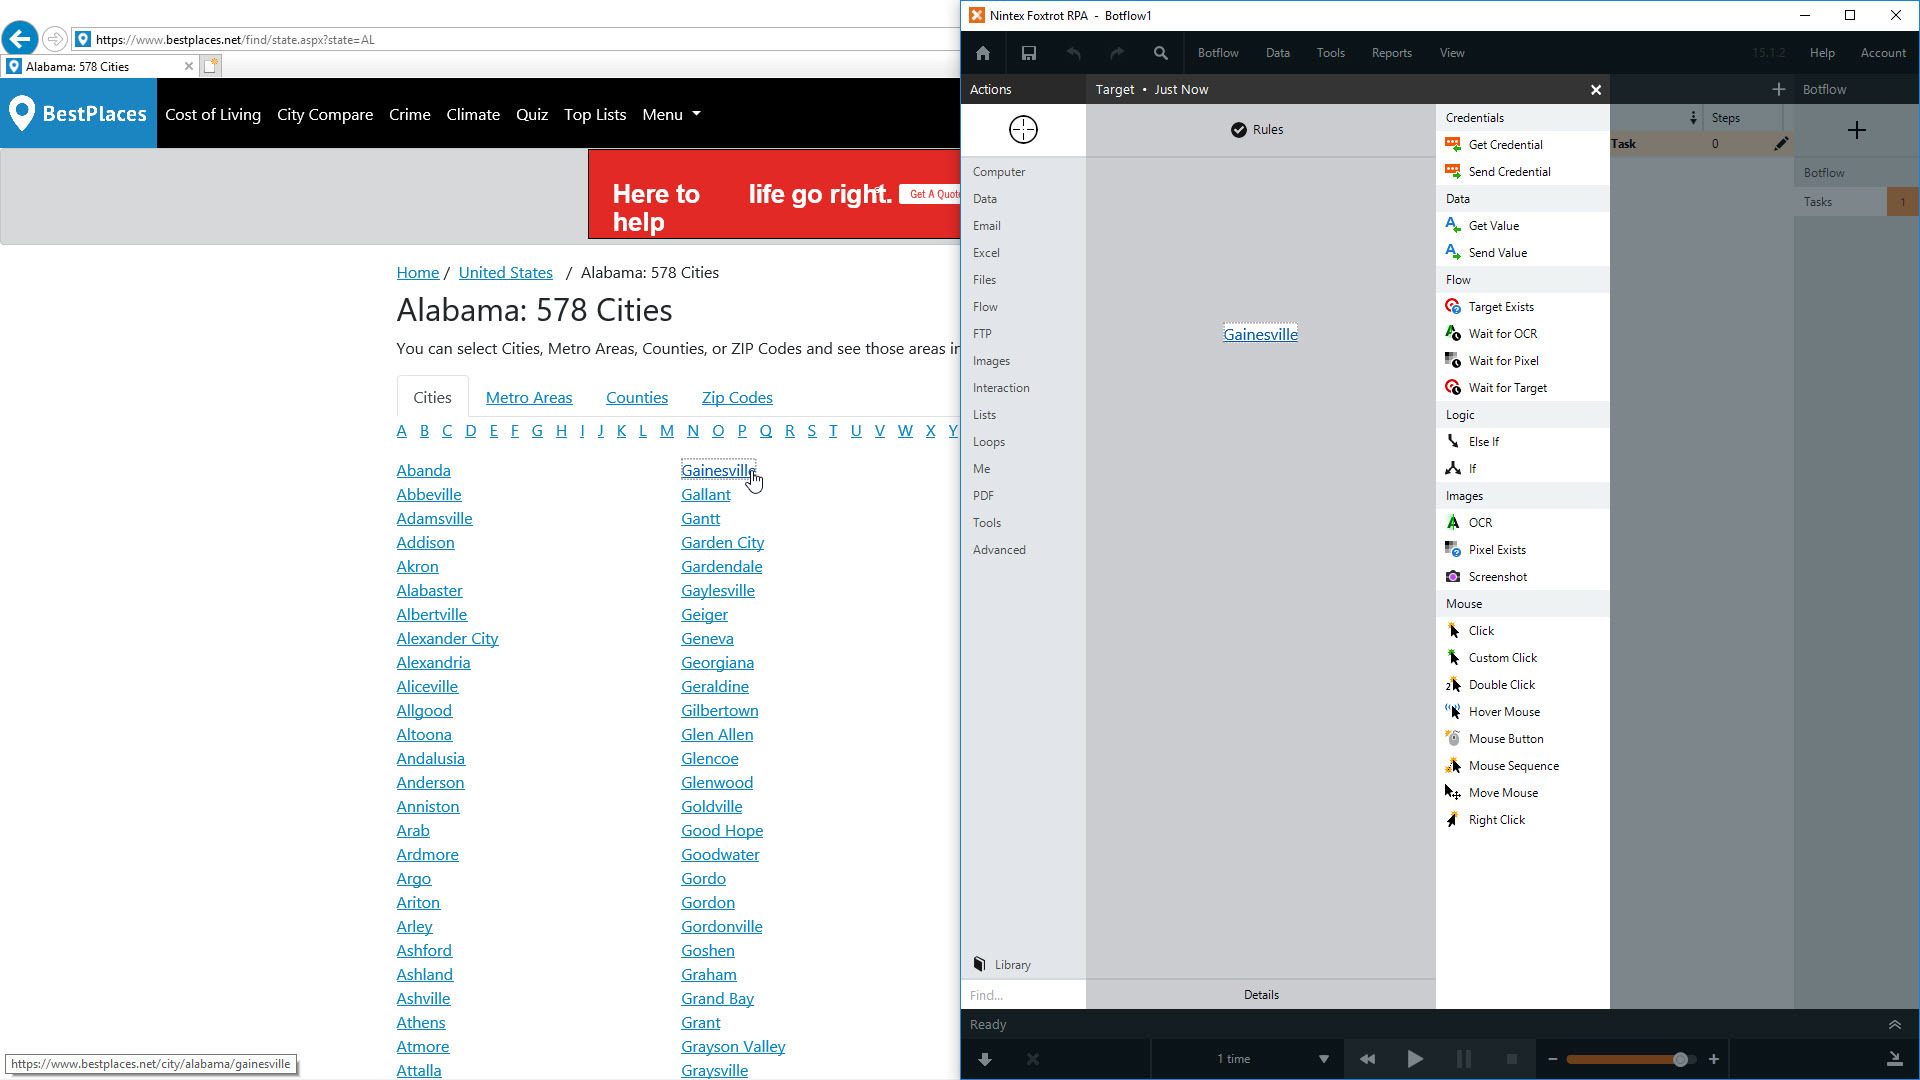 I call this page “unfriendly” because when I targeting something (for example, the city of Gainseville), all that is pulled out is that exact link I targeted. There is no table associated, this list actually is held in a <div> table instead of a <table> table. In order to use Nintex RPA’s highlighting tech, it has to be held within an actual web table.
The “How To”
The first thing that needs to be done is a quick Select All and Copy on the page. The best practice for sending keystrokes to a website is to target the full window of Internet Explorer, and use a Send Value action on “Mode: None” and “Speed: Very Slow”. You can use the Expression builder to input the keystrokes of “[^Ctrl+A][^Ctrl+C]”.
Now that the info is on our clipboard, we can take that and paste it somewhere. And you guessed right, it will be going into Excel. Add a quick “Create Workbook” action to the botflow and let it run. Then target the full Excel window which is easily accessed from the “Targets” banner when hovering the bullseye over Excel.
And again using a Send Value action on “Mode: None” and “Speed: Very Slow” to send a “[^Ctrl+V]”. It will take a little bit of time for the clipboard to paste into Excel, but once it does you should notice that it needs a little bit of clean up. Lots of images, some ugly text, that kind of stuff all came over. This may not be the case for every time you use this technique, it all depends on how the target application is setup and what is copied over.
The Cleaning
This section is going to vary wildly depending on the contents of what was pasted. In my case, there are some pictures that need to be removed and some extra stuff that I don’t need. Remember, I only need a full list of the cities from my page, nothing else.
I’ll talk specifically about removing images since I feel this will come up frequently. The best way to do this that I have found is to use Excel’s “Go To Special” functionality. You can pull this menu up with ‘F5’ and then choose the “Special…” button, or press ‘Alt+S’. With Nintex RPA, you would follow the same steps as pasting, except using these keystrokes instead.
From the “Go to Special” window, the next choice would be to choose “Objects” (or simply pressing ‘B’) and then click “OK” (or press ‘Enter’). Again this is similar to all the other keystrokes up to this point. Target the “Go to Special” window, setup your Send Value action on “None” & “Very Slow” with the appropriate keystrokes in the “Value” field. Once the OK button is pressed, this will select all the images in the current Sheet, and after that it is just a matter of pressing ‘Delete’.
Now that the images are removed is the tricky part. At this point, it is all about finding a replicable pattern. In my case, I figured out the list of cities will always have the alphabet spelled out the row before the cities start, and some marketing text in the row below the end of the list. It is just a matter of digging in a little bit, investigating 2-3 other records/cases and finding commonality between them all to work from.
Once you’ve figured out a pattern for the data you’re needing to extract, it is just a matter of putting together the steps to clean up and extract it. In my case, I just need the list to be cleaned up so I use a series of “Search Cells”, “Get Info” and “Delete Row” actions to remove everything I don’t need. See the video for the rest of my build out.
Conclusion
And there we have it. A nice clean list for me to work through for the next phase of my project. As mentioned above, there were some other challenges to overcome on this one that I may write about in the future, so keep a look out for those.
Any questions, comments or concerns feel free to leave a comment below :) If you enjoyed this, make sure to drop some Kudos and share with your friends! Thanks.
-John