

As the Product team continues its acceleration on updates to Nintex Workflow Cloud, the magnitude of these releases has been amplified. This post may seem like an aftershock to the announcement last month around the Advanced Preview of Complex Object support in Nintex Xtensions, but don't fault me on the timing. I cant stress enough how excited I am about this new groundbreaking feature!
Ok, you're probably wondering what's with all the puns, and if you weren't before, now it's probably shaking out. Complex Object support has been on the minds of most users building Xtensions since we released the Nintex Xtensions framework several years ago. With this 'earth shaking' release, and my love for puns, what better way to celebrate than building an Xtension with Seismic (API for reference). If you are just here for the Seismic Xtension, you can download it from the Nintex Process Accelerator Gallery, and if you'd rather just watch me walk through this configuration, please check out the video below:
With that out of the way, I'll cover some examples of how this will look in the workflow and in the swagger definition. If you're looking for more information on this functionality, the Nintex help files have a great write-up that provides some additional context and specific steps for configuring. For simplicity's sake, I'll be showing screenshots of the YAML for the definition using Swagger Editor (a great tool for building Xtensions if you haven't used it before).
Configuration:
The Basics
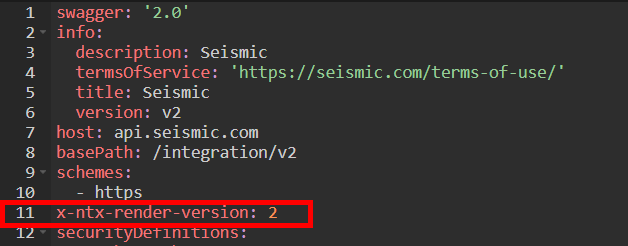
The first step is to start defining out your API with the basics (basepath, host, security, etc.). You may have seen other examples in the Nintex Process Accelerator Gallery or one of my other blog posts so I'm not going to delve into the basics here. One new piece to the configuration that will enable the new functionality I'll be describing below is adding the render version at the root of your Xtension. The x-ntx-render-version shown in the example below will enable this new functionality / user interface:
Inputs
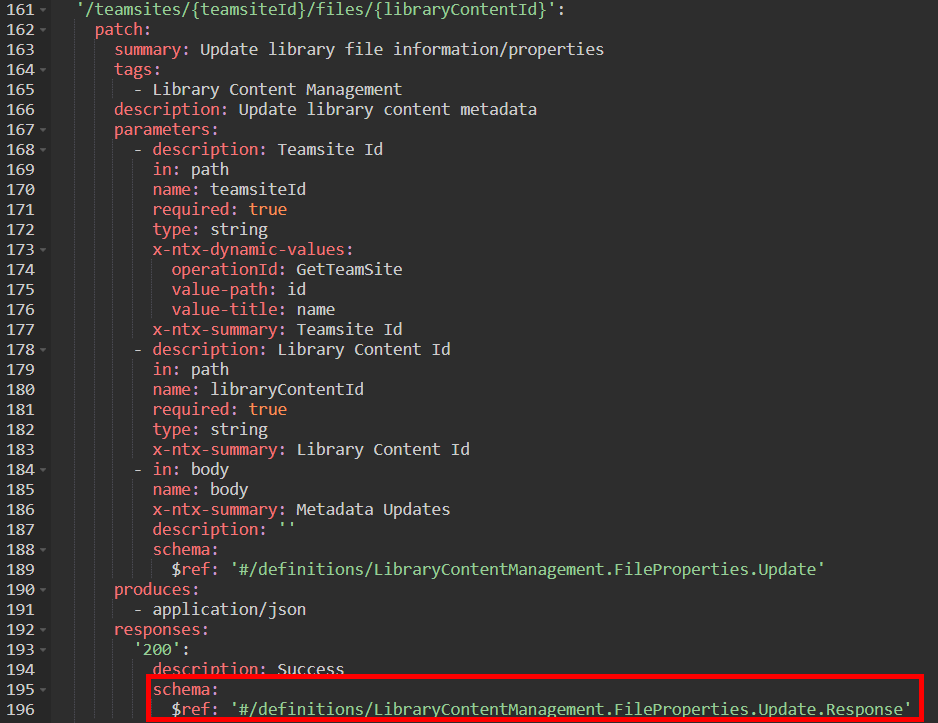
Once you have the basics covered, it's time to start defining out your paths and methods. In this first example I'll be showing how it looks to configure input parameters using Complex Objects. For this specific method in the Seismic API, we are updating the properties of a file. This requires that we provide a grouping (array) of metadata properties (objects) in the body of the request. In the previous iteration of Nintex Xtensions, this would require some sort of middleware like an Azure function to flatten out the structure and provide the inputs. Fortunately, we can do all of this within the designer swagger definition now!
Within this Xtension I am using a definition to make things cleaner and to be able to reuse common property definitions throughout my other actions. The configuration will look something like below (again this is in YAML as opposed to JSON):
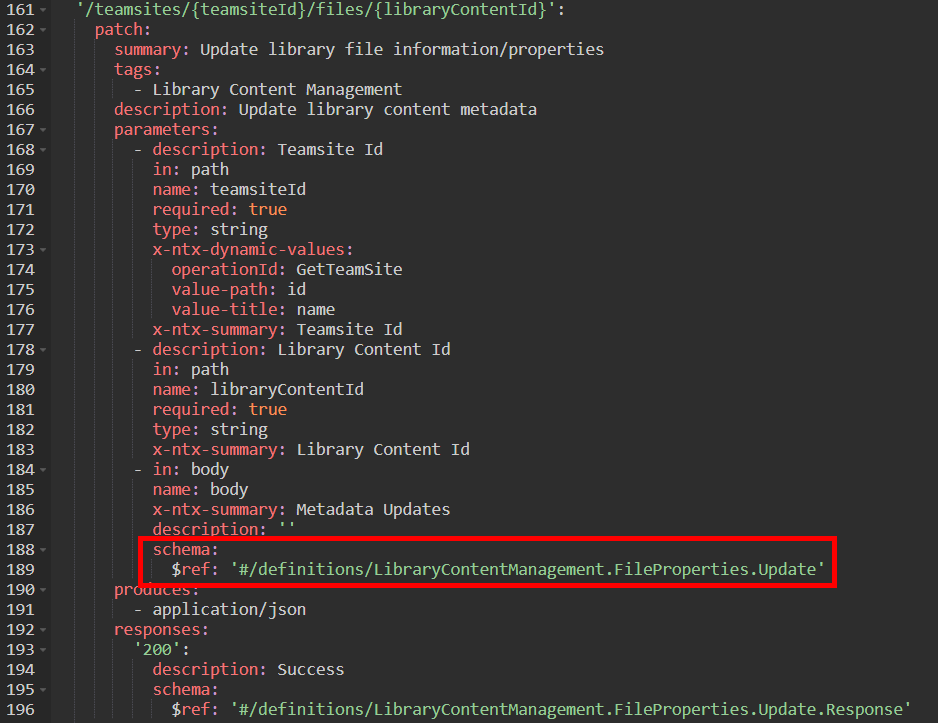
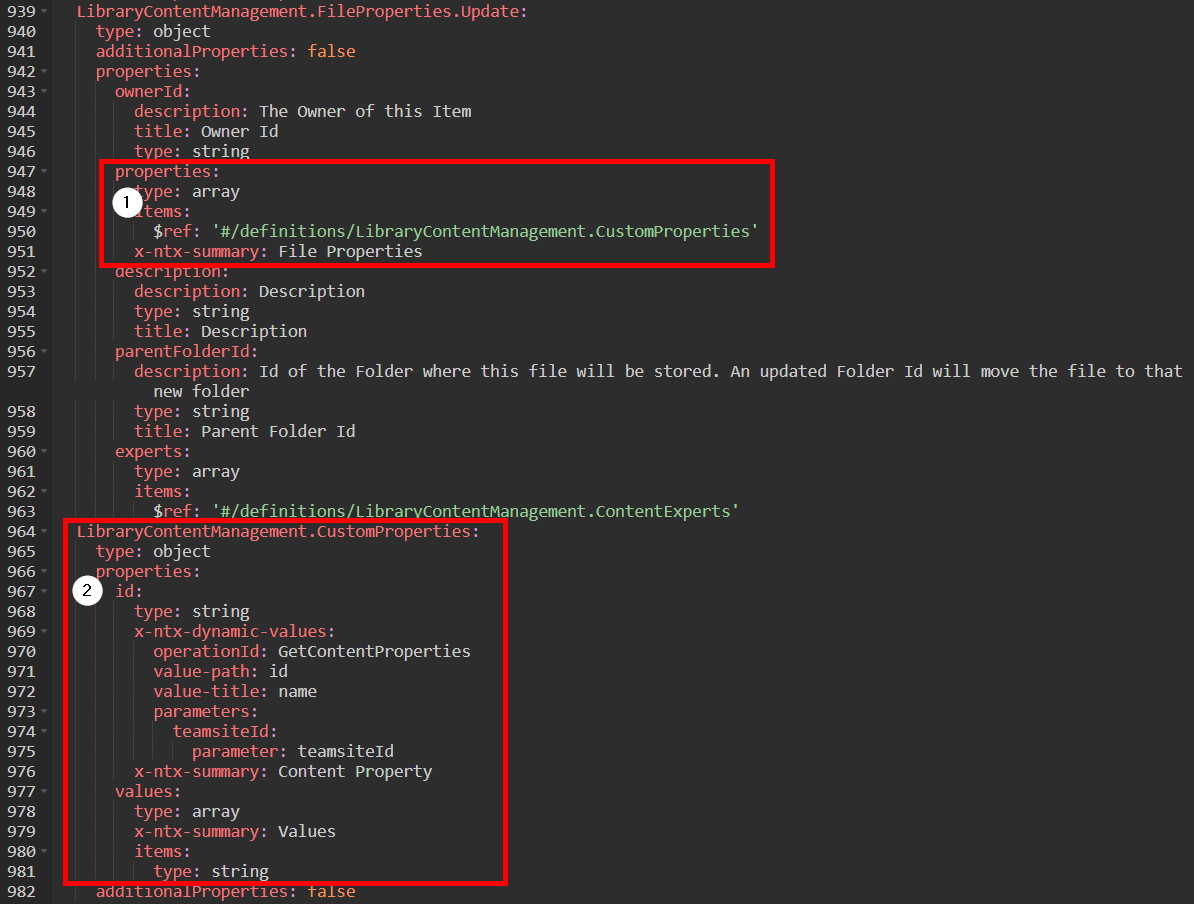
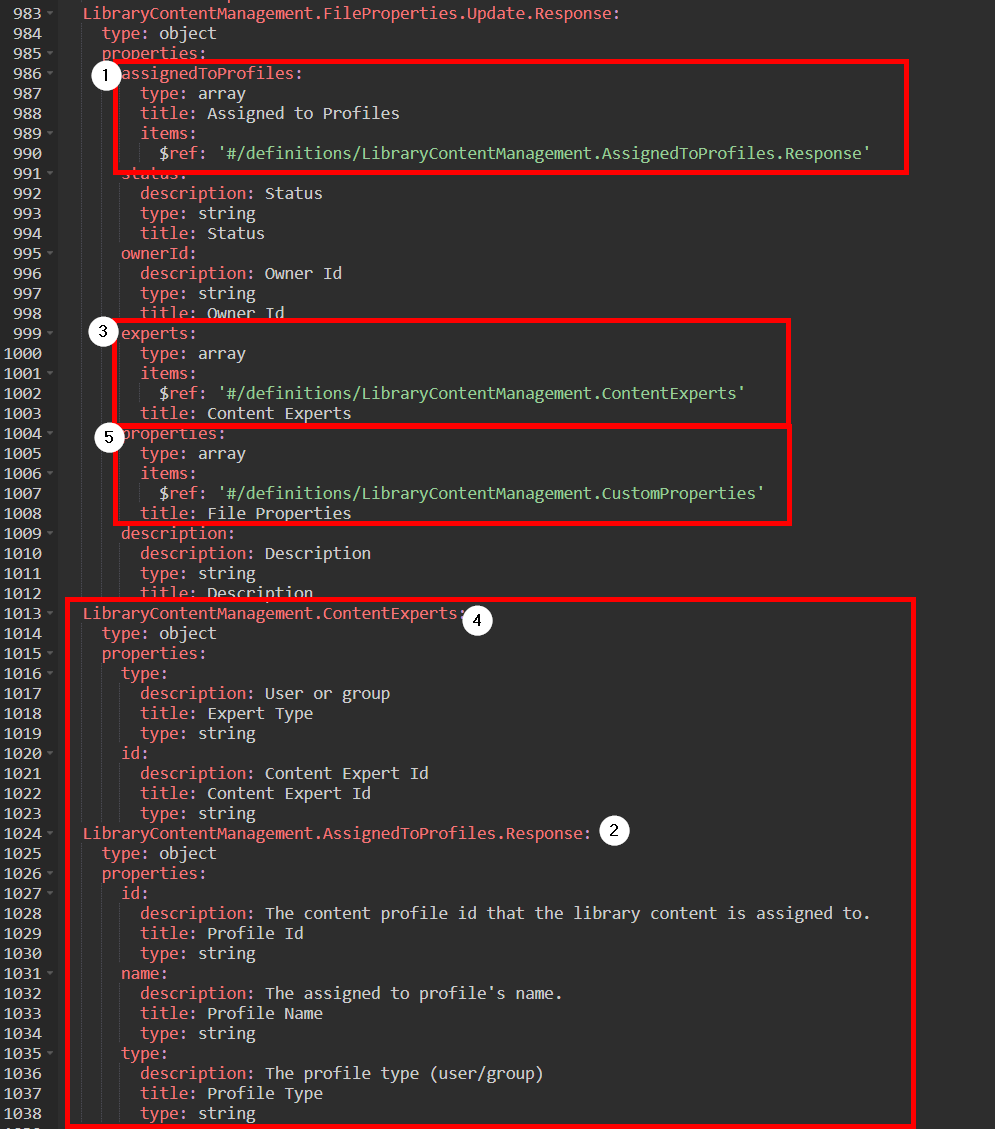
As you can see we've defined out the grouping (array) of custom properties (objects) within the definition.
Outputs
Similar to the input, the Seismic API will rely on complex objects for the output of this request. It will provide us with some flat fields along with arrays of properties that are associated with this file. There were be a few additional fields we want defined that will be output when we provide the file update including the assigned to user. What's nice with defining the outputs in this manner is we can configure as much or as little information as we want coming from the API when each of these actions are used.
As was the case in the input parameters, I am using definitions in the output parameter so I can reuse common properties within the Xtension. In this case I am reusing the 'CustomProperties' and the 'ContentExperts' properties that are also in use in the inputs.
Again, with this example the outputs include complex objects and we'll want to surface this information in our workflow somehow.
User Experience
Once the Xtension configuration has been completed, you can export as JSON and upload into Nintex Xtensions. Now for the fun part. How does this all look within Nintex Workflow Cloud?
Action Inputs
For the inputs, the object renderer provides a very simple user interface to configure the actions. It will provide the items outside of the array as standard fields, and it will provide the option to expand out the array to add the different properties within the object. What's nice here, is that we can add multiple items to the configuration to allow for adding different properties (as is the case within Seismic).
Below you'll see the example we built out and how it looks in the designer.
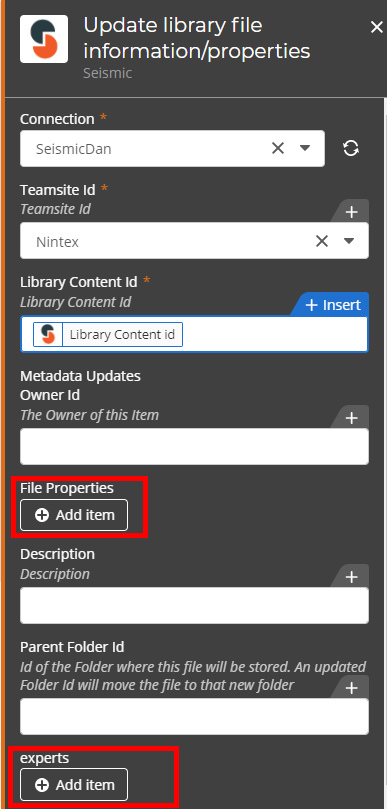
Note that the Array's are now prompting to 'Add Item' allowing us to add the object we defined. Once you click there, you'll see the first level of the 'CustomProperties' object we defined including the name of the category (Content property) we're adding fields from.
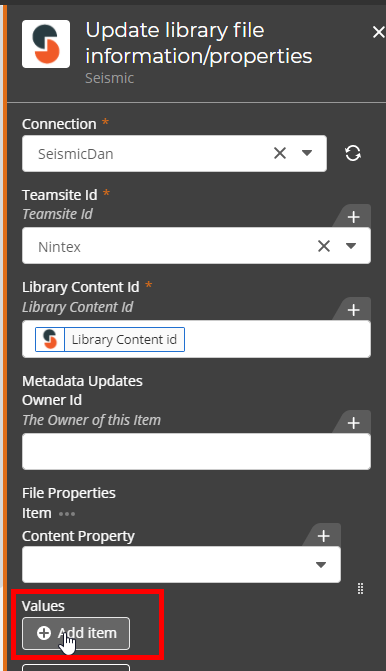 Here you can see the "Content Property" is now a field for us to choose and the array of values are now available to click 'Add Item'
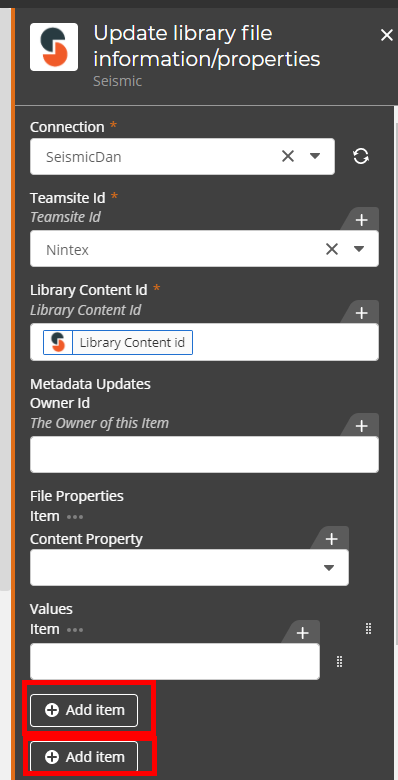
Lastly, you can see that we have two add Item buttons once we click for the 'Values'. This allows us to add values in for that specific Item with the first button, or add another Content Property object with the second. This helps us to clearly define out the action in the workflow and provide the ability to add multiple properties within the workflow.
Action Outputs
Once the inputs are completed, the next thing we want to do is use the output data within the workflow. We've designed the Xtension to give us a variety of data points, but how do we access it?
First, you will configure the output result to use a variable. What you will notice here if you've built workflows in Nintex Workflow Cloud in the past is that there is now only one result that needs to be configured, and the variable type will be object. What's nice here is that everything is now going to be stored into an object as opposed to configuring a variable for each individual property within the Xtension.
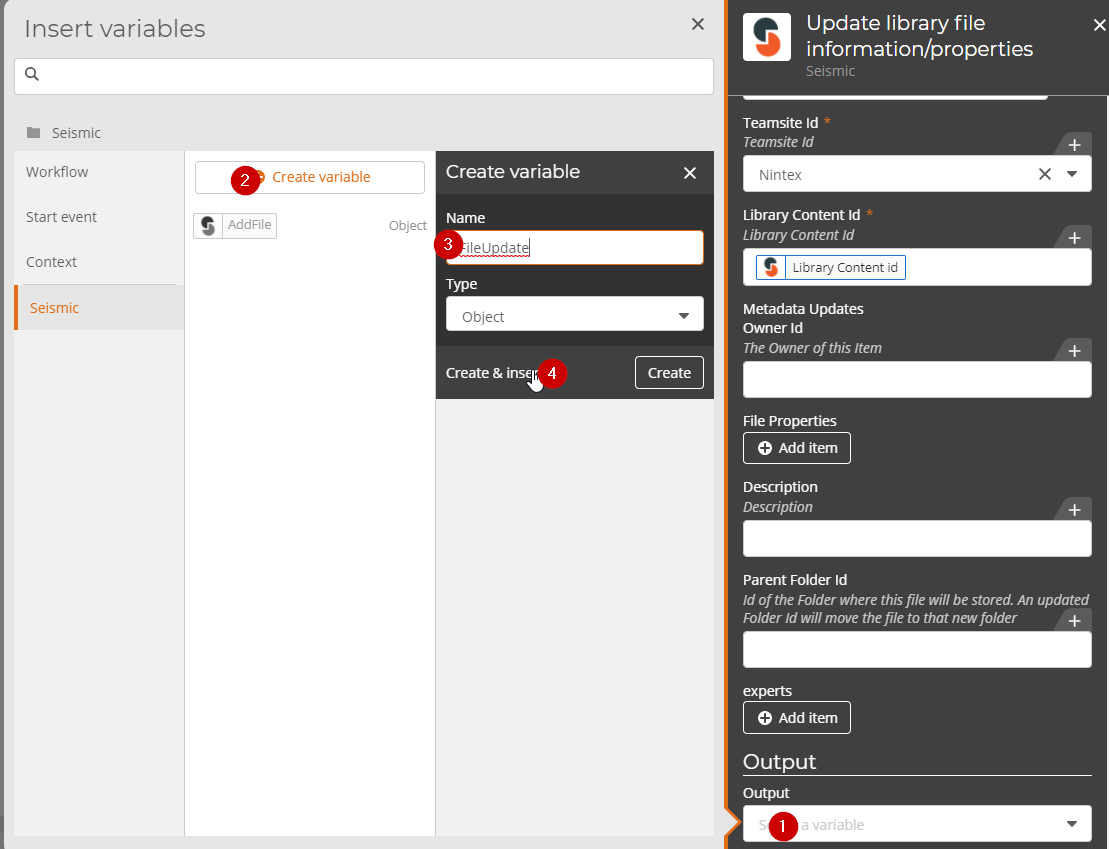
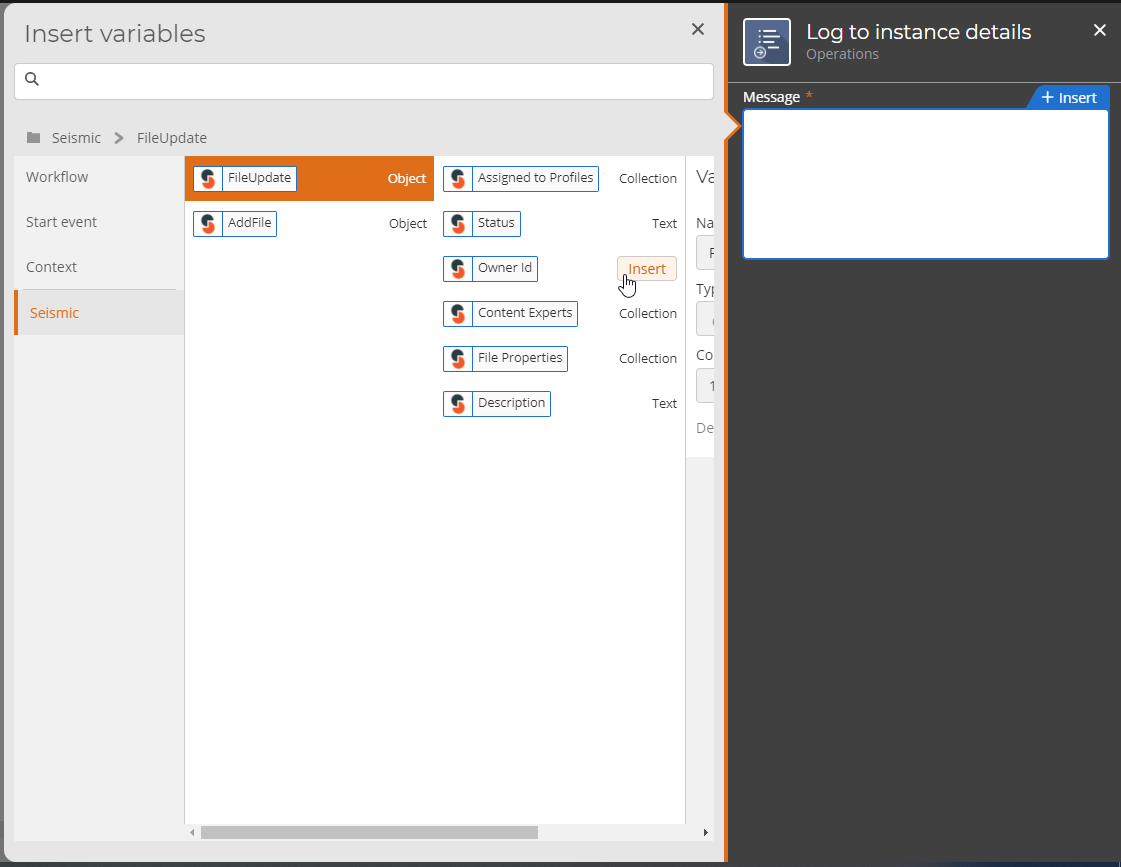
Once that object is added, you now can use any of the results throughout your workflow. There are a few minor differences to how variables worked previously, in that, 1) your objects will be grouped under a heading around your connector (see 'Seismic' in the screenshot below), and 2) you will now navigate through the object to determine which variable to use.
Thanks for reading! If you have any questions please feel free to comment below.

