Dynamically Grow Panel Size based on content

  • 2 July 2021
  • 1 reply
  • 294 views

Badge +3

This question is specific to Nintex Workflow for SharePoint 2013.  


I have created a JavaScript solution that will display and allow document attachments into a document library folder, related to the List Item.  The requirement is that the main List Item form and associated Task forms contain areas to upload documents and then having the ability to display those documents on other task forms etc.  


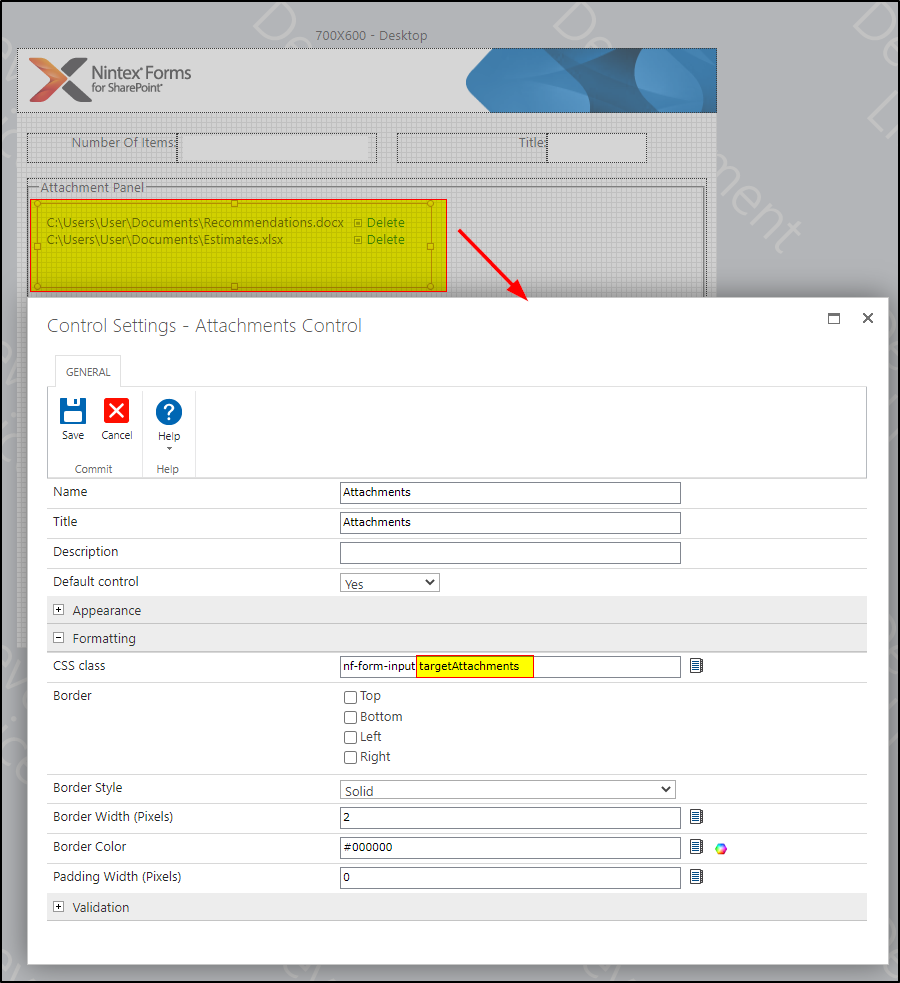
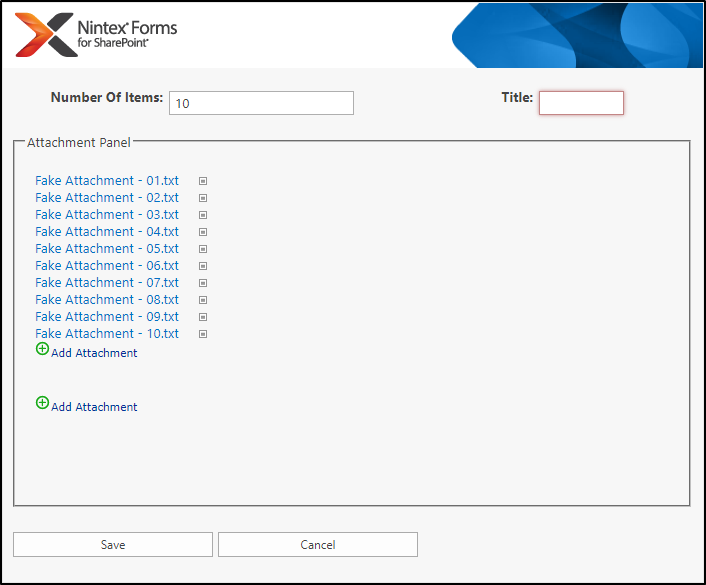
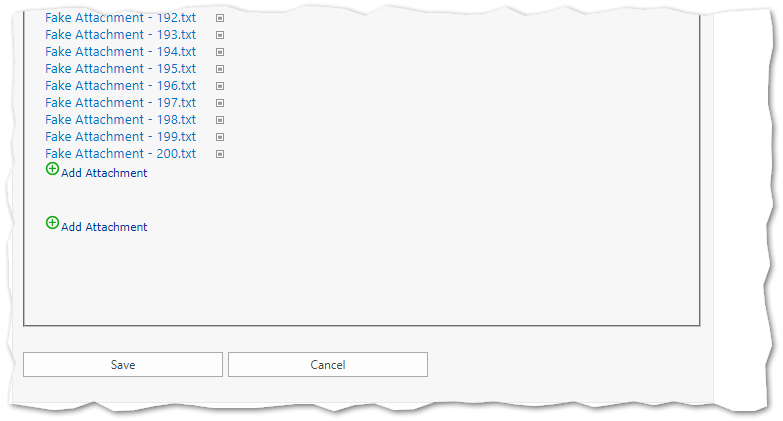
My solution works except if there are a number of attachments.  My solution uses Panels on a form with custom CSS class names.  My JavaScript code iterates through the form looking for the attachment classes and replacing the content of a Panel with my custom Attachment forms.  


I display these attachments as unordered list items for each section of the form where the attachments are located.  I have attempted to utilize the NWF.FormFiller.Functions.ProcessFillerControl procedure to resize the panels but that doesn't work.  I am assuming the reason it isn't working is that the contents of the FieldSet have been replaced with my own DIVs.  If I try to increase sizes of the Parent DIVs, changes to the CSS does not have any affect.  


Does anyone know how to dynamically resize panels based on the size of the containing content?

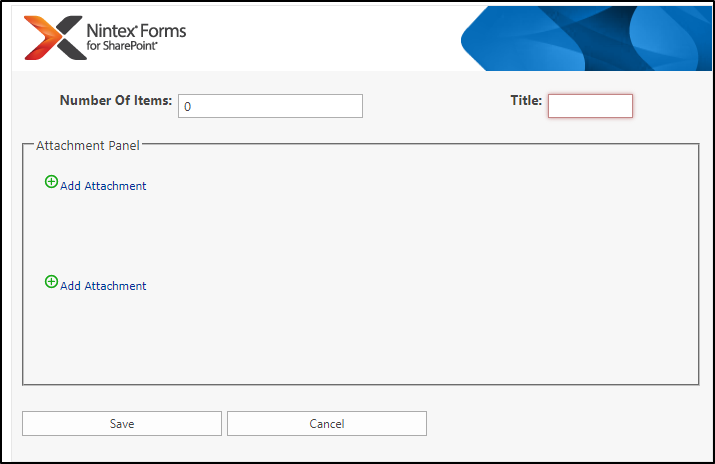
The attached screen capture is a test form to test the solution.  The section of the form that says ID is: 1 is actually a different control.  The add attachment button is behind the Label control so I can't press the button anymore.  If I could resize the panel, the ID is: 1 label would be below the Attachment button.


1 reply

Userlevel 5
Badge +14

You can indeed make the Panel and Form Canvas grow to fit any custom items you've added to an Attachment Control. 

It'll take a little explaining, but I'm confident we can arrive at a solution. 


(Note: This solution uses things like Form Events (see my blog post here: The Big Event), and assumes that you have some proficiency at javascript. That said, I have commented the code to be as clear as possible)

Here is a test form:


As you can see it contains some basic Inputs, a Panel, and inside of that panel, two Attachment Controls. The Attachment Control I'll be populating with fake links has a css class on it called "targetAttachments": 


To simulate the creation of self generated links in the Attachment Control, I created a formatting rule for the "Number of Items" control that will populate one of the Attachment Controls with a number of fake links equal to the value I type into the "Number of Items" input field. 


For completion's sake, here is the Rule: 


(function(formControlCall) {
/*
This rule should only run once the 'RegisterAfterReady' Form Event has ran
*/

if (pageIsReady) {

/* get the control the rule is running on */
var formControlID = formControlCall.split("'")[1] || "";
var targetControl = sourceContext.find("[formcontrolid='" + formControlID + "'].nf-filler-control");
var targetInput = targetControl.find("[formcontrolid='" + formControlID + "'].nf-associated-control");
/* get the current value */
var controlValue = parseInt(targetInput.val(), 10);
/* make sure it's an actual number! */
var validNumber = !Number.isNaN(controlValue) && controlValue >= 0;

/* if it IS a number... */
if (validNumber) {

/* run our custom function that makes our fake rows */
makeRows(NWF$(".targetAttachments"), controlValue);
} else {

/* if it is NOT a number, change it to 0, and run this rule again */
targetInput.val("0").trigger("blur");
}
}
return false;
}("{Control:Self}"));


As you can see from the comments this is rather simple and straight forward. It gets the control that the rule is running on, gets its value, tests to make sure that the value is a number, and if it is then it sends that value to a custom function that will actually make the rows. If it isn't a valid number, then it sets the control to 0, and the rule is executed again.


Here's what it looks like with 0 created links:


10 fake links: 


200 fake links (truncated): 


Before I get into the rest of the JavaScript, let me take some time to explain how an attachment control is populated. 


As the form loads, it reaches a point where all of the custom code has been loaded, and the controls as you have placed them in the Designer View, are brought into the form and placed in those locations and at their initial size. In the case of the Attachment Control, even if you've actually attached something to them, none of the links for those attachments have been generated yet.


Once they have, the Attachment Control's size will be reevaluated, and will update along with any other form controls that need to be updated / resized in response to this change.


To resize the control manually and correctly we need to know: 


  1. The size of the Attachment Control's internal Height at the time of its initialization

  2. The size of the Attachment Control's internal Height after it has been populated with *regular* attachments


Once we know those two key bits of info, we can use them to make sure that the Control is resized once its contents grow beyond the scope of that default height (point 1), and know how much to resize the Control by taking a new measurement at the time of when we want to resize it, comparing it against the last known good size (point 2).


To get the initialized default minimum height, we can check the control during the 'RegisterBeforeReady' Form Event stage: 


NWF.FormFiller.Events.RegisterBeforeReady(function(){
/*
For each Attachment Control...
*/
NWF$(".nf-attachment-control").each(function(index, attachmentControl){
attachmentControl = NWF$(attachmentControl);

/* Set the property "minInternalHeight" on the data object to the current internal height */
attachmentControl.data("minInternalHeight", attachmentControl.find(".nf-filler-control-inner").outerHeight());
});
});


In the above code, I'm saving that value to the jQuery data object in a property called "minInternalHeight". 

To get the second height we need, we just need to wait until the 'RegisterBeforeFillerVisible' Form Event, as by that point, any default links of actual attachments that would normally be present have been populated by the Form. 


This will be more apparent in the full JavaScript, but I thought some additional explanation would help provide context. 


With that out of the way, let's look at the full JS: 


/* gets set to true once the form has completely finished its background stuff */
var pageIsReady = false;

/*
this will normalize access to the internal function that Nintex Forms relies on to resize
and reposition controls and the form canvas. Because a few functions moved around once they
created the Responsive Forms update, this should cover versions before and after said update
*/
var normalizedRepositionAndResize =
(
NWF.FormFiller.Functions.RepositionAndResizeOtherControlsAndFillerContainerHeight ||
NWF.FormFiller.Resize.RepositionAndResizeOtherControlsAndFillerContainerHeight
);

/*
The custom function I'm using to generate my fake Attachment rows.
Though this is not particularly important in this instance as you have your own
code which generates your own links, feel free to explore it to see if there
is anything worth while.
*/
var makeRows = function(attachmentControl, rows){
/* Create a string of "0"s the same length as the string of the rows value */
var rowNumberPlacesPadding = rows.toString().split("").map(function(){return "0"}).join("");

/* reference to the attachmentControl's table of links */
var rowTable = attachmentControl.find(".nf-attachmentsTable");

/* reference to the <tbody/> of said table */
var tBody = rowTable.find("tbody");

/*
Standard Attachment link row html with some modifications to remove the 'Delete' button,
and to add a class that makes it easy to differentiate between a Form generated link
(like for an existing actual attachment), and the ones I'm making myself.

As you can see I have broken them up between the "Start" and the "End" which allows
me to insert a generated "File Name" between the two. When once concatenated, it creates
a single table row that represents a link
*/
var rowHTMLStart = "<tr class='fakeRow'><td class='ms-vb'><a href='#'>";
var rowHTMLEnd = "</a><img src='/_layouts/15/NintexForms/images/spacer.gif' alt='Delete' width='10'></td><td class='propertysheet'><img src='/_layouts/15/NintexForms/images/spacer.gif' alt='Delete' width='10'><img src='/_layouts/15/NintexForms/images/rect.gif' width='8'></td></tr>";

/* An array used to collect all of the generated link table rows */
var rowArray = [];

/* Loop starting point */
var i = 1;

/* If the Attachment Control has never been populated with links,
then it will have no <tbody> element. Make one! */
if (tBody.length < 1) {
rowTable.html("<tbody/>");
tBody = rowTable.find("tbody");
}

/* Destroy any previously made fake Rows */
tBody.find(".fakeRow").remove();

/* If we need to make new rows... */
if (rows > 0) {

/* create a new row and push it into the rowArray array */
for (i; i <= rows; i += 1) {
rowArray.push(rowHTMLStart + "Fake Attachment - " + (function(i){return rowNumberPlacesPadding.slice(0, rowNumberPlacesPadding.length - i.toString().length)}(i)) + i.toString() + ".txt" + rowHTMLEnd);
}

/* take that array of text, join them, and append them to the tbody */
tBody.append(rowArray.join(""));
}

/* Calls my custom function to Resize and Reposition all surrounding Controls and Containers */
resizeAttachmentControlAndContainer(attachmentControl);
};


/* This function will accept an Attachment Control that needs to be resized, and will
resize it, reposition sibling controls, and resize any containing controls */
var resizeAttachmentControlAndContainer = function(attachmentControl){

/* get the min height of the Control's Inner Filler */
var minInternalHeight = attachmentControl.data("minInternalHeight");

/* get the old height of the Inner Filler as set before we added our custom Links */
var oldInternalHeight = attachmentControl.data("currentInternalHeight");

/* get the Current Height of the <div> containing the table holding the links */
var attachmentRowHeight = attachmentControl.find(".nf-attachmentsRow").outerHeight();

/* set the currentHeight to whichever value is larger between the attachmentRowHeight and minInternalHeight */
var currentHeight = ((attachmentRowHeight > minInternalHeight) ? attachmentRowHeight : minInternalHeight);

/* set the difference in height between what the old height was, and what it is now */
var heightDiff = currentHeight - oldInternalHeight;

/* use our 'pointer' function to the built in Nintex repositioning and resizing function to pass
the necessary information so that it can do its thing */
normalizedRepositionAndResize(attachmentControl, heightDiff, heightDiff, NWF$("#formFillerDiv"));

/* update the Inner Filler's height to be that of our current height */
attachmentControl.find(".nf-filler-control-inner").outerHeight(currentHeight, true);

/* update the currentInternalHeight property of the jQuery data Object */
attachmentControl.data("currentInternalHeight", currentHeight);
};

/*
We need to setup a few things on our Attachment Controls before ANYTHING happens to them
including any custom code you may have that populates the Attachemnt Links!
Because the RegisterBeforeReady Form Event fires well before anything else (but after all
custom JavaScript has been loaded) we can use it to get the default internal heights of
each Attachment Control and save that data to the jquery.data() object.

The reason we need to do this is because an Attachment Control doesn't actually need to
resize anything around it until the <div> containing the <table> has reached a point where
it surpasses these minimal values. And because these minimum values are best gotten now,
this is the best place to do it.
*/
NWF.FormFiller.Events.RegisterBeforeReady(function(){
/*
For each Attachment Control...
*/
NWF$(".nf-attachment-control").each(function(index, attachmentControl){
attachmentControl = NWF$(attachmentControl);

/* Set the property "minInternalHeight" on the data object to the current internal height */
attachmentControl.data("minInternalHeight", attachmentControl.find(".nf-filler-control-inner").outerHeight());
});
});


/*
By the time we reach the 'RegisterBeforeFillerVisible' Form Event, any 'natural' Attachment
links have been placed into the Attachment's table. It is at this point that we want to figure
out what the height of the control is so that we can use that as a reference for when we
change that height with our custom code to insert our custom links...
*/
NWF.FormFiller.Events.RegisterBeforeFillerVisible(function(){

try {

/*
...However, before we do that, we need to have Nintex remove any orphaned attachment links. An
Orphaned Link seems to be a bit of placeholder that gets left behind when you have
native / natural Attachments present. Running the internal ProcessOrphanedAttachments function
does all of the work to remove any unwanted table rows, and puts the Attachment Controls in
a state that we know is 'good'.
*/
NWF.FormFiller.Attachments.ProcessOrphanedAttachments();

/*
Now that we've ran that function, let's set a property called 'currentInternalHeight'
on the jquery data object of each Attachment Control
*/
NWF$(".nf-attachment-control").each(function(index, attachmentControl){
attachmentControl = NWF$(attachmentControl);
attachmentControl.data("currentInternalHeight", attachmentControl.find(".nf-filler-control-inner").outerHeight());
});

/* <START> THIS IS WHERE YOU WILL GENERATE YOUR CUSTOM ROWS <START> */

/*
The code immediately below this is just code that I'm using that looks
at the value of my Number Of Items control and inovkes my 'makeRows' function
so that it pre-generates those fake Attachment links before the form is visible.

You'll likely replace this with your own code!
*/

/* get the rows from the Number Of Items control's value */
var rows = NCU.FormFunctions.getControlValueByName("Control_NumberOfItems");

/* If it's actually a number, send it to the makeRows function */
if (typeof rows === "number" && !Number.isNaN(rows)) {
makeRows(NWF$(NWF$(".nf-attachment-control")[0]), rows);
}

/* <END> THIS IS WHERE YOU WILL GENERATE YOUR CUSTOM ROWS <END> */

/* your custom code should now be executed and nothing should go below this line */

} catch (e) {
console.log("An error was encountered while trying to use the ProcessOrphanedAttachments function");
console.log(e.toString());
}
});


/* Lastly, once the Form has been loaded, we set the value of 'pageIsReady' to true */
NWF.FormFiller.Events.RegisterAfterReady(function(){
pageIsReady = true;
});


As you can see, it's a lot, but the main portions you will likely take away from this are:


NWF.FormFiller.Events.RegisterBeforeReady(function(){
/*
For each Attachment Control...
*/
NWF$(".nf-attachment-control").each(function(index, attachmentControl){
attachmentControl = NWF$(attachmentControl);

/* Set the property "minInternalHeight" on the data object to the current internal height */
attachmentControl.data("minInternalHeight", attachmentControl.find(".nf-filler-control-inner").outerHeight());
});
});

NWF.FormFiller.Events.RegisterBeforeFillerVisible(function(){

try {

NWF.FormFiller.Attachments.ProcessOrphanedAttachments();

NWF$(".nf-attachment-control").each(function(index, attachmentControl){
attachmentControl = NWF$(attachmentControl);
attachmentControl.data("currentInternalHeight", attachmentControl.find(".nf-filler-control-inner").outerHeight());
});

/* <START> THIS IS WHERE YOU WILL GENERATE YOUR CUSTOM ROWS <START> */

/* Set your links up and then pass AttachmentControl to the resizing function */

/* resizeAttachmentControlAndContainer(yourAttachmentControlHere); */

/* <END> THIS IS WHERE YOU WILL GENERATE YOUR CUSTOM ROWS <END> */

} catch (e) {
console.log("An error was encountered while trying to use the ProcessOrphanedAttachments function");
console.log(e.toString());
}
});

var normalizedRepositionAndResize =
(
NWF.FormFiller.Functions.RepositionAndResizeOtherControlsAndFillerContainerHeight ||
NWF.FormFiller.Resize.RepositionAndResizeOtherControlsAndFillerContainerHeight
);

var resizeAttachmentControlAndContainer = function(attachmentControl){

var minInternalHeight = attachmentControl.data("minInternalHeight");
var oldInternalHeight = attachmentControl.data("currentInternalHeight");
var attachmentRowHeight = attachmentControl.find(".nf-attachmentsRow").outerHeight();
var currentHeight = ((attachmentRowHeight > minInternalHeight) ? attachmentRowHeight : minInternalHeight);
var heightDiff = currentHeight - oldInternalHeight;

normalizedRepositionAndResize(attachmentControl, heightDiff, heightDiff, NWF$("#formFillerDiv"));

attachmentControl.find(".nf-filler-control-inner").outerHeight(currentHeight, true);
attachmentControl.data("currentInternalHeight", currentHeight);
};


With everything provided, you should be able to feel your way through some of it, but do not be too worried if you get lost because this is not obvious stuff at all. Post back where with any questions you have or help that you need to implement this if you get stuck and we can work through it. 

I hope this helps!

Reply