

Integrating K2 with Microsoft Teams
KB003316
PRODUCT
Introduction
You can use the Microsoft Graph API in conjunction with the K2 REST Service Type to integrate K2 with Microsoft Teams. Once you have integrated K2 with Teams, you can perform actions such as reading team information, managing teams, retrieving user information, and more.
Also, if you are new to Azure, you can learn more about Microsoft Azure and obtain a demo account at https://azure.microsoft.com/en-us/
Getting Started
Before you begin, you will need the following:
- K2 Administrative account for access to the K2 Management site
- Microsoft Azure Subscription
- Azure Administrative account for access to the Azure management portal
- Configured instance of Azure Active Directory (AAD)
Authentication
Communicating with the Graph API uses OAuth as the authentication method. This requires you to set up an app in Azure Active Directory to allow your K2 environment to authenticate.
Configure Azure Active Directory for OAuth
- Add a new app registration for use with K2 for Microsoft Teams
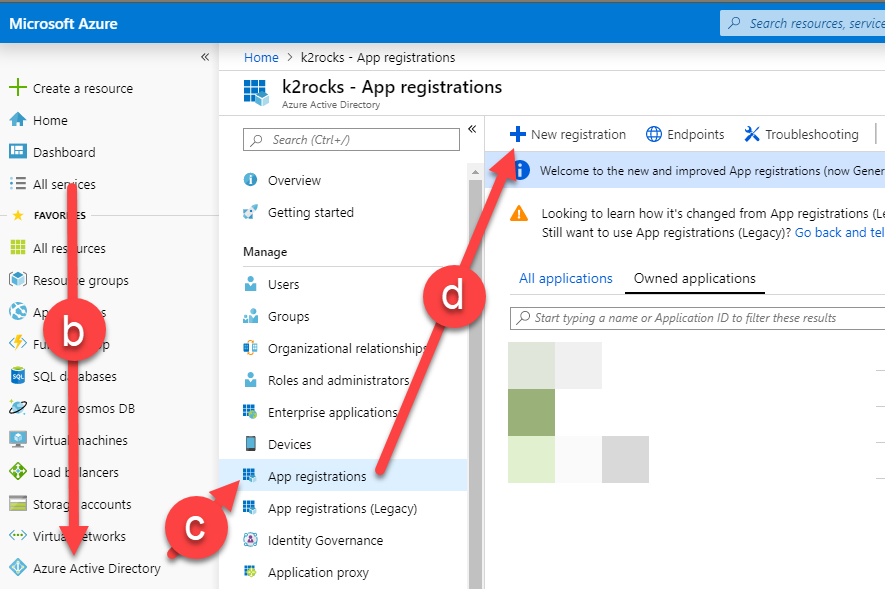
- Log into your Azure Portal.
- Go to the Azure Active Directory blade.
- Select App Registrations
- On the right, click New Registration
- Complete the Register an application form and click register.
Example Redirect url: https://www.[k2environmentidentifier].com/identity/token/oauth/2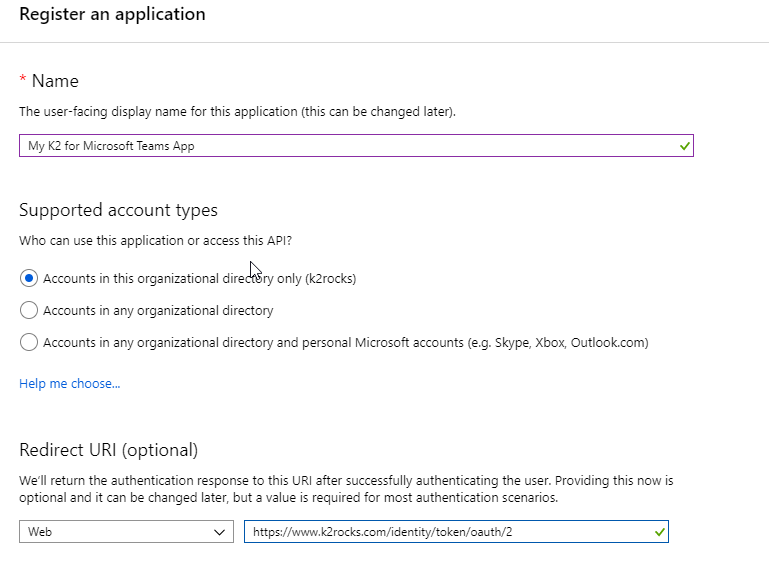
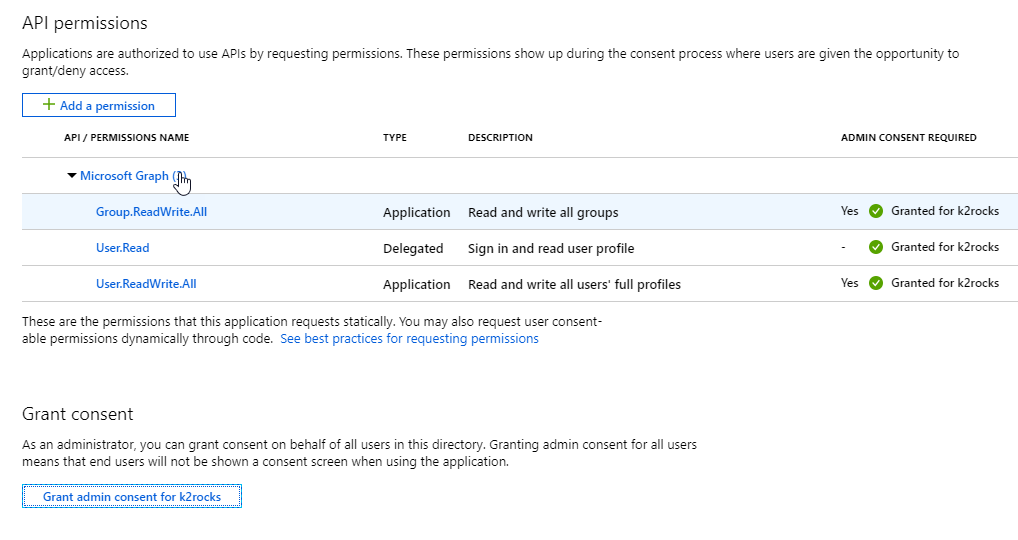
- Add API Permissions for Microsoft Graph and Teams. To use the Microsoft Graph APIs for Teams, Group.ReadWrite.All, User.ReadWrite.All and User.Read permissions are required. Be sure to Grant Admin consent for these scopes to ensure smooth operation of the Teams integration.
Configure K2 OAuth Service
Using the K2 Management site, configure the necessary OAuth resources as listed in the tables below.
OAuth Authentication Endpoints
- Authorization: https://login.microsoftonline.com/[tenant id]/oauth2/v2.0/authorize
- Token: https://login.microsoftonline.com/[tenant id]/oauth2/v2.0/token
- Refresh: https://login.microsoftonline.com/[tenant id]/oauth2/v2.0/token
OAuth Resource Parameters Default Values
| Parameter Name | URL Encode | Auth Default Value | Token Default Value | Refresh Default Value |
| client_secret | Yes | |||
| redirect_uri | Yes | |||
| grant_type | Yes | authorization_code | refresh_token | |
| response_type | Yes | code | ||
| scope | Yes | https://graph.microsoft.com/Group.ReadWrite.All https://graph.microsoft.com/User.Read https://graph.microsoft.com/User.ReadWrite.All | ||
| client_id | Yes |
OAuth Resource Parameters Usage
| Parameter Name | Auth Req | Auth Resp | Token Req | Token Resp | Refresh Req |
| client_secret | Yes | Yes | |||
| redirect_uri | Yes | Yes | Yes | ||
| grant_type | Yes | Yes | |||
| response_type | Yes | ||||
| scope | Yes | ||||
| client_id | Yes | Yes | Yes |
Configuring the REST Service Instance
It is highly recommended that you are familiar with the OpenAPI specification, as it is the basis of K2’s REST integration. For more information on working with the REST Service Broker and Swagger, please see the knowledge base article, Resources for Working with the REST Service Broker for some great resources and additional information. For more detail on configuring the REST Broker, please see the REST Service Type topic in the K2 User Guide.
You can find a JSON descriptor file for the Microsoft Teams Integration at https://help.k2.com/repository/data/json/Examples/microsoft/k2formicrosoftteams.json.
Authentication
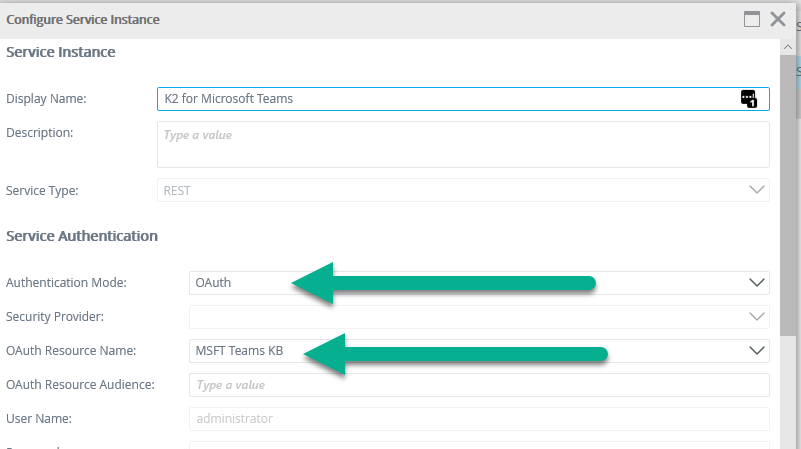
The calls to the Graph API are authorized through an oAuth consent flow, which uses the oAuth resource configured earlier in this article. When configuring the REST Service instance, be sure to choose OAuth as your authentication type and then choose the appropriate OAuth resource name that you configured. (In this example, our resource is called MSFT Teams KB. Yours may be different.)
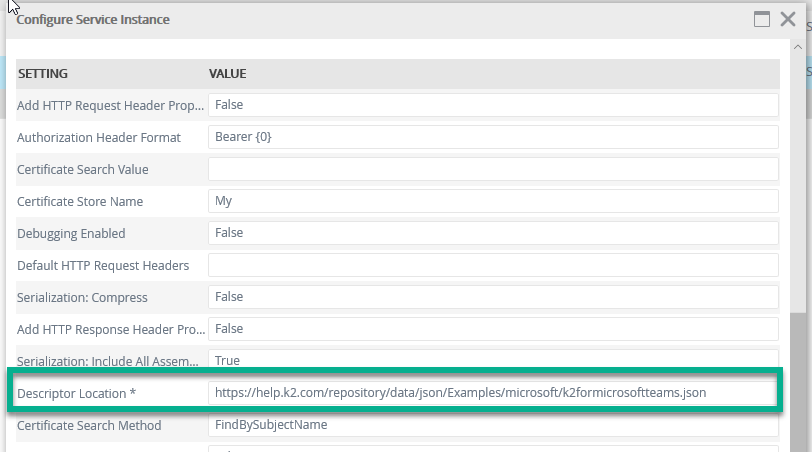
Descriptor Location
When configuring the REST Service Broker instance, you will need to provide the URL to the JSON descriptor file for the K2 for Microsoft Teams API. After setting the security options, scroll down to the service keys section and look for a field labelled Descriptor Location. Paste the url for the provided JSON descritor file at https://help.k2.com/repository/data/json/Examples/microsoft/k2formicrosoftteams.json into that field. Once the descriptor location is filled in, you can click OK and complete the registration process
Using K2 integration with Microsoft Teams
Now that you have been able to register your instance of the REST broker and the Graph API endpoint you wish to work with, you can begin to create you smart objects to allow you to interact with the API in your K2 applications.
Microsoft Teams is a create way to enhance your K2 application by being able to provision workspaces for participants in your application to work together.
First, you need to understand the steps required to provision a team.
You can then also:
- Add a Channel(s) to the Team
- Add Tabs to a Channel
1. Create a Group
A group is just an Azure Active Directory group. To create a group, you need to provide the following information:
- Display Name – The name of the team.
- Description – A short description of the team.
- Group Type (this will always be of type Unified).
- Mail Enabled (Yes/No) – Do you want to be able to send email to the Team.
- Mail Nickname – This will essentially become the email alias for the team.
- Security Enabled – This is typically false for Teams use cases.
You will use the Group > CreateGroup service method, which takes an object of type CreateGroupRequest that contains all the properties above.
The CreateGroup method will return a lot of data about the newly created team, but the one property you will want to be sure is save is the ID field as this will be required for all of the remaining steps and interaction with your team
2. Add a Team to the Group
Once you have created a group and saved the resulting group ID, the next step is to enable that group to be a Team. You really aren’t adding a team, but rather, simply adding another attribute to your group so that is can be used as a Team.
You will want to use the Group > Add_Team_To_Group service method. This method takes two parameters: Group Id and AddTeamRequest.
GroupId is required and some selections from AddTeamRequest are required
AddTeamRequest has four objects:
- MemberSettings – Team settings to set permissions for members
- allowCreateUpdateChannels
- allowDeleteChannels
- allowAddRemoveApps
- allowCreateUpdateRemoveTabs
- allowCreateUpdateRemoveConnectors
- GuestSettings – Team settings to set permissions for guests
- allowCreateUpdateChannels
- allowDeleteChannels
- MessagingSettings – controls the messaging settings for the team
- allowUserEditMessages
- allowUserDeleteMessages
- allowOwnerDeleteMessages
- allowTeamMentions
- allowChannelMentions
- FunSettings – Controls the ability to use giphy in a team
- allowGiphy
- giphyContentRating
- allowStickersAndMemes
- allowCustomMemes
3. Add an Owners and Members to a Team
a) How to look up a user
This step also applies to adding members to a Team
We have provided a way for you to look up users. You could, in theory, build the URL above through string manipulation and use a user’s UPN (username@yourdomain.com), but for Microsoft Teams and Graph that method could take up to an hour for the Team to show up for the user due to how the graph works. So, a quicker method is to look up the user by the UPN and then use that result add users to your team. Two calls take a few seconds as compared to waiting up to an hour for Teams to update.
To look up a user, you can use the Get_User_by_ID_or_Principal_Name service method on the GetUserByPrincipalName service object. This method takes a single text parameter called userIDorPrincipalName. This means if you want to pull details about a user and not just look up their ID, you can use an ID or UPN to retrieve those user details.
The return of this method contains a field called Id, which you will want to use when adding a user to a Team.
b) Add a Owner to a Team
By default, the user ID that you are using when you create the team is automatically added as an owner to the Team, but you may also want to add other owners so additional users will have administrative privileges on the Team.
Adding an owner to a Team is as simple as using the Add_Owner_To_Team service method which will take an object of type AddOwnerToTeamRequest along with a Team ID. (We called it Team ID at this point for clarity to help you remember where you are in the process, it is still the same group id you saved from Step 1, but only after you have "Team Enabled” the group.)
The AddOwnerToTeamRequest requires only one property which is called _odata_id. The value of this property is in the format of https://graph.microsoft.com/beta/users/625c3e99-c685-447d-8b92-51f5c73c3ad5 - your value may be different.
You might have to combine a couple of strings, but we have provided methods for looking up the identifier. Technically, you could use a user’s userPrincipalName instead of the ID, but more on that below
c) Add a Member(s) to a Team
Just like with adding an Owner, adding a member to a Team is as simple as using the Add_Member_To_Team service method which will take an object of type AddMemberToTeamRequest along with a Team ID.
The AddOwnerToTeamRequest requires only one property which is called _odata_id. The value of this property is in the format of https://graph.microsoft.com/beta/users/625c3e99-c685-447d-8b92-51f5c73c3ad5 - your value may be different.
Just like before refer to Step 3a above that describes how you can look up the user’s Id.
Owners will need to be added as Members of a team if you require that the owners are able to interact with a team, and not just perform administrative functions
Adding Tabs to a Team Channel
Channels in a Team can have tabs added to them. Tabs expose functionality from other applications/services. Out of the box, Microsoft Teams has support for number of Tab types.
To add a tab to a Team, you must provide configuration information that is unique to that tab type. For more information on what configuration information is required and a list of built-in tab types, please refer to https://docs.microsoft.com/en-us/graph/teams-configuring-builtin-tabs
Additional Management Methods
In addition to provisioning a Team, there are several methods for performing maintenance tasks on Teams, including:
- Get Team
- Get My Teams
- Get Team Owners
- List Team Members
- Get Teams for a User
- List Channels for a Team
- List of Groups
- List Tabs for a Channel
- Archive Team
- Unarchive Team
- Check Team Archive Status
- Delete Channel from Team
- Delete Tab from Channel
- Remove Member from Team
- Remove Owner from Team
