KB001721
PRODUCT: K2 blackpearl
Use Cases
Many Forms will have a need for data, whether its giving the user default values and options, or storing entries. Here are a few ways lists and data interact with Forms:
- Populating drop down options.
- Cascading (filtering) options.
- Populating a default question set.
- Saving child data.
- Storing data sets that will grow large (more than 5,000 items).
This guide will explain how to implement each of these points. Note that you will need to install the Event Scheduling accelerator to follow along with this how-to. To find out more about using the accelerators in your solution, use this link: http://help.k2.com/onlinehelp/k2appit/UserGuide/current/default.htm#App_Templates/App_Templates.htm
Populating Drop Down Options
In the first steps of this how-to, we will create additional columns and modify an existing column. By moving the drop-down options to another list, we can more easily manage the entries available to our users, and create a list that can be edited to reflect current options if the data changes.
- For the Event Scheduling calendar we will be generating new fields for use. From the CALENDAR tab, select List Settings from the ribbon.
- Scroll down to the Columns section. Click the Create column link at the bottom of the section.
- Add a column called Event Type as the type Single line of text and Then click OK.
- Next we will change the Category from Choice to a Single line of text. Click on the Category column, and in the options select Single line of text and then select OK.
- Next we will need to create a list for the categories and event types. Navigate to the home tab, and Add list, library or other apps from the tile links.
- Select Custom List, and name it Event Scheduling Types.
- From the List tab, navigate to the List Settings.
- Navigate to the Advanced settings.
- Under the Attachments settings, switch the attachments option to Disabled, and then select OK to save. For this list we will not need to use the attachments of the list.
- Select the Title column, and change the Column name to Event Type, and then select OK.
- Select the Create column option to create a new column. Name this column Category of the type choice.
- For the choices, enter the values you'd like your users to have available as categories. This example uses the following: Internal, Client, Prospect, Partner, Meeting.
- For Display choices, select Drop-Down Menu, and set Allow 'Fill-in' choices to No. Then select OK to save.
- For our scenario, we'll need to enter some choices for our users. These choices will be used in a later step to configure our drop-down options in the view. Navigate back to the main Event Scheduling Types List and enter some values into the list. Our example uses the following choices:
Event Type
Category
Holiday Party
Internal
Resource Meeting
Internal
Project Meeting
Internal
Collaboration Event
Internal
In-House Meeting
Client
External Event
Client
On-Site Meeting
Client
On-Site Meeting
Prospect
Dinner Meeting
Prospect
In-House Partner Event
Partner
Hosted Partner Event
Partner
Off-Site Meeting
Partner
General Meeting Event
Meeting
- From the List tab in the ribbon tool bar, select the K2 Application icon.
- From the Application elements page, select Create New Application.
- In the Data option select Site and all of its subsites, and then select OK. In the application page for the list, you will see that 2 smart objects have been created. With the SmartObject created for our Event Scheduling Types list, we can now modify the Event Scheduling application to include our drop-down list options. The SmartObject is needed in order for Appit to retrieve data from the list.
- Navigate back to the sites home page, and select the Event Scheduling list.
- Select the Calendar tab, and navigate to the K2 Application page. Wait for the application to verify the SmartObjects, and then select Regenerate SmartObjects so that the new fields will be included when we edit the View. In this step, only the SmartObjects should be regenerated so that any work done to the Forms or Views will not be set back to default.
- Check out the New Event View, and then select Edit by right clicking the View.
- A warning will appear for the Category field. Select the field and delete it from the canvas. The Category field needs to be readded becuase of the modification made to the SharePoint list.
- In the fields pane, drag the Category field back onto the canvas and delete the extra title created. Select the Category field and click the Change Control button in the top tool bar.
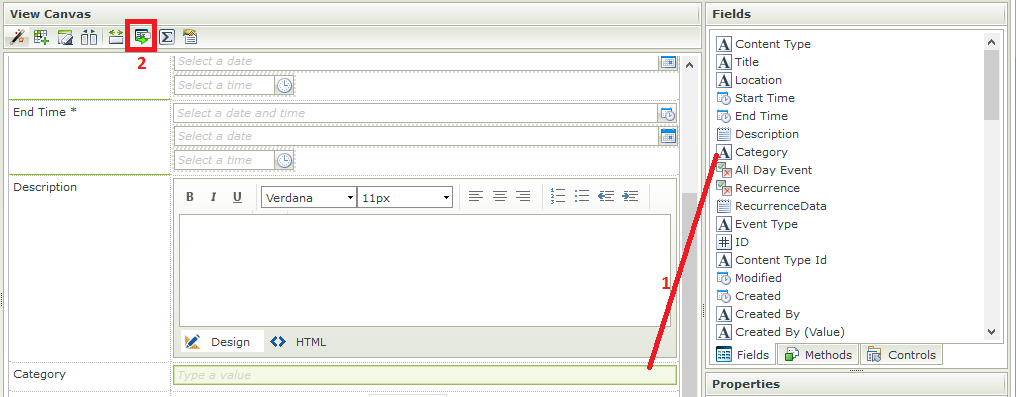
- Select Drop-Down List and then select OK.
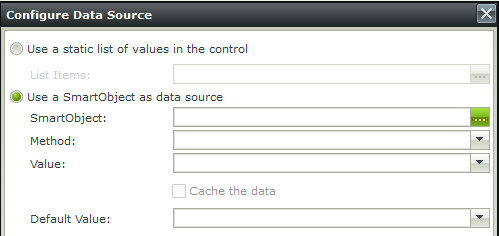
- While selected on the category drop-down, scroll to the Data Source then Type in the Properties menu, and select the ellipses to configure the drop-down data options.
- select the option to Use a SmartObject as data source, and click the ellipses next to the SmartObject to configure.
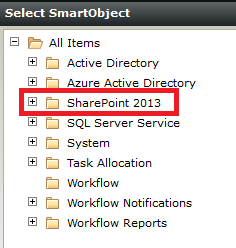
- Navigate to the list created for the Event Scheduling Types, by navigating through the SharePoint 2013 folder.
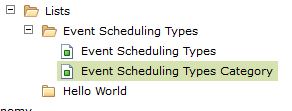
- Your dropdown should now be configured as follows:
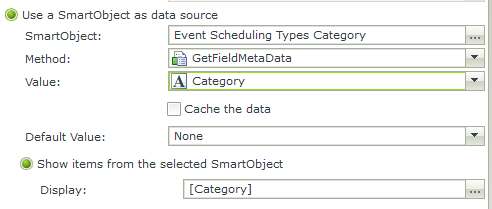
- Select Finish to save and exit. Right click the New Event form and select Run to test the drop-down.
- Repeat steps 20-28 for the Edit Event View.
Cascading (Filtering) Options
We're now going to configure the cascading drop-down to our list in order to create filtered options based on the category so that the list of events/options showed to the user is filtered, depending on the category of event that they selected.
- Select the New Event View and select Edit.
- We will add a new row beneath the Category line. Select the category cell, and use the Insert Row Below button to add a new row.
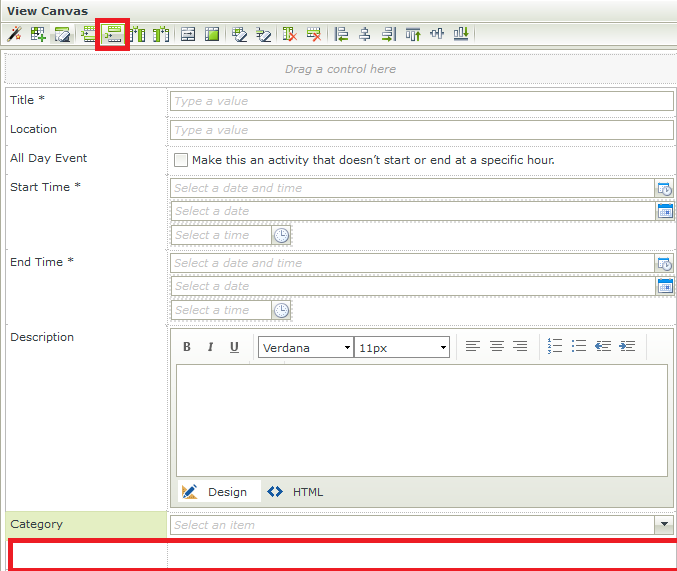
- Drag the Event Type from the fields task pane into the right hand cell of the row inserted. Drag the title to the left hand to match the form layout. Use the Change Control button to change the text field to a drop-down.
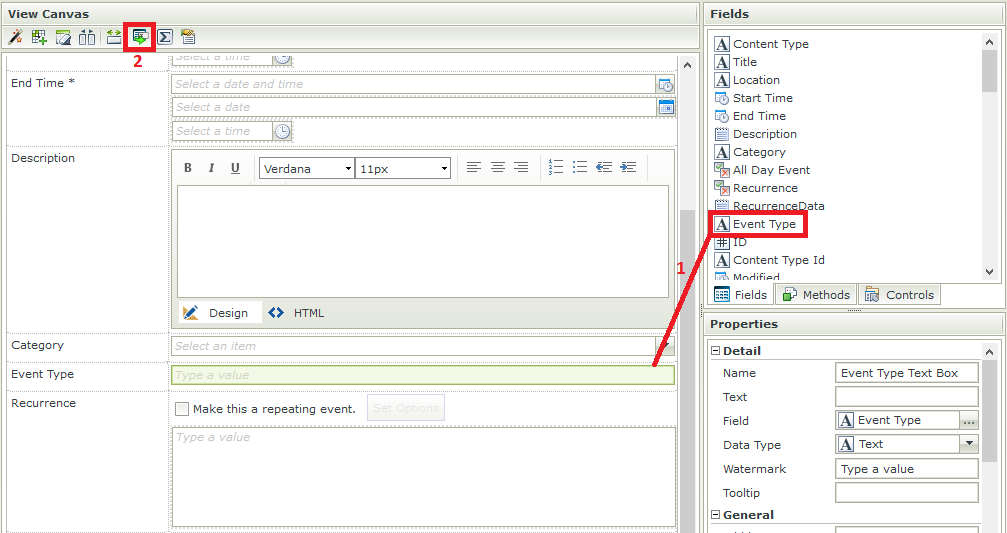
- In the Data Source options for Type, select the ellipses to configure the drop-down options.

- Select the Use a SmartObject as a data source option, and select the ellipses in the SmartObject option to configure.
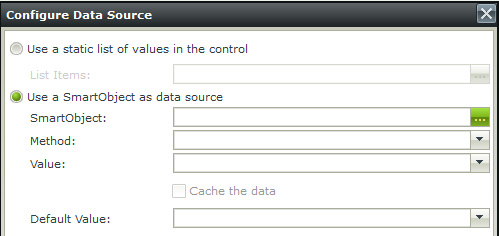
- Navigate to the list created for the Event Scheduling Types, by navigating through the SharePoint 2013 folder.
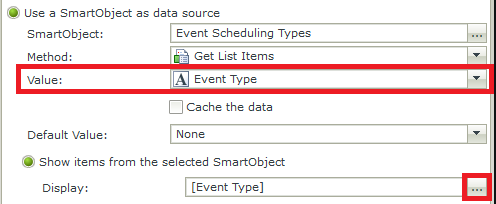
- Change the Value to Event Type, and select the ellipses next to display to modify to the Event Type.
- Select the option to Filter the data according to another control's value. For the Parent Control drop-down, select Category Drop-Down List and Category as the Child Joint Property. These properties are the linking piece to narrow the options in the drop-down menu to a specific category. Then select OK.

- Select Finish. In the application page, right click the New Event form and select Run to test your changes.
- Change the Category drop-down to test the Event Type filtering options.
- Repeat steps 30-39 to make the same changes to the Edit Event View.
Populating a Default Question Set
For event scheduling there may be some additional questions for the event. In this segment, we will create a list of default questions in order to have more flexibility in our form if questions are changed, added, or deleted from the list. By placing the default questions in a separate list, rather than as columns in the design of the form, if the questions change the View and Form design will not be affected and the questions can be updated more easily.
- Create a new list called Event Scheduling Questions.
- Once the list has been created, use the Title column to create a set of default questions. Here are the questions we will use for our example:
How many people will attend the event?
What kinds of refreshments are needed?
Which (if any) meal should be provided for the event?
How many internal resources will attend?
What are the decor specifications for the event?
- Once the questions have been entered, navigate to the List Settings from the top menu bar.
- Navigate to the Advanced settings.
- Under the Attachments settings, switch the attachments option to Disabled, and then select OK to save.
- Use the Create column link to add a column named Answer to the list as the type Multiple lines of text, with 8 rows, and the type of text being Plain text.
- From the List tab in the ribbon tool bar, select the K2 Application icon.
- From the Application elements page, select Create New Application.
- In the Data option select Site and all of its subsites, and then select OK. In the Application elements page, you will see that 1 SmartObject has been created. Right click the smart object, and select Design View. This is the view that will be used in our new form to enter new questions.
- Navigate to the General tab from the breadcrumb bar at the top of the designer. Name your view Default Event Questions, select the List View with the Method of Get List Items, and Call the method when the form loads. Then Select Next.
- Select Create Labels and Controls.
- Select Title and Answer for fields to include in the layout. Then scroll down to the Edit Options.

- In the Edit Options, select Enable list editing and uncheck the Enable Add new row link, and check the option to Allow the user to edit existing rows. Then select OK.

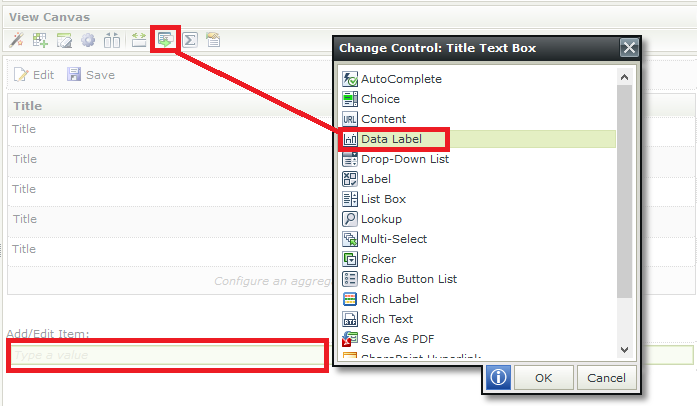
- Select the Title text box from the Add/Edit row, and use the Change Control button to change the row to a Data Label.
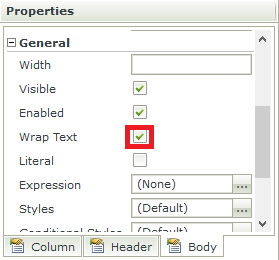
- Click on the title column, and in the Body tab of the Properties. In the General settings, select Wrap Text to wrap the questions text.
- Next select the Header tab, and change the Text to Questions.
- Select the Text Area column, and in the Header tab change the text to Answers.
- Select the save icon at the top of the view, and in the General settings of the Properties menu, uncheck the Visible option. Click Finish to save.
- Navigate back to the Application elements page for the Event Scheduling app. Check out the New Event Form, and then select Edit.
- From the K2 Designer Task pane, locate your Event Scheduling Questions folder, and drag the view onto your form below the New Event Scheduling View.
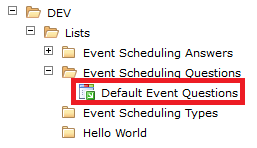
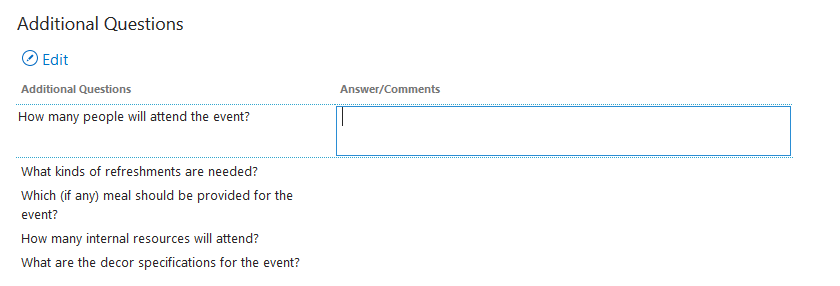
- Name the View Additional Questions, and uncheck the Collapse option in the Properties of the view. Click Finish to save your changes and return to the Application elements page.
- Right click the New Event Form and select Run to preview your changes.
Saving Child Data
Now that we've created a list of our default questions, well need to create a list to save the answers to. We'll want to save the answers to a list with a reference to the parent item in order to call the items into a View for editing or display in the Form.
- From the Homepage, create a new list called Event Scheduling Answers.
- Click the ellipses on the new list, and select the SETTINGS option to edit the list.
- Navigate to the Advanced settings.
- Under the Attachments settings, switch the attachments option to Disabled, and then select OK to save.
- Use the Create column link to create the following columns:
Column Name
Type
Question
Single line of Text
Answer
Multiple Lines of Text, Plain Text, 8 lines
EventScheduleID
Single Line of Text
- Navigate back to the list, and in the ribbon select the K2 Application icon from the ribbon.
- From the Application elements page, select Create New Application.
- In the Data option select Site and all of its subsites, and then select OK. In the K2 application page, you will see that 1 SmartObject has been created. Right click the SmartObject, and select Design View. This is the view that will be used to display the answers after the initial entry.
- In the General tab of the breadcrumb bar, name the view Event Schedule Answer Display. Select Call the method when the form loads and then select Next.
- Select Create New Labels and Controls.
- Select Question and Answer for the layout and then select OK.
- Adjust the width of the columns. Select the question column, and in the Body tab of the Properties menu, check the Wrap Text option in the General settings. Do the same for the Answer. By changing this setting, all of the text will wrap if the length is longer than the cell.
- Select Finish to save the view. Navigate back to the New Event Form and click Edit.
- Navigate to the Rules tab of the breadcrumb bar.
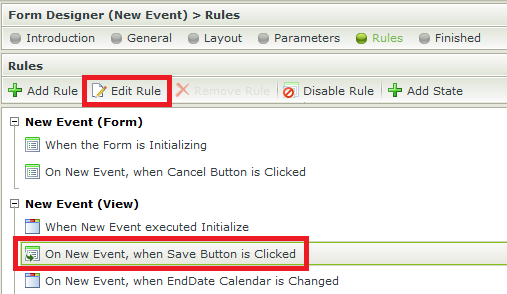
- Select the On New Event, when Save Button is Clicked rule and then select Edit Rule.
- Click on the Create Calendar Event Action in the rules pane, then in the conditions search for the for each and drag the For each item in a List View option. Configure for all items on the Default Event Questions view. The logic to save the items should be added after the calendar event is created, so the id can be utilized as the link between the 2 lists.

- Next click on the for each condition then in the Actions tab select Execute a SmartObject method from the SmartObject interaction to add the method to the rule. Select the Event Scheduling Answers SmartObject from the wizard and select the Create List Item method.

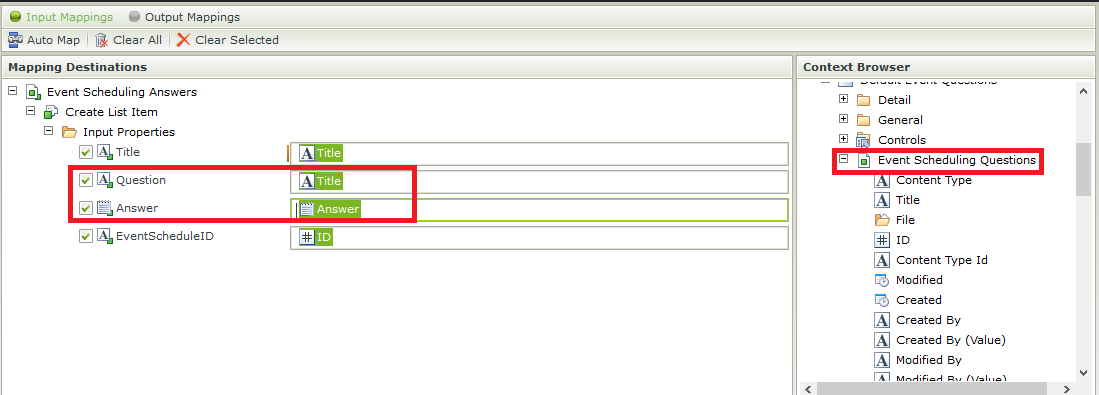
- For the Title field, expand the New Event SmartObject, and add the Title to the Title field, and the ID to the EventScheduleID field.

- Next, expand the Default Event Questions View and the Event Scheduling Questions SmartObject, and drag the Title onto the Question field, and Answer onto the Answer field.
- Select Finish and OK then Finish to save your changes and exit.
- From the Event Scheduling application, select the Edit Event Form, and select Edit.
- Expand the Event Scheduling Answers list, and add the Event Scheduling Answer Display View to the Form.
- Rename the View Additional Questions.
- Navigate to the rules window and select the When the form is Initializing Rule, and click the Edit Rule button.

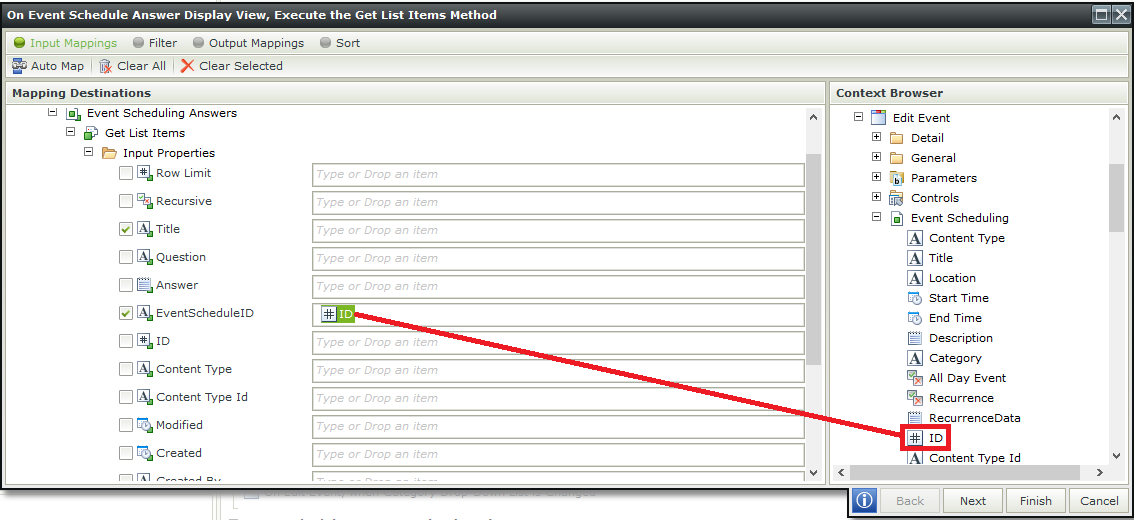
- Add a action to execute a view method. Select the Event Schedule Answer Display view, and the Get List Items method. Then click configure. This is how the correct questions will be pulled into the correct parent form.

- Expand the Event Scheduling SmartObject in the Edit Event View, and drag the ID field onto the EventScheduleID. Click Finish, then OK and Finish to close and save your changes.
- Repeat steps 13-27 for the Display view.
Using SmartBox to Store Data
In this step we will go through creating a SmartBox SmartObject to store data in, and create the view to query the data for display. This step replaces Saving Child Data from the last step. A scenario that will require using SmartBox to store items is when the SharePoint list will grow to more than 5,000 items. Then the data must be stored where there is not a limit to the number of items that can be stored.
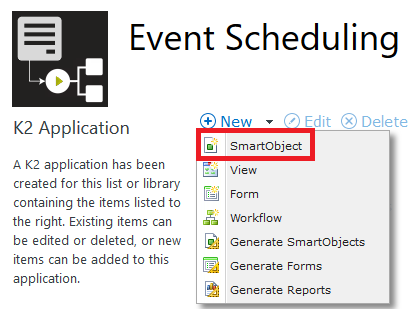
- From the Event Scheduling application page, select New then SmartObject.
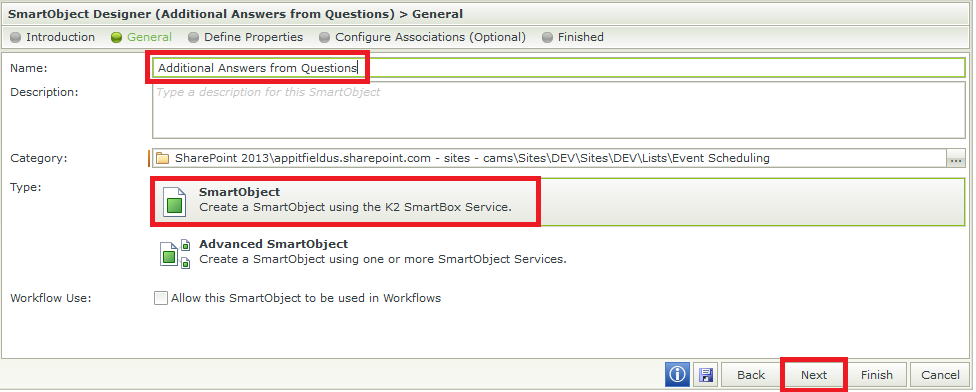
- In the General tab, name the SmartObject Additional Answers from Questions and then click Next.
- In the define properties window, select Add to add properties.

- Add 3 fields with the Name and Type as listed below:
Name
Type
Question
Text
Answer
Memo
Schedule ID
Number

- Select Finish to save the smart object. We have just created the SmartObject that will be used to store the data in SmartBox.
- From the Event Scheduling application page, right click the AdditionalAnswers from Questions SmartObject, and select Design View from the menu.
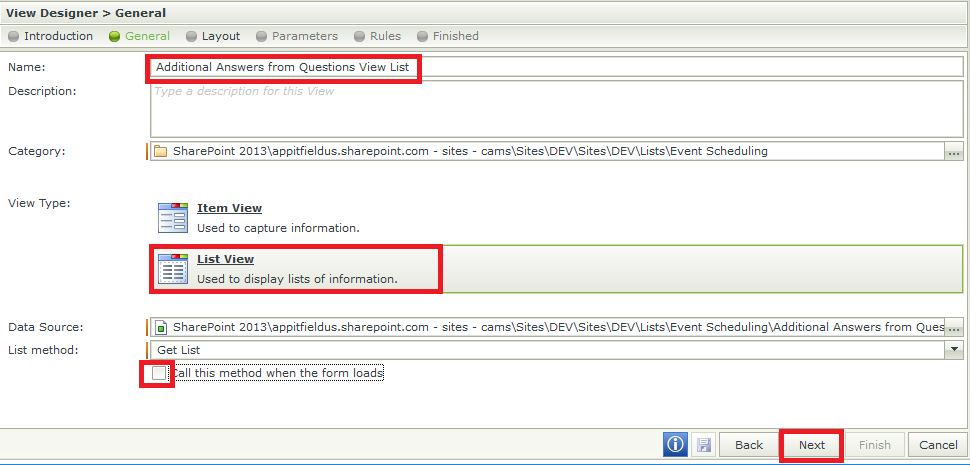
- In the General window, name the view Additional Answers from Questions View List, with a view type of List View and uncheck the option to Call this method when the form loads. Then select Next.
- In the view designer, select Create Labels and Controls.
- select the Question and Answer fields and then select OK. Scale the columns accordingly and then select Finish. Modify steps 13-27 of the Saving Child Data section using the new SmartObject and view created.


