Understanding the impact of the new SmartForms Text Styles
KB003071
PRODUCT
K2 Five 5.3 and K2 Cloud Update 8 introduce some styling and feature terminology changes. Because of this, your forms may look slightly different after upgrading and you will see different terminology when formatting items. After upgrading to K2 Five 5.3 and K2 Cloud Update 8, you can decide if and how you want to update your forms, but no immediate changes are necessary. In most cases you will not notice the differences, but the changes help you more consistently style your forms. This article helps you understand the changes and how they affect your existing SmartForms.
Table of contents
- Styling changes
- Understanding the new style options
- How do these changes affect existing Smartforms?
- Order in which styling is applied
- Methods for styling your forms
Styling changes
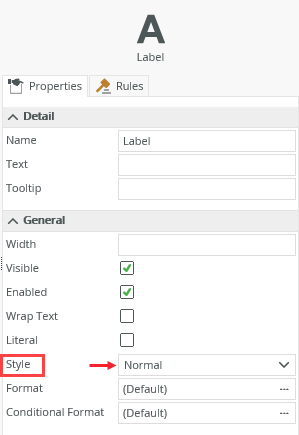
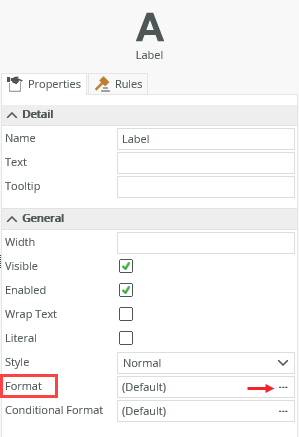
You can find a new Style property on the Label and Data Label controls. This allows you to apply text styles such as Normal, Heading 1, Heading 2, Paragraph and more to these controls. When you use the controls on a form the font size and font color of the form’s theme are applied to the font style you select.
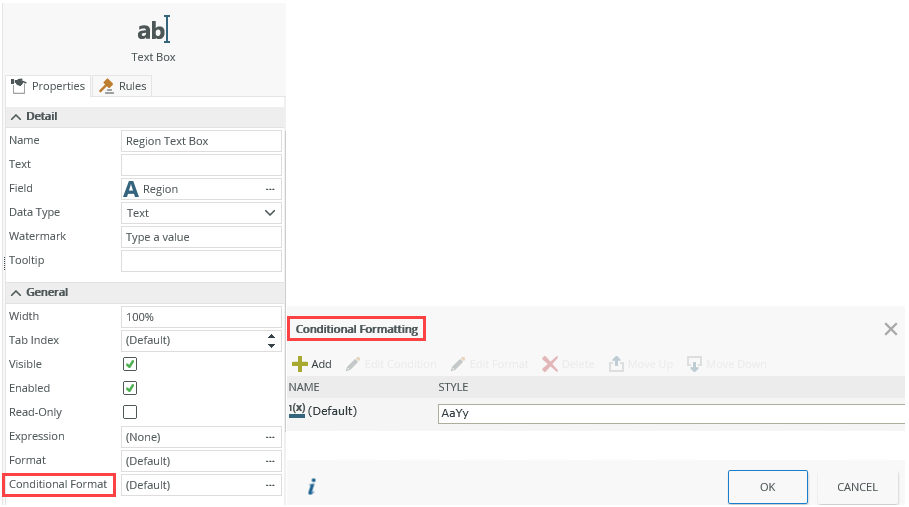
With the introduction of the Style property, the existing Styles and Conditional Styles properties are renamed to Format and Conditional Format.
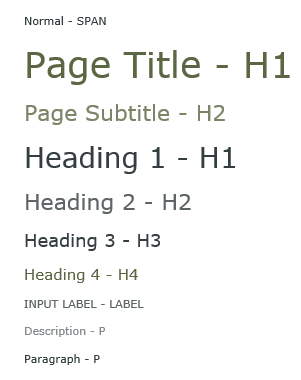
Each K2 theme now has standard styles for elements such as H1, H2, and Paragraph in the theme's CSS. Previously there were no styles associated with these elements. These new styles allow you to apply changes throughout a form without having to manually change font sizes and colors on all headings and labels. Most of the style names have an equivalent CSS class. See Understanding the new style options for more information about these classes.
The table below lists the changes before and after K2 Five 5.3 and K2 Cloud Update 8.
| Component | Before K2 Five 5.3 and K2 Cloud Update 8 | After upgrade to K2 Five 5.3 and K2 Cloud Update 8 |
| Label and Data Label controls | No Style property | New Style property |
| Styles property | Styles | Format |
| Conditional Styles property | Conditional Styles | Conditional Format |
| Themes | No styles for elements such as H1, H2, and Paragraph | All themes now have default styles for certain tags, see Understanding the New Style Options |
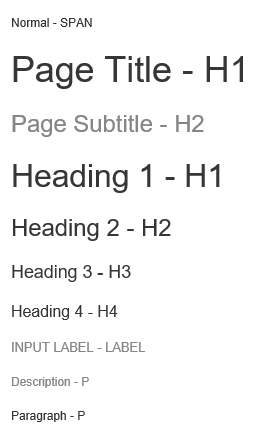
Understanding the new style options
If you are familiar with CSS and HTML, the Label and Data Label controls render with the elements as shown below.
- K2 may change rendering specifics in future releases as the K2 platform evolves
- The Normal text style is the default style for all existing and new controls and renders the same as in previous releases
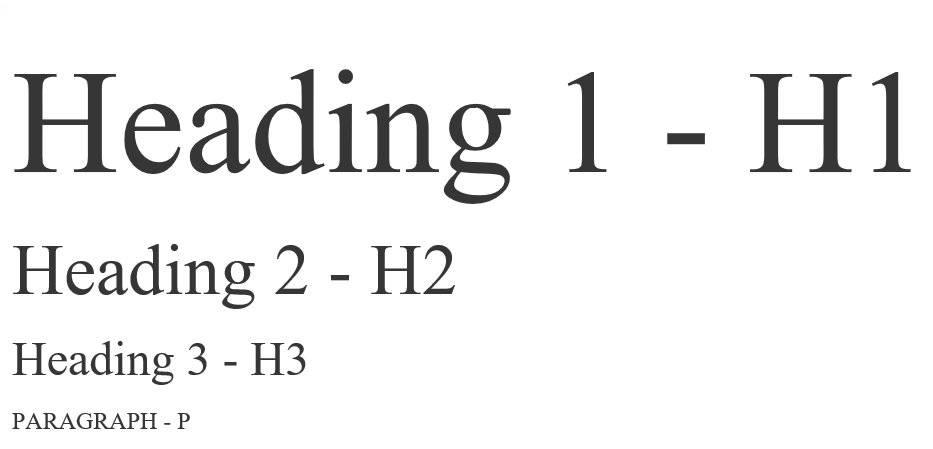
| Style Name | Tag | CSS Class | Details |
| Normal | <span> | [none] | (Default) No change from what the control renders before K2 Five 5.3 and K2 Cloud Update 8. It renders as a <span> and inherits its font styling from the theme (typically global font styles would be set on the <span> or <form> elements by the theme) |
| Page Title | <h1> | .page-title | Typically used at the top of the page or form for the title of the form such as “Expense Onboarding System” |
| Page Subtitle | <h2> | .page-subtitle | Typically used for the sub-title in a header area of a page such as "for company expenses and travel" |
| Heading 1 | <h1> | [none] | Typically used for a heading for the page or form. For example, use the Page Title for branding the page and Heading 1 to define what's on this page if there is no Page-Title. The Heading 1 may be the same as the Page Title such as "Expense Settings" if the entire form is about expense settings |
| Heading 2 | <h2> | [none] | Typically used for key sections throughout the page or form. This style is also used by most themes for the header of a view on a form such as "History", "Details", "Contact Us", and "Approvals" |
| Heading 3 | <h3> | [none] | Level 3 heading |
| Heading 4 | <h4> | [none] | Level 4 heading |
| Input Label | <label> | .input-label | Typically used for labels next to input controls such as "First Name:" |
| Description | <p> | .description | Typically used for:
|
| Paragraph | <p> | [none] | Typically used for blocks of text |
How do these changes affect existing SmartForms?
The following outlines the impact on existing SmartForms:
-
- The Style property of all Label and Data Label controls is set to Normal. This has no effect on the controls as the Normal text style renders the same as in previous K2 releases.
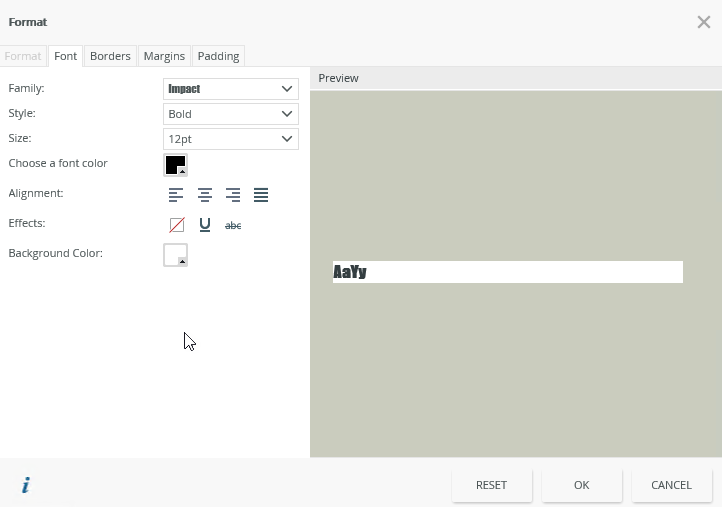
- The Styles property and dialog available for controls and forms are now called Format as shown in the images below.
- The Conditional Styles property and dialog available for controls and forms are now called Conditional Format and Conditional Formatting as shown in the images below.
- Themes now have default styles for predefined tags. See Understanding the new style options for more information. If you have custom themes, you can regenerate or update your custom theme using the new out-of-the-box themes.
- If you use custom themes with custom style elements that have precedence over the new out-of-the-box theme styling, you don’t have to reapply your changes to align with the new themes. You can continue to use your custom theme.
- If you used the Literal property of a Label or Data Label control and typed custom HTML such as a <p>, <h1>, <h2>, <h3> in the Text property of the control, the text may look different as it now uses the theme styles for these elements. See Understanding the new style options for more information. The images below show an example where custom HTML is used in a Label control before and after K2 Five 5.3 and K2 Cloud Update 8.
- The Style property of all Label and Data Label controls is set to Normal. This has no effect on the controls as the Normal text style renders the same as in previous K2 releases.
| Before K2 Five 5.3 and K2 Cloud Update 8 | After upgrade to K2 Five 5.3 and K2 Cloud Update 8 | |
| Design Time | 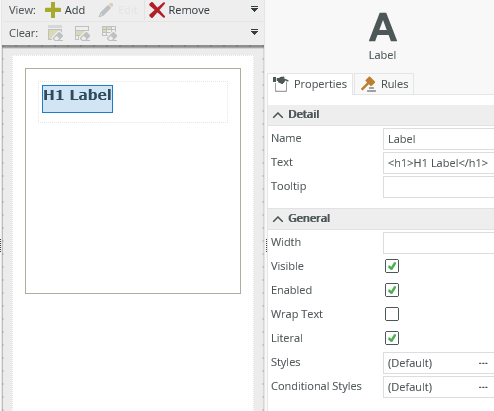 | 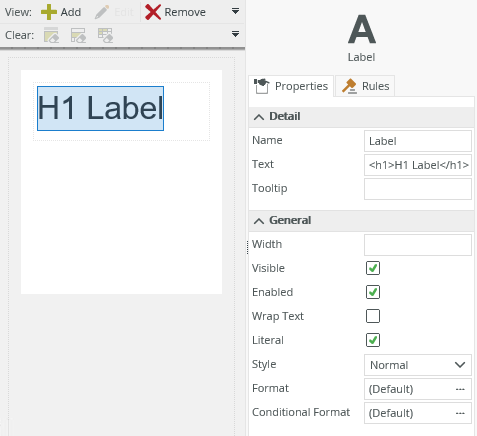 |
| Runtime |  | 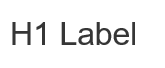 |
- If you typed custom HTML such as <p>, <h1>, <h2>, <h3>, <h4>, or <label> in the Text property of a Rich Text control, the text may look different as it now uses the theme styles for these elements, however, the styling applied to the control overrides form styling.
- If you used the text style toolbar in the Rich Text control to style your text, you may not notice any changes on upgrade because the styles applied at the control level when using the toolbar styling, will override the theme styles.
The following table shows the impact on existing themes and custom themes:
| Before K2 Five 5.3 and K2 Cloud Update 8 | After upgrade to K2 Five 5.3 and K2 Cloud Update 8 |
| You use a custom theme with custom Style elements such as <p>, <h1>, <h2>, <h3> on your form | Your custom theme still applies and no changes are visible |
| You use a custom theme that DOES NOT contain custom Style elements such as <p>, <h1>, <h2>, <h3> on your form | K2 standard (core) Style elements apply. The Platinum theme is the core K2 theme |
| You use a K2 theme with standard Style elements specific to the theme you select such as Blue Void on your form | K2 theme specific Style elements apply |
| You use K2’s Platinum theme with no standard Style elements (default) on your form | K2 standard (core) Style elements apply. The Platinum theme is the core (default) K2 theme |
The images below show how the new styles apply to themes such as Platinum (default) and Blue Void on a form.
| Platinum | Blue Void |
 |  |
Order in which styling is applied
Styling is applied in a largest-to-smallest manner. For example, if you apply styling to a control, SmartForm default styling is applied first, then the theme’s styling, and then the Style, Format and Conditional Format settings. This order is followed, from a more global scope down to the control level:
- The default SmartForm settings. These are platform-wide settings that all views and forms inherit.
- The Core.CSS settings that all themes inherit, including custom themes.
- Out-of-the-box or custom theme settings configured on the form.
- Any custom CSS that you’ve added at the form or view level to override inherited styling.
- Any custom styling at the control level including formatting, conditional formatting, and any custom HTML styling. Controls configured with a Style property inherit their styling from the above methods unless you override them at the control level.
Examples of how styling is applied
Use this section to learn how styling applies in different scenarios:
- When you select a style such as Heading 1 from the Style property of a Label or Data Label control, the font size and color of the form's theme is applied to the font style.
- When you use the Literal property of a Label or Data Label control and use custom HTML that matches the new styling elements (such as a <p>, <h1>, <h2>, <label>, and <span>) in the Text property of the control, the font size, and color of the form's theme is applied to the font style.
- When you use one or more HTML tags that match the new styling elements in the Text property of a Rich Text control, the font size, and color of the form's theme is applied to the font style unless the content contains inline styles from another application, such as Microsoft Word.
- When you use the styling options of the Rich Text control at runtime, such as Bold, Italic, Font-size, these are applied in addition to any styling applied at the form level.
- When you use custom CSS in the Text or Expression properties of a Data Label control on a form, and the CSS contains one or more new style elements, you override the styles of the form.
- When you use a custom theme on your form with one or more new style elements, the Style settings inherit the custom theme settings.
- When you use inline styling such as the Format and Conditional Format properties of a control or view on a form, you override the custom theme and, in turn, the Style property of the control.
Methods for styling your forms
You can use one or a combination of the methods below to apply styling to your controls and forms in K2 Five 5.3 and K2 Cloud Update 8. See Order in which styling is applied to understand how the different methods impact each other and potentially override a previous styling.
- If you want to apply a style such as Heading 1 to a Label or Data Label control, use the Style property
- If you want to change the font family, background color and more of a control or form, use the Format and Conditional Format properties
- To reset just one or two Label or Data Label controls on your form to not use the theme text styles, follow the steps below:
- Select the Normal text style from the Style property drop down of the control
- Click the ellipsis next to the Format property of the control and set specific styles for your text in the Format dialog. Anything you set in the Format dialog overrides the theme's values for that specific control
- Select the Normal text style from the Style property drop down of the control
- Use the Theme property of a form to change the appearance of your form
- Use a custom theme to customize the appearance of your form
- If you want to reset all Data Labels, Labels and Rich Text controls on a form to not use the theme text styles, follow the steps below.
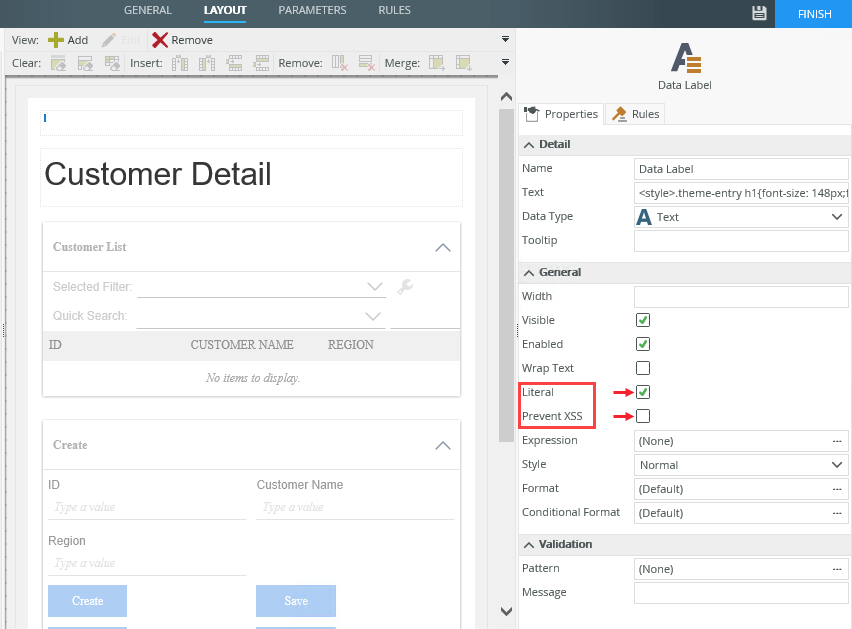
- Add a Data Label to your form
- Type custom CSS in the Text property of the Data Label control such as using a value for a large H1 tag as shown below: <style>.theme-entry h1{font-size: 148px;font-family: initial;padding: initial;margin: initial;text-transform : initial;}</style>The Text property of a Data Label control can only have 255 characters. If you want to use more than 255 characters, see the method for using CSS in an expression.
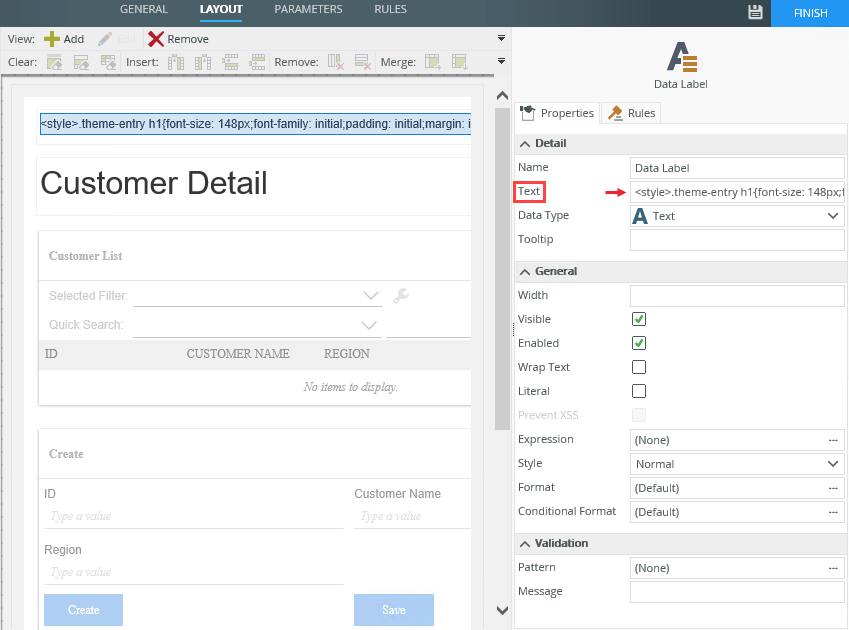
- Select the Literal property. Deselect the Prevent XSS property to allow the control to execute the custom script
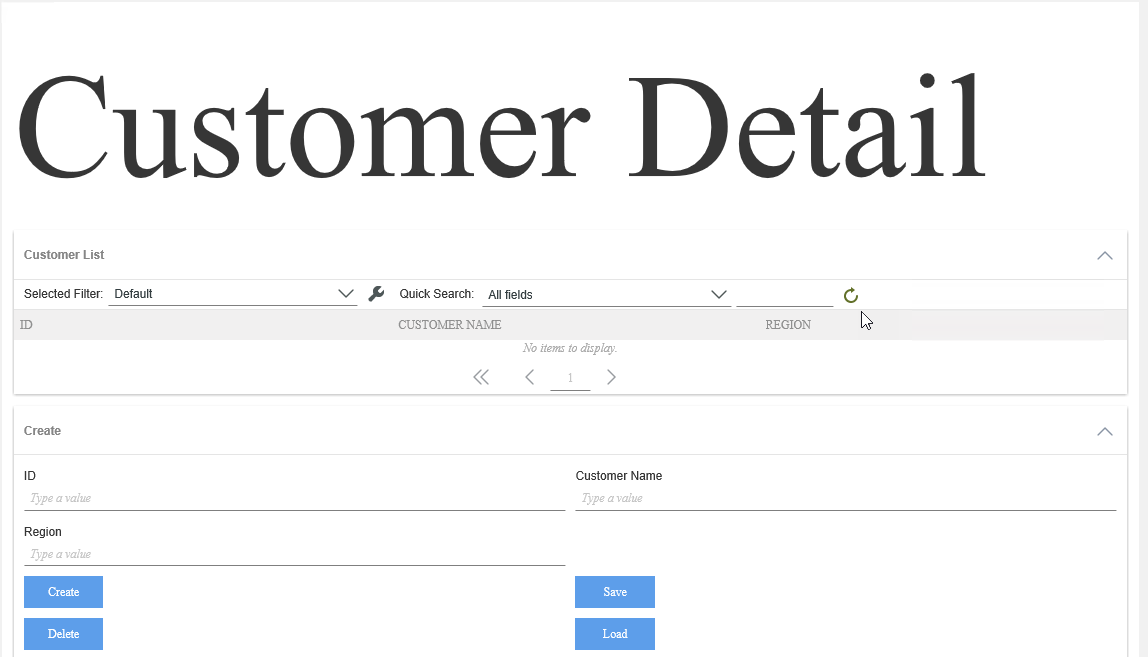
- When you run the form, the large H1 style applies to all Labels and Data Labels with a Heading 1 style as shown below
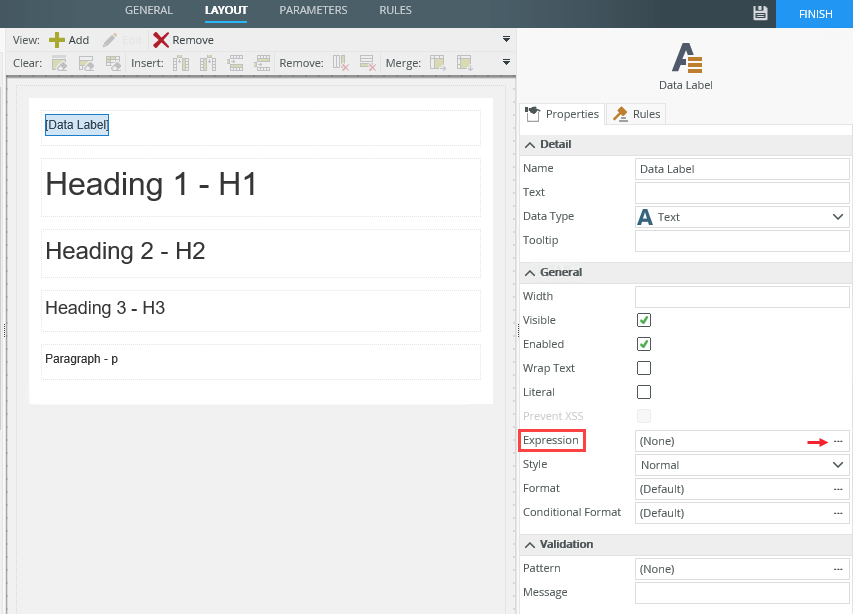
- If you want to reset all Data Labels, Labels and Rich Text controls on a form to not use the theme text styles, and you want to customize the styling, you can add your custom CSS to an expression. Follow the steps below to use this method.
- Add a Data Label to your form
- Click the ellipsis next to Expression
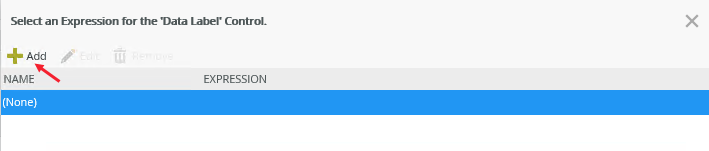
- Click Add on the Select an Expression for the ‘Data Label’ Control page
- Specify a Name for the expression and then type your custom CSS. Use the Preview section to validate your code. Here is an example CSS: <style>.theme-entry h1{font-size: 148px;font-family: initial;padding: initial;margin: initial;text-transform : initial;}.theme-entry h2{font-size: 72px;font-family: initial;padding: initial;margin: initial;text-transform : initial;}.theme-entry h3{font-size: 48px;font-family: initial;padding: initial;margin: initial;text-transform : initial;}.theme-entry p{font-size: 24px;font-family: initial;padding: initial;margin: initial;text-transform : uppercase;}</style>
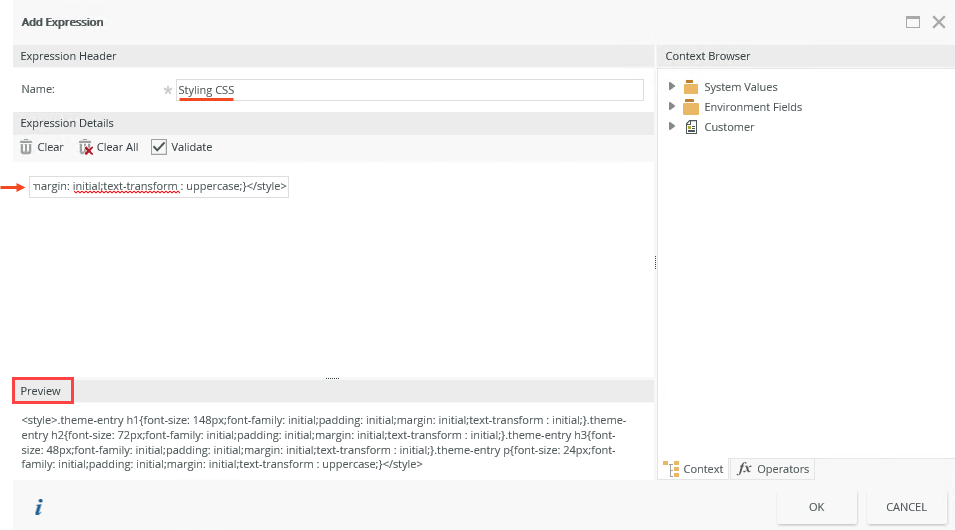
- Click OK to save the expression and OK again to apply the expression to the control
- Select the Literal property. Deselect the Prevent XSS property to allow the control to execute the custom script

- When you run the form, the custom CSS is applied to all Labels and Data Labels on the form as shown here: