

Configuring the K2 REST API for AAD App Proxy
KB003398
PRODUCT
You can configure K2 to expose the K2 Workflow REST API through an Azure AD application proxy, and this article explains how to implement this configuration.
The configuration enables access to an on-premise instance of the K2 Workflow REST API where all users are present in Active Directory (AD) and have also had their identities synced to Azure AD (AAD). This allows the AAD app proxy connector service to generate a Kerberos token for an Active Directory user, using a corresponding UPN from their AAD account. The AAD app proxy connector service generates Kerberos tickets and passes them to the K2 REST workflow API. The diagram below shows a high-level overview of the configuration: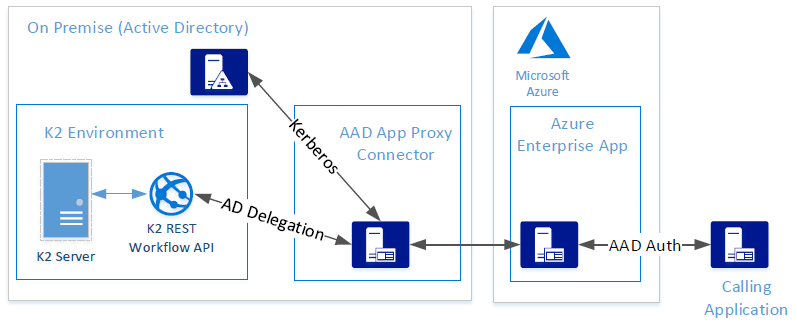
- Part 1: Activate the K2 REST API
- Part 2: Change authentication settings for the REST API virtual directory
- Part 3: Configure the AAD App Proxy connector
- Part 4: Create Kerberos SPNs and configure delegation
- Part 5: Create and Configure an Azure Enterprise App
- Part 6: Testing the configuration
Part 1: Activate the K2 REST API
- Log into K2 as Administrator and navigate to the K2 Management site – such as https://k2.denallix.com/management/
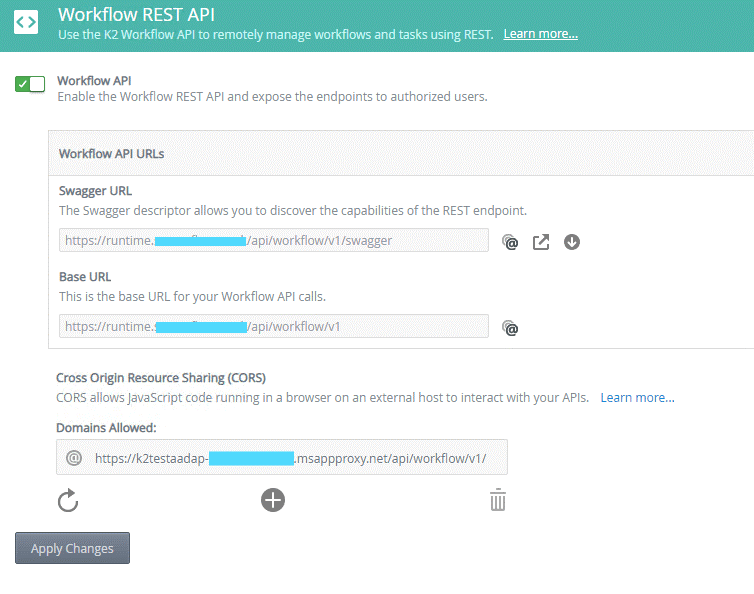
- Expand the Integration > APIs > Workflow REST node
- Enable the Workflow REST API with the toggle next to Workflow API
- Select V1 in the API version drop-down and copy the Base URL for the REST API endpoint. For example https://k2.denallix.com/api/workflow/v1
- If the internal URL is different from the external URL used to access the API through the AAD app proxy, you need to add the external URL to the Cross-Origin Resource Sharing (CORS) list of allowed domains.
- Click Apply Changes to continue. The configuration should look like this:
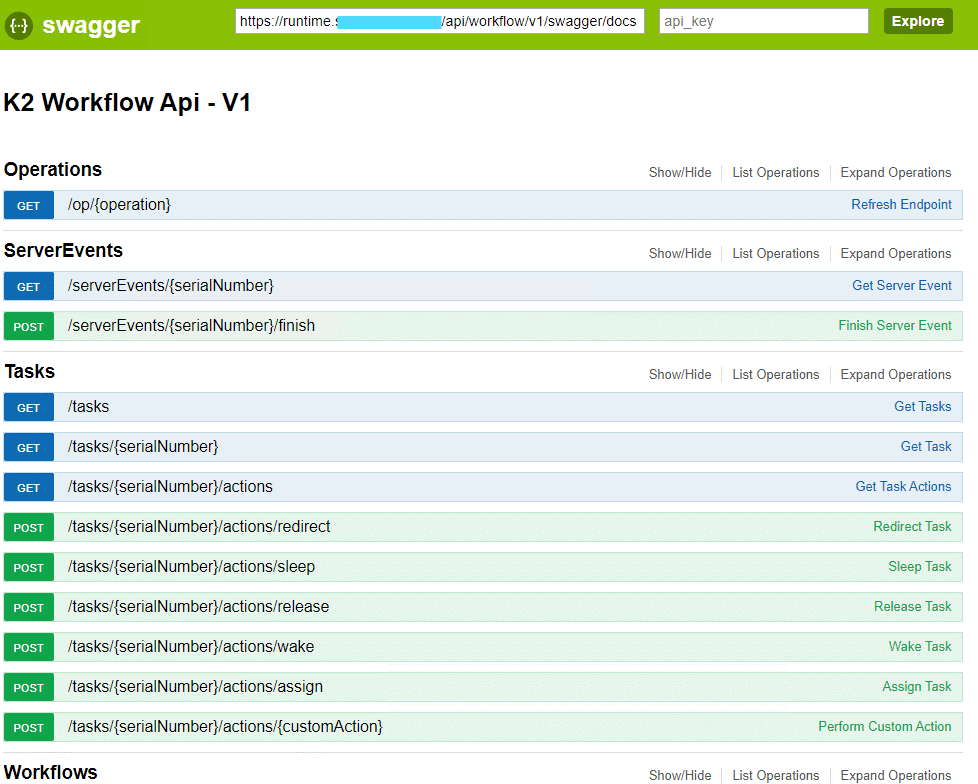
- Copy the Swagger URL and open it in a new browser window to confirm you can access it. The swagger URL link is similar to https://k2.denallix.com/api/workflow/v1/swagger. The browser output should look like this:
Part 2: Change authentication settings for the REST API virtual directory
The K2 REST API needs to accept Kerberos tickets from the AAD app proxy connector service. Use this section to change the configuration of the K2 REST API virtual directories to accept these. You must do this even if your K2 installation was set to use Kerberos during installation.
- Open IIS and expand your K2 website.
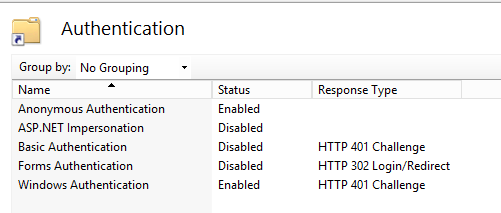
- Select the API node and double-click Authentication under the IIS section.

- Enable Anonymous Authentication and Windows Authentication, as shown below:
- Within the API node, select the Workflow node and double-click Authentication under the IIS section. Enable Anonymous Authentication and Windows Authentication.
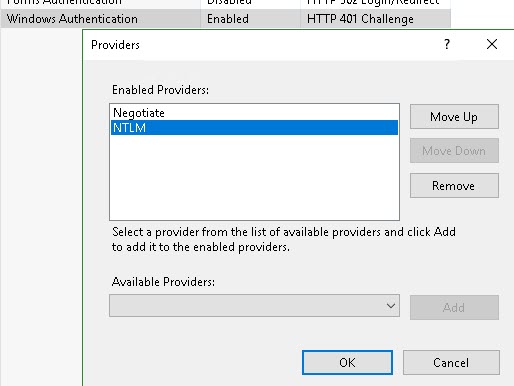
- With the Workflow node still selected, right-click the Windows Authentication item in the list and select Providers. Add the Negotiate provider and set the sequence to be Negotiate and then NTLM, as shown below:
- Within the Workflow node, select the V1 node and double-click Authentication under the IIS section. Enable Anonymous Authentication and Windows Authentication.
- With the V1 node still selected, right-click the Windows Authentication item in the list and select Providers. Add the Negotiate provider and set the sequence to be Negotiate and then NTLM.
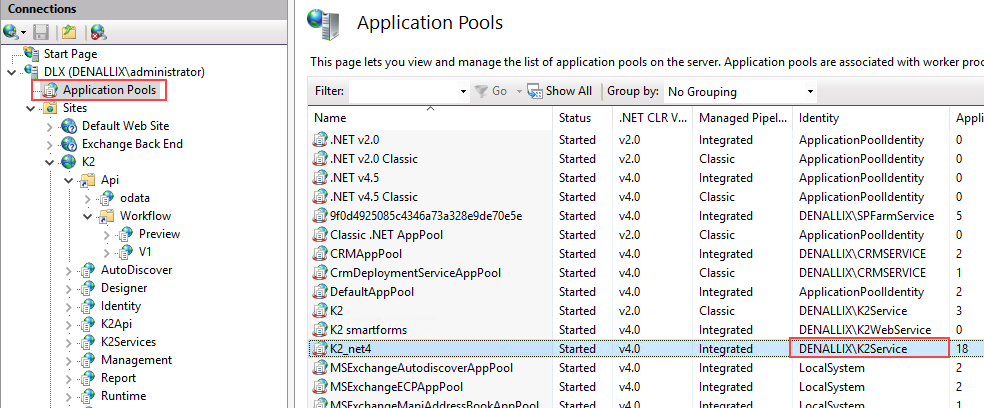
- With the V1 node still selected, open the Advanced Settings (on the far right of the window) and note the application pool in use. For example, K2_net4.
- Click Application Pools and note the account used by the application pool from the previous step.
- If you are using the Preview version of the REST endpoint in your organization, repeat steps 5 and 6 for the Preview endpoint. (Note that most applications and code should preferably use the V1 endpoint)
- Open command prompt or PowerShell as an administrator and perform an IISRESET to complete the IIS configuration.
Part 3: Configure the AAD App Proxy connector
The Azure AD application proxy uses a connector service running on an internal server to establish an outbound connection to Azure, and inbound connections to the internal K2 REST broker. Follow these steps to install and configure the AAD app proxy connector.
- Navigate to https://portal.azure.com and sign in as a tenant administrator.
- Select Azure Active Directory from the left vertical link list.
- Select Application proxy from the link list displayed in the next blade.
- If required, create a new connector group to contain the new connector.
- Click on Download connector service to download the connector installer.
- Connect to the internal server that you intend to use to host the app proxy connector service. Then run the downloaded connector service installer.
- When prompted to sign in to Azure, do so with a user that has permissions to create connectors.
- After refreshing the Application proxy page in the Azure portal, you should now see the internal server FQN listed. If the connector is not listed in the correct group, change the assigned connector group by clicking on the connector in the list.
Part 4: Create Kerberos SPNs and configure delegation
You need a Kerberos configuration to allow the AAD app proxy to impersonate the logged-in user through to the K2 Workflow REST API web application. The connector service uses the AAD UPN to create a corresponding AD Kerberos ticket to pass to the K2 server. Follow these steps to create the required SPNs and configure delegation between the services.
- Log onto a server with an account that has permissions in AD to run the SetSPN command. Start either a command prompt or PowerShell as administrator and execute this command: setspn -s HTTP/[host]:[port] [domainaccountname]
- Substitute [APISiteName] with the DNS name of your API site – for example k2.denallix.com
- Substitute [domain][accountName] with the service account for the API virtual directory application pool noted above in the Change authentication settings for the REST API virtual directory section.
setspn -s HTTP/k2.denallix.com DenallixK2Service - Log on to a domain controller or a server with access to Active Directory Users and Computers and open it.
- Configure delegation for the computer hosting the AAD app proxy connector service:
- Search for the computer that is hosting the AAD app proxy connector service and open its properties.
- Select the Delegation tab.
- Select Trust this computer for delegation to specified services only and User any authentication protocol.
- Click Add, click Users or Computers and search for the service account used for the SPN in step 1 above. Select it and click OK.
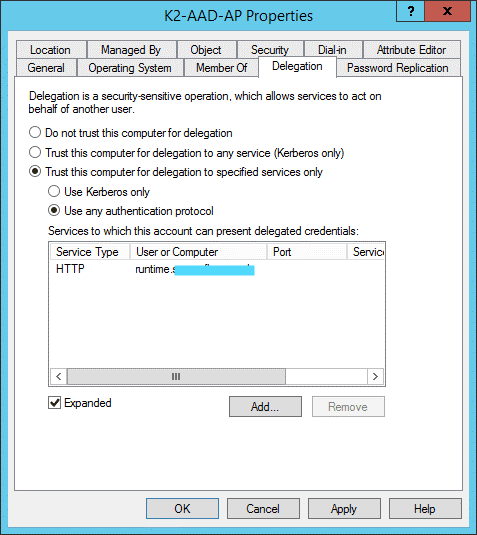
- The delegation tab of the properties page for the computer that is hosting the AAD app proxy connector service should look like this:
- Configure delegation for the application pool account:
- Search for the application pool account used in the SPN (for example, denallixk2Service), open its Properties.
- Select the Delegation tab.
- Select Trust this computer for delegation to specified services only and User any authentication protocol.
- Click Add, click Users or Computers and search for the computer that is hosting the AAD app proxy connector service. Select it and click OK.
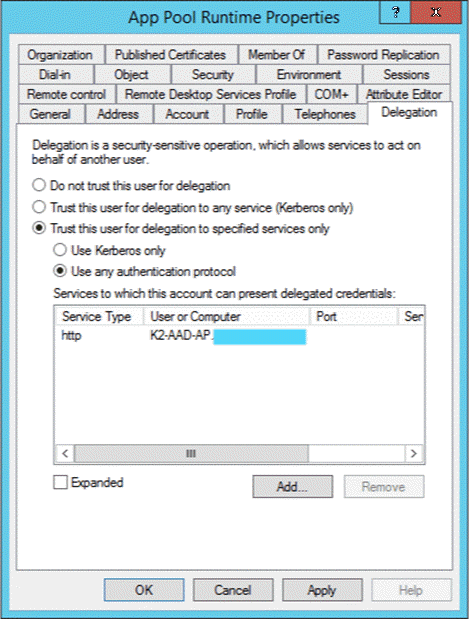
- The delegation tab of the properties page for the app pool account should look like this:
Part 5: Create and Configure an Azure Enterprise App
You need an Azure enterprise app to be able to make authenticated external connections to the internal REST service. Use the following steps to configure an enterprise app to work with the new connector you created in the preceding steps.
- Navigate to https://portal.azure.com and sign in as a tenant administrator.
- Navigate to Azure Active Directory > Application proxy and select Configure an app.
- Name: enter a name for the enterprise app
- Internal URL: enter the URL used to access the REST service on the internal network. Using the example earlier in this article, the URL would be https://k2.denallix.com/api/workflow/v1/
- External URL: choose an external URL. If possible, this should be the same as the internal URL.
- Select Azure Active Directory for pre-authentication.
- Select the connector group chosen in the earlier section of this article.
- For Translate URLs In, set both Header and Body to Yes. It may not be necessary to have Application Body set to Yes but keep this set in the beginning and turn it off later to improve performance if needed. You should not need Translation if using the same URL for external and internal.
- Leave all other settings as default.
- Click Add to create the new enterprise app.
- Once you have created the app, click the Owners link for the app and assign your administrator user as an app owner.
- Select the Users and groups link and add any users from AAD that need access to the REST broker. Make sure that you add the user testing the configuration to this list. You need to have created this user through AAD connect and the user must have a corresponding Active Directory user account.
- Select Single sign-on in the link list for the app.
- Select Windows Integrated Authentication.
- Configure WIA as follows:
- Internal Application SPN: This will be like the SPN created earlier in this article, excluding the account name, for example:
HTTP/k2.denallix.com - Delegated Login Identity: Select On-premises SAM account name
- Click Save to save the single sign-on settings.
- Internal Application SPN: This will be like the SPN created earlier in this article, excluding the account name, for example:
- Navigate back to the root Azure Active Directory section in the Azure portal and select App registrations.
- Select the app you just created.
- Click the Authentication link.
- Ensure there are two redirect URIs registered, the base URL for the REST service (external) and the base URL with .auth/login/aad/callback appended. The Redirect URIs list should look like this:
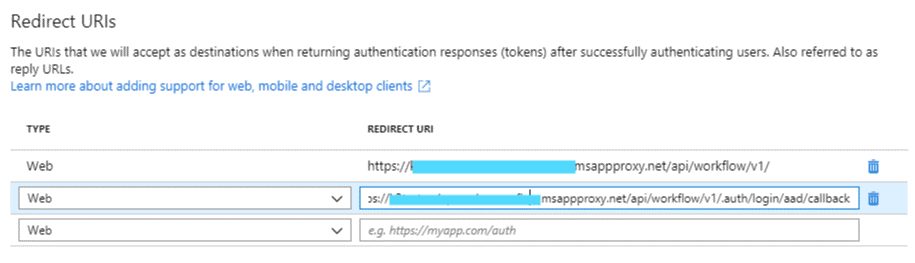
- Click Save to save the redirect URIs.
Part 6: Testing the configuration
Basic browser-based test
- Open a browser and navigate to the swagger page of the Workflow REST API using the external URL. For example,
https://k2testaadap-mydomain.msappproxy.net/api/workflow/v1/swagger - When prompted to sign in to AAD, sign in with a user you added during step 5 of the previous section.
- If the configuration is correct you will see a similar swagger API overview page as shown in the first section of this document.
Use Postman to perform a test call to the Workflow REST API
You need the following information to request an access token from Azure to call the AAD app proxy URL:
Now you can get an access token and call the K2 Workflow REST API.
Get the Callback URL
- Log on to the Azure portal site as a tenant administrator.
- Click on Azure Active Directory.
- Click on App registrations.
- Select the app created previously.
- Select the link under Redirect URIs in the main area on the right.
- Copy the URI created previously ending with .auth/login/aad/callback.
Get the Auth URL and Access Token URL
- Log on to the Azure portal site as a tenant administrator.
- Click on Azure Active Directory.
- Click on App registrations.
- Select the app created previously.
- Select Endpoints at the top of the main area on the right.
- Copy the following URLs:
- Auth URL: OAuth 2.0 authorization endpoint (v1)
- Access token URL: OAuth 2.0 token endpoint (v1)
Get the client ID
- Log on to the Azure portal site as a tenant administrator.
- Click on Azure Active Directory.
- Click on App registrations.
- Select the app created previously.
- Copy the GUID under Application (client) ID in the main area on the right.
Create and copy the client secret
- Log on to the Azure portal site as a tenant administrator.
- Click on Azure Active Directory.
- Click on App registrations.
- Select the app created previously.
- Click the Certificates and Secrets link in the vertical link list displayed.
- Under Client secrets click New client secret, provide a description, select the desired expiration and click Add.
- Copy the client secret value displayed.
Get an access token and call the K2 Workflow REST API
- Open postman and create a new request.
- Change the request type/verb to POST and enter the full external URL for the API resource you wish to call. In this case, we will be starting a new K2 workflow instance using postman. An example of the URL is:
https://k2test-myexternaldomain.msappproxy.net/api/workflow/v1/workflows/8
The URL above calls the workflows method and passes the process ID 8. Retrieve the process ID for the desired workflow using the K2 management site. Navigate to the desired workflow and note the ID in the query string. - Select the Authorization tab.
- Change the Type to OAuth 2.0 and Add authentication data to Request Headers.
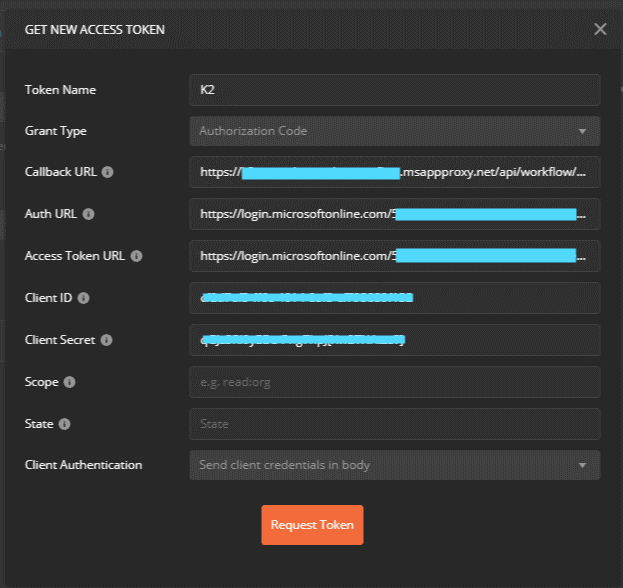
- Select Get New Access Token and use the information you copied earlier to fill in the pop-up window. Your screen should look like this:
- Click Request Token. When the AAD login window shows, sign in using the test user account from earlier. AAD should create a token and pass it to Postman.
- Select the new token, scroll to the bottom and select Use Token. This should show the token on the right.
- Click the Headers tab.
- Add a new key called Content-Type with value application/json.
- Click the Body tab.
- Select the raw radio button and set the drop-down on the right to JSON. Copy the following JSON into the body section: {
"folio": "Test #00001",
"expectedDuration": 86400,
"priority": 1
} - Click Send to call the API. If all configurations are correct, you should see a 200 OK status response with a new process instance ID in the body.
- Navigate to the process overview in the K2 Management site and confirm the new process instance with the folio information provided.
