How To: Building Forms Using Views
KB001722
PRODUCT
Use Cases
Views are a way to interact with your data. Each form is comprised of 1 or more views. This how-to will focus on how to utilize views in your designs, and where to place logic in your designs. This how to has been broken down into the following areas:
- Creating a customer information view
- Adding the customer view to a form
- Adding a view to display related records
This how-to uses the IT Support Ticket Accelerator as the starting point. To follow along, deploy the Accelerator. To find out more about using the accelerators in your solution, use this link: http://help.k2.com/onlinehelp/k2appit/UserGuide/1.3/default.htm#App_Templates/App_Templates.htm
Creating a Customer Information View
Customer information is useful in many processes to give the assigned person information about who submitted the support ticket. This information should not be saved, but will need a view to display in the IT request. Therefore, we will create a separate list that could be used by multiple apps to get the customer data.
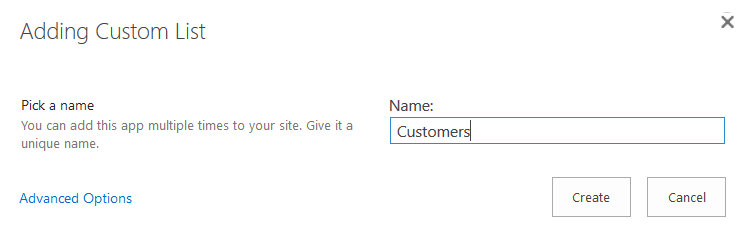
- Create a new Custom List on the SharePoint site named Customers.
- From the Site Contents, select settings on the new Customers list.
- Navigate to the list settings of the Customers list. Click on Advanced settings, and change the Attachments to Disabled, then click OK.
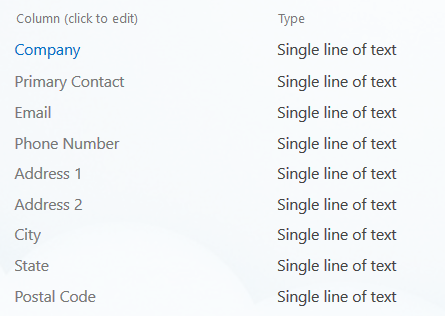
- From the Settings page, click on Title, and rename to Company. Add the following columns all as a single line of text with the default settings: Primary Contact, Email, Phone Number, Address 1, Address 2, City, State, Postal Code. Enter some data for testing, the following data was used in our example:
Company
Primary Contact
Email
Phone Number
Address 1
Address 2
City
State
Postal Code
Acme Inc.
Elmer Fudd
Elmer@AcmeInc.com
555-0122
3230 Spruce Avenue
suite 1
Mount Airy
MD
21771
Denallix
Sam Jones
Sam@Denallix.com
555-0132
2807 Augusta Drive
Burke
VA
22015
Initech
Michael Bolton
MBolton@Initech.com
555-9963
6229 3rd Street
Apt. 34
Sheboygan
WI
53081
Gringotts
Reubeus Hagrid
Hagrid.R@Gringotts.gov
555-6969
6722 Route 5
Birmingham
AL
35209
Universal Export
James Bond
J.B.007@UEP.gov
555-4171
7108 Cross Street
#C
Neenah
WI
54956
Virtucon
Austin Danger
ADP@Virtucon.net
555-0178
4664 East Avenue
unit 1
Voorhees
NJ
08043
- After entering a few customers into the Customers list, select the List tab in the ribbon and then the K2 Application icon. Next we will need to create the SmartObject and View that will be used in the support ticket process.
- Select Create New Application. In the next screen in the elements for the application, change the Data option to Site and all of its subsites and then select OK. Once the generation is complete, right click the Customers SmartObject and select Design View.
- Navigate to the General tab on the breadcrumb bar and name the View Customer Display. Leave the View Type as an Item View and then select Next.
- Select Create Layout Table Only in the View Canvas. Create a layout table that is 4 columns by 4 rows and select OK. Select the top left cell, and use the Merge Cell to the Right button to combine the first 2 cells. Merge the first 2 columns for all 4 left column cells. Select the top row third cell, and merge with the far left cell. Do this for the first 3 cells, leaving 2 cells at the bottom. Your table should look as follows:

- The purpose of creating the layout table is to create a nice layout for the information about our customer. Next, navigate to the Fields task pane and drag the fields to your table in the following appearance:

- From the Controls panel, drag a second Table onto the view with 1 row and 2 columns. We are adding an additional table to the view so that on the edit and display forms we will be able to hide the table in the View. Add a Drop-Down List to the left cell.
- Select the drop-down list and rename it Search Drop-Down List in the Properties task pane. This drop-down will be used to display the contact information in the table.
- Scroll down to the Type settings under the Data Source group and select the ellipses to configure the drop-down source.
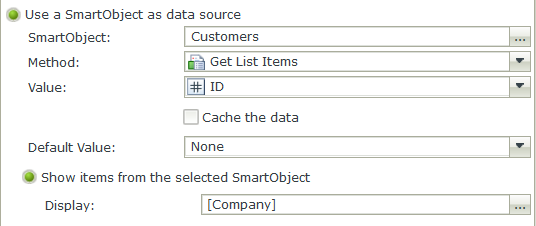
- Configure the drop-down to Use a SmartObject as a data source by selecting the ellipses to choose from the SmartObjects on your site.
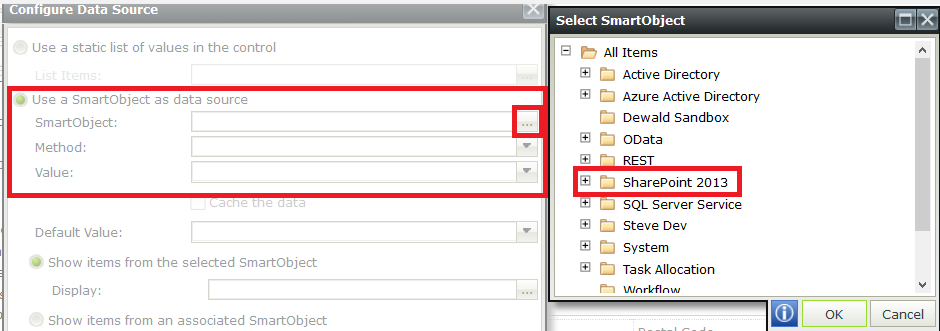
- Select the Customers SmartObject and then select OK. For the Method use Get List Items and use the ID for the Value and then switch the display to Company then select OK.
- Add a Label to the right column. In the Text option set the value to Please choose a company.
- Since we will want the drop-down to always populate the information, we will add a rule on the drop-down to set the values of the other fields. Select the drop-down and in the Rules task pane, click on the Add Rule button. In the Event, change the option to When the control is Changed.
- In the Actions tab, drag an Action for Execute a SmartObject method onto the Rule Designer.
- For the SmartObject, choose the Customers SmartObject under the SharePoint2013 folder and execute its Get List Item By ID method.
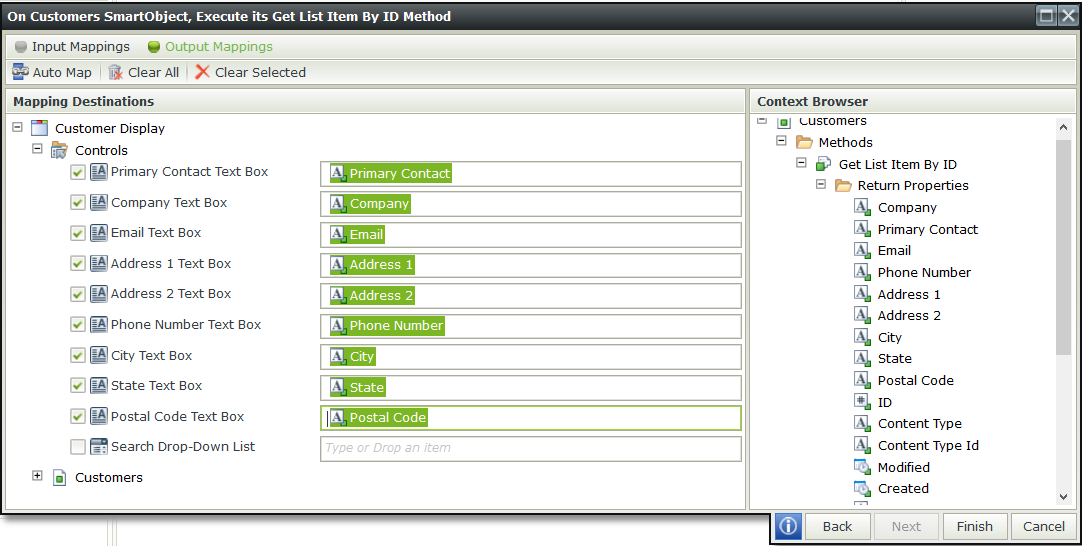
- In the Input Mappings, drag the Search Drop-Down List control onto the ID field and select Next.
- In the Output Mappings, drag the corresponding fields from the Context Browser onto the matching field in the Controls and then select Finish. This will dynamically update the information displayed to the user in the view.
- Select Finish to save you view and exit.
Adding the Customer View to a Form
Next we will take steps to link the customer information and the Support Ticket together. A field will need to be added to the Support Ticket list in order to capture the customer list item id, and then use that id to query the list in the edit and display Forms.
- Navigate to the Support Ticket list. From the top ribbon, select List Settings. Scroll down to the Columns section, and click the Create column link.
- Name the column CustomerID as the type Single line of text then select OK.
- Navigate back to the Support Ticket list, and select the K2 Application icon from the ribbon to open the Application elements page.
- Wait for the page to finish loading and when prompted, select Regenerate SmartObjects. This will add the new column to the SmartObject without recreating the View and Forms that have already been created.
- Check out the New Issue Form and select Edit.
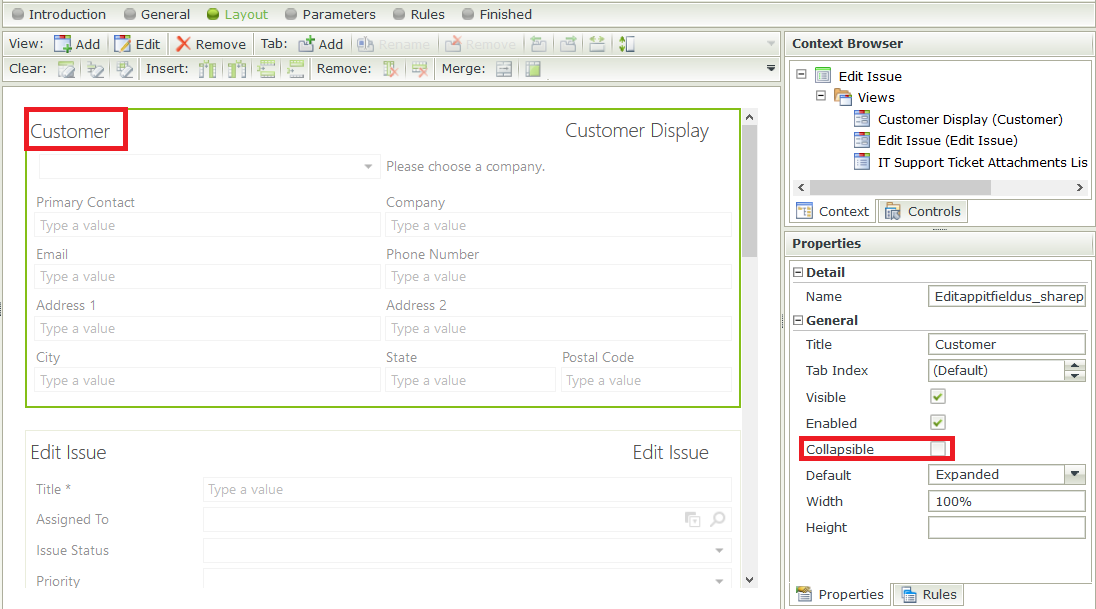
- Select the New Issue View. In the Properties task pane, uncheck the Visible option. This View will be configured to show once the user has chosen a company.
- From the designer, locate the Customer Display View and add the View to the top of the layout page. Uncheck the Collapsible option. Rename the View Customer and select the Rules task pane to open the In customer Display, When Search Drop-Down List is Changed rule.

- On open of the Rule Designer, notice how the rules are not editable from the form. Rules designed in a view will display in the form but are not editable, however, new rules can be added. Add a condition for a control on a View contains a value. Set the View to Customer Display and the control to Search Drop-Down List.

- Next in the Actions, add an action to Set a View’s properties. Select the New Issue View and then click configure. Select the Visible check box with the value of yes and then click OK. This step will show the New Issue View once the user has selected a customer from the drop-down.

- Next on the Save action for the View, the CustomerID must be set before the item is created to create a reference to the customer in the ticket item. Select the New Issue View, and in the Rules task pane, select the On New Issue, when Save Button is Clicked rule and select Edit.
- Select the then on New Issue View, execute the Create List Item method rule, and search for transfer in the Actions task pane. Add an action to Transfer Data and move the rule to the step before by using the Move Up button or the up arrow that appears on hover of the item. The CustomerID control will need to be set before the item is created in order to create a reference that can be used later on.
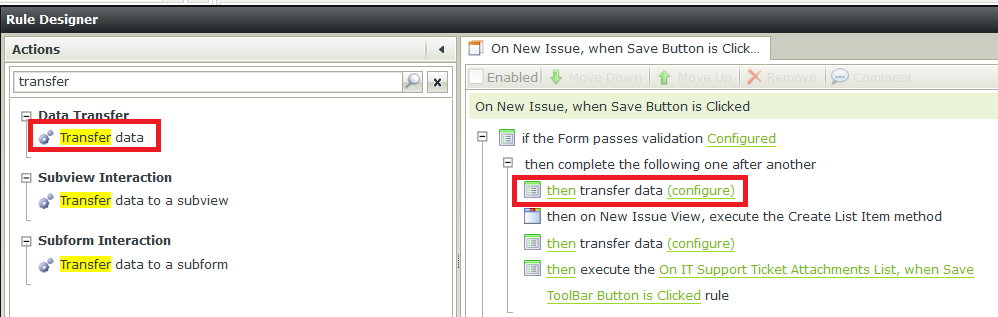
- Click configure. Expand the New Issue View, and the Support Ticket SmartObject.
- Expand the New Issue View in the Context Browser and then the Support Ticket SmartObject. Drag the Search Drop-Down List onto the CustomerID field for the configuration and then select OK. Select OK again and then Finish to return to the Application elements page.

Using Parent Information to Link Views on Forms
In the last step, the CustomerID was captured in our Support Ticket item. By capturing this ID, we can reuse that information to display linked information to the user by querying views with related information. In this step, we will reuse the Customer View on the Edit Issue Form.
- Check in the New Issue View and New Issue Form.
- In the Application elements page, check out the Edit Issue Form, and select Edit.
- In the K2 Designer, open the SharePoint 2013 folder, and navigate to the Customer Display View and drag it onto the canvas above the Edit Issue View.
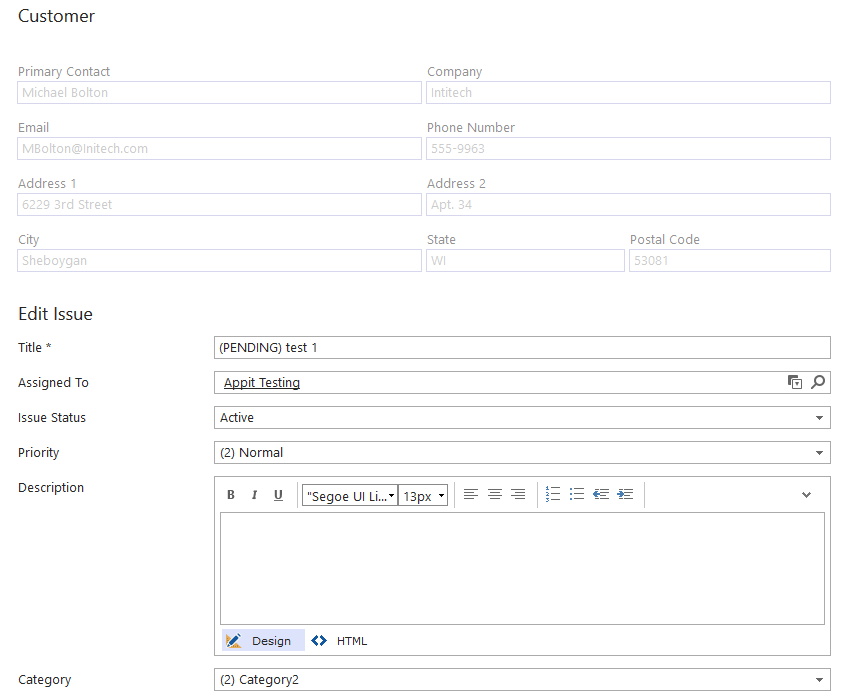
- Uncheck the Collapsible option in the Properties menu, and change the title to Customer.
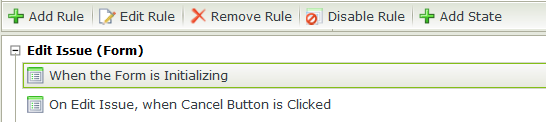
- Select the Rules tab from the breadcrumb bar, and select the When the Form is Initializing rule from the Edit Issue (Form) and select Edit.
- Add a Rule to Set a View’s properties. Select the Customer Display View and then click configure.
- Check the check box for Enabled, and set the option to No. This will disable the Customer View so that the user cannot edit information.
- Next, search for view control and add an Action to Set a View control’s properties. Select the Customer Display View and the Table1 created for the search drop-down. Click configure.
- Under the Visible option, select the check box and set the option to No. This will hide the search on the view to prevent users from changing the associated contact.
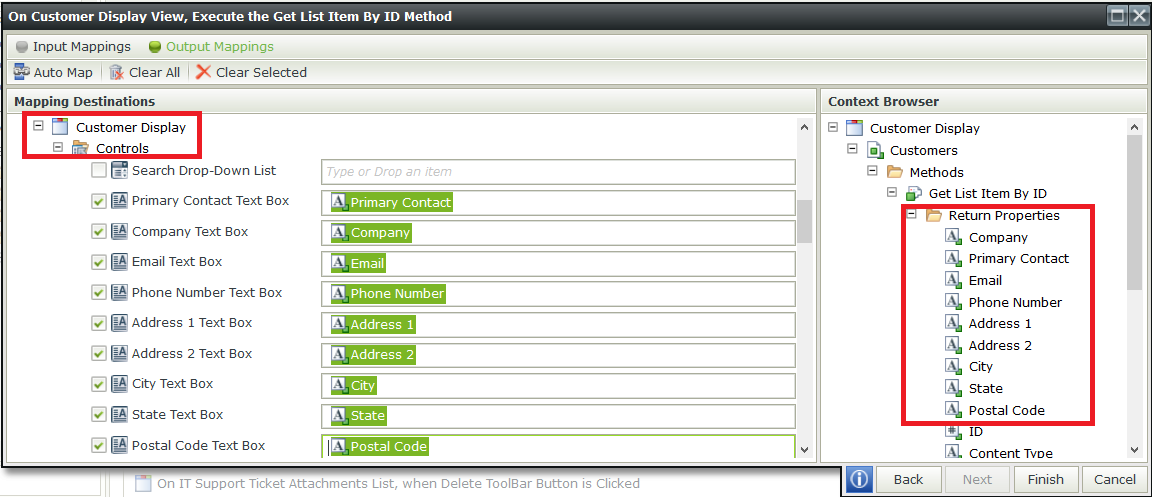
- Next search for view method and add an Action to Execute a view method. Select the Customer Display View and the Get List Item By ID method. Then click configure.
- In the Support Ticket SmartObject under the Edit Issue View, drag the CustomerID field on to the ID field from the Controls folder. Then click Next.
- Locate the Customer Display View, and drag the Return Properties onto the matching fields. Then click Finish.
- Submit a new request to test. Then repeat steps 1-13 for the Display Issue View and Display Issue Form.
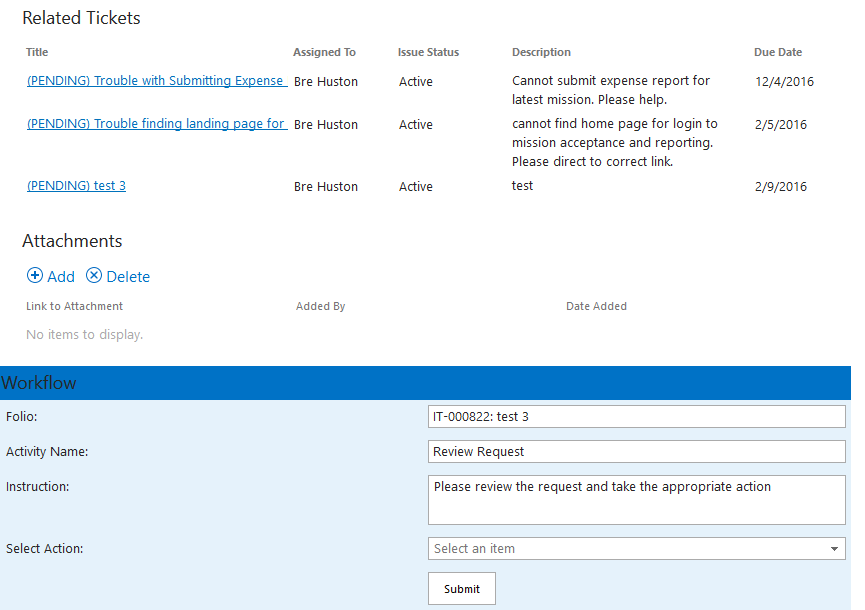
Adding a View to Display Related Records
After adding a customer to the Support Ticket, the tickets related to the customer are now linked using the CustomerID field. In these steps, we will create a new view to display the related tickets to give the user a better snapshot of the other tickets that have been submitted for the customer.
- From the Application elements page, right click the Support Ticket SmartObject and select Design View.
- In the General tab, name the View Related Support Tickets and select the List View for View Type. Uncheck the option to Call this method when the form loads. Then click Next.
- Select Create Labels and Controls in the View Canvas. Select the Title, Assigned To (Value), Issue Status, Description and Due Date.
- Adjust the column widths to give the Description more space. Rename the Text value to Assigned To in the Header tab of the Properties task pane.
- Select the Description column, and in the Body tab of the Properties task pane, check the option to Wrap Text.
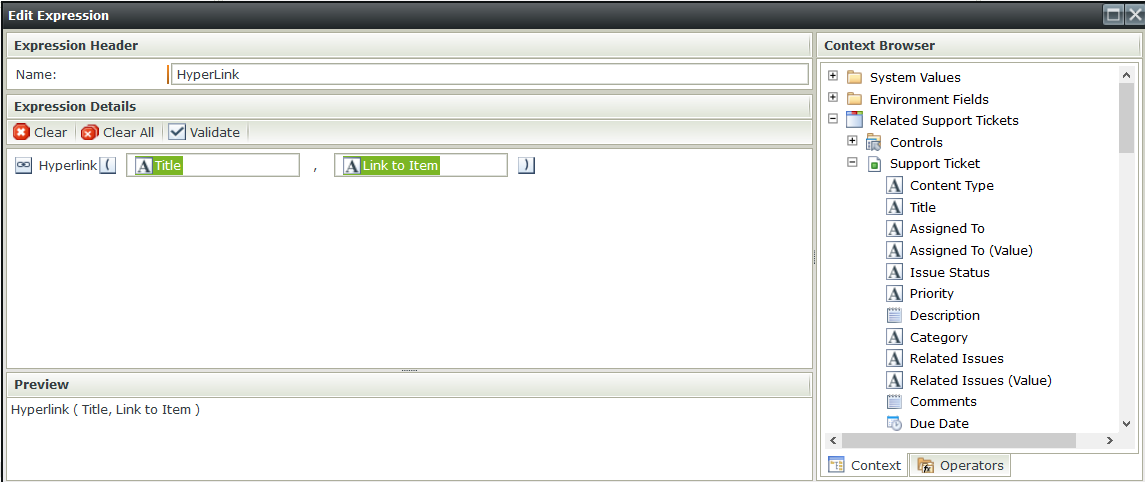
- From the Controls menu, drag a Hyperlink onto the Title column. In the Properties menu, configure an Expression for the hyperlink.
- Open the Operators tab in the Context Browser and add the Hyperlink expression under the Text folder.
- Then from the Support Ticket SmartObject, drag the Title into the first cell, and the Link to Item into the second. This will create a dynamic link to the item in the list.
- Select Finish to save and navigate back to the Application elements page.
- Check Out and Edit the Edit Issue Form.
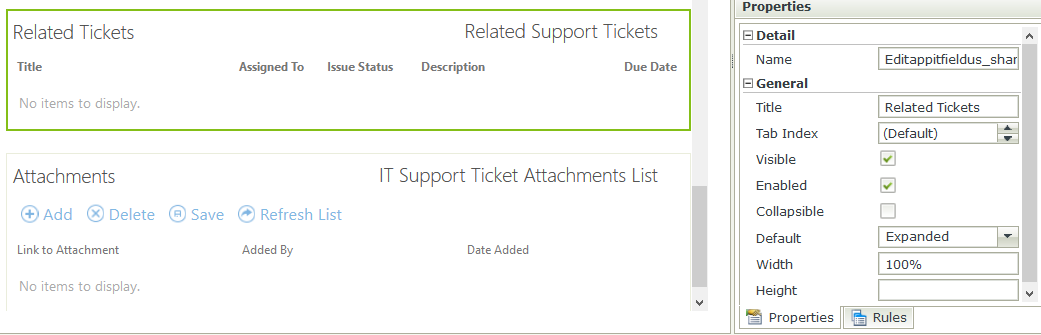
- Drag the Related Support Tickets View onto the canvas under the Edit Issue View, and name it Related Tickets and un-check the Collapsible Option in the General tab of the Properties task pane.
- Navigate to the rules task pane and under Edit Issue (Form) select the When the Form is Initializing rule and select Edit Rule.
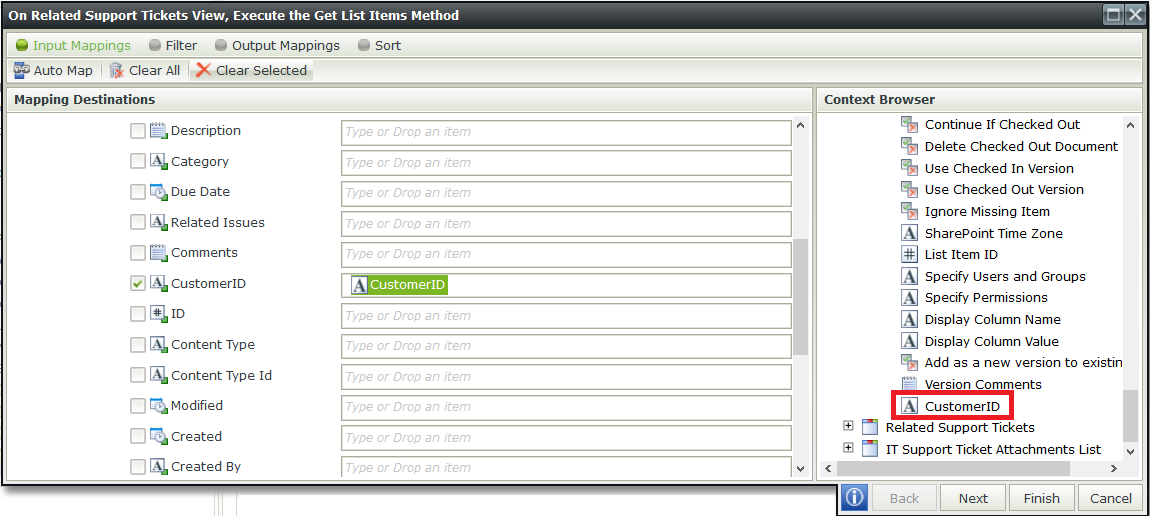
- Add a rule to Execute a View method. Select the Related Support Tickets View and the Get List Items method and then click configure.
- From the Context Browser under Support Ticket SmartObject in the Edit View, drag the CustomerID field onto the CustomerID Input Property and click Finish. This will narrow our search to the tickets related to the specified customer.
- Repeat steps 10-14 for the Display Issue Form.