Expanding views on a form

  • 24 February 2020
  • 8 replies
  • 95 views

Hello,


if we create a form with 2 or more views it is a nice feature that we can expand and collapse the different views.

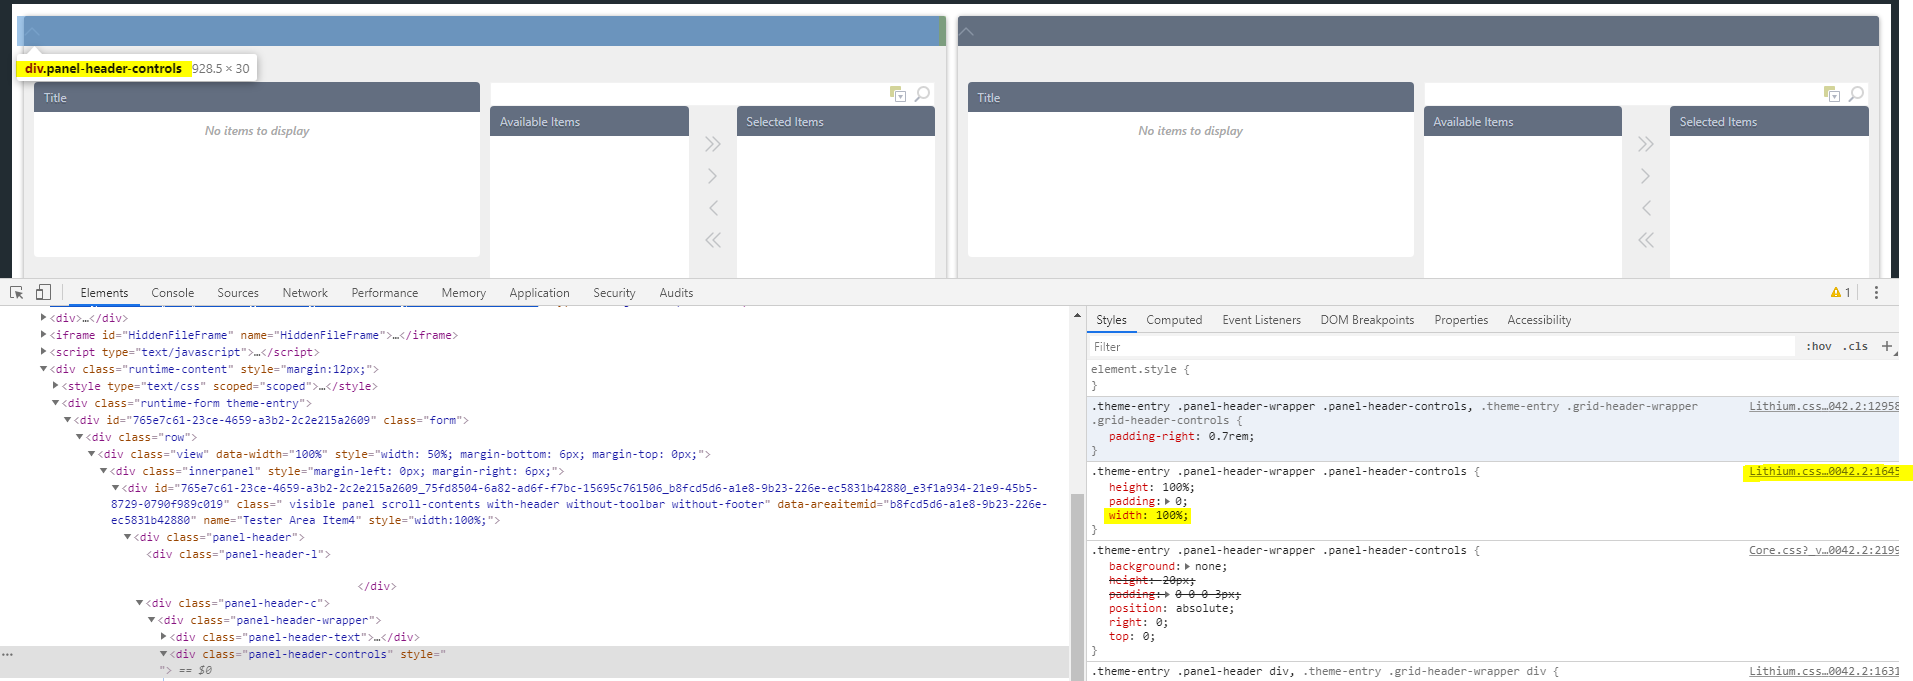
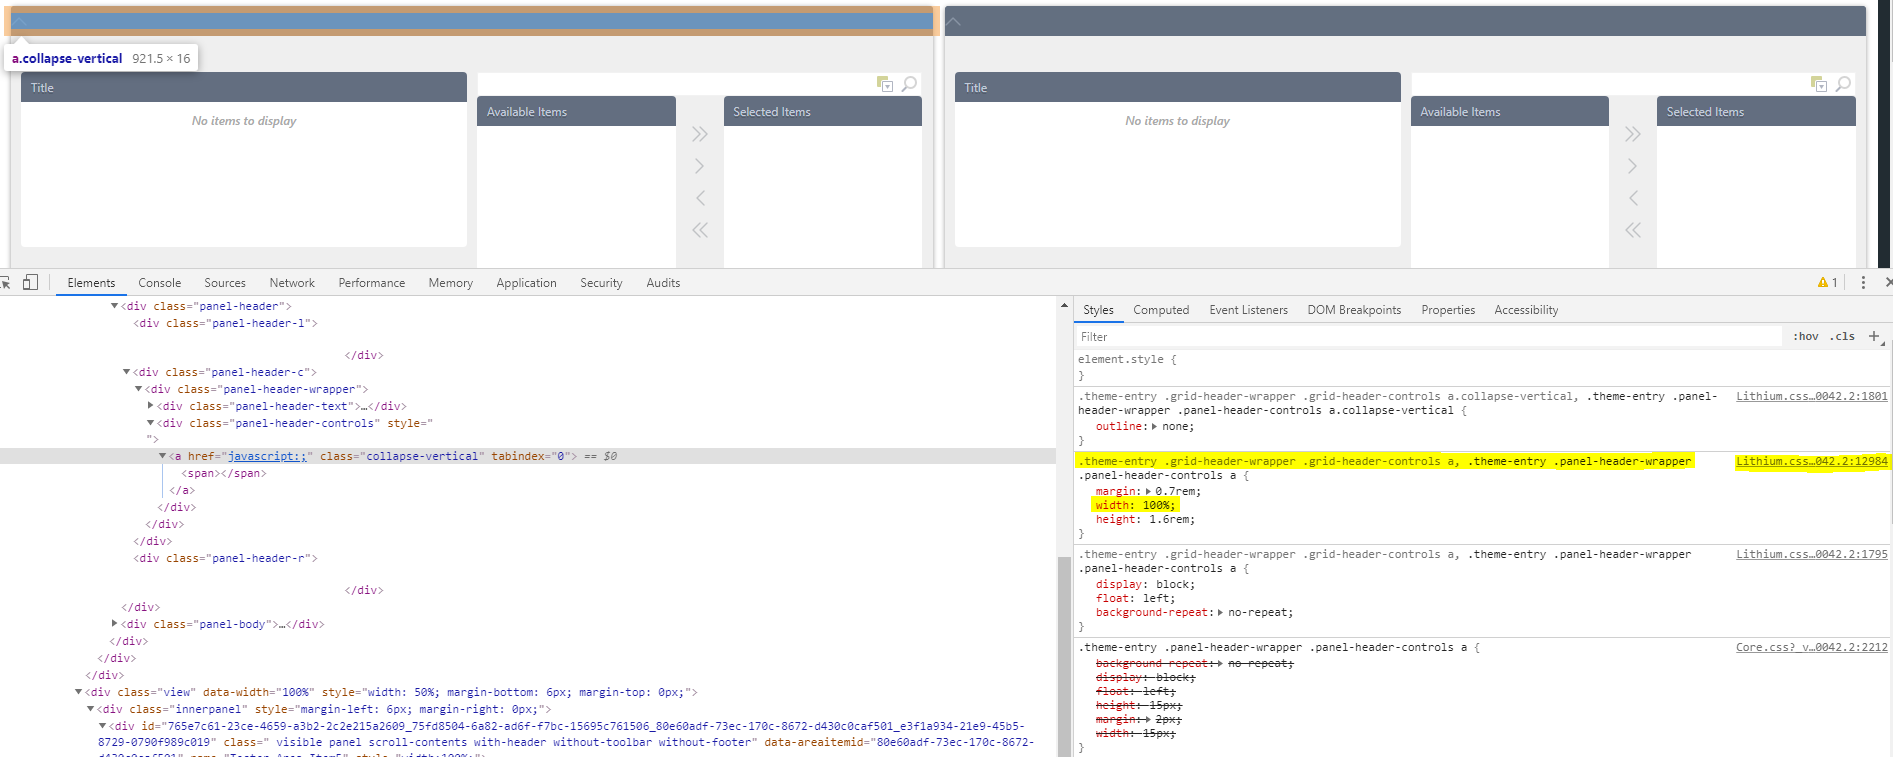
But this seems only be possible by clicking on the "small arrow on the far right side"...

Our users would like to click the whole bar to expand and collapse the views... Is this possible?


regards,

Johann


8 replies

Hi there  @JSC 


What you can do is use inject custom CSS into a SmartForm to expand the collapse buttons size on the view. 


This can be done by:


  1. Add a Data Label onto your form:

    • Set it to Text 


  2. Make sure these settings are set on your Data Label:


    • Literal: true

    • Prevent XSS: false


  3. Add a custom expression to the Data Label with code simililiar to this:

    • <link rel="stylesheet" type="text/css" href="/Designer/Styles/Themes/Lithium/Test.css">

      • There are 2 parts in this code that will depend on you - namely your path and your CSS name. (Designer in this case is refering to K2 Designer which is in your K2 root folder.)

      • I am using the Lithium theme in this case hence why my custom CSS is inside the Lithium theme folder.


  4. Make a custom CSS file in the above mentioned file path:

    • Specifically where you specify the width of the button, something similiar to this:


  5. Clear your cache and refresh - your changes should now be there and you should be able to click the bar to collapse the view.


You can play around with the CSS more to change where the icon might be or whatever else you need as well.


Hope this helps!


This is working realy good but I still have a problem with the "arrow down" and "arrow up" picture. If I put the "active area" on the full width, the arrows display on the right side (and cross the view title text)
I can hide it with "opacity: 0;" but then it is not visible at all...
Is there a possibility to move only the picture to the old place?

Hi  @JSC ,


You can use a bit more CSS to achieve this. The 2 commands you can use are:


  • position: relative;

    • An element is positioned relative to its normal position. Setting the left properties of a relatively-positioned element will cause it to be adjusted away from its normal position.


  • left: XXXpx;

    • Where XXX is dependent on how wide you made your active area and how much you would like to push it to the right side of your collapseable bar.


I hope I understood your question correctly!


I tried this but it does not only shift the arrow back to the left but also make the "area", where I can click to collapse and expand the view, smaller again...
So in fact I end up with the same result, befor adding any CSS 😉
I found another problem:
If you have two views in a row it does only work for the left views - and not for the right views.
I tried to do the same for them:
<style> div.panel-header > div.panel-header-c > div > div.panel-header-controls > a{ width: 200rem; height: 2rem; opacity: 0; } </style>
<style> div.grid-header > div > div.grid-header-controls > a{ width: 20rem; height: 2rem; opacity: 0; } </style>

I can "hide" the arrow with this but I cannot make the "clickable area" wider...

Any suggestions?

Hi  @JSC ,


I've done a bit more research and spend a little more time on this and I am happy to say I found 2 great solutions to your issue. Either will work but it will depend on your context as to which one you choose.


Scenario 1 - You need this function for only specific forms (similiar to my initial response)


Since it's custom code injected into a specific form you will have to do this entire process for every form where you want the code applied. Additionally, you will lose things like Hover Animation, Click animation (icon turns), Icon styles according to your theme etc. Also note that this code is specifically for the Lithium theme so the background-positon's Y-value (second number) might need to change as this will change what icon is shown.


  1. Add a Data Label onto your form:

    • Set it to Text 


  2. Make sure these settings are set on your Data Label:


    • Literal: true

    • Prevent XSS: false


  3. Add a custom expression to the Data Label with code simililiar to this:

    • <link rel="stylesheet" type="text/css" href="/Designer/Styles/Themes/Lithium/Test.css">

      • There are 2 parts in this code that will depend on you - namely your path and your CSS name. (Designer in this case is refering to K2 Designer which is in your K2 root folder.)

      • I am using the Lithium theme in this case hence why my custom CSS is inside the Lithium theme folder.


  4. Make a custom CSS file in the above mentioned file path:

    • Specifically with this code for your case:


    • div.panel-header > div.panel-header-c > div > div.panel-header-controls > a{
      width: 100%;
      background-position: 100% 26.2%;
      padding-left: 50px;
      }

      div.panel-header > div.panel-header-c > div > div.panel-header-controls{
      width: 100%;
      }


  5. Clear your cache and refresh - your changes should now be there and you should be able to click the bar to collapse the view.


Scenario 2 - You need this function on all forms


For this you will need to make a custom theme which will mean a longer process however the result will be a lot more responsive (no lose of animations or styling on the icons etc) and it will be applied to ALL forms without the need of a Data Label.


  1. You will need to create a custom theme, in order to do so please follow this article as it will depend on the theme used on your system. 

    • According to the steps, you will have to temporarily disable caching on your site which is done by changing values in your web.config which is found under your K2 Runtime folder, please make sure that you undo these changes once you are done with this entire process or specifically after step.

    • Additionally, after you make any changes to your webconfig be sure to do an IISreset which you can do by typing iisreset in an elevated command prompt.


  2. Once you have made your custom theme you will need to modify the following code to your relevent CSS files :

    • Before you do step 2 please note: Disabling the web cache will allow the chrome inspect tool to show the dependent CSS file as well as it's row number (which will depend on your theme) - you will use this to add/modify the CSS code in step 2.

      • Also the row number highlighted in my screenshots won't always point you to exactly where your needed code is (might be a few rows above or below the section you need). So to avoid making the wrong changes please take a moment upon each change and compare the code in the CSS to the CSS you see in your browser.


    •  Div Panel Header Controls

      • You need to add "width: 100%" to the header control of the button (the div right above the button)


    • The HREF button (your collapse/uncollapse arrow)

      • The width and background-position will need to be modified

        • You will need to first modify the width property to be "width: 100%"


        • Then lastly you will need to change the background-position property to "background-position: 103.2% 0%" - This will need to be done 4 times in 4 different places so similiar to the above simply find your code section and change the needed values .

          • The reason this needs to be done so many times is that you can think of this one having 4 states (4 images, 4 stylings etc), to further explain please look at the below differences in row numbers when the button is collapsed:

          • To when it is uncollapsed:


  • This is a longer process than the Data Label route however it is the best practice if you need these changes across all Forms.

  • Also please be extremely careful when following the steps in Scenario 2, as performance issues can arise if you dont undo the web.config changes when you are done and other issues may occur if the best practices and preperations are not followed.


Lastly please note: As this is custom code it will not be supported by K2 Support. 


Hope this helps!


Thanks. This is a good solution for most of my views ;-)


I have a layout with two views side by side. Your solution works for all views that are "alone" but for the red circled view, it does not really work. I tried to do the same for them, but I failed...


They do not use divs like "div.panel-header > div.panel-header-c > div > div.panel-header-controls > a" but "div.grid-header > div > div.grid-header-controls > a"

I tried similar CSS there but it did not work... (I am a noob for CSS...)


Can you provide the proper CSS code for those views as well?


regards,

Johann


Hi  @JSC ,


By the sounds of it you are using the first scenario solution - I believe the discrepencies are due to our difference in K2 versions but the following is what you should look for:


You have 2 parts that you need to override the CSS for - the button and the immediate parent of that button (one div up).


For the "parent":


 width: 100%;


For the "button":


 width: 100%;
background-position: 100% 26.2%;
padding-left: 50px;

So to test that you have the right selectors, use the Google inspect tool and do some live CSS editing - your changes will be done immediatly and you can see where and what you need to tweak which you can then later paste into your custom CSS file. 


  • TIP: if you want the direct selector of a certain item then right click on the div in the google inspect window > Copy > Copy Selector. 

    • Just note that whatever code set will obviously ONLY work for that specific item as it's an ID selector (unique).

    • If you want you can also try add a bit of padding for that one button but just be sure to do some compatibility tests to see how it would react.


Unfortunetly I can't advise the specific selectors as it seems our versions differ but regardless the CSS code I have provided should work if put in the right place - I believe it's just a matter of playing around with it to find the right place!


Alternatively you can also do some reading here and do a bit of trial and error to find the right combination of CSS for your needs. 

I really hope you come right. All the best!


Reply