How to enable K2 Designer for SharePoint when using a Visual Studio 2010 Content Type Project in SharePoint 2010
KB001299
PRODUCTIntroduction
SharePoint 2010 allows the option to make use of a Visual Studio 2010 Content Type project to be deployed to SharePoint 2010 as a Document Library or List template with custom columns as required. This template will then be available for selection when creating a new Document Library or List in the site collection. Normal functionality is available on this Document Library or List template; however the K2 Designer for SharePoint menu item will not be available automatically and needs to be enabled manually. This document will explain the steps on how to enable the K2 Designer for SharePoint menu item for use of the K2 Designer for SharePoint feature.
How to enable the K2 Designer for SharePoint menu item
This section will explain how to enable the K2 Designer for SharePoint menu item manually for a Visual Studio 2010 Content Type project deployed to SharePoint 2010. There are 4 steps needsed as explained below.
Step 1
The Content Type Instance ID is required to update the elements.xml file. Updating the elements.xml file will be explained in step 2. Follow the steps below to retrieve the Content Type Instance ID:
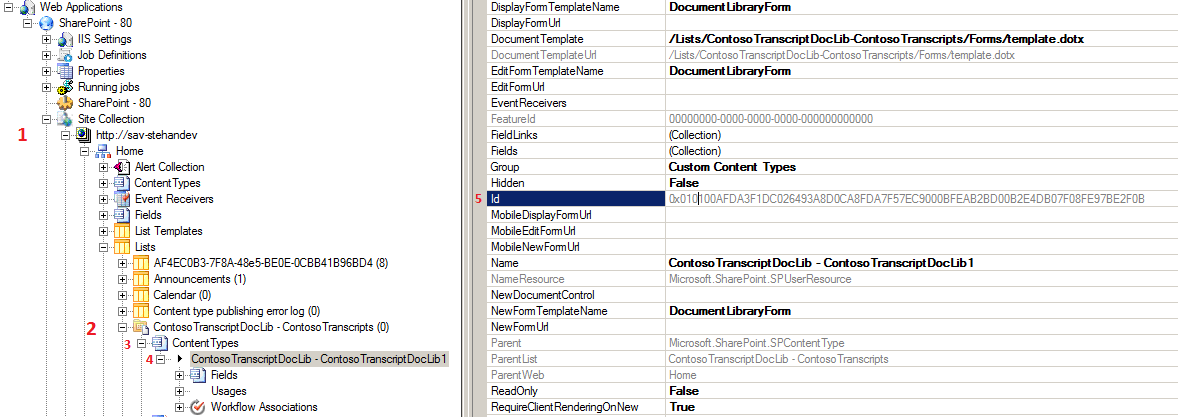
- Using the SharePoint Manager 2010, navigate to the specified Site Collection and then to the sub site where the Visual Studio 2010 Content Type Project was deployed.
- From the Lists Category expand the Visual Studio 2010 Content Type project.
- Expand Content Type.
- Select the Instance.
- Find the ID of that instance. Copy this ID for later use.

Step 2
The Content Type Instance ID needs to be inserted into the elements.xml file located in C:Program FilesCommon FilesMicrosoft SharedWeb Server Extensions14TEMPLATEFEATURESK2WebDesignerV2. Follow the steps below to insert the Content Type ID:
- Navigate to the elements.xml file as per above mentioned location.
- Open the file for edit.
- Find the “<!—Group -->” comment located at line 1202 (at the time of writing).
- Insert the following section of code before the “<!—Group -->” comment.< br/>
<CustomAction Id="K2.List.Ribbon.CustomAction.YourContentTypeID" RegistrationId=" YourContentTypeID" RegistrationType= "ContentType" Location="CommandUI.Ribbon" >
<CommandUIExtension>
<CommandUIDefinitions>
<CommandUIDefinition Location="Ribbon.Library.Settings.Controls._children">
<Button
Id="K2.Ribbon.CreateNewK2Process"
Alt="$Resources:K2WebDesigner_Title"
ToolTipTitle="$Resources:K2WebDesigner_Title"
ToolTipDescription="$Resources:K2WebDesigner_Description_Library"
Sequence="5"
LabelText="$Resources:K2WebDesigner_Title"
Image32by32="/_layouts/images/k2/k24sp_sitesettings_k2d4spmenuitem_32x32.png"
Command="CreateNewProcess"
TemplateAlias="o1" />
</CommandUIDefinition>
</CommandUIDefinitions>
<CommandUIHandlers>
<CommandUIHandler
Command="CreateNewProcess" CommandAction="K2WebDesigner.aspx?List={ListId}&SiteUrl={SiteUrl}" />
</CommandUIHandlers>
</CommandUIExtension>
</CustomAction>
- Replace the YourContentTypeID” with the Content Type Instance ID retrieved in step 1.
Step 3
The K2 Designer for SharePoint feature needs to be reinstalled as a final step to enable the K2 Designer for SharePoint feature on the Document Library or List deployed from a Visual Studio 2010 Content Type Project. In order to do this the feature ID needs to be retrieved from the feature.xml file. Follow the steps below to retrieve the feature ID:
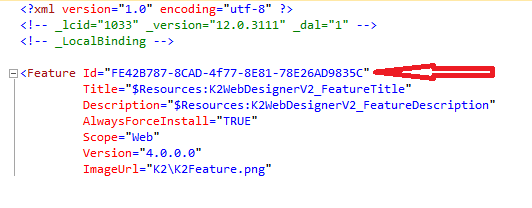
- Navigate to the feature.xml file located in C:Program FilesCommon FilesMicrosoft SharedWeb Server Extensions14TEMPLATEFEATURESK2WebDesignerV2.
- Open the feature.xml file for edit and locate the feature ID as shown in Image 2 below.

3. Copy the feature ID for later use.
Step 4
The K2 Designer for SharePoint feature can now be reinstalled using the feature ID retrieved in step 3. Follow the steps below to reinstall the K2 Designer for SharePoint feature:
- Open the command prompt by clicking on Start, type cmd in the Search Programs and Files search box. Command prompt will now open.
- Change the directory to “C:Program FilesCommon FilesMicrosoft SharedWeb Server Extensions14BIN” by typing cd C:Program FilesCommon FilesMicrosoft SharedWeb Server Extensions14BIN.
- Uninstall the K2 Designer for SharePoint feature using the following command with the feature ID retrieved in step 3:< br/> STSADMIN.EXE -o uninstallfeature -id YOURFEATUREID –force
- Now reinstall the K2 Designer for SharePoint feature using the following command:< br/> STSADMIN.EXE -o installfeature -name K2WebDesignerV2 -force
If you now open the Document Library or List deployed from the Visual Studio 2010 Content Type Project, the K2 Designer for SharePoint menu item is now visible on the ribbon bar and the feature can be accessed as normal.


