

How To: Use the REST Service Type to dynamically manage SharePoint List and Library Content
Use this alternative approach to working with SharePoint list and library items when you need to create, update or delete SharePoint content. With this approach, in contrast to using the K2 for SharePoint app, allows you to use the REST Service Type (provided in the K2 platform) along with the Service Descriptor file attached to this article, to dynamically specify any SharePoint list or library by its site URL and the name of the list or library when executing a SmartObject method. This allows you to create list items, delete list items and documents, and update metadata on any item across site collections with a single REST Service Type Service Instance.
Before you Begin
Download and unzip the SharePoint.JSON service descriptor using the link on the right. Next, determine how many instances of the REST service you need to generate. If your site collections are under the same base path, you may only need one Service Instance. The recommended approach is to register one Service Instance per path, either from the root or from a managed path, but if your site structure is different, or if you want a separate Service Instance per department or business function, you can create multiple Service Instances.
Steps
Use these four steps to create a service instance and then generate and test your SmartObjects.
Step 1: Open the SharePoint.JSON file and update it
- Download the SharePoint.JSON file by clicking the link on the right.
- Open the file in a text editor such as Notepad.
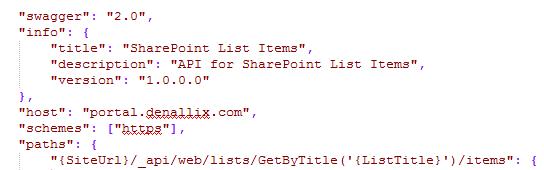
- Update the values of the host and schemes entries to correspond to your SharePoint environment.
-
Update the value of paths if you need to limit the Service Instance to a particular path in SharePoint, such as sites. If you wanted a single Service Instance for all sites under the sites managed path, the value would be:
sites/{SiteUrl}/_api/web/lists/GetByTitle('{ListTitle}')/items
Notice that the SiteUrl and ListTitle values have brackets. These and the bracketed ItemID in other methods are the main values that make the Service Instance dynamic because these values need to be passed as parameters to the methods each time you call them. Do not enter actual values here, but rather use the bracketed "placeholder" values as they are shown in this example.
-
Save the file to a location where your K2 server is able to access the file. Make a note of this location, and if you are a K2 Cloud customer, make sure the location is URL-accessible (Azure blob storage works well for this).
Step 2: Register a Service Instance of the REST service type, using the descriptor file you edited
- Launch the K2 Management site, and browse to Integration > Service Types.
- Find the REST Service Type, select it and click New Instance.
- Specify a Display Name and Description (optional).
- Change the Authentication Mode to OAuth and choose an OAuth Resource Name from the drop-down. For OAuth Resource Audience type the URL of your SharePoint site. The example values below represent the K2 Denallix core virtual machine.

- Using the location of the Service Descriptor file that you had saved in Step 1, specify the name and full path to your SharePoint.JSON file in the Descriptor Location service key property. For K2 Cloud customers, the location must be URL-accessible.
- Change the Add HTTP Request Header Property to Methods value to True. This allows you to pass header values per method call, which is necessary to create, update and delete list and library items in SharePoint.
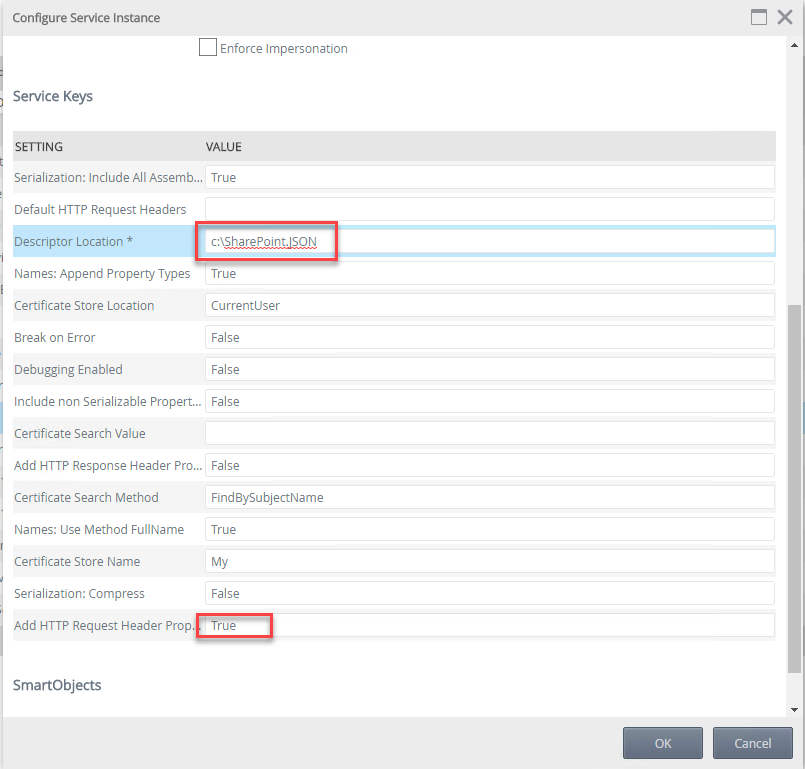
- Click OK to create the Service Instance.
Step 3: Generate SmartObjects for each instance
- Generate SmartObjects for each instance you've created by browsing to Integration > Service Instances.
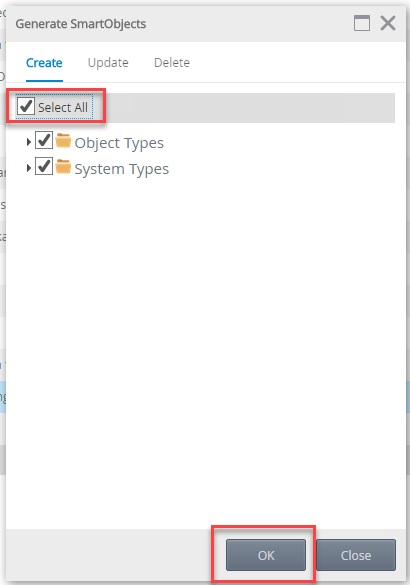
- Select the instance and click Generate SmartObjects.
- Click Select All and then click OK.
Step 4: Test the SmartObjects
- In this step you test the SmartObjects by calling methods to create list items. (You may also want to test updating and deleting list items and documents.) Note that each method needs a different header. See the HTTP Headers table below for those values.
- Create a custom list called CustomList on your SharePoint site.
- Use the Categories node in K2 Management to browse to the location of the generated SmartObjects, for example, Categories > REST.
- Expand the Object Types node and select Create List Item.
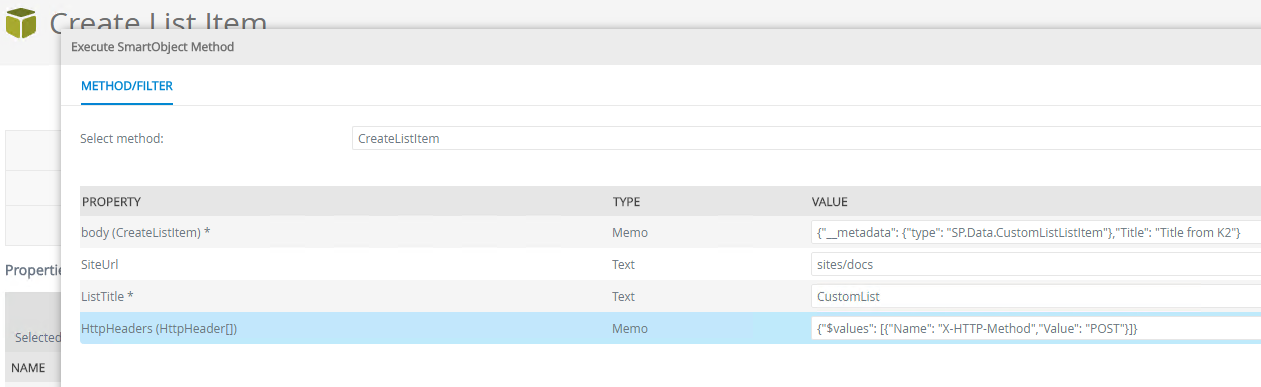
- In the Methods section of the main page, select the CreateListItem method and click Execute.
- On the Execute SmartObject Method page, specify the following values:
- body (CreateListItem): {"__metadata": {"type": "SP.Data.CustomListListItem"},"Title": "Title from K2"}
- SiteUrl: sites/docs
- ListTitle: CustomList
- HttpHeaders (HttpHeader[]): {"$values": [{"Name": "X-HTTP-Method","Value": "POST"}]}
- Click Execute and then browse to your custom list, refresh it and note that the new list item is created. If you don’t see your new list item check, turn on a network monitoring tool like Fiddler to see what the response was from the SharePoint server. The HTTP error gives you some idea of what happened, such as a 401 Access Denied error. You will not see errors return from the SmartObject call.
Finding the ListItemEntityTypeFullName
When you need to create or update items in a list or library, you must pass the full name of the entity type for that list or library as a serialized value in the body. Use SharePoint to figure out what this is for any given list or library. For example, the Announcements list on the same subsite in the example above has a different ListItemEntityTypeFullName than a custom list. Use the URL example below to retrieve this value in your browser:
https://{SharePoint Server URL}/{Managed Path, if any}/{Site Collection}/{subsite}/_api/web/lists/GetByTitle('{List Name}')/?$select=ListItemEntityTypeFullName
Replace the bracketed placeholder values as necessary with values from your environment. Find the ListItemEntityTypeFullName tag in the XML returned, and copy the entity's name, using that value in your serialized body. In this case, the name of an item in an Announcements list is SP.Data.AnnouncementsListItem:

Use the following table for standard ListItemEntityTypeFullName values. The serialized test value examples also include a placeholder title:
| Type | ListItemEntityTypeFullName | Serialized Test Value |
| Custom List Item | SP.Data.CustomListListItem | {"__metadata": {"type": "SP.Data.CustomListListItem"},"Title": "Title from K2"} |
| Document | SP.Data.Shared_x0020_DocumentsItem | {"__metadata": {"type": "SP.Data.Shared_x0020_DocumentsItem"},"Title": "Title from K2"} |
| Picture | SP.Data.PicturesItem | {"__metadata": {"type": "SP.Data.PicturesItem"},"Title": "Title from K2"} |
Escape any spaces in the value using the _x0020_ code as you can see in the document's value.
Serializing the Body
When you need to create the body dynamically (as is the case for more real-world scenarios), you must serialize the body by calling two serialize methods, one on the Metadata SmartObject and one on the Create List Item SmartObject.
Specify the ListItemEntityTypeFullName value as the Type for the Serialize method of the Metadata SmartObject:
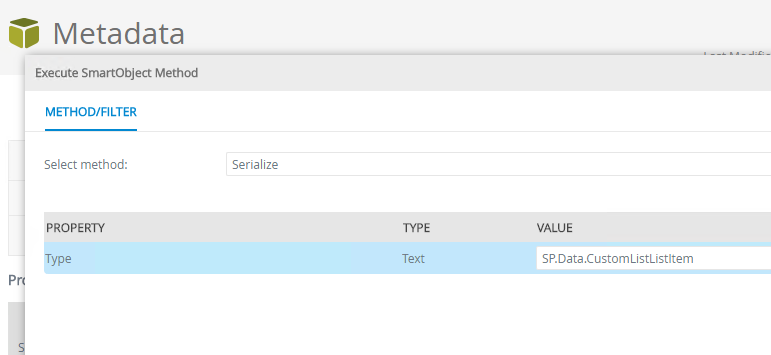
Your return from this method should look similar to the following string:
{"$type":"SharePoint___Root.k2RESTidentifier_Metadata, SharePoint___Root, Version=0.0.0.0, Culture=neutral, PublicKeyToken=null","type":"SP.Data.CustomListListItem"}
Then use this string in the Serialize method of the Create List Item SmartObject:
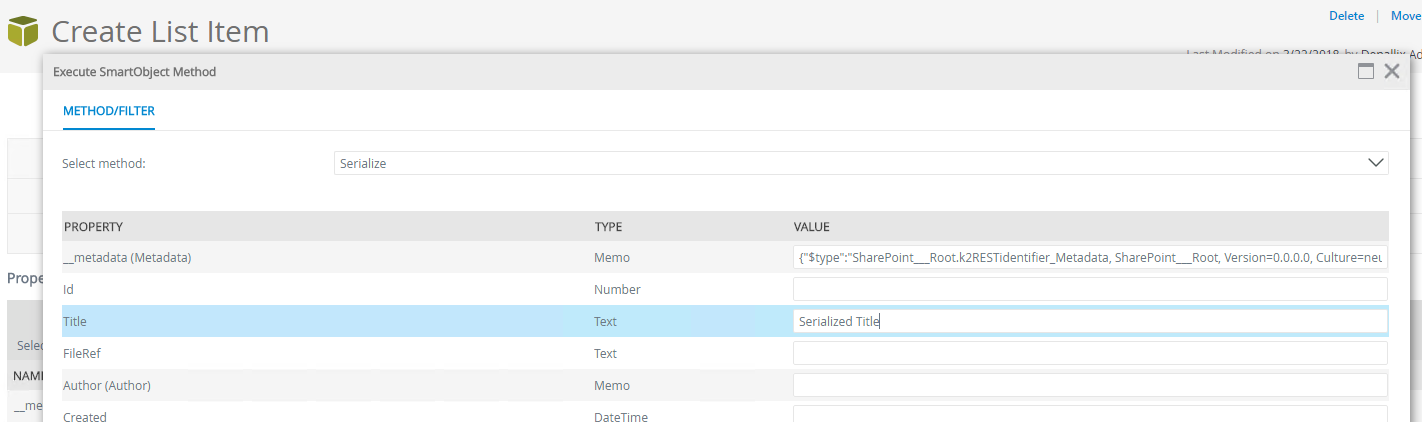
Your return from this method should look similar to the following string:
{"$type":"SharePoint___Root.k2RESTidentifier_CreateListItem, SharePoint___Root, Version=0.0.0.0, Culture=neutral, PublicKeyToken=null","__metadata":{"$type":"SharePoint___Root.k2RESTidentifier_Metadata, SharePoint___Root, Version=0.0.0.0, Culture=neutral, PublicKeyToken=null","type":"SP.Data.CustomListListItem"},"Id":null,"Title":"Serialized Title","FileRef":null,"Author":null,"Created":null,"Editor":null,"Modified":null,"LinkFilename":null,"FileSystemObjectType":null,"ContentTypeId":null,"ListItemEntityTypeFullName":null,"odata.editLink":null,"odata.etag":null,"odata.id":null,"odata.metadata":null,"odata.type":null}
Note that this string is much longer and more detailed than the example value used in Step 4: Test the SmartObjects. This is what the SmartObject methods generate when dynamically passing values and you'll notice that it includes the name of the service instance as well as all properties of the SmartObjects.
To create a new item in the custom list, call the CreateListItem method with the serialized string and the other input properties as shown here:
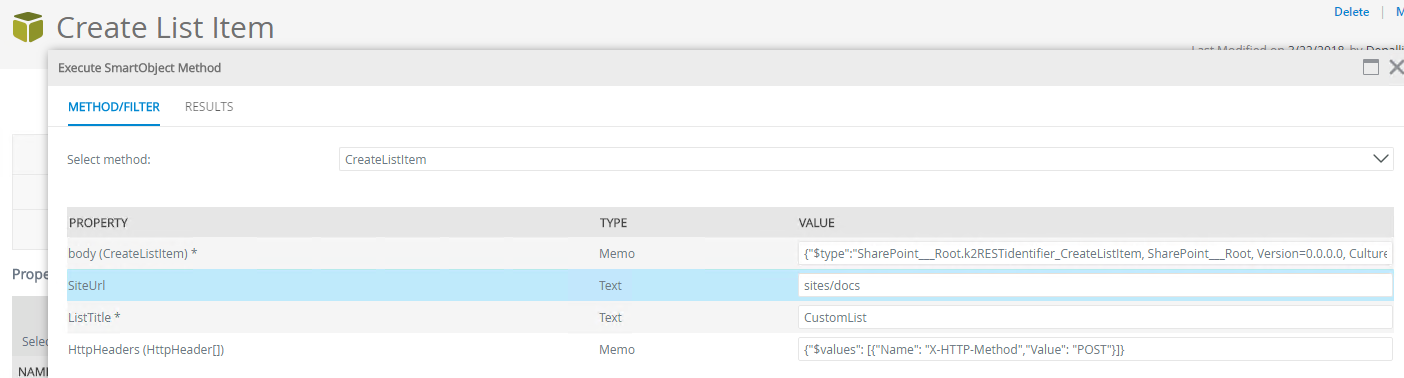
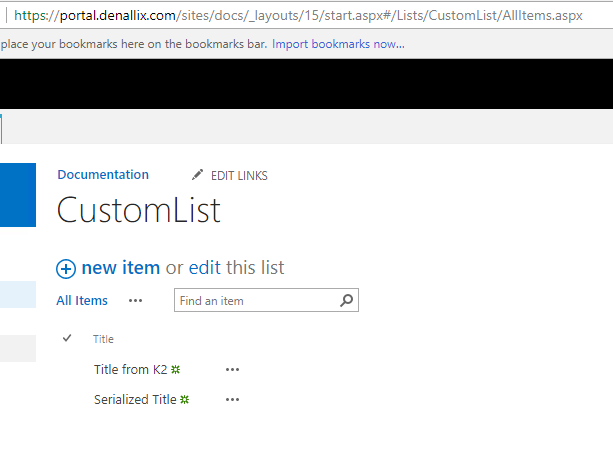
Your end result is the same as the test from Step 4 but with a different title. You should see two items in your custom list.
HTTP Headers
The HTTP headers that you pass depend on the operation you're performing. Use this table to determine the values of the headers for each method. You can create a SmartObject to store these values or statically specify them. Note that you use PostListItemMetadata and DeleteListItem for both lists and libraries.
| Operation | SmartObject (Method) | HTTP Header |
| CreateListItem | Create List Item (Create) | {"$values": [{"Name": "X-HTTP-Method","Value": "POST"}]} |
| PostListItemMetadata | Post List Item Metadata (Update) | {"$values": [{"Name": "X-HTTP-Method","Value": "MERGE"},{"Name": "If-Match","Value": "*"}]} |
| DeleteListItem | Delete List Item (Delete) | {"$values": [{"Name": "X-HTTP-Method","Value": "DELETE"},{"Name": "If-Match","Value": "*"}]} |
You must specify the ID of the item in the SharePoint list or library to use the update and delete methods. For this you can use the GetListItemMetaData method of the Get List Item Metadata SmartObject.
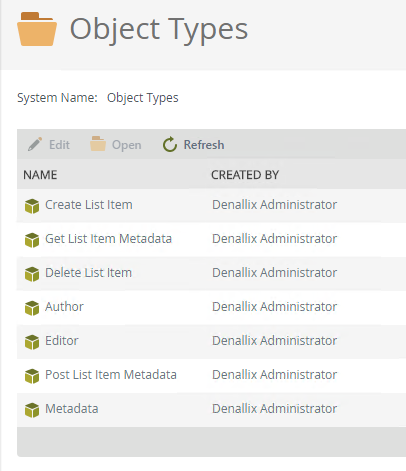
SmartObjects
Each service instance includes the following SmartObjects.
- Create List Item: Allows you to create an item in a list and serialize the body
- Get List Item Metadata: Used to retrieve metadata on a list item or document
- Delete List Item: Allows you to delete a list item or document
- Author: Allows you to deserialize information about the author
- Editor: Allows you to deserialize information about the person who last updated the list item or document
- Post List Item Metadata: Allows you to update list item or document metadata
- Metadata: Allows you to serialize and deserialize metadata for the list item or document
Using the SmartObjects in a Workflow
Once you've tested that the SmartObjects work as expected, you can call them using the SmartObject step in a workflow. In this case, you must add three SmartObject steps to the workflow, two to initially serialize the string as detailed in Serializing the Body section and the third to create, update or delete the list item. Use workflow data fields to store the serialized responses and inputs used among the steps.
Considerations
- You must have the K2 Cloud Update 4 or K2 Five (5.1) or later to register the service instance and use the POST method. You can find the on-premises release at https://portal.k2.com/downloads
- This approach may not work properly on the root site collection of a web application. If you receive 404 errors or the Create List Item test doesn't create a list item, try it on a list on a site in a managed path.
Resources
For more information about the SharePoint REST API, see the following resources:
- Complete basic operations using SharePoint REST endpoints (MSDN)
- CRUD Operation On List Items Using REST API Services In SharePoint 2013: Part Three
- Using the $expand OData Query Option in SharePoint 2013
