

Bulk Action Multiple Workflow Tasks
KBS100277
PRODUCTObjective
This KB provides an example of ways we can use the K2 Controls and the Workflow Reporting SmartObjects to Action multiple tasks at one time. This prevents the need to manually select the action for each task. This is a very basic setup; however, it has the potential for many other use cases.
The configuration can be edited to allow for better filtering and to return more unique results for better worklist management. The primary use was intended for users who needed to be aware of lots of tasks but they did not require any action on the forms.
Before You Begin
Please be aware that in many cases it is better to use Escalations/Deadlines for tasks that do not require the user to change any data on the SmartForm. It is highly recommended that you first attempt your solution using Escalations/Deadlines before resorting to this example.
https://help.k2.com/onlinehelp/k2five/userguide/5.4/default.htm#K2-Workflow-Designer/Use/Toolbox/Basic/Task/TaskTabs/07Deadline/Deadline-Tab.htm
How-to Steps
1. Create an Item View.
2. Add a 'List Box Control' to the view.
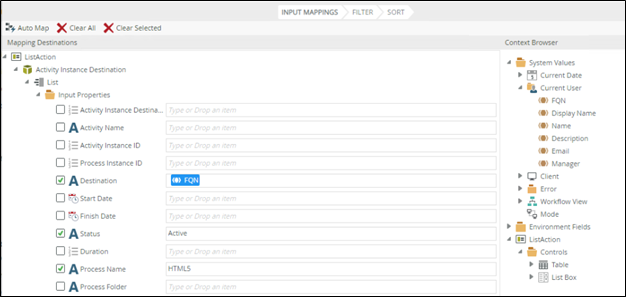
3. In the Properties, set the Data Source to the "Activity Instance Destination" SmartObject.
a. This is located under All Items > Workflow Reports > Workflow General.
4. Create a rule – "When the View executed Initialize".
5. Add a Data Transfer Action to the rule – "Then populate List Box list control with data".
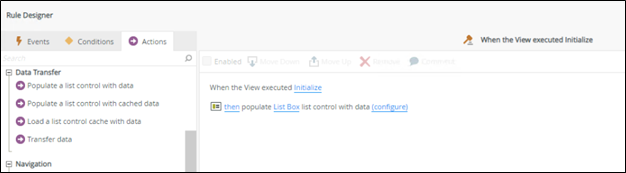
6. The (Configure) for this rule can be edited to fit specific filtering requirements. For this example, input values for the Destination, Status, and Process Name.
7. Save the rule and the View.
8. Create a Form.
9. Add the newly created Item View to the Form and a Button control.
10. Create a rule – "When Button is Clicked".
11. Add a For-Each Looping Condition to the rule – "For each item in a list control on a View ".
12. Add a Workflow Interaction Action to the rule – "Action a worklist item".
13. Select the Activity/Task for the Workflow that needs actioning.
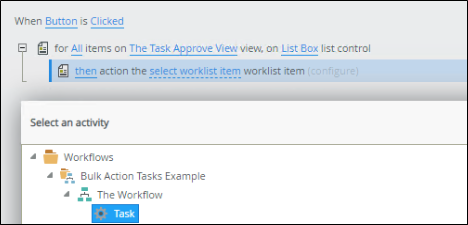
14. Click (configure)
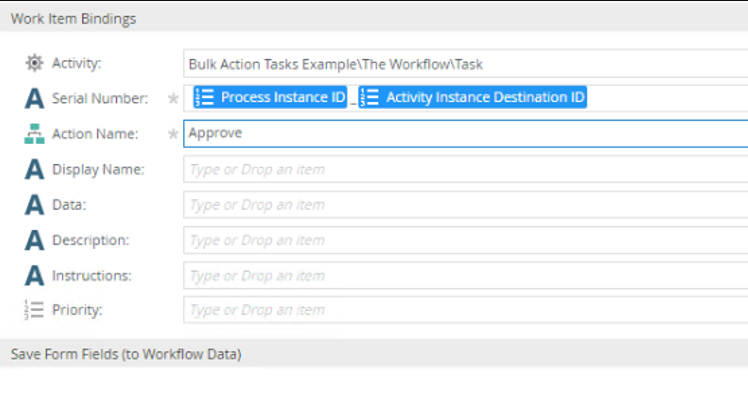
a. Activity – should remain the same.
b. Serial Number – In the context browser, expand the View > Controls > List Box > Activity Instance Destination SmartObject. Use this to build the Serial Number: [Process Instance ID]_[Activity Instance Destination ID]. (Underscore required.)
c. Action Name – This will depend on what the actions are set to in the workflow. For this example, 'Approve' is used.
15. Save the rule and the Form.
16. Check-in the Form and View and then run the Form. All of the tasks assigned to the user for a specific workflow should show in the List Box Control. Clicking the button should start processing all the tasks in the list box with the 'Action'.
