

The much awaited Nintex Lazy Approval action for Office 365 SharePoint online is here making your approval process SUPER FAST! All we have to do now is to simply type 'Ok' or a few other accepted keywords (covers almost all words I could think of for saying yes or no) in the assigned task notification and hit SEND. Right from your inbox without going to your SharePoint environment.
Here's something I tried and sharing for you to try in your cloud as well(weather permitting ofcourse - just kidding!)
App Requirements:
Your organization has purchased a few training resource licenses and your rock-star team of devs/engineers/architects/students/runners/movers/shakers...well you get the idea, want a process in place that will track requests allowing users to avail training for two weeks and then release the hold, so others can book the same.
Solution:
Create a list, setup a workflow, assign a task when resource is requested. Pause the process for two weeks, then continue the process by assign a task for returning the item. On return, release the hold for the resource.
List columns:

Training Requests SharePoint list columns.
Leaving out the default columns(Created, Created By, Modified, Modified By and Title ofcourse we now have
- StartDate - defaults to Today
- EndDate - calculated by adding two weeks to StartDate
- ServiceRequested - Lookup list with names of available resources
- Reason- multiline textbox for explaining why you need the resource.
- TrainingRequestWorkflow(well, this is your column with status of the workflow)
- Requester-You, when you submit the request. Set the default view to show image and title
Customize with Nintex Forms to show the fields as shown below. (I set Requester name to current user and StartDate as Today on form load)

Submit a request for training resource
Now we are ready to assign requested resources to users via lazy approval process. Image below shows workflow steps.
- Set workflow status to In Progress


- Add Time to Date-Assign that to workflow variable dtEndTime

Add two weeks, set variable dtEndDate and set it to field EndDate
- Set field in current item- Assign value of dtEndTime to EndDate field in the list

- Assign a task-This is where you set Lazy Approval

Assign a task action values in detail
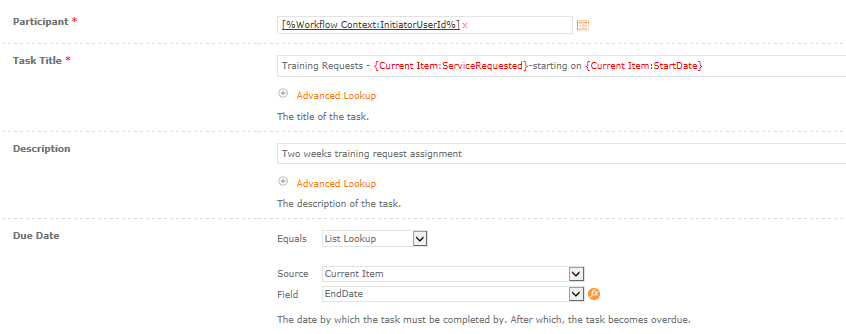
 Set your Default Outcome to (Ok/No), OOTB default is Approved/Rejected.Check the Allow LazyApproval to enable the same. What this does is to email the user when a task is assigned seen in email below.

- If the user replies with OK then set the following actions in the workflow path

-Set field in the current item-Title with EndDate
-Set Workflow Status to Assigned-Paused And Pause until EndDate
-Pause Until Date
- After pausing the workflow for two weeks, Assign a task just as in step 4. Except, when the user replies with OK, Set the workflow status as Hold-Released. Reset the Title as ‘Training Available’


- After two weeks/end date, you will receive a notification again reminding you to release the item.


- Once the user replies OK then the list item is updated, and task is marked as complete.

- If the user replied with ‘No’ then Set Workflow Status as ‘Extend-Hold’ and then Reset Title as seen in the value below. Workflow task is completed.


Thats it! You are done. And here is the quick snapshot of all steps at a glance.

Quick snapshot of all the steps.
Lazy Approval really makes approval process and task completion faster for users.
This is just an(my) example and one way of solving a request/task assignment scenario with Lazy Approval enabled. As we all know, there are multiple solutions for any task/requirement. Choose what best fits your needs and have fun working smart! 
