
I am sharing one of the possible ways to Trigger Foxtrot RPA from Nintex Workflow Cloud. Before we get into the scripts on how to do that, maybe it's a good idea to explain a bit further in the following paragrah, on how from the architecture perspective this is done.
Architecture
Assuming you have a troop of robot soldiers (i.e. FoxBot) lead by a commander (i.e. FoxHub), ignoring the number of soldiers you need to have to form a troop, in our scenario it could be as little as 1 or 2. Since the army is deployed to the battlefield, the location of the army is changing (i.e. without a fixed IP), we are not able to reach out to the Commanders to send orders.
Since we are not suppose to enter the military zone, central general office can only use special communication where messages are being broadcasted over the encrypted radio frequency, and the army should have worker on duty to pick up and decrypt the message(s). As such we deployed a messenger/worker to each Commander (i.e. which is our Foxhub), the worker's duty is to listen to Broadcast Messages from the central control room and pass the message to the Commander. The commander is then based on the received message to assign duty/job to its soldiers on what to do.
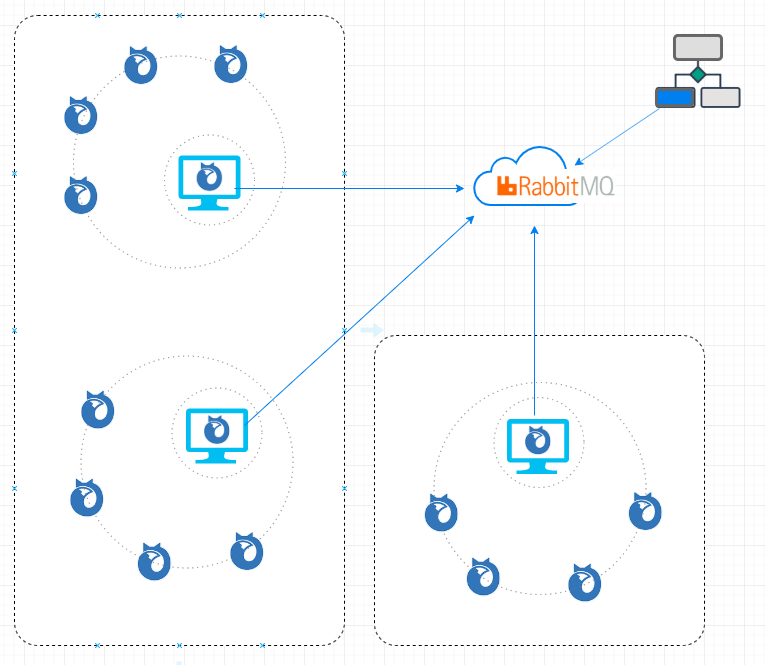
This architecture is depicted in the diagram below. In our scenario, Nintex Workflow Cloud is the engine for "Publishing" message over the RabbitMQ Message Queue system. We are not reaching to Foxhub to pass the messages, instead the Worker that is attached to FoxHub is Subscribed/listening to the Message Queue and pick up any message(s) that is for them to action on. This is safe and we do not need to worry on how to expose our FoxHub to the internet. Message Queue is super fast without us to worry if the FoxHub will be able to take the load of requests as they are queued. In our scenario you will notice the FoxHub will be triggered immediately whenever there is a message published.
This is exactly how we going to do:
- Setting Up Message Queue (i.e. RabbitMQ in our exercise)
- Create the Worker Application
- Create NWC workflow to publish message to the Message Queue
- Testing: Worker picks up the message(s) and talks to FoxHub to assign new job(s)
Setting Up Message Queue
In our scenario, we going to use RabbitMQ for the purpose, as the focus of this exercise is not about RabbitMQ, we are goin to leverage one of the cloud RabbitMQ provider solution to avoid having the need to install RabbitMQ ourselves. In my example, I am using the CloudAMQP.com (i.e. one of the RabbitMQ as a Service provider, the link will direct you to the available plans). For testing or development purpose, you may pick the free "Little Lemur - For Development" to start.
Once you have signed up, a instance will be provisioned. I provide my plan (i.e. I am using Tough Tiger plan here) details in the below capture as am example on what you will get, (please take note on the Red Arrowed highlighted details you will need in the connection later).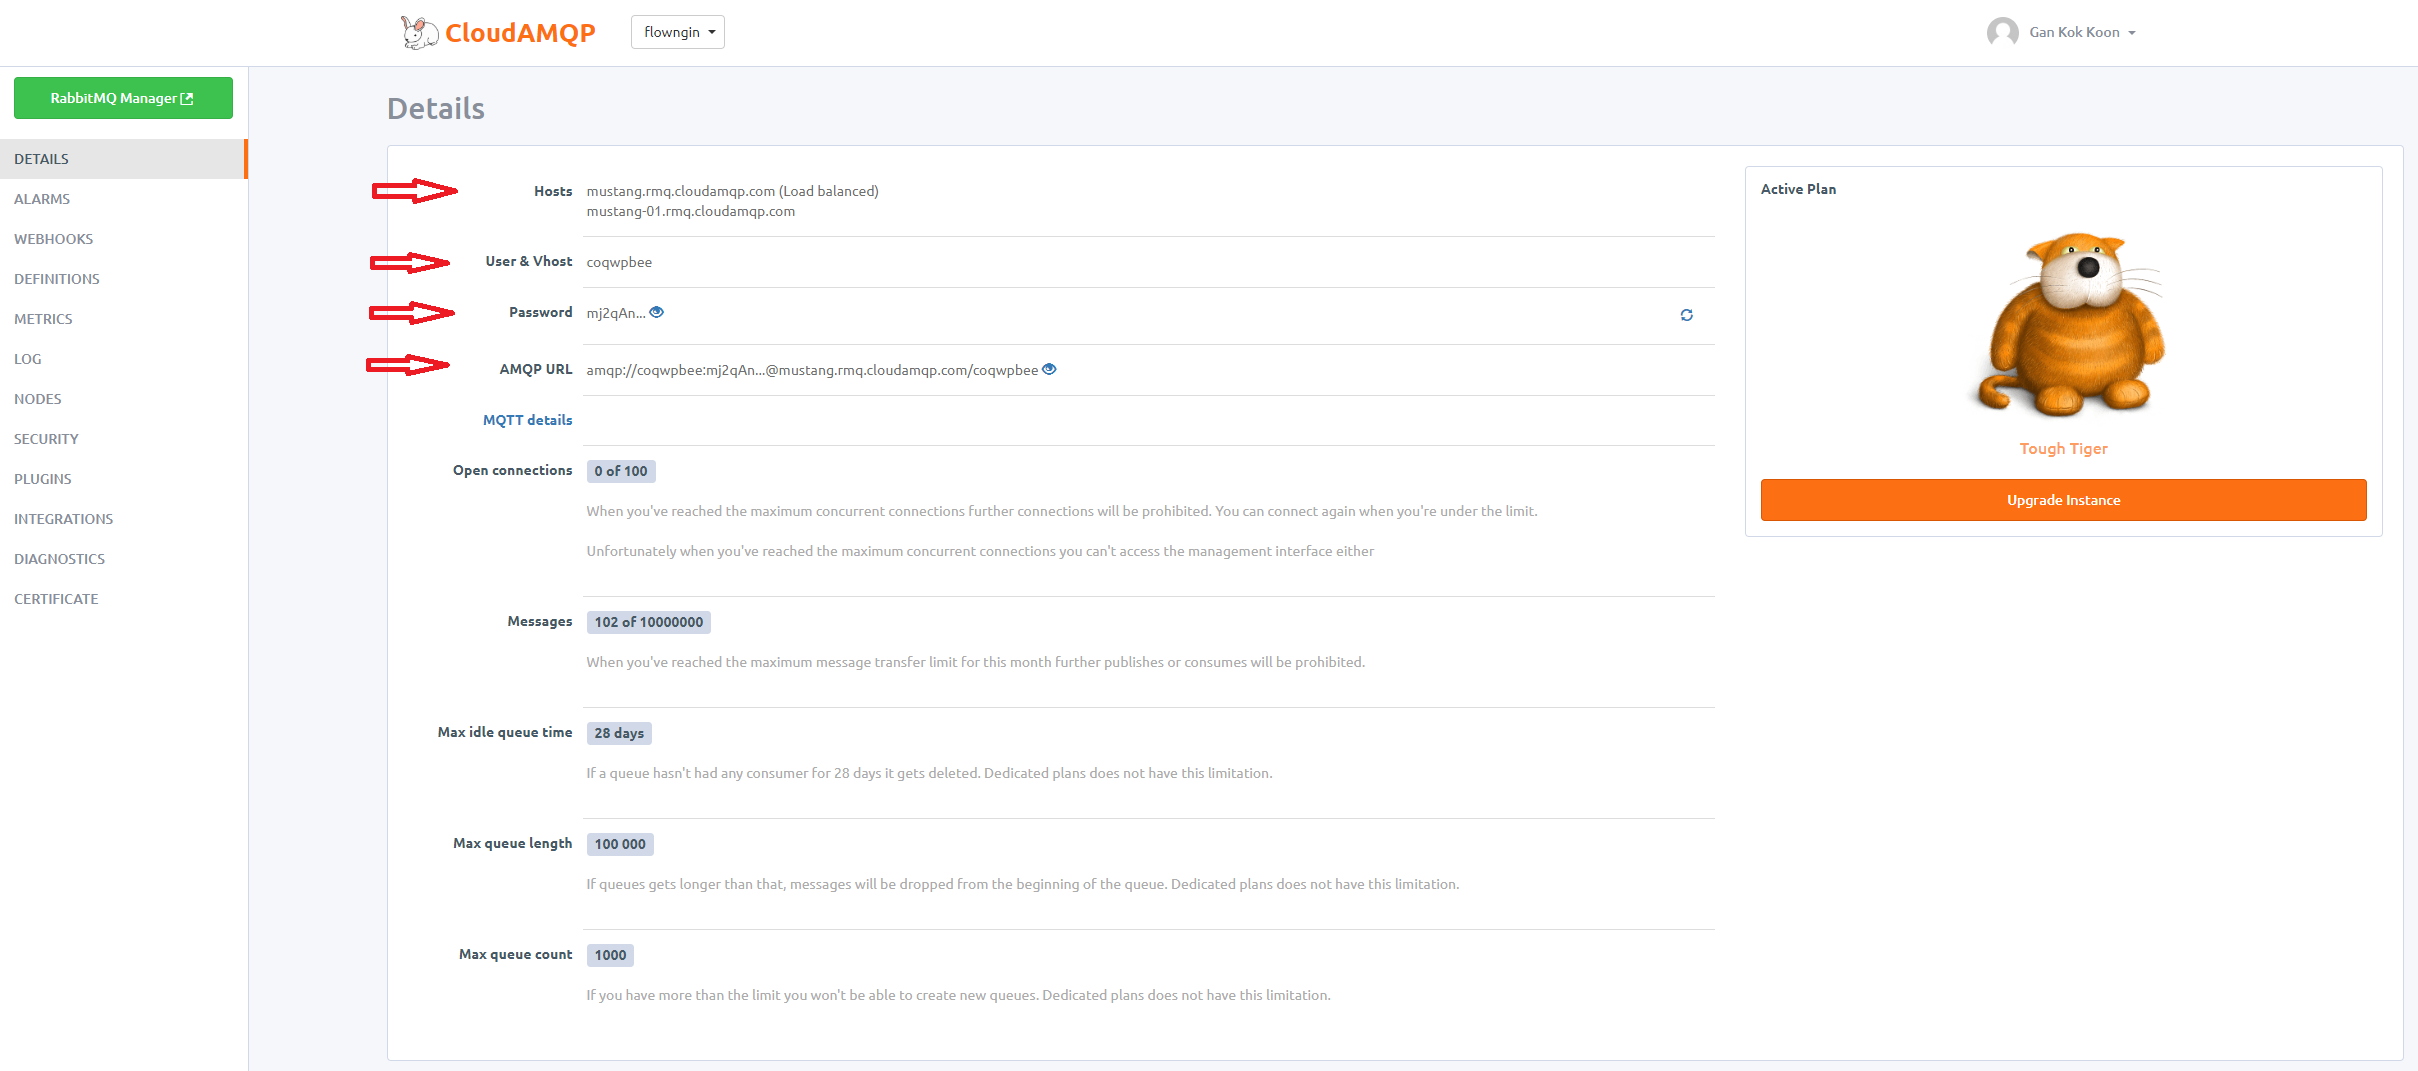
Create the Worker application
Worker can be a Windows console app or windows services. For this exercise we going to create it as a Windows Console Application so we can easily monitor the console logs and interact with the application over the console screen. In the event if this is created as a Windows service, we can also setup dependencies for it to auto start every time we start the Foxhub application.
Worker Application is a worker process (i.e. consumer/receiver/subscriber in Message Queue term). It subscribes to Message Queue, being notified whenever there is a new message published to the Queue by publisher. Upon notified and receiving a new message, the Worker is going to use Foxhub API to talk to Foxhub setting up jobs and assigning jobs to Foxbots/Foxtrots. FoxhubAPI.dll is provided in every FoxHub installation that comes with FoxTrot Suite installation.
We going to create a Windows Console Application using Visual Studio (i.e. I am using VS2017 for the purpose, but using .Net Framework 4.7.2), I realized when i compile my application, since FoxHubAPI.DLL is a 32-bit assembly compiled with the latest .Net Framework 4.7.2, I am forced to set the Target CPU to 32-bit and using .NET Framework 4.7.2 is required).
In the Visual Studio, create a new project and select C# Console App as shown in the capture below, give the project a name (i.e. Worker in my below example).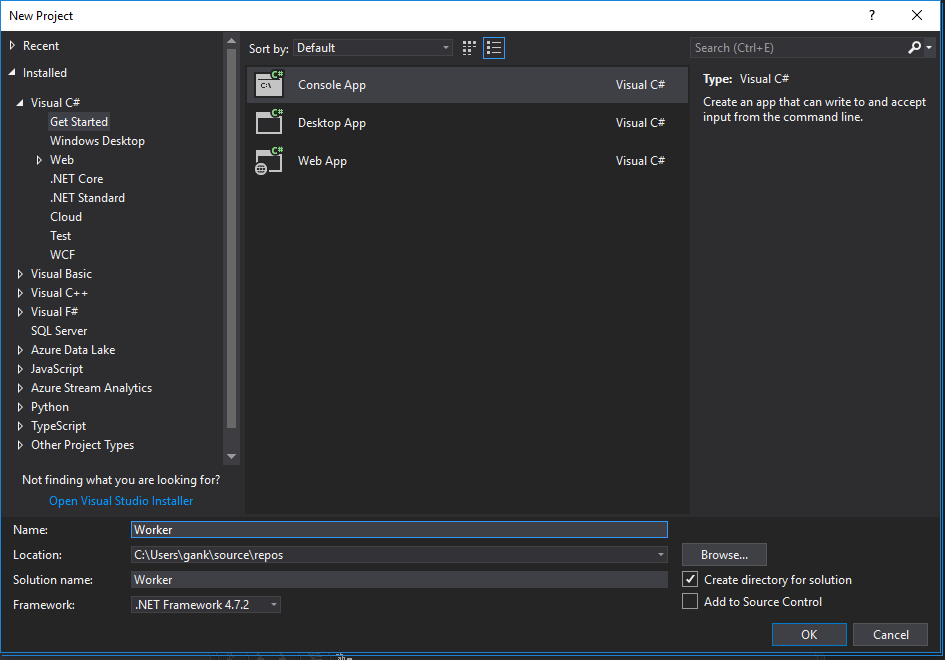
In order for our Worker Application to subscribe and listen to RabbitMQ, we going to install the RabbitMQ.Client API for .NET into our project. We can do this with Tools - NuGet Package Manager - Manage NuGet Package for Solution... from the Visual Studio menu. Search for RabbitMQ from the "Browse" tab as shown below, to find the RabbitMQ Client to install.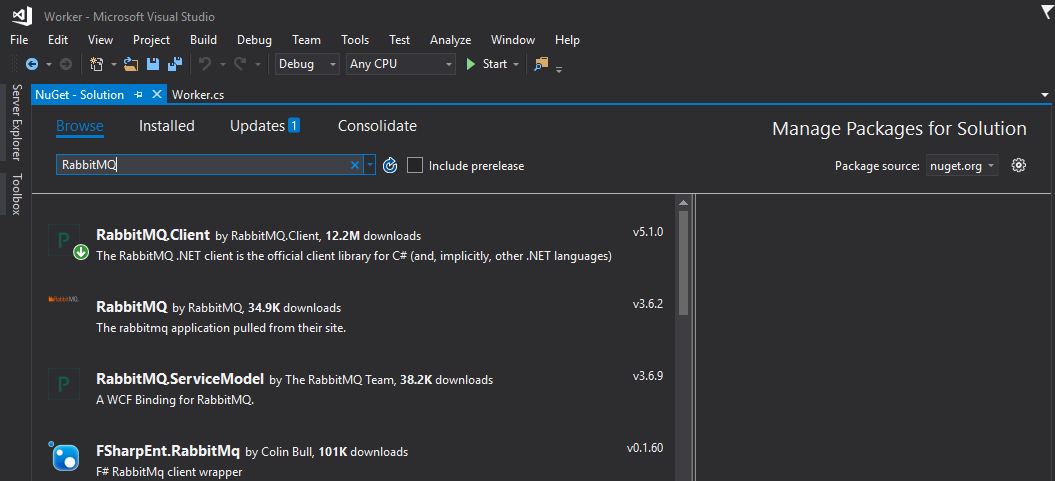
Besides communication to the RabbitMQ, the Worker application will also interact with FoxHub using the FoxHubAPI.dll assembly. Add the FoxHubAPI.dll by right click on the Worker solution to browse and add FoxHubAPI.DLL in the Solution Explorer. You should get something similar for the Solution Explorer to the screen capture below once done.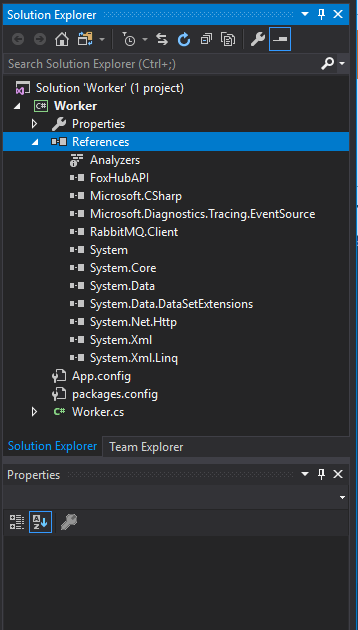
For the exercise purpose, the codes I shared below for the Worker.cs is hard-coded with RabbitMQ connection and FoxHub job queue details. My advice is you can consider to make these settings configurable at the later stage. The following code provide a basic testing I have done so far to prove a working listening and getting message from RabbitMQ and triggering FoxHub to add and get FoxBot to work on the newly added Job. You will need to change the connection values in the following code accordingly to your RabbitMQ setup, same to the RPA file i hardcoded for FoxHub to take.
using RabbitMQ.Client;using RabbitMQ.Client.Events;using System;using System.Collections.Generic;using System.Linq;using System.Text;namespace Worker{ class Worker { private static void Main() { string strHubPCName = Environment.MachineName; string strAppPCName = Environment.MachineName; //Create the CFoxHub object: FoxHubAPI.CFoxHub objFoxHub = new FoxHubAPI.CFoxHub(strHubPCName, strAppPCName); //Initialize communication with FoxHub: if (objFoxHub.Init() == false) { //Communication with FoxHub failed! return; //Abort and do nothing. }; Console.WriteLine("Connected to Hub"); //Log into FoxHub: //objFoxHub.Login("", "worker", "password"); //Create a Dictionary object to hold the list of bots: Dictionary<int, string> objBotDict; //Get the list of bots: objBotDict = objFoxHub.GetBots(); //Used to capture the Queue Item ID returned by calling QueueJob(): int intQueueItemID; ConnectionFactory factory = new ConnectionFactory { UserName = "coqwpbee", Password = "mxhSRj04O4be85cOsXaCrOrSomethingElse", VirtualHost = "coqwpbee", HostName = "mustang.rmq.cloudamqp.com" }; using (var connection = factory.CreateConnection()) using (var channel = connection.CreateModel()) { channel.QueueDeclare(queue: "hello", durable: false, exclusive: false, autoDelete: false, arguments: null); var consumer = new EventingBasicConsumer(channel); consumer.Received += (model, ea) => { var body = ea.Body; var message = Encoding.UTF8.GetString(body); Console.WriteLine(" [x] Received {0}", message); //Add the job to the queue. Assign all bots to the job: //You may get the RPA file variable from your message instead //to replace with what I have hard coded here.. intQueueItemID = objFoxHub.QueueSoloJob(DateTime.Now.ToString("F"), "C:\Users\gank\CallVBS.rpa", objBotDict.Keys.ToList()); //Run the job: objFoxHub.RunJob(intQueueItemID); int intStatus; //Retrieve the job's status: intStatus = objFoxHub.GetJobStatus(intQueueItemID); }; channel.BasicConsume(queue: "hello", autoAck: true, consumer: consumer); Console.WriteLine(" Press [enter] to exit."); Console.ReadLine(); } //Clean up objects: objBotDict = null; objFoxHub = null; } }}Once compiled, we may execute the worker.exe, the console will be running waiting and listening to new message(s) from the RabbitMQ.
What is missing here as of now, is a publisher to publish message to the queue. For this, in our scenario, we are going to use Nintex Workflow Cloud to as a publisher to publish a message triggering the FoxHub to assign and get job done by FoxTrot/Bot. This is simple, as CloudAMQP provides Rest API Endpoint for the purpose. We are just going to add a "Call Http Web Service" action to send/publish a message to the RabbitMQ.
Nintex Workflow Cloud to publish message to RabbitMQ
CloudAMQP.com provides http end point for publishing message, what we need to do for Nintex Workflow Cloud is simply add the "Call a web service" action to send message via the CloudAMQP API. You may follow my example below for configuring the "Call a web service" action.
URL: https://<user>:<password>@<host>/api/exchanges/<virtual-host>/amq.default/publish
Request type: HTTP Post
Request content:
{"vhost":"<vhost>","name":"amq.default","properties":{"delivery_mode":1,"headers":{}},"routing_key":"<queue-name>","delivery_mode":"1","payload":"<message>","headers":{},"props":{},"payload_encoding":"string"}
Additional Note:
- Since our Worker example I hard coded for the Worker to subscribe and listen to "hello" queue, the above <queue-name> value will have to set to "hello" in our example, but you may change it to a better queue name.
- I have my message in the format of "RPA;C:path o pafile.rpa", which i can have the Worker to pick up the message and locate the RPA project file to be assigned to the job queue in FoxHub.
Testing the Setup
To test the setup, simply do the following steps:
- Run the FoxHub (note: make sure you have at least one bot registered to the FoxHub)
- Run the Worker.exe (note: we never have any error handler in our code, as we need to connect to the FoxHub, we need to make sure the FoxHub is running before we run the Worker.exe). This should bring us the console with message of "Connected to Hub" and "Press [Enter] to exit. as shown below
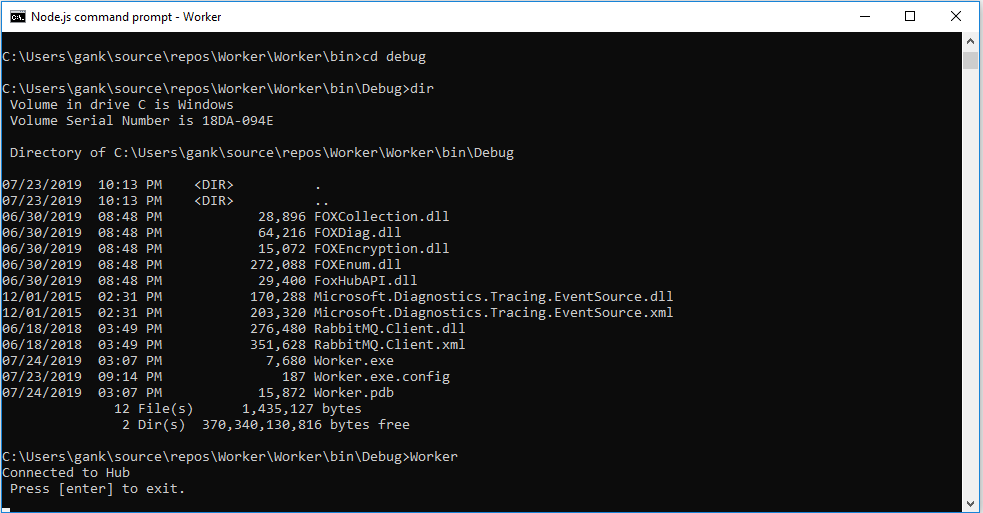
- The above console shows the Worker is now active and listening to the RabbitMQ for new messages
- We can now trigger our Nintex Workflow Cloud workflow to run, which it will publish new message to the Message Queue.
- The Worker will immediately picks up the message and trigger FoxHob to add and assign job to FoxTrot/Bot to run.
Important Note:
1. I am using Visual Studio 2017 with .NET Framework 4.7.2
2. The FoxHubAPI.DLL is a 32-bit assembly, you will need to set your project target to run on x86
3. You can get the help content of FoxHubAPI from the Help menu of the FoxHub Application
4. There is no verification code to handle checking if FoxHub is running, as such you will need to start the FoxHub application before you run Worker.exe


